ESP32 C3 Super Mini - SSD1309-OLED-Display 128x64 | 2,42-Zoll-I2C-OLED-Tutorial

Lernen Sie, wie Sie das SSD1309-OLED-Display 128×64 (2,42 Zoll) über die I2C-Schnittstelle mit Ihrem ESP32 C3 Super Mini verwenden. Diese einsteigerfreundliche Anleitung behandelt alles von der grundlegenden Verdrahtung bis zu fortgeschrittenen Funktionen wie Bitmap-Bildern und eigenen Schriftarten.

In diesem Tutorial lernen Sie:

ESP32 C3 Super Mini SSD1309-OLED-Display 128x64

Erforderliche Hardware

1×ESP32 C3 Super Mini
1×USB-Kabel Typ-A zu Typ-C (für USB-A PC)
1×USB-Kabel Typ-C zu Typ-C (für USB-C PC)
1×SSD1309 I2C OLED Display 128x64 (2.42 inch)
1×Verbindungskabel

Oder Sie können die folgenden Kits kaufen:

1×DIYables Sensor-Kit (18 Sensoren/Displays)
Offenlegung: Einige der in diesem Abschnitt bereitgestellten Links sind Amazon-Affiliate-Links. Wir können eine Provision für Käufe erhalten, die über diese Links getätigt werden, ohne zusätzliche Kosten für Sie. Wir schätzen Ihre Unterstützung.

Überblick über the SSD1309 2.42-Inch OLED Display

Der SSD1309 ist ein CMOS-OLED-Treiberchip für 128×64-Punktmatrix-Displays, der über I2C kommuniziert.

Hauptmerkmale:

  • Auflösung: 128×64 Pixel (2,42 Zoll Diagonale)
  • Schnittstelle: I2C (nur 2 Drähte erforderlich – SDA und SCL)
  • Kompatibilität: Registerkompatibel mit dem SSD1306
  • Spannungstoleranz: Akzeptiert bis zu 16V an VCC (höher als der SSD1306)
  • Eingebauter Aufwärtswandler: Die meisten Module enthalten eine Spannungsregelung auf der Platine
  • Geringer Stromverbrauch: 20-40 mA bei voller Helligkeit
  • Monochrom: Weiße Pixel auf schwarzem Hintergrund
  • Warum es sich hervorragend für Einsteiger eignet: Einfache I2C-Verdrahtung, leicht zu bedienende Bibliothek, und der I2C-Bus kann mit anderen Geräten geteilt werden

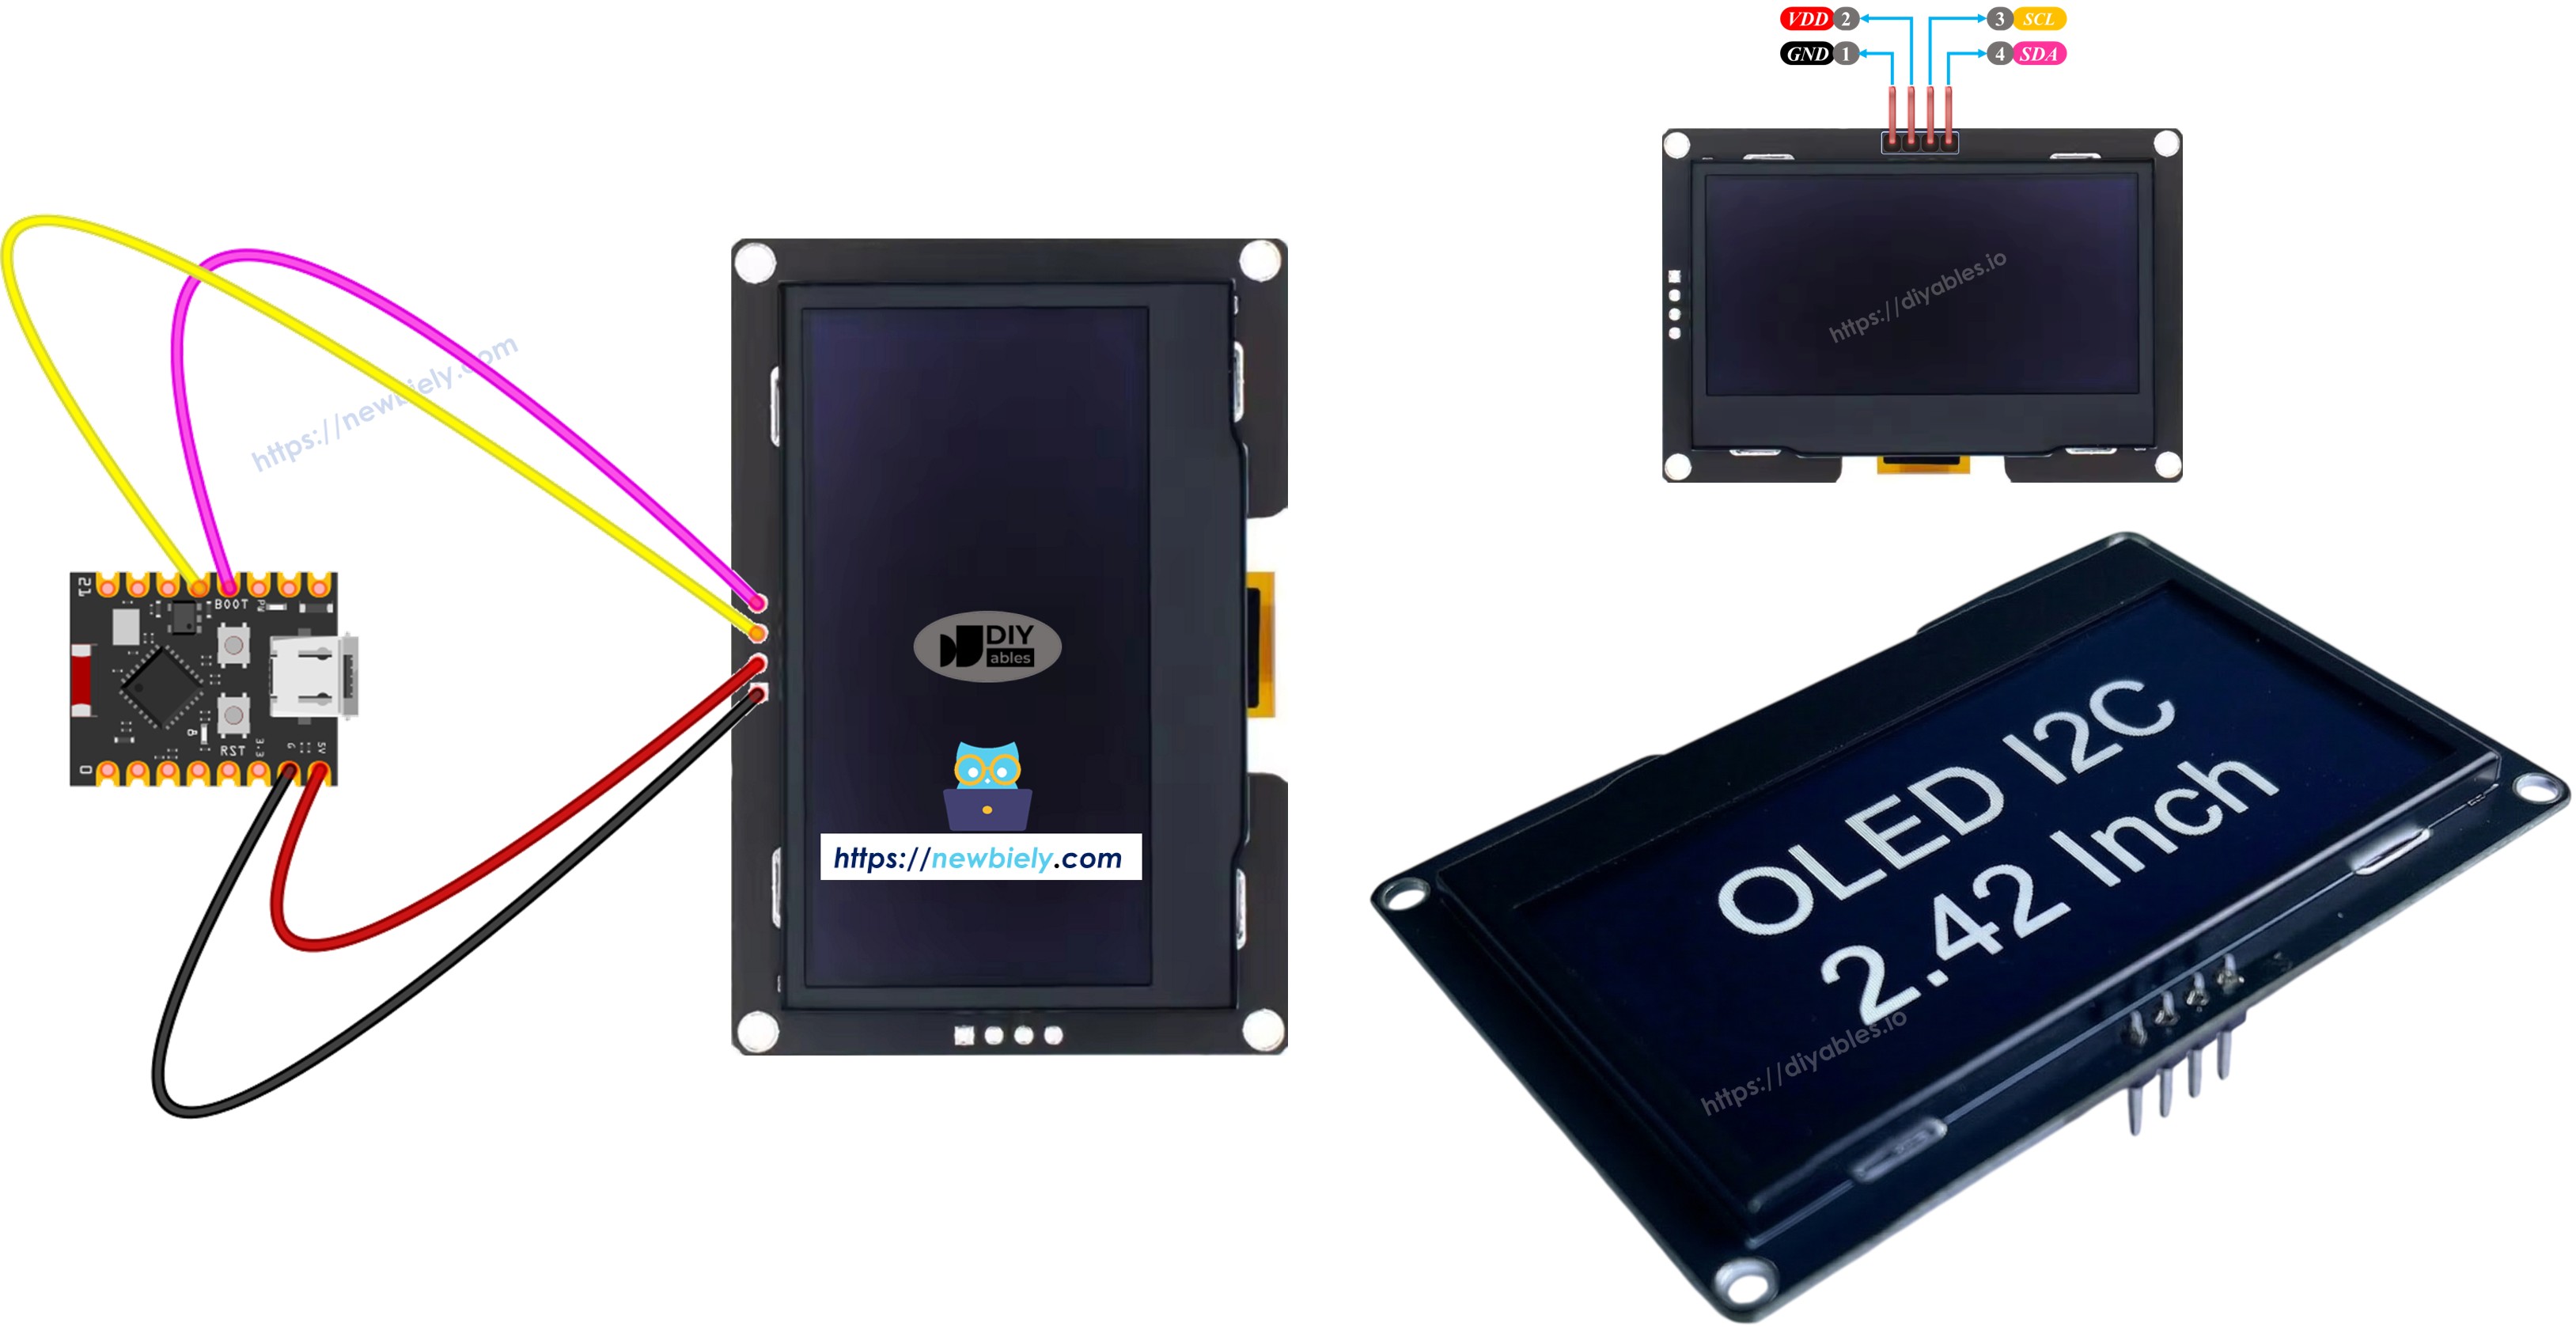
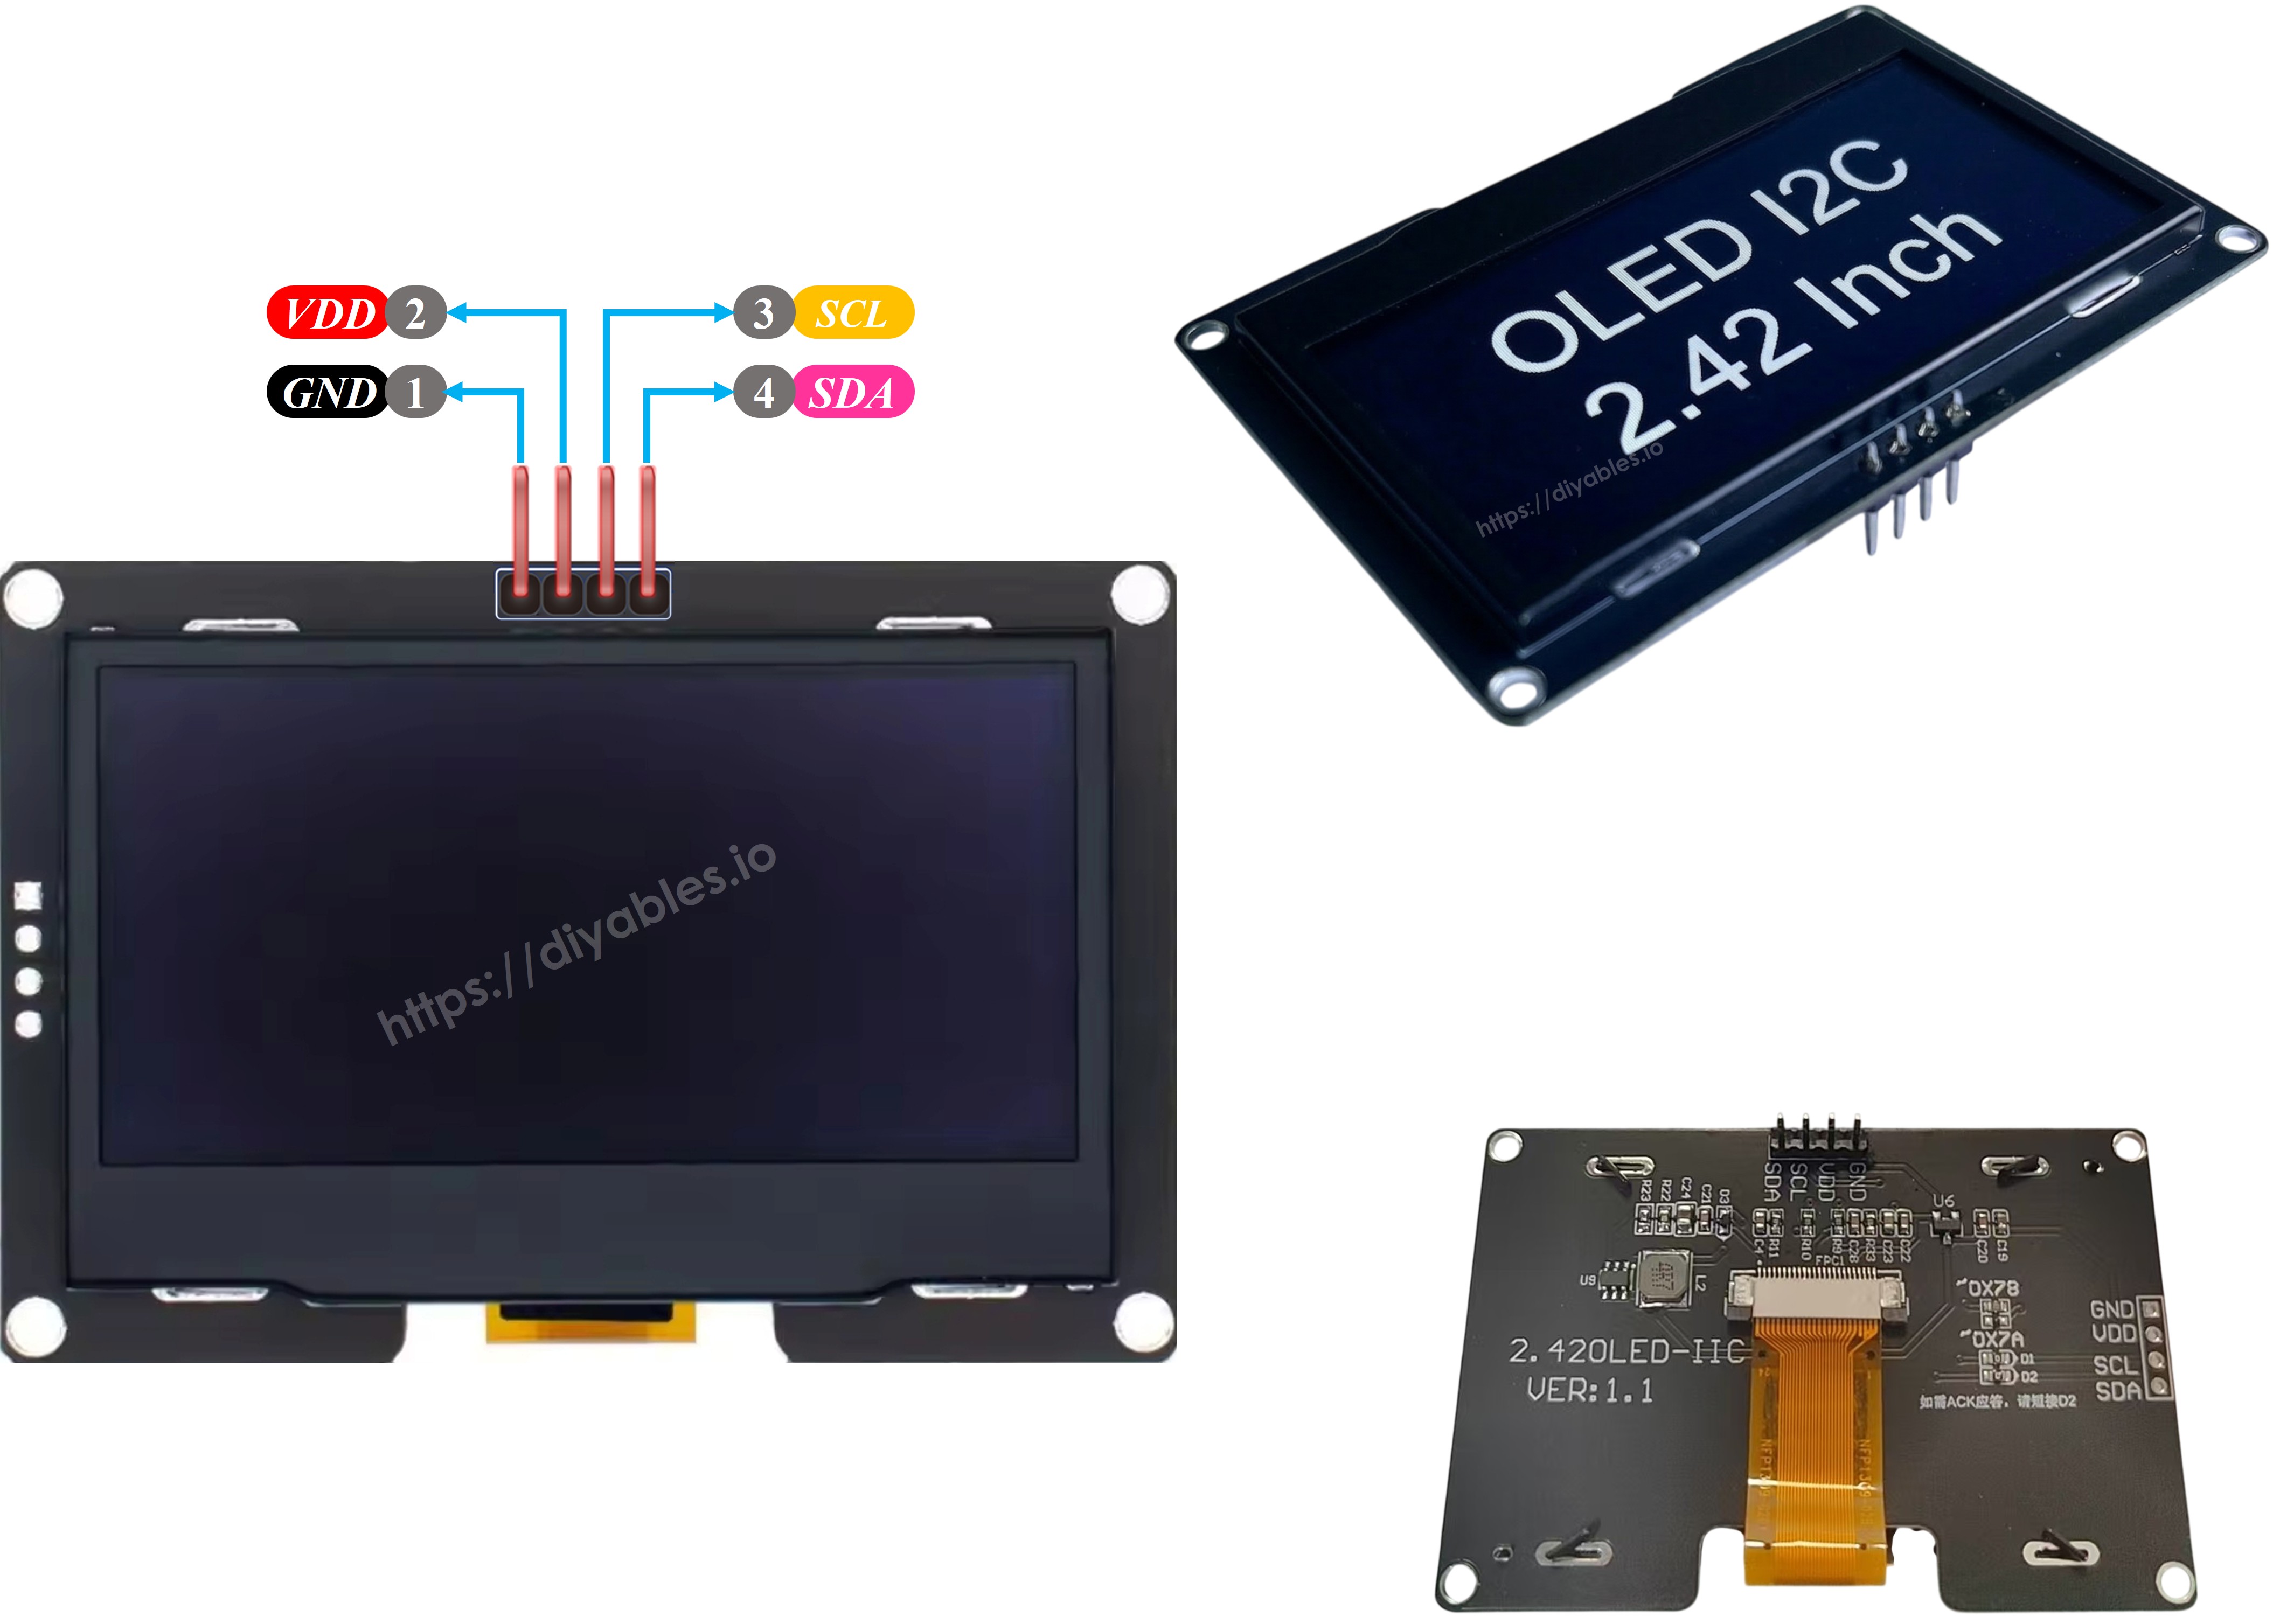
Pinbelegung des SSD1309-OLED (I2C-Modul)

Das 2,42-Zoll-SSD1309-OLED-Modul hat vier Pins:

  • GND: Masseanschluss
  • VCC: Stromversorgung (3,3V)
  • SCL: I2C-Taktleitung
  • SDA: I2C-Datenleitung
Pinbelegung des SSD1309-OLED

※ Notiz:

  • Die Pin-Anordnung des OLED-Moduls kann je nach Hersteller unterschiedlich sein. Verwenden Sie immer die auf dem Modul aufgedruckten Beschriftungen.
  • Dieses Tutorial verwendet das SSD1309-I2C-OLED von DIYables, das getestet wurde und nachweislich funktioniert.

Verdrahtungsdiagramm

Schließen Sie das SSD1309-OLED-Display 128x64 gemäß diesem Schaltplan an Ihren ESP32 C3 Super Mini an:
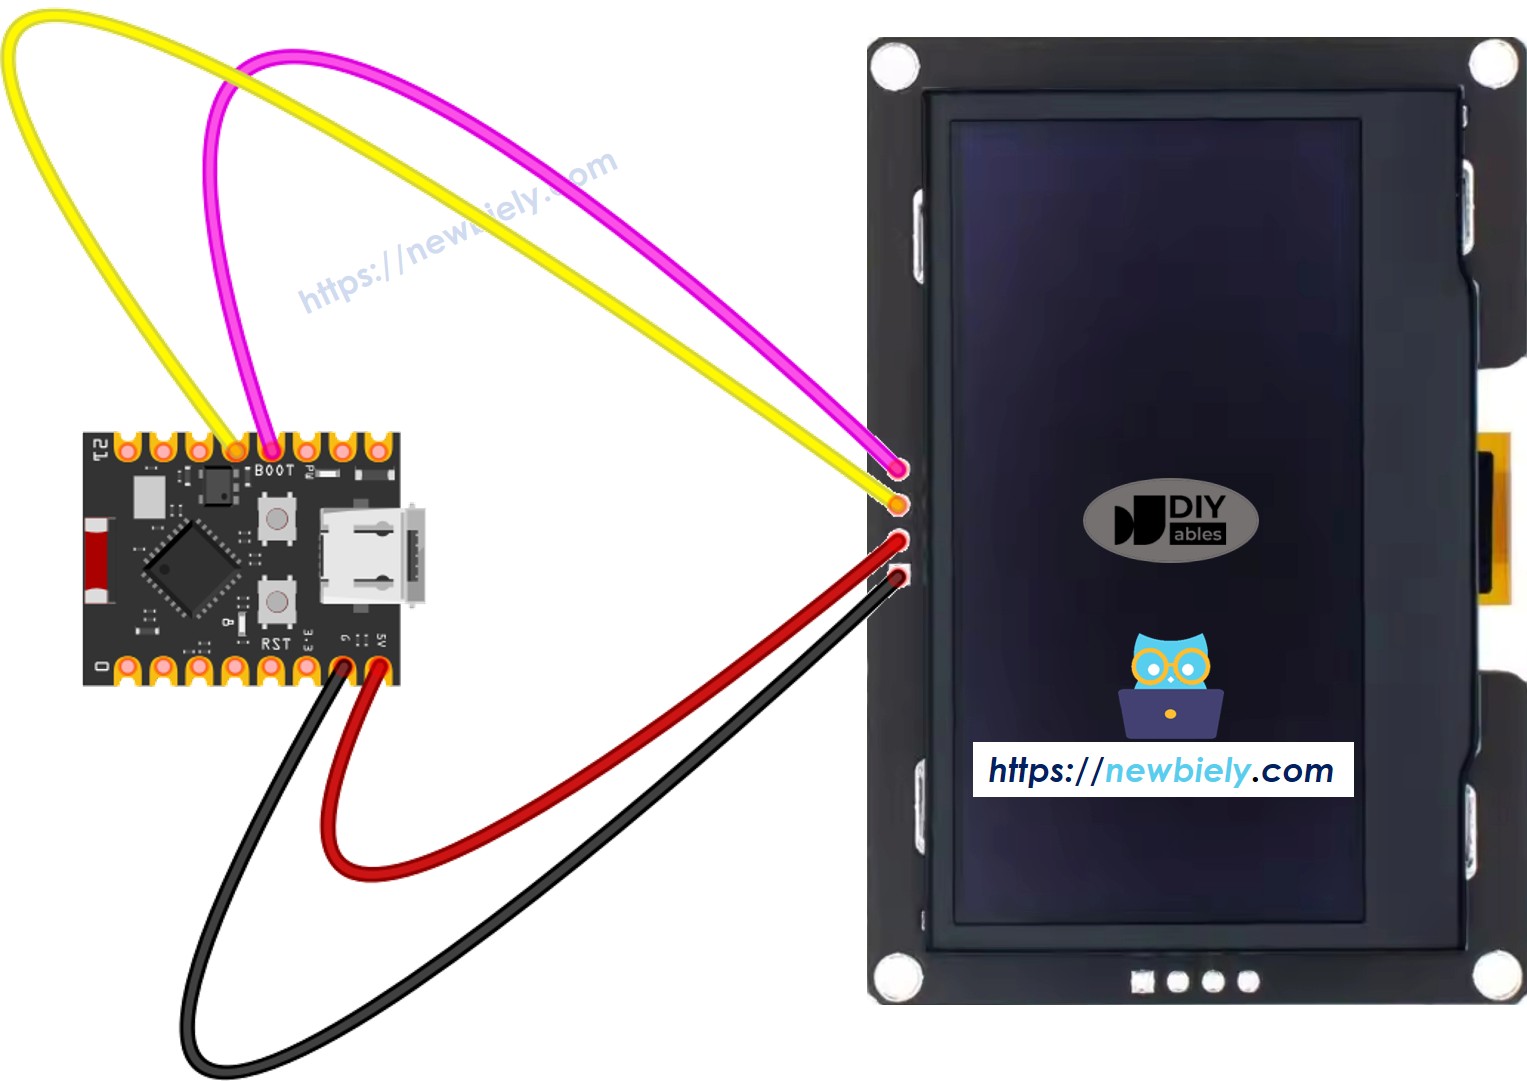
ESP32 C3 Super Mini SSD1309-OLED Schaltplan

Dieses Bild wurde mit Fritzing erstellt. Klicken Sie, um das Bild zu vergrößern.

Verbindungstabelle:

OLED-Modul ESP32 C3 Super Mini
VCC 3,3V
GND GND
SDA A4
SCL A5

※ Notiz:

  • Hinweis: Stellen Sie vor dem Einschalten sicher, dass die Verbindungen fest sitzen
  • Hinweis: Die I2C-Pins (A4/A5) können mit anderen I2C-Geräten geteilt werden

Wie man den ESP32 C3 Super Mini für das SSD1309-OLED programmiert

Dieser Abschnitt zeigt Ihnen, wie Sie die erforderliche Bibliothek installieren und Code für Ihr SSD1309-OLED-Display am ESP32 C3 Super Mini schreiben.

Was Sie tun werden:

  • Die Bibliothek DIYables_OLED_SSD1309 und ihre Abhängigkeiten installieren
  • Das I2C-OLED-Display in Ihrem Code initialisieren
  • Text, Zahlen und Grafiken anzeigen
  • Fortgeschrittene Funktionen wie Scrolling und eigene Schriftarten verwenden

Die Bibliothek DIYables_OLED_SSD1309 installieren

  • Klicken Sie auf das Symbol Libraries in der linken Leiste der Arduino IDE.
  • Suchen Sie nach DIYables_OLED_SSD1309 und suchen Sie dann die Bibliothek DIYables OLED SSD1309 von DIYables.
  • Klicken Sie auf Install, um die Bibliothek DIYables_OLED_SSD1309 zu installieren.
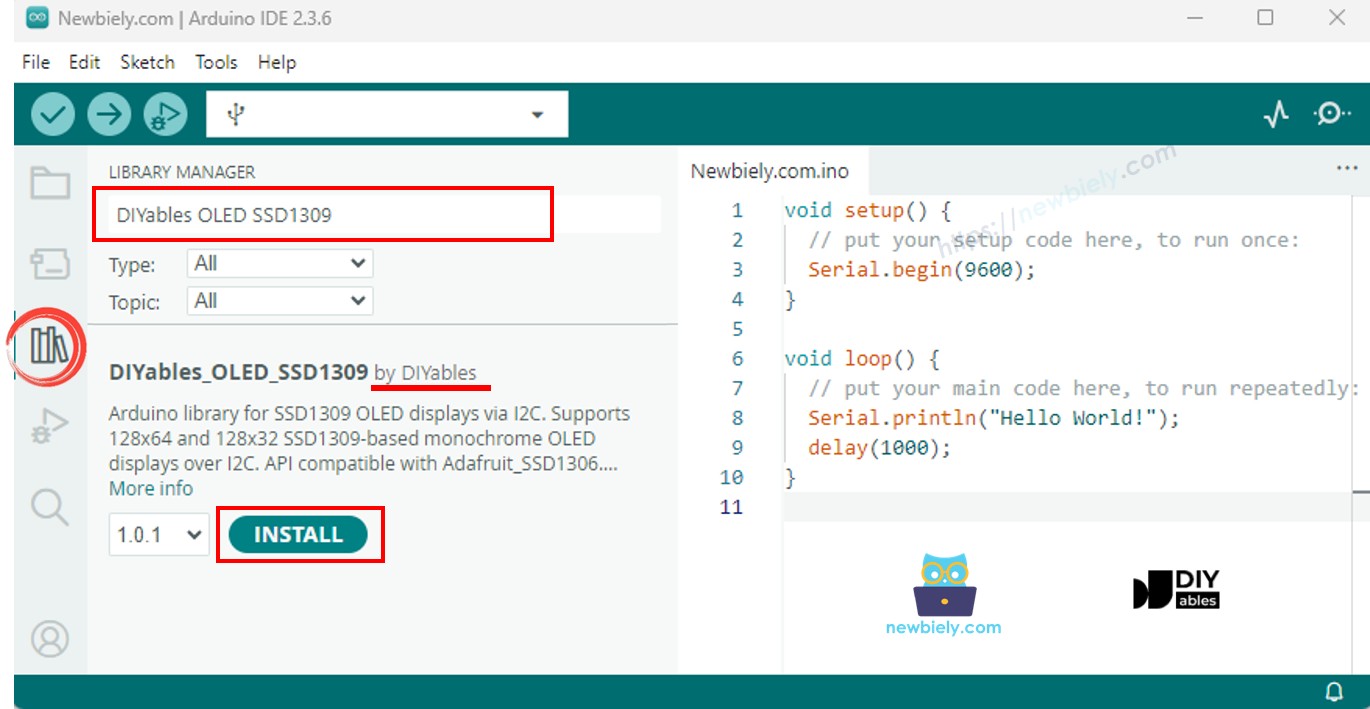
ESP32 C3 Super Mini SSD1309-OLED-Bibliothek
  • Sie werden aufgefordert, Abhängigkeiten für die Bibliothek zu installieren.
  • Klicken Sie auf Install All, um alle erforderlichen Abhängigkeiten zu installieren.
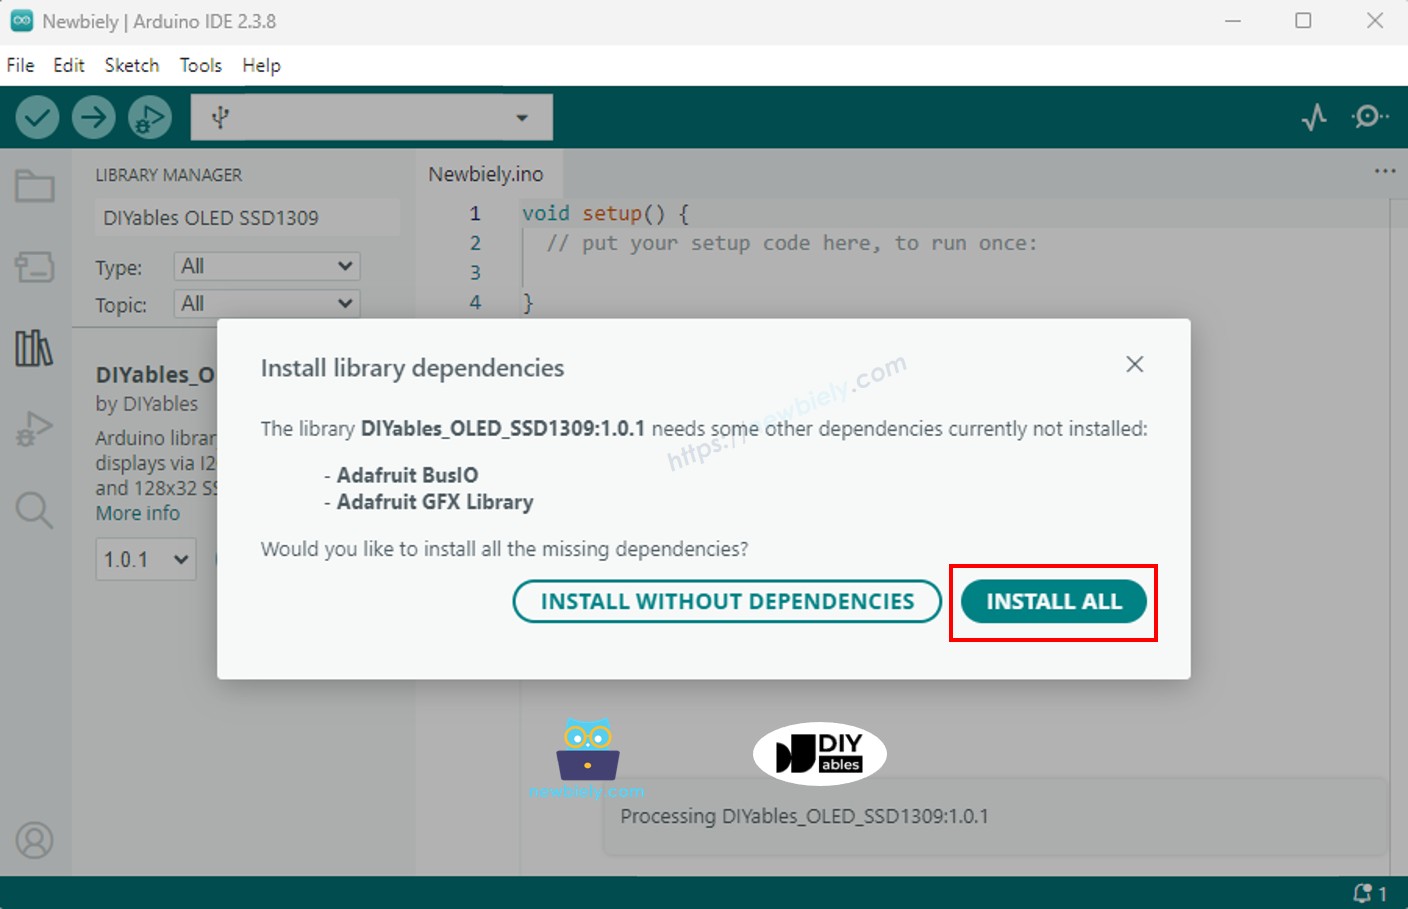
ESP32 C3 Super Mini Adafruit-GFX-Bibliothek

Programmierschritte

1. Die erforderlichen Bibliotheken einbinden

#include <Wire.h> #include <Adafruit_GFX.h> #include <DIYables_OLED_SSD1309.h>

2. Die Bildschirmabmessungen definieren

#define SCREEN_WIDTH 128 #define SCREEN_HEIGHT 64

3. Das Display-Objekt deklarieren

#define OLED_RESET -1 // Reset pin not used on most I2C modules #define SCREEN_ADDRESS 0x3C DIYables_OLED_SSD1309 display(SCREEN_WIDTH, SCREEN_HEIGHT, &Wire, OLED_RESET);

4. Das OLED in setup() initialisieren

if (!display.begin(SSD1309_SWITCHCAPVCC, SCREEN_ADDRESS)) { Serial.println(F("SSD1309 allocation failed")); for (;;); // halt }

5. Inhalte anzeigen

display.clearDisplay(); display.setTextSize(2); display.setTextColor(SSD1309_PIXEL_ON); display.setCursor(0, 20); display.println(F("Hello ESP32")); display.display(); // push buffer to screen

ESP32 C3 Super Mini Code — Hello World auf dem SSD1309-OLED

Dieses einfache Beispiel zeigt den Text "Hello World" auf Ihrem SSD1309-OLED-Display an.

Was dieser Code macht:

  • Initialisiert das I2C-OLED-Display
  • Löscht den Bildschirmpuffer
  • Legt Textgröße und Position fest
  • Zeigt den Text "Hello World" an
  • Sendet den Puffer an den physischen Bildschirm
/* * Dieser ESP32 C3 Super Mini Code wurde von newbiely.de entwickelt * Dieser ESP32 C3 Super Mini Code wird der Öffentlichkeit ohne jegliche Einschränkung zur Verfügung gestellt. * Für vollständige Anleitungen und Schaltpläne besuchen Sie bitte: * https://newbiely.de/tutorials/esp32-c3/esp32-c3-super-mini-ssd1309-oled-display */ /* * DIYables OLED SSD1309 – Hello World * Prints text in two sizes on the 2.42 inch 128x64 I2C OLED with Arduino Nano. */ #include <Wire.h> #include <Adafruit_GFX.h> #include <DIYables_OLED_SSD1309.h> #define SCREEN_WIDTH 128 #define SCREEN_HEIGHT 64 #define OLED_RESET -1 #define SCREEN_ADDRESS 0x3C DIYables_OLED_SSD1309 display(SCREEN_WIDTH, SCREEN_HEIGHT, &Wire, OLED_RESET); void setup() { Serial.begin(115200); if (!display.begin(SSD1309_SWITCHCAPVCC, SCREEN_ADDRESS)) { Serial.println(F("SSD1309 allocation failed")); for (;;); } display.clearDisplay(); display.setTextSize(1); // 6x8 pixels per character display.setTextColor(SSD1309_PIXEL_ON); // turn pixels on display.setCursor(0, 0); display.println(F("Hello, World!")); display.println(); display.setTextSize(2); // 12x16 pixels per character display.println(F("DIYables")); display.setTextSize(1); display.println(); display.println(F("SSD1309 OLED 128x64")); display.display(); // push buffer to screen } void loop() { }

ESP32 C3 Super Mini Code — Text auf dem SSD1309-OLED anzeigen

Dieses Beispiel zeigt fortgeschrittene Textfunktionen, darunter mehrere Textgrößen, Zahlenformatierung und effiziente RAM-Nutzung.

Was dieser Code macht:

  • Zeigt Text in verschiedenen Größen
  • Zeigt Ganzzahlen und Gleitkommazahlen an
  • Verwendet das F()-Makro, um RAM zu sparen
  • Formatiert Zahlen dezimal und hexadezimal
  • Demonstriert die richtige Cursorpositionierung
/* * Dieser ESP32 C3 Super Mini Code wurde von newbiely.de entwickelt * Dieser ESP32 C3 Super Mini Code wird der Öffentlichkeit ohne jegliche Einschränkung zur Verfügung gestellt. * Für vollständige Anleitungen und Schaltpläne besuchen Sie bitte: * https://newbiely.de/tutorials/esp32-c3/esp32-c3-super-mini-ssd1309-oled-display */ /* * DIYables OLED SSD1309 – Display Text * Displays text in various sizes and formats on the 2.42" SSD1309 OLED with Arduino Nano. */ #include <Wire.h> #include <Adafruit_GFX.h> #include <DIYables_OLED_SSD1309.h> #define SCREEN_WIDTH 128 #define SCREEN_HEIGHT 64 #define OLED_RESET -1 #define SCREEN_ADDRESS 0x3C DIYables_OLED_SSD1309 display(SCREEN_WIDTH, SCREEN_HEIGHT, &Wire, OLED_RESET); void setup() { Serial.begin(115200); if (!display.begin(SSD1309_SWITCHCAPVCC, SCREEN_ADDRESS)) { Serial.println(F("SSD1309 allocation failed")); for (;;); } display.clearDisplay(); // Various text sizes display.setTextSize(1); display.setTextColor(SSD1309_PIXEL_ON); display.setCursor(0, 0); display.println(F("Size 1 - DIYables")); display.setTextSize(2); display.println(F("Size 2")); display.setTextSize(3); display.println(F("Sz3")); display.display(); delay(3000); // Number formatting display.clearDisplay(); display.setTextSize(1); display.setCursor(0, 0); int value = 42; float pi = 3.14159; display.print(F("Integer: ")); display.println(value); display.print(F("Float: ")); display.println(pi, 2); // 2 decimal places display.print(F("Hex: 0x")); display.println(value, HEX); display.print(F("Binary: 0b")); display.println(value, BIN); display.display(); } void loop() { }

Referenz nützlicher Display-Funktionen

Grundlegende Display-Steuerung:

  • oled.clearDisplay() — löscht den Bildpuffer (alle Pixel aus)
  • oled.display() — überträgt den Puffer an das OLED, damit Änderungen sichtbar werden
  • oled.drawPixel(x, y, color) — setzt oder löscht ein einzelnes Pixel

Textfunktionen:

  • oled.setTextSize(n) — skaliert die Schrift um den Faktor *n* (1 = 6×8, 2 = 12×16 usw.)
  • oled.setCursor(x, y) — bewegt den Textcursor zu den Pixelkoordinaten *(x, y)*
  • oled.setTextColor(SSD1309_PIXEL_ON) — nur Textvordergrund (transparenter Hintergrund)
  • oled.setTextColor(SSD1309_PIXEL_OFF, SSD1309_PIXEL_ON) — Text mit expliziter Hintergrundfarbe
  • oled.println("message") — gibt eine Zeichenkette aus und springt in die nächste Zeile
  • oled.println(number) — gibt eine Ganzzahl dezimal aus
  • oled.println(number, HEX) — gibt eine Ganzzahl hexadezimal aus

Hardware-Scrolling:

  • oled.startscrollright(start, stop) — Hardware-Scrolling nach rechts zwischen Seite *start* und *stop*
  • oled.startscrollleft(start, stop) — Hardware-Scrolling nach links
  • oled.startscrolldiagright(start, stop) — Hardware-Scrolling diagonal nach rechts
  • oled.startscrolldiagleft(start, stop) — Hardware-Scrolling diagonal nach links
  • oled.stopscroll() — stoppt jedes aktive Hardware-Scrolling

Display-Einstellungen:

  • oled.setContrast(value) — stellt die Helligkeit des Displays ein (0–255)
  • oled.dim(true/false) — dimmt das Display schnell oder stellt es wieder her
  • oled.invertDisplay(true/false) — Farbumkehr auf Hardware-Ebene

Wie man Text auf dem SSD1309-OLED vertikal und horizontal zentriert

Das Zentrieren von Text auf Ihrem ESP32 C3 Super Mini OLED-Display sorgt für professionell aussehende Oberflächen.

Siehe Wie man auf einem OLED vertikal/horizontal zentriert

ESP32 C3 Super Mini Code — Formen auf dem SSD1309-OLED zeichnen

Mit der Bibliothek DIYables_OLED_SSD1309 können Sie geometrische Formen auf Ihrem 128x64-OLED-Display zeichnen.

Was dieser Code macht:

  • Zeichnet Pixel, Linien und Rechtecke
  • Erstellt Kreise und Dreiecke
  • Zeigt gefüllte und umrandete Formen
  • Demonstriert abgerundete Rechtecke
  • Verwendet die Grafikfunktionen von Adafruit GFX
/* * Dieser ESP32 C3 Super Mini Code wurde von newbiely.de entwickelt * Dieser ESP32 C3 Super Mini Code wird der Öffentlichkeit ohne jegliche Einschränkung zur Verfügung gestellt. * Für vollständige Anleitungen und Schaltpläne besuchen Sie bitte: * https://newbiely.de/tutorials/esp32-c3/esp32-c3-super-mini-ssd1309-oled-display */ /* * DIYables OLED SSD1309 – Draw Shapes * Demonstrates drawing pixels, lines, rectangles, circles, and triangles on the 2.42" OLED with Arduino Nano. */ #include <Wire.h> #include <Adafruit_GFX.h> #include <DIYables_OLED_SSD1309.h> #define SCREEN_WIDTH 128 #define SCREEN_HEIGHT 64 #define OLED_RESET -1 #define SCREEN_ADDRESS 0x3C DIYables_OLED_SSD1309 display(SCREEN_WIDTH, SCREEN_HEIGHT, &Wire, OLED_RESET); void setup() { Serial.begin(115200); if (!display.begin(SSD1309_SWITCHCAPVCC, SCREEN_ADDRESS)) { Serial.println(F("SSD1309 allocation failed")); for (;;); } display.clearDisplay(); display.display(); } void loop() { // Draw pixels display.clearDisplay(); for (int i = 0; i < 20; i++) { display.drawPixel(random(SCREEN_WIDTH), random(SCREEN_HEIGHT), SSD1309_PIXEL_ON); } display.display(); delay(2000); // Draw lines display.clearDisplay(); for (int y = 0; y < SCREEN_HEIGHT; y += 8) { display.drawLine(0, 0, SCREEN_WIDTH - 1, y, SSD1309_PIXEL_ON); } display.display(); delay(2000); // Draw rectangles display.clearDisplay(); display.drawRect(10, 10, 40, 30, SSD1309_PIXEL_ON); // outline display.fillRect(60, 10, 40, 30, SSD1309_PIXEL_ON); // filled display.drawRoundRect(10, 45, 40, 15, 5, SSD1309_PIXEL_ON); // rounded corners display.display(); delay(2000); // Draw circles display.clearDisplay(); display.drawCircle(32, 32, 20, SSD1309_PIXEL_ON); // outline display.fillCircle(96, 32, 20, SSD1309_PIXEL_ON); // filled display.display(); delay(2000); // Draw triangles display.clearDisplay(); display.drawTriangle(20, 10, 10, 50, 30, 50, SSD1309_PIXEL_ON); // outline display.fillTriangle(90, 10, 70, 50, 110, 50, SSD1309_PIXEL_ON); // filled display.display(); delay(2000); }

ESP32 C3 Super Mini Code — Hardware-Scrolling auf dem SSD1309-OLED

Das SSD1309-OLED verfügt über ein eingebautes Hardware-Scrolling, das Inhalte ohne Nutzung von CPU-Ressourcen verschiebt.

Was dieser Code macht:

  • Demonstriert alle vier Scrollrichtungen (rechts, links, diagonal rechts, diagonal links)
  • Verwendet Hardwarebeschleunigung für flüssiges Scrollen
  • Zeigt, wie das Scrollen gestartet und gestoppt wird
  • Arbeitet mit Seitennummern (0-7 für 8 Pixel hohe Streifen)

※ Notiz:

Rufen Sie display() auf, um Ihre Inhalte an das OLED zu übertragen, bevor Sie ein Scrolling starten. Stoppen Sie das Scrolling mit stopscroll(), bevor Sie neue Inhalte zeichnen.

/* * Dieser ESP32 C3 Super Mini Code wurde von newbiely.de entwickelt * Dieser ESP32 C3 Super Mini Code wird der Öffentlichkeit ohne jegliche Einschränkung zur Verfügung gestellt. * Für vollständige Anleitungen und Schaltpläne besuchen Sie bitte: * https://newbiely.de/tutorials/esp32-c3/esp32-c3-super-mini-ssd1309-oled-display */ /* * DIYables OLED SSD1309 – Scroll Text * Demonstrates all four hardware scroll directions on the 2.42" OLED with Arduino Nano. */ #include <Wire.h> #include <Adafruit_GFX.h> #include <DIYables_OLED_SSD1309.h> #define SCREEN_WIDTH 128 #define SCREEN_HEIGHT 64 #define OLED_RESET -1 #define SCREEN_ADDRESS 0x3C DIYables_OLED_SSD1309 display(SCREEN_WIDTH, SCREEN_HEIGHT, &Wire, OLED_RESET); void setup() { Serial.begin(115200); if (!display.begin(SSD1309_SWITCHCAPVCC, SCREEN_ADDRESS)) { Serial.println(F("SSD1309 allocation failed")); for (;;); } display.clearDisplay(); display.setTextSize(2); display.setTextColor(SSD1309_PIXEL_ON); display.setCursor(10, 24); display.println(F("DIYables")); display.display(); delay(2000); } void loop() { // Scroll right across all pages display.startscrollright(0x00, 0x07); delay(3000); display.stopscroll(); delay(500); // Scroll left display.startscrollleft(0x00, 0x07); delay(3000); display.stopscroll(); delay(500); // Diagonal scroll right display.startscrolldiagright(0x00, 0x07); delay(3000); display.stopscroll(); delay(500); // Diagonal scroll left display.startscrolldiagleft(0x00, 0x07); delay(3000); display.stopscroll(); delay(500); }

ESP32 C3 Super Mini Code — Bitmap-Bild auf dem SSD1309-OLED anzeigen

Zeigen Sie eigene Bilder auf Ihrem SSD1309-OLED an, indem Sie sie in Byte-Arrays umwandeln.

So wandeln Sie Bilder um:

  1. Öffnen Sie das Online-Tool image2cpp
  2. Laden Sie Ihr Bild hoch (PNG, JPG, BMP usw.)
  3. Stellen Sie die Canvas-Größe auf 128×64 (oder kleiner) ein
  4. Wählen Sie Arduino code als Ausgabeformat
  5. Kopieren Sie das erzeugte Array in Ihren Sketch
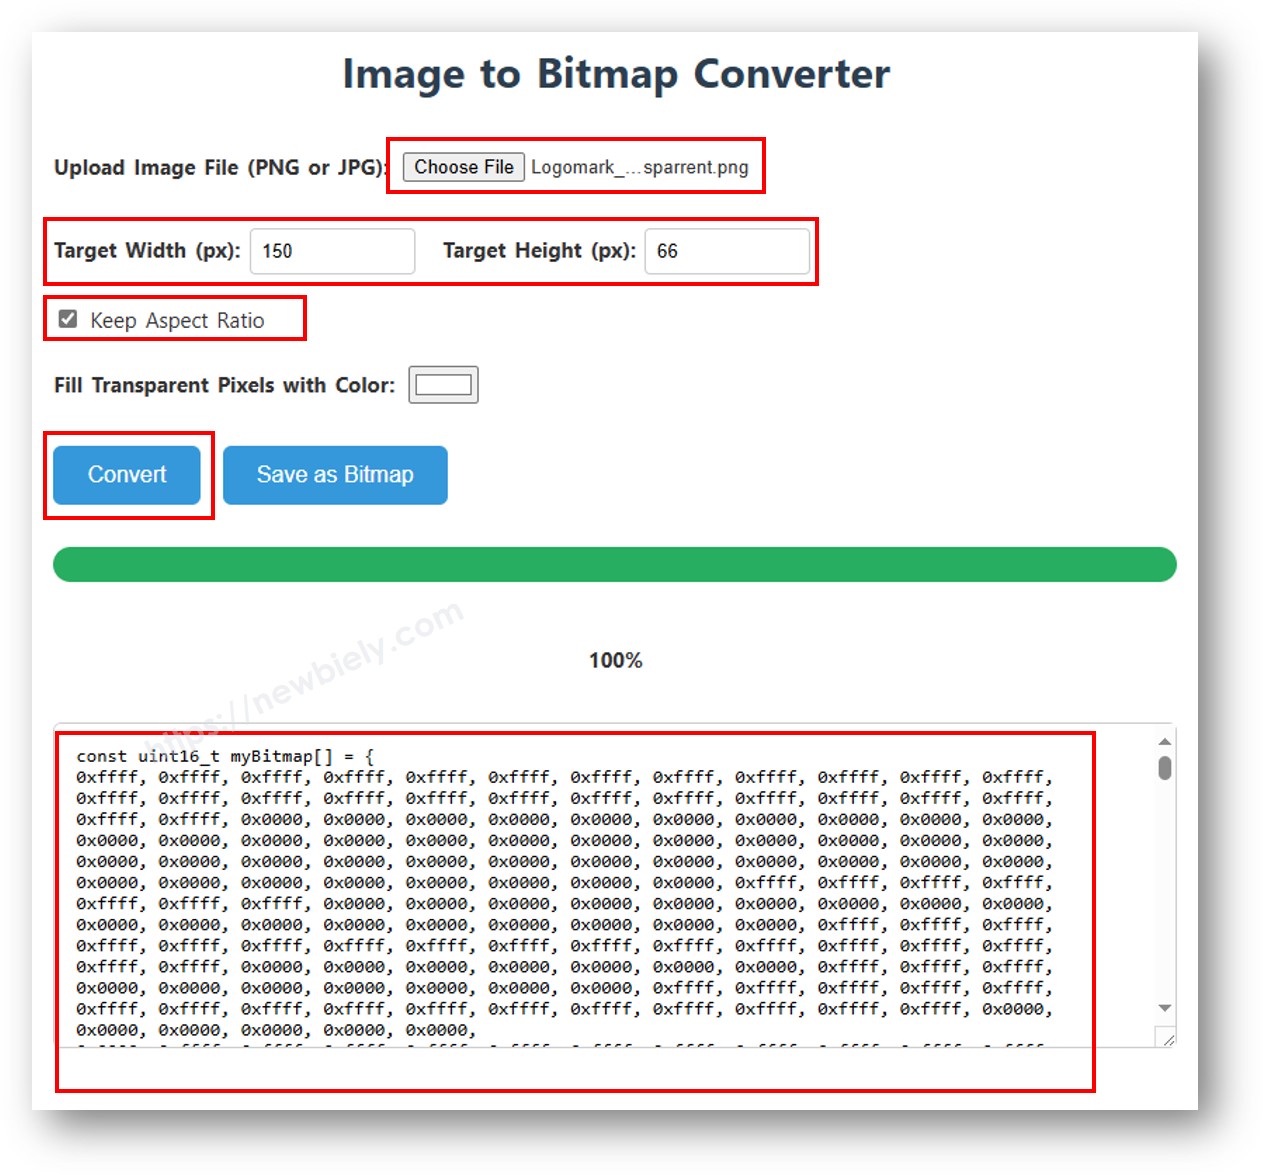
Bild in Bitmap-Array umwandeln

Was dieser Code macht:

  • Wandelt Bilder in monochrome Bitmaps um
  • Speichert Bitmap-Daten in PROGMEM, um RAM zu sparen
  • Zeigt das Bitmap auf dem 128x64-OLED an
  • Zeigt die richtige Positionierung des Bitmaps
/* * Dieser ESP32 C3 Super Mini Code wurde von newbiely.de entwickelt * Dieser ESP32 C3 Super Mini Code wird der Öffentlichkeit ohne jegliche Einschränkung zur Verfügung gestellt. * Für vollständige Anleitungen und Schaltpläne besuchen Sie bitte: * https://newbiely.de/tutorials/esp32-c3/esp32-c3-super-mini-ssd1309-oled-display */ /* * DIYables OLED SSD1309 – Display Bitmap Image * Shows a 16x16 heart icon and 128x64 DIYables logo on the 2.42" OLED with Arduino Nano. */ #include <Wire.h> #include <Adafruit_GFX.h> #include <DIYables_OLED_SSD1309.h> #define SCREEN_WIDTH 128 #define SCREEN_HEIGHT 64 #define OLED_RESET -1 #define SCREEN_ADDRESS 0x3C DIYables_OLED_SSD1309 display(SCREEN_WIDTH, SCREEN_HEIGHT, &Wire, OLED_RESET); // 16x16 heart icon bitmap const unsigned char heart_icon[] PROGMEM = { 0x00, 0x00, 0x0c, 0x30, 0x1e, 0x78, 0x3f, 0xfc, 0x7f, 0xfe, 0xff, 0xff, 0xff, 0xff, 0xff, 0xff, 0xff, 0xff, 0xff, 0xff, 0x7f, 0xfe, 0x3f, 0xfc, 0x1f, 0xf8, 0x0f, 0xf0, 0x03, 0xc0, 0x00, 0x00 }; // 128x64 DIYables logo bitmap const unsigned char diyables_logo[] PROGMEM = { 0xff, 0xff, 0xff, 0xff, 0xff, 0xff, 0xff, 0xff, 0xff, 0xff, 0xff, 0xff, 0xff, 0xff, 0xff, 0xff, 0xff, 0xff, 0xff, 0xff, 0xff, 0xff, 0xff, 0xff, 0xff, 0xff, 0xff, 0xff, 0xff, 0xff, 0xff, 0xff, 0xff, 0xff, 0xff, 0xff, 0xff, 0xff, 0xff, 0xff, 0xff, 0xff, 0xff, 0xff, 0xff, 0xff, 0xff, 0xff, 0xff, 0xff, 0xff, 0xff, 0xff, 0xff, 0xff, 0xff, 0xff, 0xff, 0xff, 0xff, 0xff, 0xff, 0xff, 0xff, 0xff, 0xff, 0xff, 0xff, 0xff, 0xff, 0xff, 0xff, 0xff, 0xff, 0xff, 0xff, 0xff, 0xff, 0xff, 0xff, 0xff, 0xff, 0xff, 0xff, 0xff, 0xff, 0xff, 0xff, 0xff, 0xff, 0xff, 0xff, 0xff, 0xff, 0xff, 0xff, 0xff, 0xff, 0xff, 0xff, 0xff, 0xff, 0xff, 0xff, 0xff, 0xff, 0xff, 0xff, 0xff, 0xff, 0xff, 0xff, 0xff, 0xff, 0xff, 0xff, 0xff, 0xff, 0xff, 0xff, 0xff, 0xff, 0xff, 0xff, 0xff, 0xff, 0xff, 0xff, 0xff, 0xff, 0xff, 0xff, 0xff, 0xff, 0xff, 0xff, 0xff, 0xff, 0xff, 0xff, 0xff, 0xff, 0xff, 0xff, 0xff, 0xff, 0xff, 0xff, 0xff, 0xff, 0xff, 0xff, 0xff, 0xff, 0xff, 0xff, 0xff, 0xff, 0xff, 0xff, 0xff, 0xff, 0xff, 0xff, 0xff, 0xff, 0xff, 0xff, 0xff, 0xff, 0xff, 0xff, 0xff, 0xff, 0xff, 0xff, 0xff, 0xff, 0xff, 0xff, 0xff, 0xff, 0xff, 0xff, 0xff, 0xff, 0xff, 0xff, 0xff, 0xff, 0xff, 0xff, 0xff, 0xff, 0xff, 0xff, 0xff, 0xff, 0xff, 0xff, 0xff, 0xff, 0xff, 0xff, 0xff, 0xff, 0xff, 0xff, 0xff, 0xff, 0xff, 0xff, 0xff, 0xff, 0xff, 0xff, 0xff, 0xff, 0xff, 0xff, 0xff, 0xff, 0xff, 0xff, 0xff, 0xff, 0xff, 0xff, 0xff, 0xff, 0xff, 0xff, 0xff, 0xff, 0xff, 0xff, 0xff, 0xff, 0xff, 0xff, 0xff, 0xff, 0xff, 0xff, 0xff, 0xff, 0xff, 0xff, 0xff, 0xff, 0xff, 0xff, 0xff, 0xff, 0xff, 0xff, 0xff, 0xff, 0xff, 0xf0, 0x00, 0x00, 0x00, 0x00, 0x00, 0x00, 0x00, 0x00, 0x00, 0x00, 0x0f, 0xff, 0xff, 0xff, 0xff, 0x80, 0x00, 0x00, 0x00, 0x00, 0x00, 0x00, 0x00, 0x00, 0x00, 0x00, 0x01, 0xff, 0xff, 0xff, 0xff, 0x00, 0x00, 0x00, 0x00, 0x00, 0x00, 0x00, 0x00, 0x00, 0x00, 0x00, 0x00, 0xff, 0xff, 0xff, 0xfe, 0x00, 0x07, 0xff, 0xc1, 0xff, 0xe0, 0x7f, 0xf0, 0x1f, 0xfc, 0x03, 0x00, 0x7f, 0xff, 0xff, 0xfc, 0x00, 0x1f, 0xff, 0xf7, 0xff, 0xf9, 0xff, 0xfc, 0x7f, 0xff, 0x0f, 0x80, 0x3f, 0xff, 0xff, 0xf8, 0x00, 0x3f, 0xff, 0xff, 0xff, 0xfd, 0xff, 0xfe, 0xff, 0xff, 0x9f, 0xc0, 0x1f, 0xff, 0xff, 0xf8, 0x00, 0x7f, 0x80, 0xff, 0x00, 0x7f, 0xc0, 0x3f, 0xf0, 0x0f, 0xfc, 0x00, 0x1f, 0xff, 0xff, 0xf0, 0x00, 0xfe, 0x00, 0x7f, 0x00, 0x3f, 0x80, 0x1f, 0xe0, 0x07, 0xf8, 0x00, 0x0f, 0xff, 0xff, 0xe0, 0x01, 0xfc, 0x00, 0x3e, 0x00, 0x1f, 0x00, 0x0f, 0xc0, 0x03, 0xf0, 0x00, 0x0f, 0xff, 0xff, 0xe0, 0x03, 0xf8, 0x00, 0x3e, 0x00, 0x1f, 0x00, 0x0f, 0xc0, 0x03, 0xf0, 0x00, 0x07, 0xff, 0xff, 0xc0, 0x07, 0xf8, 0x00, 0x3e, 0x00, 0x1f, 0x00, 0x0f, 0xc0, 0x03, 0xf0, 0x00, 0x03, 0xff, 0xff, 0xc0, 0x0f, 0xf8, 0x00, 0x3e, 0x00, 0x1f, 0x00, 0x0f, 0xc0, 0x03, 0xf0, 0x00, 0x03, 0xff, 0xff, 0x80, 0x0f, 0xf8, 0x00, 0x3e, 0x00, 0x1f, 0x00, 0x0f, 0xc0, 0x03, 0xf0, 0x00, 0x01, 0xff, 0xff, 0x80, 0x1f, 0xf8, 0x00, 0x3e, 0x00, 0x1f, 0x00, 0x0f, 0xc0, 0x03, 0xf0, 0x00, 0x01, 0xff, 0xff, 0x00, 0x3f, 0xf8, 0x00, 0x3e, 0x00, 0x1f, 0x00, 0x0f, 0xc0, 0x03, 0xf0, 0x00, 0x00, 0xff, 0xff, 0x00, 0x3f, 0xf8, 0x00, 0x3e, 0x00, 0x1f, 0x00, 0x0f, 0xc0, 0x03, 0xf0, 0x00, 0x00, 0xff, 0xfe, 0x00, 0x7f, 0xf8, 0x00, 0x3e, 0x00, 0x1f, 0x00, 0x0f, 0xc0, 0x03, 0xf0, 0x00, 0x00, 0xff, 0xfe, 0x00, 0x7f, 0xf8, 0x00, 0x3e, 0x00, 0x1f, 0x00, 0x0f, 0xc0, 0x03, 0xf0, 0x00, 0x00, 0xff, 0xfc, 0x00, 0xff, 0xf8, 0x00, 0x3e, 0x00, 0x1f, 0x00, 0x0f, 0xc0, 0x03, 0xf0, 0x00, 0x00, 0xff, 0xfc, 0x00, 0xff, 0xf8, 0x00, 0x3e, 0x00, 0x1f, 0x00, 0x0f, 0xc0, 0x03, 0xf0, 0x00, 0x00, 0xff, 0xfc, 0x01, 0xff, 0xf8, 0x00, 0x3e, 0x00, 0x1f, 0x00, 0x0f, 0xc0, 0x03, 0xf0, 0x00, 0x00, 0xff, 0xf8, 0x01, 0xff, 0xf8, 0x00, 0x3e, 0x00, 0x1f, 0x00, 0x0f, 0xc0, 0x03, 0xf0, 0x00, 0x00, 0xff, 0xf8, 0x03, 0xff, 0xf8, 0x00, 0x3e, 0x00, 0x1f, 0x00, 0x0f, 0xc0, 0x03, 0xf0, 0x00, 0x00, 0xff, 0xf0, 0x03, 0xff, 0xfc, 0x00, 0x7e, 0x00, 0x1f, 0x80, 0x1f, 0xe0, 0x07, 0xf8, 0x00, 0x00, 0xff, 0xf0, 0x07, 0xff, 0x7f, 0x80, 0xff, 0x00, 0x7f, 0xc0, 0x3f, 0xf0, 0x0f, 0xfc, 0x00, 0x00, 0xff, 0xf0, 0x07, 0xfe, 0x3f, 0xff, 0xff, 0xff, 0xfd, 0xff, 0xfe, 0xff, 0xff, 0x9f, 0xc0, 0x00, 0xff, 0xe0, 0x0f, 0xfc, 0x1f, 0xff, 0xf7, 0xff, 0xf9, 0xff, 0xfc, 0x7f, 0xff, 0x0f, 0x80, 0x00, 0xff, 0xe0, 0x0f, 0xf8, 0x07, 0xff, 0xc1, 0xff, 0xe0, 0x7f, 0xf0, 0x1f, 0xfc, 0x03, 0x00, 0x00, 0xff, 0xe0, 0x1f, 0xf0, 0x00, 0x00, 0x00, 0x00, 0x00, 0x00, 0x00, 0x00, 0x00, 0x00, 0x00, 0x00, 0xff, 0xc0, 0x1f, 0xe0, 0x00, 0x00, 0x00, 0x00, 0x00, 0x00, 0x00, 0x00, 0x00, 0x00, 0x00, 0x00, 0xff, 0xc0, 0x3f, 0xc0, 0x00, 0x00, 0x00, 0x00, 0x00, 0x00, 0x00, 0x00, 0x00, 0x00, 0x00, 0x00, 0xff, 0xc0, 0x3f, 0x80, 0x00, 0x00, 0x00, 0x00, 0x00, 0x00, 0x00, 0x00, 0x00, 0x00, 0x00, 0x00, 0xff, 0x80, 0x7f, 0x00, 0xff, 0xff, 0xff, 0xff, 0xff, 0xff, 0xff, 0xff, 0xff, 0xff, 0xff, 0xff, 0xff, 0x80, 0x7f, 0x00, 0xff, 0xff, 0xff, 0xff, 0xff, 0xff, 0xff, 0xff, 0xff, 0xff, 0xff, 0xff, 0xff, 0x80, 0xfe, 0x00, 0xff, 0xff, 0xff, 0xff, 0xff, 0xff, 0xff, 0xff, 0xff, 0xff, 0xff, 0xff, 0xff, 0x00, 0xfc, 0x00, 0xff, 0xff, 0xff, 0xff, 0xff, 0xff, 0xff, 0xff, 0xff, 0xff, 0xff, 0xff, 0xff, 0x01, 0xf8, 0x00, 0xff, 0xff, 0xff, 0xff, 0xff, 0xff, 0xff, 0xff, 0xff, 0xff, 0xff, 0xff, 0xff, 0x01, 0xf0, 0x00, 0xff, 0xff, 0xff, 0xff, 0xff, 0xff, 0xff, 0xff, 0xff, 0xff, 0xff, 0xff, 0xfe, 0x03, 0xe0, 0x00, 0xff, 0xff, 0xff, 0xff, 0xff, 0xff, 0xff, 0xff, 0xff, 0xff, 0xff, 0xff, 0xfe, 0x07, 0xc0, 0x00, 0xff, 0xff, 0xff, 0xff, 0xff, 0xff, 0xff, 0xff, 0xff, 0xff, 0xff, 0xff, 0xfc, 0x0f, 0x80, 0x00, 0xff, 0xff, 0xff, 0xff, 0xff, 0xff, 0xff, 0xff, 0xff, 0xff, 0xff, 0xff, 0xf8, 0x1f, 0x00, 0x00, 0xff, 0xff, 0xff, 0xff, 0xff, 0xff, 0xff, 0xff, 0xff, 0xff, 0xff, 0xff, 0xf0, 0x3e, 0x00, 0x00, 0xff, 0xff, 0xff, 0xff, 0xff, 0xff, 0xff, 0xff, 0xff, 0xff, 0xff, 0xff, 0xe0, 0x7c, 0x00, 0x00, 0xff, 0xff, 0xff, 0xff, 0xff, 0xff, 0xff, 0xff, 0xff, 0xff, 0xff, 0xff, 0xc0, 0xf8, 0x00, 0x00, 0xff, 0xff, 0xff, 0xff, 0xff, 0xff, 0xff, 0xff, 0xff, 0xff, 0xff, 0xff, 0x81, 0xf0, 0x00, 0x00, 0xff, 0xff, 0xff, 0xff, 0xff, 0xff, 0xff, 0xff, 0xff, 0xff, 0xff, 0xff, 0x03, 0xe0, 0x00, 0x00, 0xff, 0xff, 0xff, 0xff, 0xff, 0xff, 0xff, 0xff, 0xff, 0xff, 0xff, 0xff }; void setup() { Serial.begin(115200); if (!display.begin(SSD1309_SWITCHCAPVCC, SCREEN_ADDRESS)) { Serial.println(F("SSD1309 allocation failed")); for (;;); } display.clearDisplay(); display.display(); } void loop() { // Display small heart icon centered display.clearDisplay(); display.drawBitmap((SCREEN_WIDTH - 16) / 2, (SCREEN_HEIGHT - 16) / 2, heart_icon, 16, 16, SSD1309_PIXEL_ON); display.display(); delay(3000); // Display full-screen DIYables logo display.clearDisplay(); display.drawBitmap(0, 0, diyables_logo, SCREEN_WIDTH, SCREEN_HEIGHT, SSD1309_PIXEL_ON); display.display(); delay(3000); // Invert display display.invertDisplay(true); delay(2000); display.invertDisplay(false); delay(1000); }

※ Notiz:

  • Die Bitmap-Abmessungen dürfen bei diesem Modul 128×64 nicht überschreiten
  • Bilder werden automatisch in Monochrom (Schwarz-Weiß) umgewandelt

ESP32 C3 Super Mini Code — Kontrast und Dimmen am SSD1309-OLED

Steuern Sie die Helligkeit Ihres SSD1309-Displays am ESP32 C3 Super Mini mit den Kontrast- und Dimmfunktionen.

Was dieser Code macht:

  • Stellt den Kontrast von 0 (minimal) bis 255 (maximal) ein
  • Verwendet setContrast() für eine präzise Helligkeitssteuerung
  • Verwendet dim() zum schnellen Umschalten der Helligkeit
  • Demonstriert fließende Helligkeitsübergänge
/* * Dieser ESP32 C3 Super Mini Code wurde von newbiely.de entwickelt * Dieser ESP32 C3 Super Mini Code wird der Öffentlichkeit ohne jegliche Einschränkung zur Verfügung gestellt. * Für vollständige Anleitungen und Schaltpläne besuchen Sie bitte: * https://newbiely.de/tutorials/esp32-c3/esp32-c3-super-mini-ssd1309-oled-display */ /* * DIYables OLED SSD1309 – Contrast & Dim * Sweeps contrast from 0→255→0 then toggles dim mode on the 2.42" OLED with Arduino Nano. */ #include <Wire.h> #include <Adafruit_GFX.h> #include <DIYables_OLED_SSD1309.h> #define SCREEN_WIDTH 128 #define SCREEN_HEIGHT 64 #define OLED_RESET -1 #define SCREEN_ADDRESS 0x3C DIYables_OLED_SSD1309 display(SCREEN_WIDTH, SCREEN_HEIGHT, &Wire, OLED_RESET); void setup() { Serial.begin(115200); if (!display.begin(SSD1309_SWITCHCAPVCC, SCREEN_ADDRESS)) { Serial.println(F("SSD1309 allocation failed")); for (;;); } // Draw a test pattern so the contrast changes are visible display.clearDisplay(); display.fillRect(0, 0, 64, 32, SSD1309_PIXEL_ON); display.fillRect(64, 32, 64, 32, SSD1309_PIXEL_ON); display.setTextSize(1); display.setTextColor(SSD1309_PIXEL_INVERSE); display.setCursor(16, 28); display.println(F("Contrast Demo")); display.display(); delay(2000); } void loop() { // Ramp up for (int c = 0; c <= 255; c += 5) { display.setContrast((uint8_t)c); delay(30); } delay(1000); // Ramp down for (int c = 255; c >= 0; c -= 5) { display.setContrast((uint8_t)c); delay(30); } delay(1000); // Quick dim toggle display.dim(true); // minimum brightness delay(2000); display.dim(false); // restore delay(2000); }

ESP32 C3 Super Mini Code — Eigene externe Schriftarten auf dem SSD1309-OLED

Die Adafruit-GFX-Bibliothek enthält Dutzende professioneller FreeFont-Schriftarten für Ihr SSD1309-OLED-Display.

Verfügbare Schriftfamilien:

  • Serif-Schriften (klassisches Aussehen)
  • Sans-Schriften (modern, klar)
  • Mono-Schriften (feste Breite)
  • Jeweils in den Stilen Regular, Bold und Italic
  • Vier Größen für jede Schrift

Was dieser Code macht:

  • Zeigt, wie eigene Schrift-Header eingebunden werden
  • Demonstriert setFont() zum Wechseln der Schrift
  • Zeigt Text in mehreren Schriftstilen an
  • Verwendet PROGMEM für eine effiziente Speicherung im Flash

※ Notiz:

  • Wenn eine externe Schrift aktiv ist, bezieht sich die Y-Koordinate des Cursors auf die Grundlinie des Textes, nicht auf die linke obere Ecke
  • Externe Schriften werden im Flash (PROGMEM) gespeichert. Setzen Sie sie überlegt ein, um im Flash-Budget des ESP32 C3 Super Mini zu bleiben
/* * Dieser ESP32 C3 Super Mini Code wurde von newbiely.de entwickelt * Dieser ESP32 C3 Super Mini Code wird der Öffentlichkeit ohne jegliche Einschränkung zur Verfügung gestellt. * Für vollständige Anleitungen und Schaltpläne besuchen Sie bitte: * https://newbiely.de/tutorials/esp32-c3/esp32-c3-super-mini-ssd1309-oled-display */ /* * DIYables OLED SSD1309 – External Fonts * Cycles through three FreeFont typefaces on the 2.42" SSD1309 OLED with Arduino Nano. */ #include <Wire.h> #include <Adafruit_GFX.h> #include <DIYables_OLED_SSD1309.h> #include <Fonts/FreeSerif9pt7b.h> #include <Fonts/FreeSansBold12pt7b.h> #include <Fonts/FreeMono9pt7b.h> #define SCREEN_WIDTH 128 #define SCREEN_HEIGHT 64 #define OLED_RESET -1 #define SCREEN_ADDRESS 0x3C DIYables_OLED_SSD1309 display(SCREEN_WIDTH, SCREEN_HEIGHT, &Wire, OLED_RESET); void setup() { Serial.begin(115200); if (!display.begin(SSD1309_SWITCHCAPVCC, SCREEN_ADDRESS)) { Serial.println(F("SSD1309 allocation failed")); for (;;); } display.clearDisplay(); display.display(); } void loop() { // ── Built-in 5×7 font ── display.clearDisplay(); display.setFont(NULL); display.setTextSize(1); display.setTextColor(SSD1309_PIXEL_ON); display.setCursor(0, 0); display.println(F("Built-in 5x7 font")); display.println(); display.setTextSize(2); display.println(F("DIYables")); display.display(); delay(3000); // ── FreeSerif 9pt ── display.clearDisplay(); display.setFont(&FreeSerif9pt7b); display.setTextSize(1); display.setTextColor(SSD1309_PIXEL_ON); display.setCursor(0, 14); // Y = baseline display.println(F("FreeSerif 9pt")); display.setCursor(0, 38); display.println(F("DIYables OLED")); display.setCursor(0, 58); display.println(F("Hello World!")); display.display(); delay(3000); // ── FreeSansBold 12pt ── display.clearDisplay(); display.setFont(&FreeSansBold12pt7b); display.setTextSize(1); display.setTextColor(SSD1309_PIXEL_ON); display.setCursor(0, 20); display.println(F("SansBold")); display.setCursor(0, 52); display.println(F("DIYables")); display.display(); delay(3000); // ── FreeMono 9pt ── display.clearDisplay(); display.setFont(&FreeMono9pt7b); display.setTextSize(1); display.setTextColor(SSD1309_PIXEL_ON); display.setCursor(0, 14); display.println(F("FreeMono 9pt")); display.setCursor(0, 34); display.println(F("0123456789")); display.setCursor(0, 54); display.println(F("!@#$%^&*()")); display.display(); delay(3000); }

Schnelle Schritte

  • Neu beim ESP32 C3 Super Mini? Absolvieren Sie zuerst unser Tutorial Erste Schritte mit dem ESP32 C3 Mini, um Ihre Entwicklungsumgebung einzurichten.
  • Display verdrahten: Verbinden Sie das SSD1309-OLED gemäß der obigen Verdrahtungstabelle mit dem ESP32 C3 Super Mini
  • Bibliothek installieren: Öffnen Sie den Bibliotheksverwalter der Arduino IDE und installieren Sie DIYables_OLED_SSD1309 und alle Abhängigkeiten
  • Beispiel öffnen: Laden Sie einen der Beispiel-Sketches aus den obigen Codeabschnitten
  • Board auswählen: Wählen Sie ESP32C3 Dev Module im Menü Werkzeuge > Board
  • Code hochladen: Schließen Sie Ihren ESP32 C3 Super Mini an und klicken Sie auf Hochladen
  • Display prüfen: Das SSD1309-OLED sollte sofort die Ausgabe des Beispiels anzeigen
  • Experimentieren: Ändern Sie Text, Farben oder Koordinaten, um zu sehen, wie das Display reagiert
  • Profi-Tipp: Rufen Sie nach dem Zeichnen immer display.display() auf, um den Bildschirm zu aktualisieren – der SSD1309 verwendet einen Bildpuffer, der an das physische Display übertragen werden muss

SSD1309-OLED-Fehlerbehebung mit dem ESP32 C3 Super Mini

Wenn auf Ihrem 2,42-Zoll-SSD1309-OLED-Display nichts erscheint, folgen Sie diesen Schritten zur Fehlerbehebung:

Häufige Probleme und Lösungen:

  • Verdrahtung prüfen: Bestätigen Sie, dass SDA→A4, SCL→A5, VCC→3,3V und GND→GND alle korrekt verbunden sind
  • Treiberchip bestätigen: Diese Bibliothek ist für den SSD1309-Controller gedacht – Module mit SH1106 oder anderen Chips funktionieren nicht
  • I2C-Adresse prüfen: Die meisten SSD1309-Module verwenden 0x3C, manche jedoch 0x3D – führen Sie den unten stehenden Scanner aus, um Ihre zu finden
  • display() aufrufen: Der SSD1309 verwendet einen Bildpuffer – nichts erscheint, bis Sie oled.display() aufrufen
  • Stromversorgung prüfen: Das 2,42-Zoll-OLED zieht 20-40 mA – stellen Sie sicher, dass die 3,3V-Versorgung genügend Strom liefern kann
  • Verbindungen testen: Bewegen Sie die Drähte vorsichtig, um lose Verbindungen zu erkennen
  • I2C-Scanner verwenden: Laden Sie den folgenden Code hoch, um die I2C-Adresse Ihres OLED zu ermitteln

I2C-Scanner-Code:

// I2C address scanner — prints every detected device to the Serial Monitor #include <Wire.h> void setup() { Wire.begin(); Serial.begin(115200); Serial.println("I2C Scanner"); } void loop() { byte error, address; int nDevices = 0; Serial.println("Scanning..."); for (address = 1; address < 127; address++) { Wire.beginTransmission(address); error = Wire.endTransmission(); if (error == 0) { Serial.print("I2C device found at address 0x"); if (address < 16) Serial.print("0"); Serial.print(address, HEX); Serial.println(" !"); nDevices++; } else if (error == 4) { Serial.print("Unknown error at address 0x"); if (address < 16) Serial.print("0"); Serial.println(address, HEX); } } if (nDevices == 0) Serial.println("No I2C devices found"); else Serial.println("done"); delay(5000); }

Erwartete Ausgabe im Seriellen Monitor, wenn der SSD1309 erkannt wird:

∞
Newbiely | Arduino IDE 2.3.8
──
☐
✕
File
Edit
Sketch
Tools
Help
ESP32C3 Dev Module
Newbiely.ino
···
8 Serial.println("Hello World!");
Output
Serial Monitor
Message (Enter to send message to 'ESP32C3 Dev Module' on 'COM15')
New Line
9600 baud
I2C Scanner Scanning... I2C device found at address 0x3C ! done Scanning... I2C device found at address 0x3C ! done Scanning... I2C device found at address 0x3C ! done
Ln 11, Col 1
ESP32C3 Dev Module on COM15
2

Anwendungs- und Projektideen

Hier sind einige praktische Projekte, die Sie mit Ihrem ESP32 C3 Super Mini und dem SSD1309-OLED-Display bauen können:

  • Wetterstationsanzeige mit Temperatur, Luftfeuchtigkeit und Vorhersagesymbolen
  • Echtzeituhr mit Datum, Uhrzeit und eigenen Alarmanzeigen
  • WLAN-Signalstärkemonitor mit visuellen Balkendiagrammen
  • IoT-Sensor-Dashboard, das mehrere Sensorwerte anzeigt
  • Musikplayer-Oberfläche mit Liedtitel, Interpret und Wiedergabesteuerung
  • Systemmonitor mit CPU-Auslastung, Speicher und Netzwerkstatus
  • Spielkonsole für einfache pixelbasierte Spiele wie Snake oder Pong
  • Laufschrift-Nachrichtentafel für Benachrichtigungen und Warnungen

Video-Tutorial

Sehen Sie sich das folgende Video an, um eine visuelle Schritt-für-Schritt-Anleitung zu diesem Projekt zu erhalten.

...VIDEO 5yFyA1jrNuk

...VIDEO

Herausforderungen

Bringen Sie Ihre Fähigkeiten mit dem SSD1309-OLED am ESP32 C3 Super Mini mit diesen Herausforderungen auf die nächste Stufe:

  • Einfach: Ändern Sie das Hello-World-Beispiel so, dass es Ihren Namen und Ihr Lieblings-Emoji in verschiedenen Textgrößen anzeigt
  • Einfach: Erstellen Sie eine einfache Digitaluhr, die Stunden, Minuten und Sekunden in großer Schrift anzeigt
  • Mittel: Bauen Sie eine Temperaturanzeige, die die Messwerte eines DHT11-Sensors mit einem grafischen Thermometer darstellt
  • Mittel: Entwerfen Sie einen animierten Ladebalken, der sich mithilfe von Rechtecken von links nach rechts füllt
  • Fortgeschritten: Erstellen Sie ein Menüsystem mit mehreren Seiten, durch die Sie mit Tastern navigieren können
  • Fortgeschritten: Bauen Sie ein Echtzeit-Diagramm, das Sensordaten über den 128x64-Bildschirm scrollt
  • Fortgeschritten: Entwerfen Sie eine Bitmap-Animation, die mehrere Einzelbilder durchläuft, um Bewegung zu erzeugen

※ UNSERE NACHRICHTEN

  • Sie können gerne den Link zu diesem Tutorial teilen. Bitte verwenden Sie jedoch unsere Inhalte nicht auf anderen Websites. Wir haben viel Mühe und Zeit in die Erstellung der Inhalte investiert, bitte respektieren Sie unsere Arbeit!