Arduino UNO Q - SSD1309 OLED Display (2.42 Zoll)

In diesem Tutorial erfahren Sie, wie Sie ein 2,42-Zoll-SSD1309-OLED-128x64-Display mit Arduino UNO Q verwenden — vom grundlegenden Text und Grafiken bis hin zur Fernsteuerung über Telegram.

Arduino UNO Q - SSD1309 OLED Display 2.42 inch

Erforderliche Hardware

1×Arduino UNO Q
1×USB-Kabel für Arduino Uno Q
1×SSD1309 I2C OLED-Display 128x64 (2,42 Zoll)
1×Jumper-Drähte
1×(Empfohlen) Schraubklemmenblock-Shield für Arduino Uno
1×(Empfohlen) Sensors/Servo Expansion Shield for Arduino Uno
1×(Empfohlen) Breadboard-Shield für Arduino Uno
1×(Empfohlen) Gehäuse für Arduino Uno
1×(Empfohlen) Prototyping-Grundplatte & Breadboard-Kit für Arduino Uno

Oder Sie können die folgenden Kits kaufen:

1×DIYables Sensor-Kit (18 Sensoren/Displays)
Offenlegung: Einige der in diesem Abschnitt bereitgestellten Links sind Amazon-Affiliate-Links. Wir können eine Provision für Käufe erhalten, die über diese Links getätigt werden, ohne zusätzliche Kosten für Sie. Wir schätzen Ihre Unterstützung.

Über die SSD1309 2,42-Zoll-OLED-Anzeige

Das SSD1309 ist ein 128×64-OLED-Treiber-IC, das häufig auf 2,42-Zoll-I2C-OLED-Modulen (manchmal auch als 2,4-Zoll bezeichnet) zu finden ist. Es ist registerkompatibel mit dem SSD1306, verwendet jedoch eine externe VCC-Schiene (die vom integrierten Boost-Konverter der Breakout-Platine transparent behandelt wird). Wichtigste Merkmale:

  • Auflösung: 128 × 64 Pixel
  • Schnittstelle: I2C (nur 4 Drähte erforderlich)
  • Displayfarbe: Weiß, Blau oder Gelb je nach OLED-Material — nicht softwaregesteuert
  • Betrachtungswinkel: Groß, selbstleuchtende Pixel — tiefe Schwarztöne, keine Hintergrundbeleuchtung erforderlich
  • Bibliothek: Verwendet DIYables_OLED_SSD1309 (erweitert Adafruit GFX)

SSD1309 OLED Pinbelegung

  • GND — mit GND verbinden
  • VCC — mit 5V verbinden
  • SCL — I2C-Taktsignal
  • SDA — I2C-Datensignal
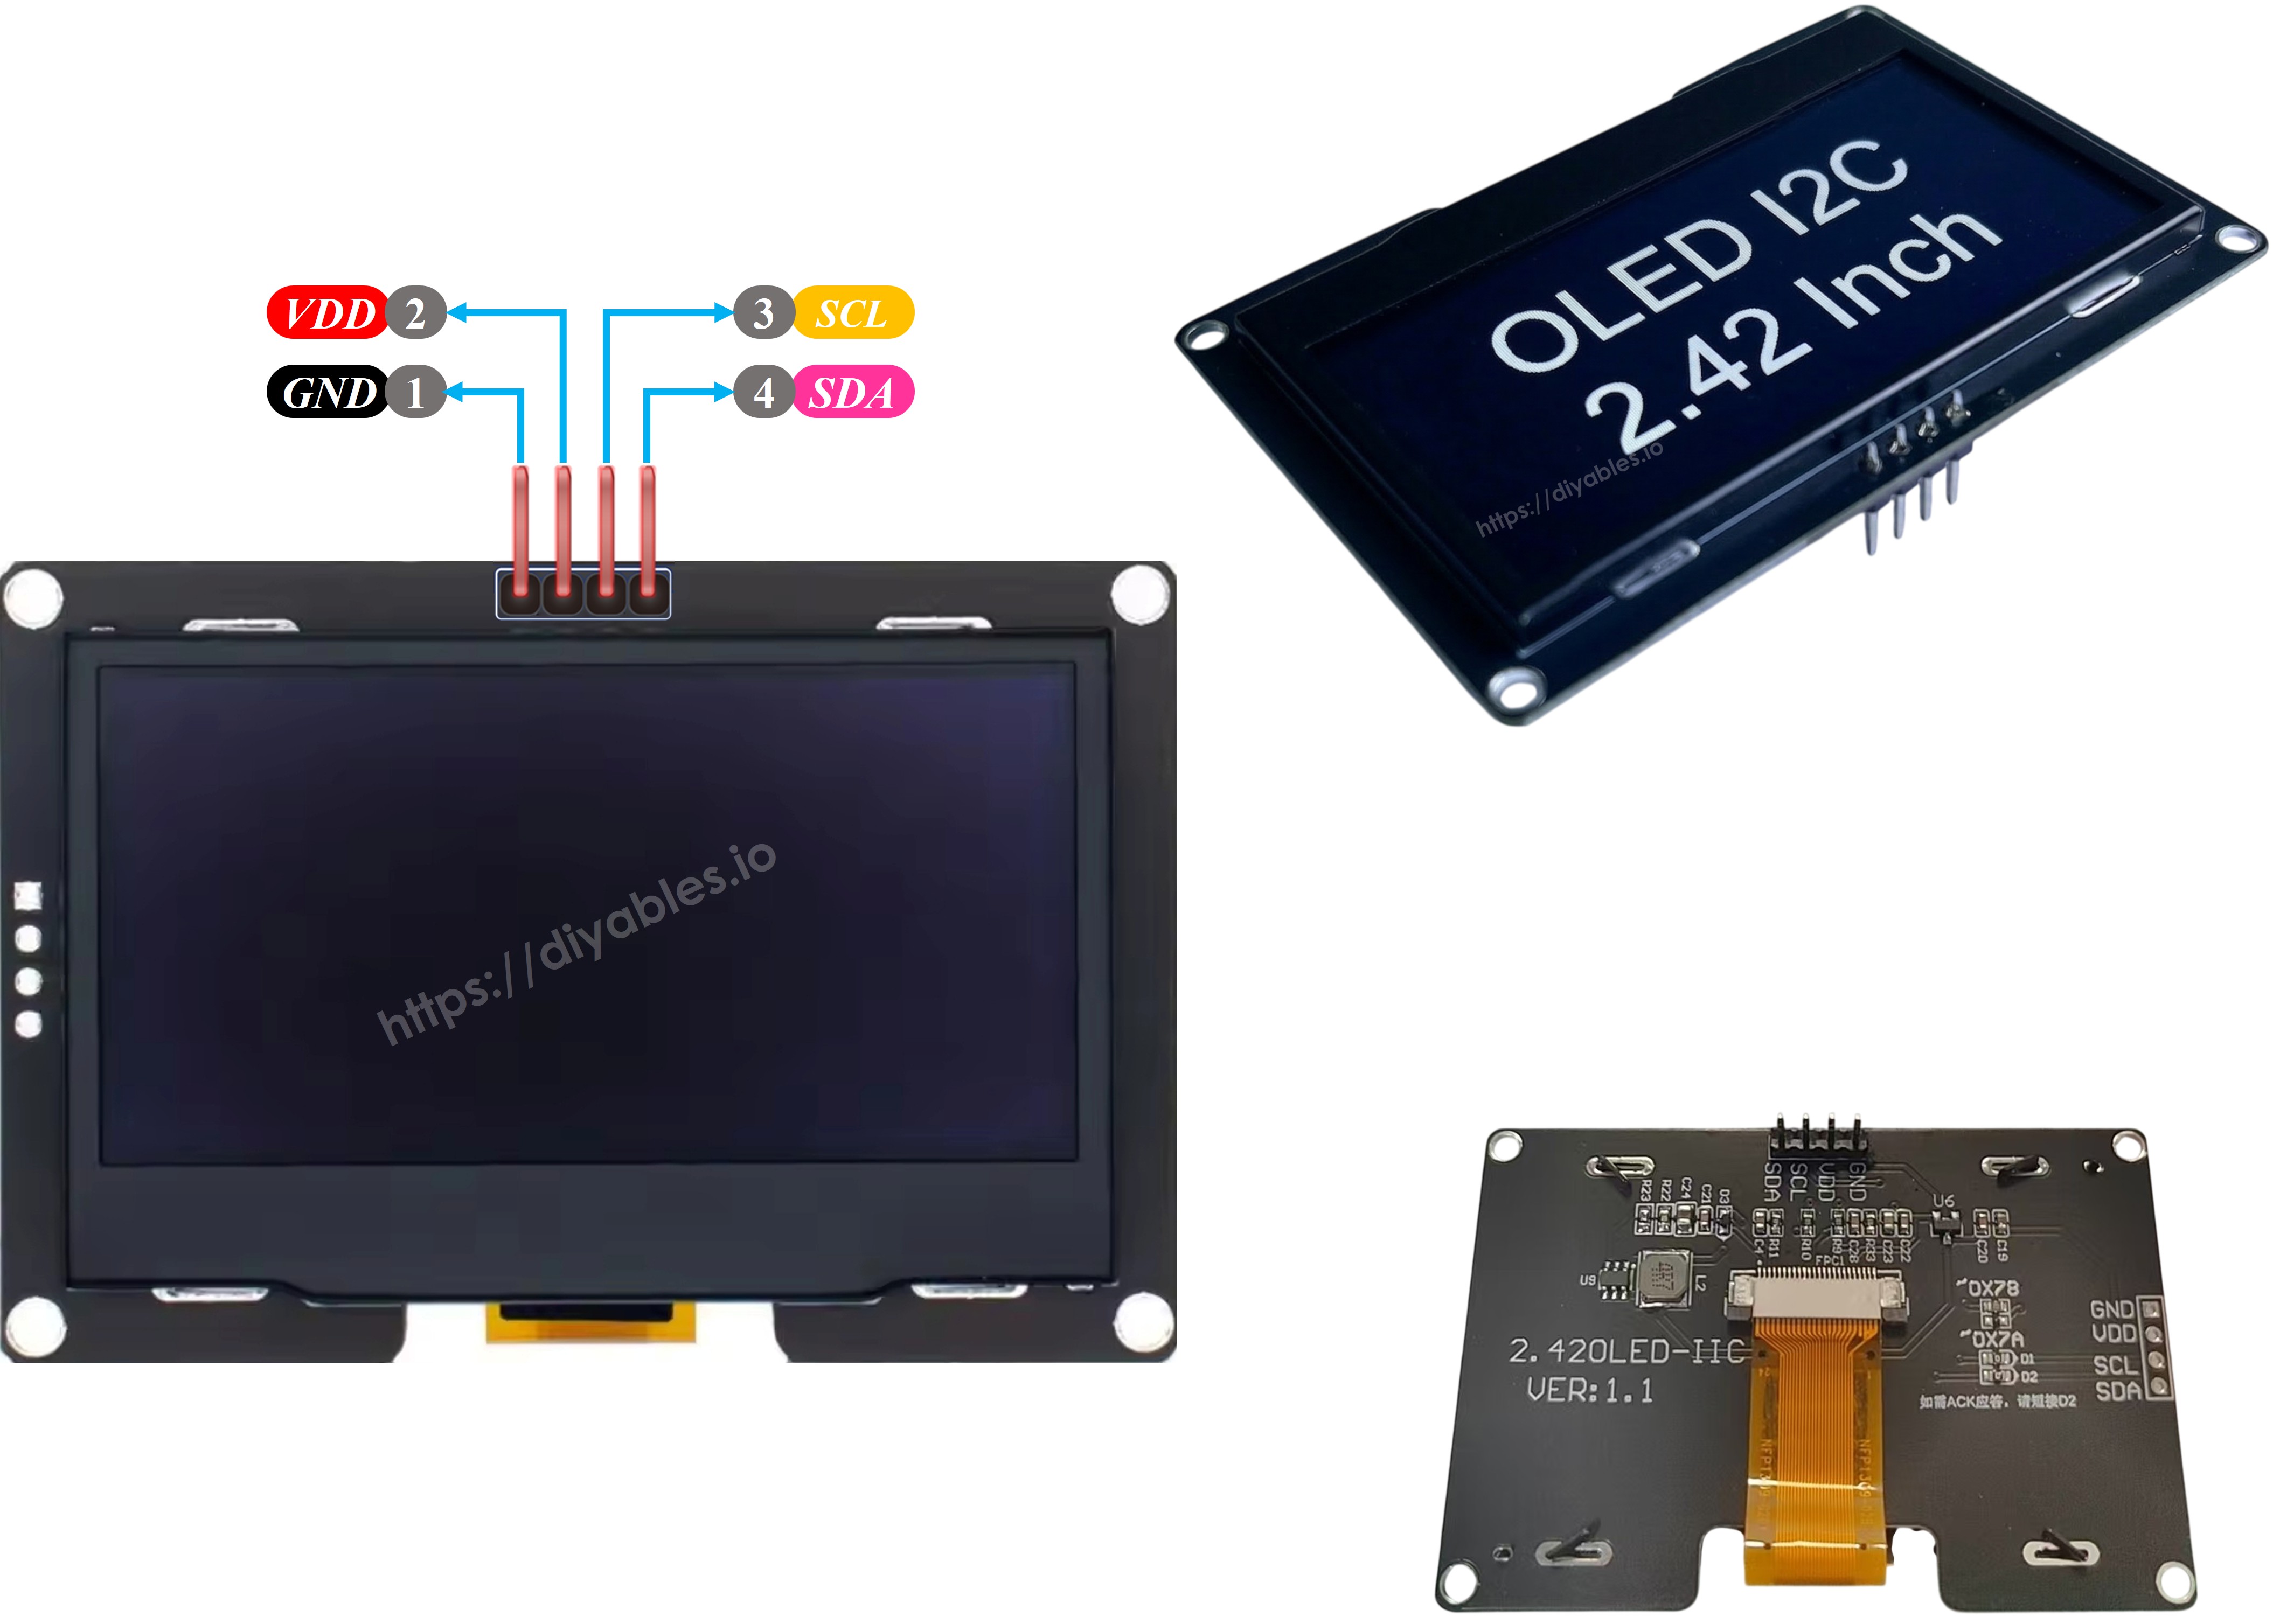
SSD1309 OLED Pinbelegung

※ Notiz:

Die Pin-Reihenfolge kann je nach Hersteller unterschiedlich sein. Beachten Sie immer die Beschriftungen auf dem OLED-Modul.

Schaltplan

Arduino UNO Q SSD1309 OLED Schaltplan

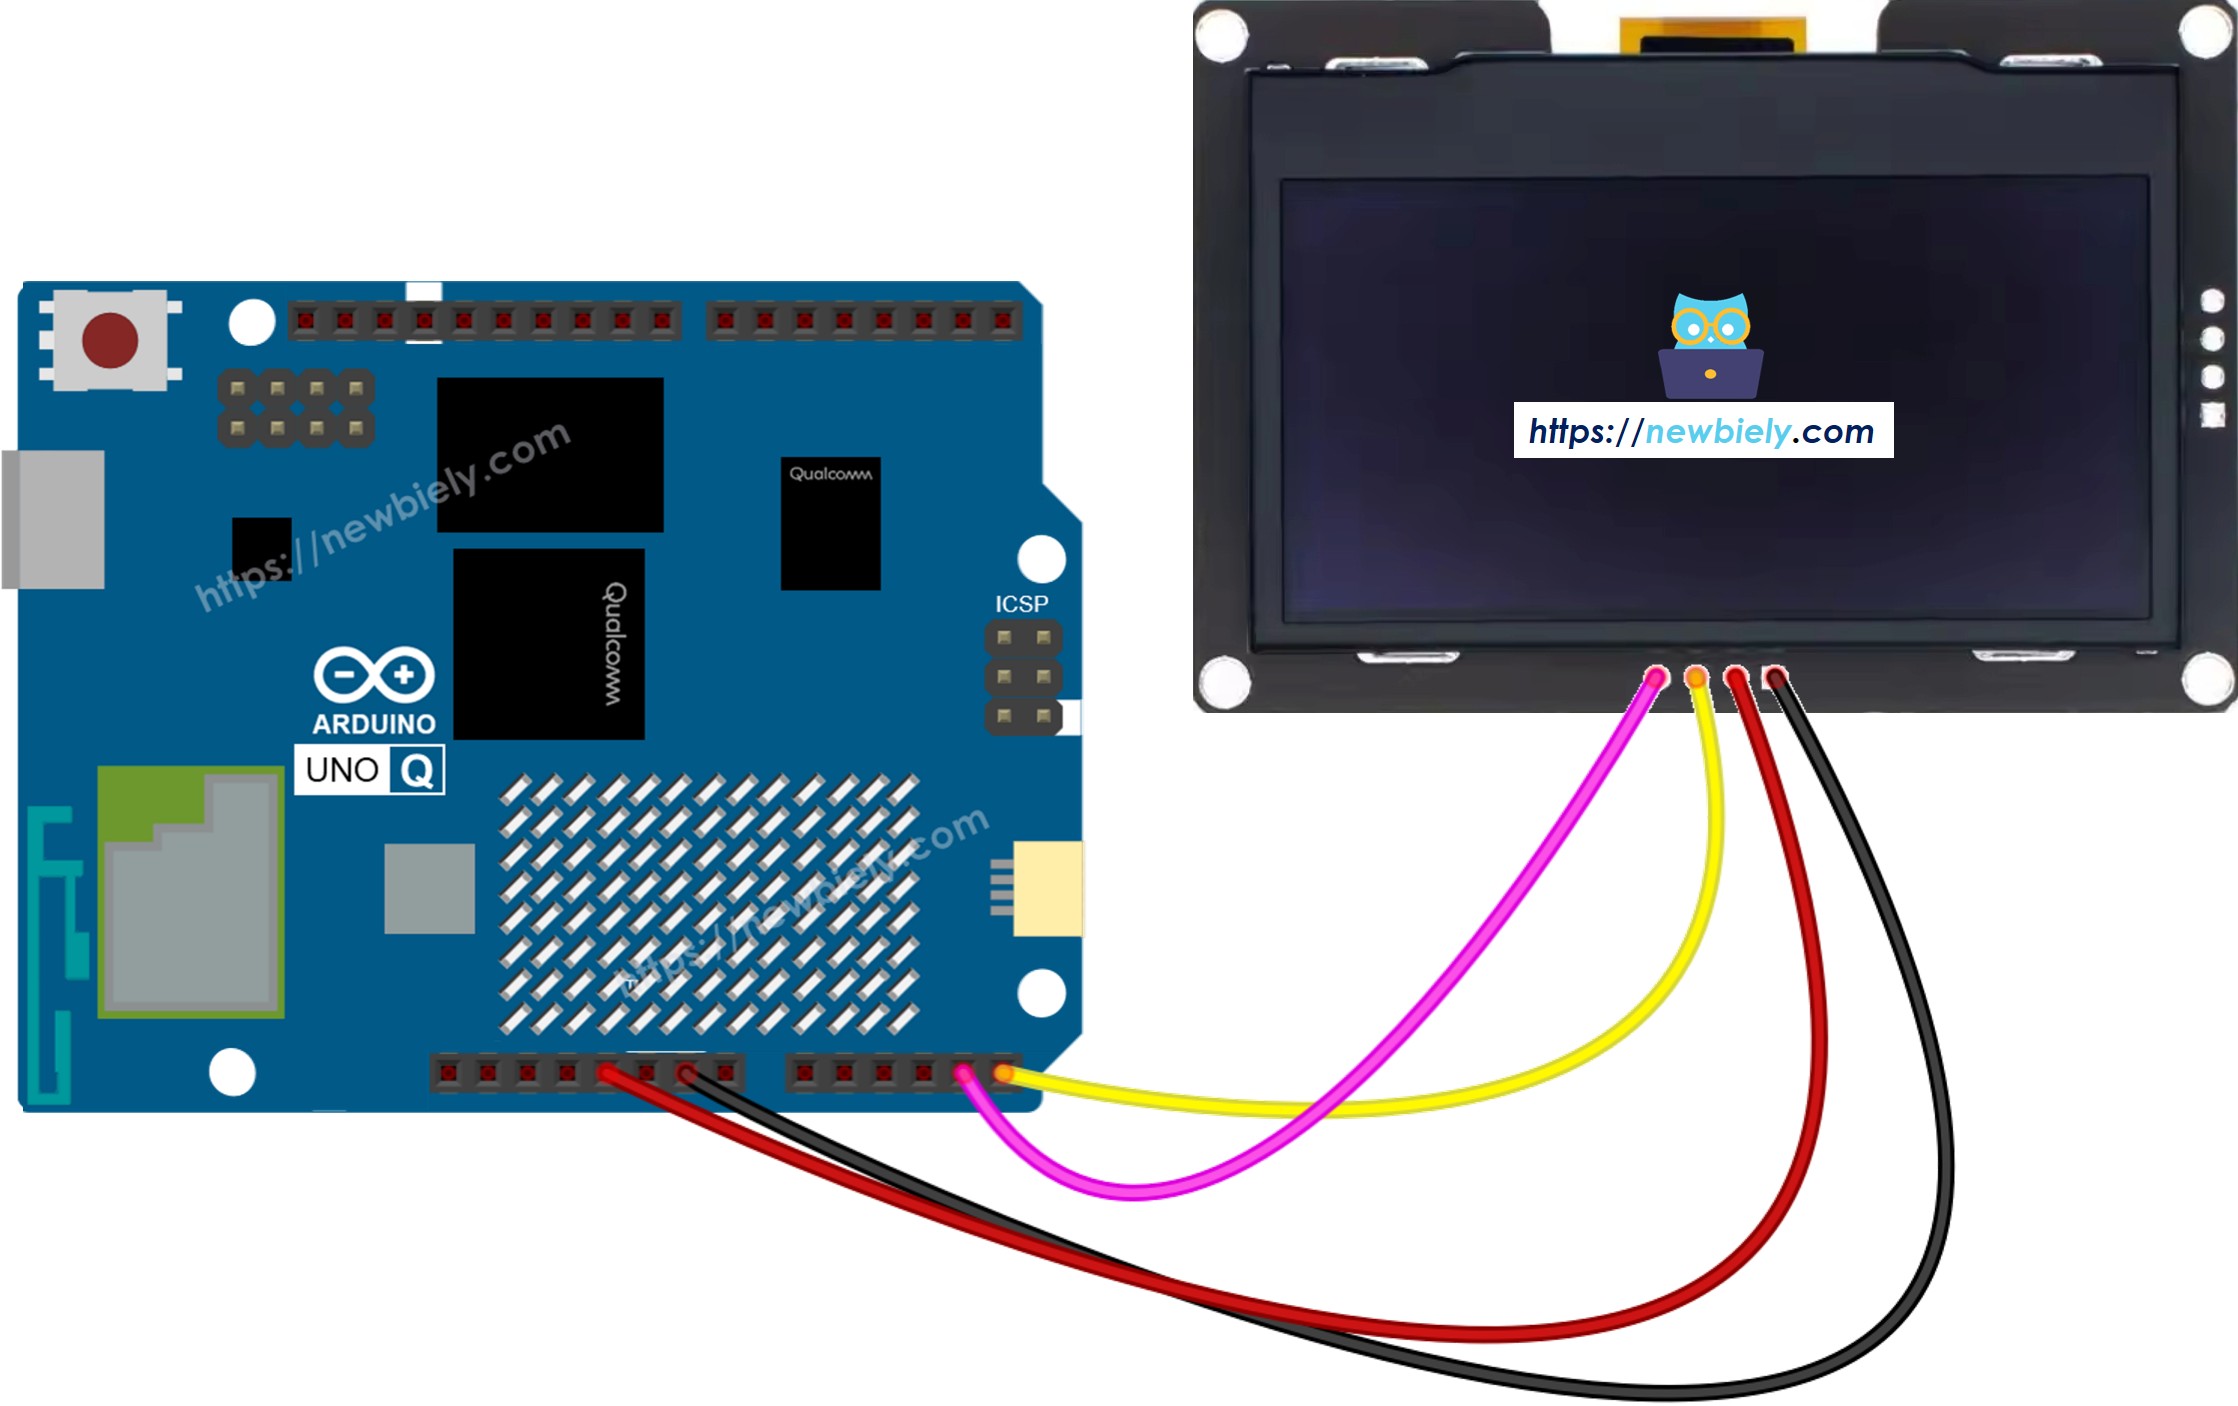
Dieses Bild wurde mit Fritzing erstellt. Klicken Sie, um das Bild zu vergrößern.

OLED-PinArduino UNO Q Pin
GNDGND
VCC5V
SCLSCL
SDASDA

So programmieren Sie die SSD1309 OLED

  • Bibliotheken einbinden:
#include <Wire.h> #include <Adafruit_GFX.h> #include <DIYables_OLED_SSD1309.h>
  • Display-Objekt erstellen:
#define SCREEN_WIDTH 128 #define SCREEN_HEIGHT 64 #define OLED_RESET -1 #define SCREEN_ADDRESS 0x3C DIYables_OLED_SSD1309 display(SCREEN_WIDTH, SCREEN_HEIGHT, &Wire, OLED_RESET);
  • In setup() initialisieren:
if (!display.begin(SSD1309_SWITCHCAPVCC, SCREEN_ADDRESS)) { while (true); // halt if display not found } display.clearDisplay();
  • Text anzeigen:
display.setTextSize(2); display.setTextColor(SSD1309_PIXEL_ON); display.setCursor(0, 0); display.println("Hello!"); display.display(); // push buffer to screen — required!

※ Notiz:

Rufen Sie immer display.display() nach Zeichnungsbefehlen auf, um den Puffer zum physischen Bildschirm zu übertragen.

Arduino UNO Q-Code — Hallo Welt auf SSD1309 OLED

Das Arduino UNO Q hat zwei Prozessoren: die STM32-MCU (verarbeitet Echtzeit-Hardware-Steuerung) und die Qualcomm-MPU (führt Debian Linux aus). In diesem Abschnitt wird nur die STM32-MCU programmiert — die Linux-Seite bleibt untätig. Ein späterer Abschnitt zeigt, wie beide Prozessoren zusammenarbeiten.

Die folgende Skizze zeigt Text in zwei verschiedenen Größen auf der OLED.

/* * Dieser Arduino UNO Q Code wurde von newbiely.de entwickelt * Dieser Arduino UNO Q Code wird der Öffentlichkeit ohne jegliche Einschränkung zur Verfügung gestellt. * Für vollständige Anleitungen und Schaltpläne besuchen Sie bitte: * https://newbiely.de/tutorials/arduino-uno-q/arduino-uno-q-ssd1309-oled-display */ #include <Wire.h> #include <Adafruit_GFX.h> #include <DIYables_OLED_SSD1309.h> #define SCREEN_WIDTH 128 #define SCREEN_HEIGHT 64 #define OLED_RESET -1 #define SCREEN_ADDRESS 0x3C DIYables_OLED_SSD1309 display(SCREEN_WIDTH, SCREEN_HEIGHT, &Wire, OLED_RESET); void setup() { Monitor.begin(9600); if (!display.begin(SSD1309_SWITCHCAPVCC, SCREEN_ADDRESS)) { Monitor.println(F("SSD1309 allocation failed")); for (;;); } display.clearDisplay(); display.setTextSize(1); // 6x8 pixels per character display.setTextColor(SSD1309_PIXEL_ON); // turn pixels on display.setCursor(0, 0); display.println(F("Hello, World!")); display.println(); display.setTextSize(2); // 12x16 pixels per character display.println(F("DIYables")); display.setTextSize(1); display.println(); display.println(F("SSD1309 OLED 128x64")); display.display(); // push buffer to screen } void loop() {}

Schnelle Schritte

  • Erste Male mit Arduino UNO Q? Folgen Sie dem Tutorial Erste Schritte mit Arduino UNO Q, um Ihre Entwicklungsumgebung vorzubereiten, bevor Sie fortfahren.
  • Verdrahten Sie die OLED: Verbinden Sie GND→GND, VCC→5V, SCL→SCL, SDA→SDA.
  • Verbinden: Stecken Sie das Arduino UNO Q mit einem USB-C-Kabel an Ihren Computer an.
  • Arduino App Lab öffnen: Starten Sie Arduino App Lab und warten Sie, bis es Ihr Arduino UNO Q erkennt.
  • Neue App erstellen: Klicken Sie auf die Schaltfläche Neue App erstellen.
Neue App in Arduino App Lab auf Arduino UNO Q erstellen
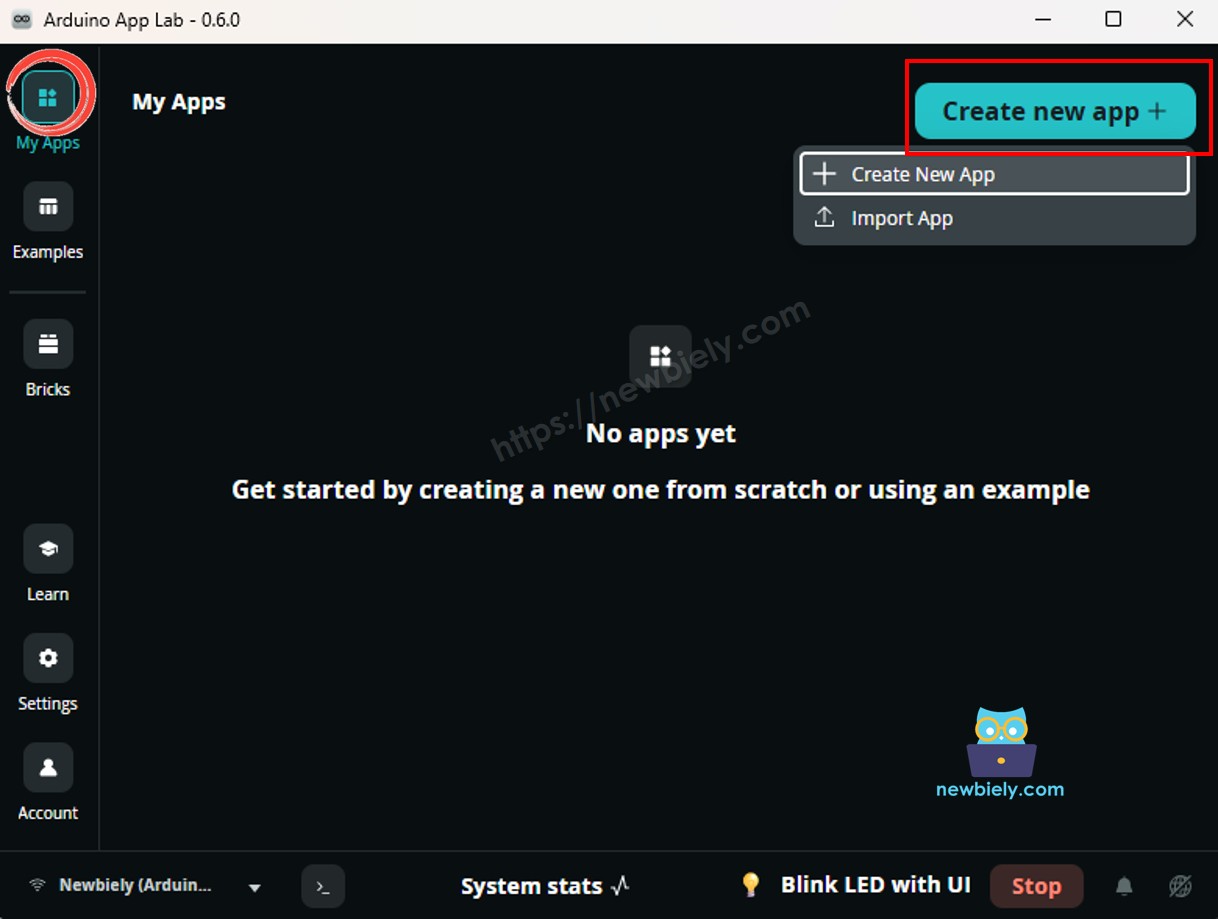
  • Geben Sie der App einen Namen, z. B.: DIYables_SSD1309
  • Klicken Sie auf Erstellen, um zu bestätigen.
  • Sie sehen einen Satz von Ordnern und Dateien, die in Ihrer neuen App generiert werden.
Arduino App Lab App-Ordner und Dateien auf Arduino UNO Q
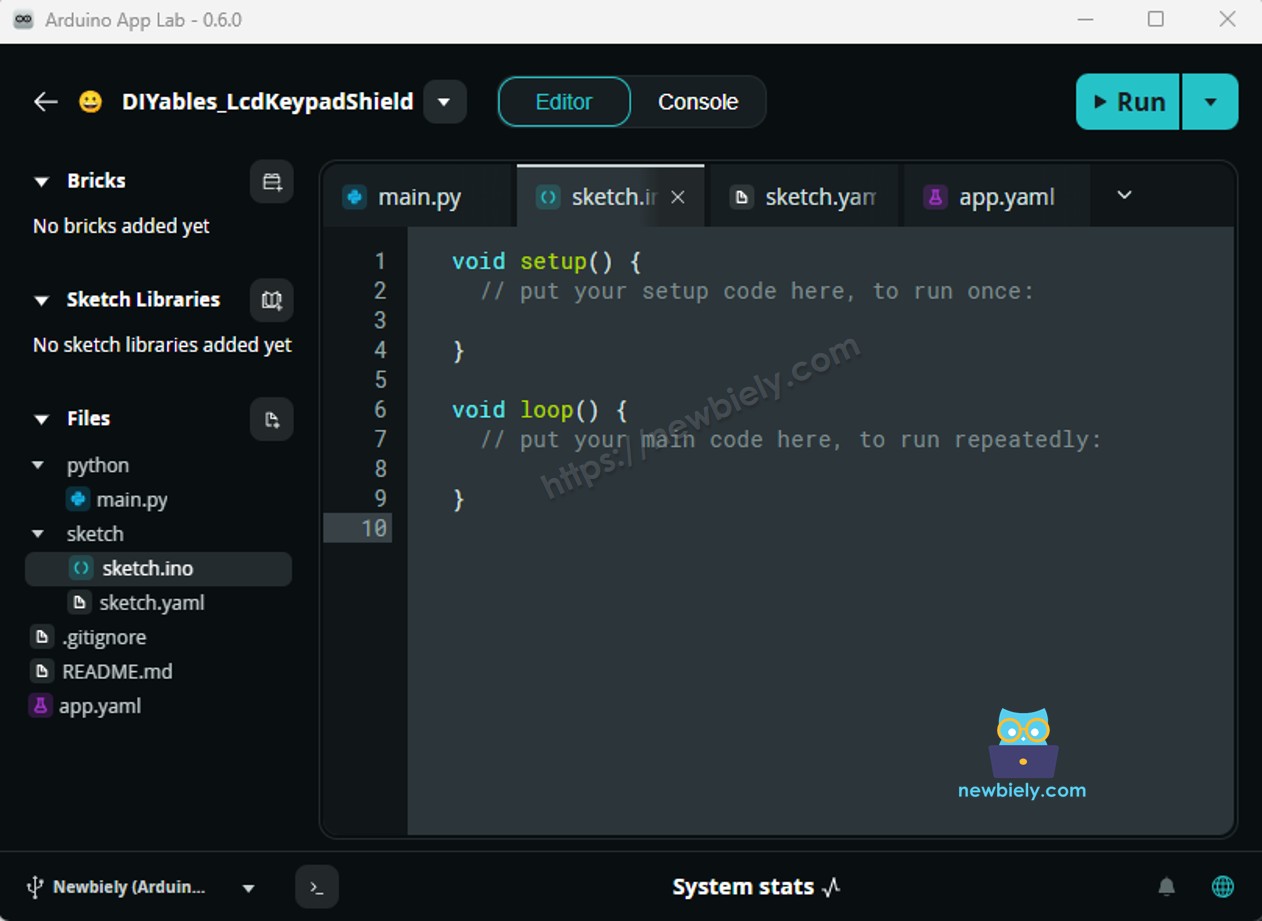
  • Suchen Sie die Datei sketch/sketch.ino — hier fügen Sie die MCU-Skizze ein.
  • Skizze einfügen: Kopieren Sie den MCU-Code oben und fügen Sie ihn in die Skizzendatei ein.
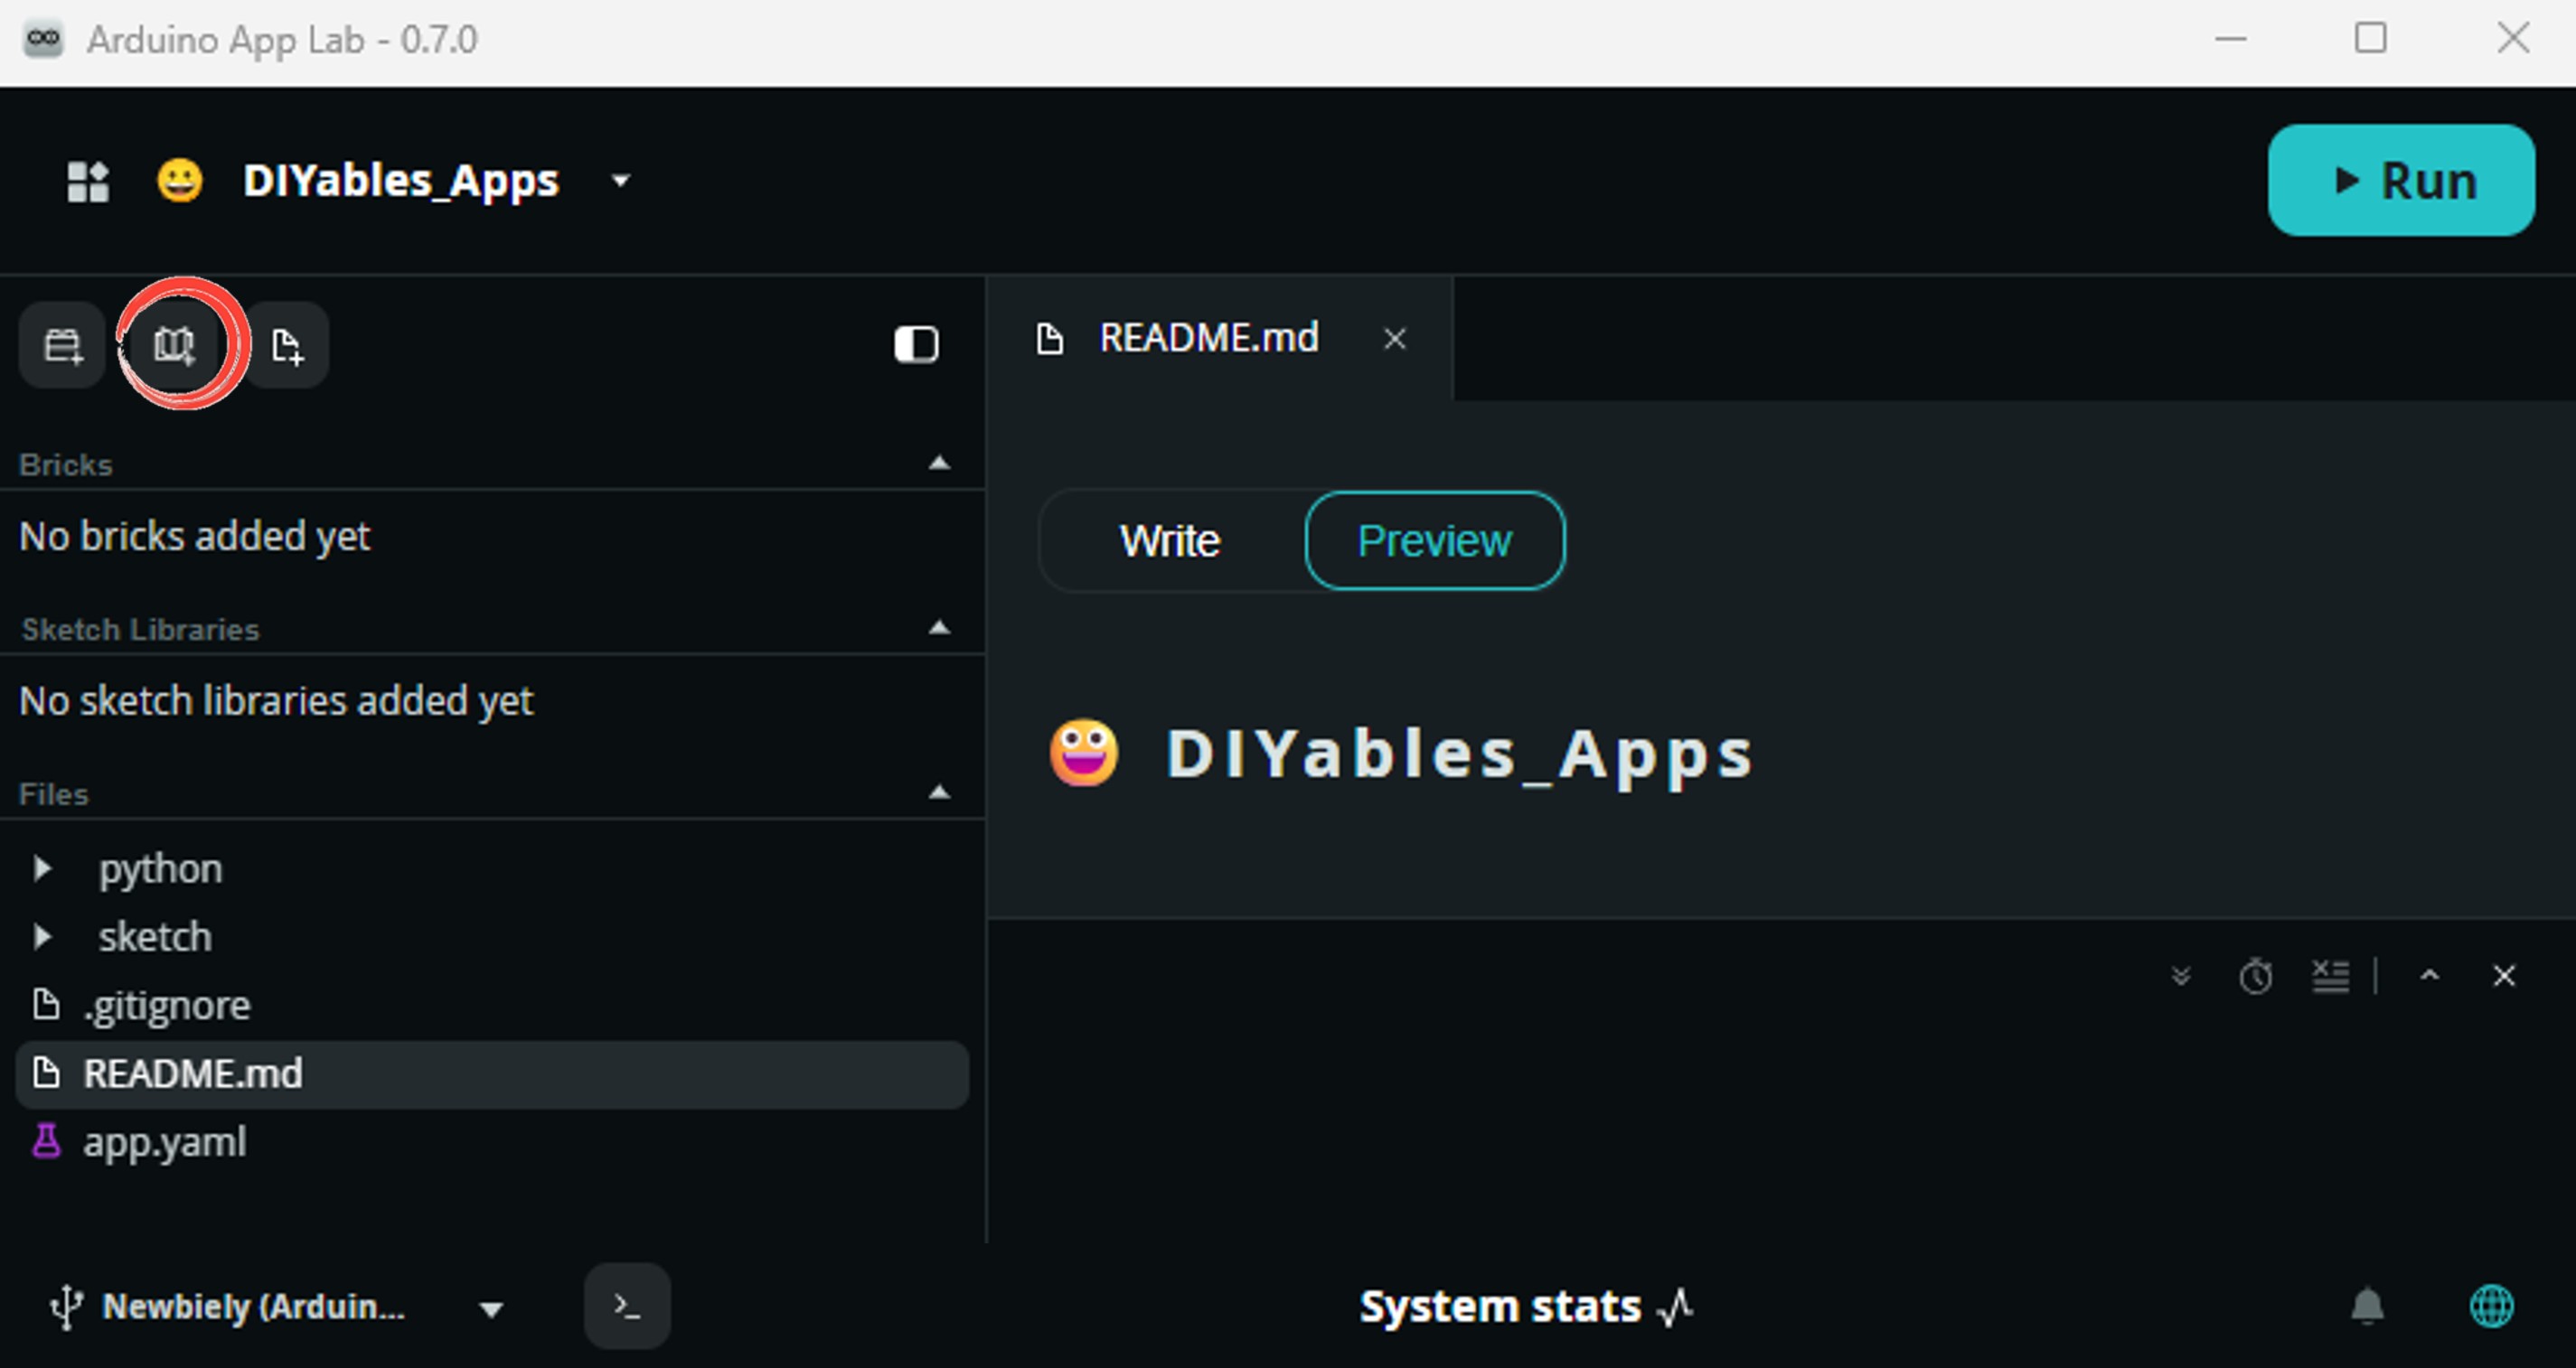
    • Install the library: Click the Add sketch library button (the open book icon with a + sign) in the left sidebar.
    Add sketch library in Arduino App Lab on Arduino UNO Q
    • Search for Arduino_RouterBridge created by Arduino and click the Install button.
    My Apps / DIYables Apps
    Run
    Bricks
    No bricks added...
    Sketch Libraries
    No sketch libra...
    Files
    python
    sketch
    .gitignore
    README.md
    app.yaml
    sketch.ino
    Add sketch library
    Arduino_RouterBridge Arduino

    This library provides a simple RPC bridge for Arduino UNO Q boards, allowing communication between the board and other devices using MsgPack serialization.

    0.4.1
    Install
    More Info
    • Search for DIYables_OLED_SSD1309 created by DIYables and click the Install button.
    My Apps / DIYables Apps
    Run
    Bricks
    No bricks added...
    Sketch Libraries
    No sketch libra...
    Files
    python
    sketch
    .gitignore
    README.md
    app.yaml
    sketch.ino
    Add sketch library
    DIYables_OLED_SSD1309 DIYables

    Supports 128x64 and 128x32 SSD1309-based monochrome OLED displays over I2C. API compatible with Adafruit_SSD1306. Extends Adafruit_GFX for full graphics support. Works with all Arduino-compatible boards.

    1.0.2
    Install
    More Info
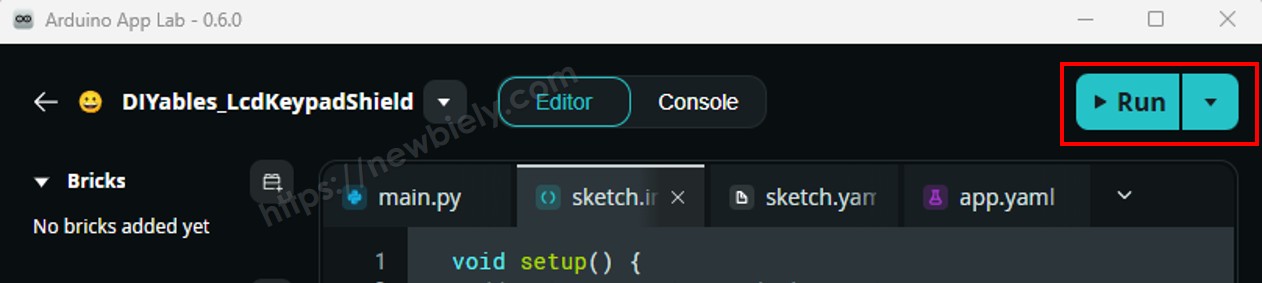
    • Hochladen: Klicken Sie in Arduino App Lab auf die Schaltfläche Ausführen, um zu kompilieren und auf die STM32 hochzuladen.
    Klicken Sie in Arduino App Lab auf Arduino UNO Q auf die Schaltfläche Ausführen

    Schauen Sie auf die OLED — sie zeigt "Hello, World!", "DIYables" und "SSD1309 OLED 128x64"!

    Arduino UNO Q-Code — Text auf SSD1309 OLED anzeigen

    Dieses Beispiel zeigt verschiedene Textgrößen und wie Sie Ganzzahlen, Gleitkommazahlen und Hexadezimalzahlen auf der OLED anzeigen.

    /* * Dieser Arduino UNO Q Code wurde von newbiely.de entwickelt * Dieser Arduino UNO Q Code wird der Öffentlichkeit ohne jegliche Einschränkung zur Verfügung gestellt. * Für vollständige Anleitungen und Schaltpläne besuchen Sie bitte: * https://newbiely.de/tutorials/arduino-uno-q/arduino-uno-q-ssd1309-oled-display */ #include <Wire.h> #include <Adafruit_GFX.h> #include <DIYables_OLED_SSD1309.h> #define SCREEN_WIDTH 128 #define SCREEN_HEIGHT 64 #define OLED_RESET -1 #define SCREEN_ADDRESS 0x3C DIYables_OLED_SSD1309 display(SCREEN_WIDTH, SCREEN_HEIGHT, &Wire, OLED_RESET); void setup() { Monitor.begin(9600); if (!display.begin(SSD1309_SWITCHCAPVCC, SCREEN_ADDRESS)) { Monitor.println(F("SSD1309 allocation failed")); for (;;); } delay(2000); display.clearDisplay(); display.setTextSize(1); display.setTextColor(SSD1309_PIXEL_ON); display.setCursor(0, 10); display.println(F("Text size = 1")); display.display(); delay(2000); display.setTextSize(2); display.setCursor(0, 30); display.println(F("Size = 2")); display.display(); delay(2000); display.clearDisplay(); display.setTextSize(1); display.setCursor(0, 0); display.println(F("Display integer:")); display.println(12345); display.println(); display.println(F("Display float:")); display.println(1.2345); display.println(); display.println(F("Display HEX:")); display.println(0xABCD, HEX); display.display(); } void loop() {}

    Schnelle Schritte

    • Kopieren Sie den Code oben und fügen Sie ihn in sketch/sketch.ino ein.
    • Klicken Sie in Arduino App Lab auf die Schaltfläche Ausführen.
    Klicken Sie in Arduino App Lab auf Arduino UNO Q auf die Schaltfläche Ausführen

    Die OLED durchläuft Text-Größen-Demos und zeigt dann eine Ganzzahl, eine Gleitkommazahl und eine Hexadezimalzahl an.

    Nützliche Display-Funktionen Referenz

    Schnelle Referenz für häufig verwendete SSD1309-OLED-Funktionen:

    • display.clearDisplay() — Rahmenpuffer löschen (alle Pixel aus)
    • display.display() — Puffer zum Bildschirm übertragen — erforderlich nach jedem Zeichnungsbefehl
    • display.drawPixel(x, y, color) — ein einzelnes Pixel setzen oder löschen
    • display.setTextSize(n) — Schrift um Faktor *n* skalieren (1 = 6×8 px, 2 = 12×16 px, …)
    • display.setCursor(x, y) — Textkursor zu Pixelkoordinaten *(x, y)* verschieben
    • display.setTextColor(SSD1309_PIXEL_ON) — nur Textvordergrund (transparenter Hintergrund)
    • display.setTextColor(SSD1309_PIXEL_OFF, SSD1309_PIXEL_ON) — Text mit explizitem Hintergrund
    • display.println("message") — Zeichenkette drucken und zur nächsten Zeile gehen
    • display.println(number) — Ganzzahl in Dezimalformat drucken
    • display.println(number, HEX) — Ganzzahl in Hexadezimalformat drucken
    • display.startscrollright(start, stop) — Hardware-Scroll nach rechts zwischen Seiten
    • display.startscrollleft(start, stop) — Hardware-Scroll nach links
    • display.startscrolldiagright(start, stop) — diagonales Scrolling nach rechts
    • display.startscrolldiagleft(start, stop) — diagonales Scrolling nach links
    • display.stopscroll() — aktives Hardware-Scrolling stoppen
    • display.setContrast(value) — Helligkeit anpassen (0–255)
    • display.dim(true/false) — schnelle Dimm-Umschaltung
    • display.invertDisplay(true/false) — Hardware-Farb-Inversion

    Arduino UNO Q-Code — Formen auf SSD1309 OLED zeichnen

    Die DIYables_OLED_SSD1309-Bibliothek erbt von Adafruit_GFX und gibt Ihnen Pixel, Linien, Rechtecke, gefüllte Rechtecke, Kreise, gefüllte Kreise, Dreiecke, gefüllte Dreiecke und gerundete Rechtecke. Die folgende Skizze durchläuft alle Formen.

    /* * Dieser Arduino UNO Q Code wurde von newbiely.de entwickelt * Dieser Arduino UNO Q Code wird der Öffentlichkeit ohne jegliche Einschränkung zur Verfügung gestellt. * Für vollständige Anleitungen und Schaltpläne besuchen Sie bitte: * https://newbiely.de/tutorials/arduino-uno-q/arduino-uno-q-ssd1309-oled-display */ #include <Wire.h> #include <Adafruit_GFX.h> #include <DIYables_OLED_SSD1309.h> #define SCREEN_WIDTH 128 #define SCREEN_HEIGHT 64 #define OLED_RESET -1 #define SCREEN_ADDRESS 0x3C DIYables_OLED_SSD1309 display(SCREEN_WIDTH, SCREEN_HEIGHT, &Wire, OLED_RESET); void setup() { Monitor.begin(9600); if (!display.begin(SSD1309_SWITCHCAPVCC, SCREEN_ADDRESS)) { Monitor.println(F("SSD1309 allocation failed")); for (;;); } display.clearDisplay(); } void loop() { // --- Pixels --- display.clearDisplay(); for (int16_t i = 0; i < display.width(); i += 4) { display.drawPixel(i, i * display.height() / display.width(), SSD1309_PIXEL_ON); } display.display(); delay(1500); // --- Lines --- display.clearDisplay(); for (int16_t i = 0; i < display.width(); i += 8) { display.drawLine(0, 0, i, display.height() - 1, SSD1309_PIXEL_ON); } for (int16_t i = 0; i < display.height(); i += 8) { display.drawLine(0, 0, display.width() - 1, i, SSD1309_PIXEL_ON); } display.display(); delay(1500); // --- Rectangles --- display.clearDisplay(); for (int16_t i = 0; i < display.height() / 2; i += 4) { display.drawRect(i, i, display.width() - 2 * i, display.height() - 2 * i, SSD1309_PIXEL_ON); } display.display(); delay(1500); // --- Filled rectangles (inverse) --- display.clearDisplay(); for (int16_t i = 0; i < display.height() / 2; i += 6) { display.fillRect(i, i, display.width() - 2 * i, display.height() - 2 * i, SSD1309_PIXEL_INVERSE); } display.display(); delay(1500); // --- Circles --- display.clearDisplay(); for (int16_t i = max(display.width(), display.height()) / 2; i > 0; i -= 5) { display.drawCircle(display.width() / 2, display.height() / 2, i, SSD1309_PIXEL_ON); } display.display(); delay(1500); // --- Filled circles (inverse) --- display.clearDisplay(); for (int16_t i = max(display.width(), display.height()) / 2; i > 0; i -= 6) { display.fillCircle(display.width() / 2, display.height() / 2, i, SSD1309_PIXEL_INVERSE); } display.display(); delay(1500); // --- Rounded rectangles --- display.clearDisplay(); for (int16_t i = 0; i < display.height() / 2 - 2; i += 4) { display.drawRoundRect(i, i, display.width() - 2 * i, display.height() - 2 * i, display.height() / 4, SSD1309_PIXEL_ON); } display.display(); delay(1500); // --- Filled rounded rectangles (inverse) --- display.clearDisplay(); for (int16_t i = 0; i < display.height() / 2 - 2; i += 4) { display.fillRoundRect(i, i, display.width() - 2 * i, display.height() - 2 * i, display.height() / 4, SSD1309_PIXEL_INVERSE); } display.display(); delay(1500); // --- Triangles --- display.clearDisplay(); for (int16_t i = 0; i < max(display.width(), display.height()) / 2; i += 5) { display.drawTriangle( display.width() / 2, display.height() / 2 - i, display.width() / 2 - i, display.height() / 2 + i, display.width() / 2 + i, display.height() / 2 + i, SSD1309_PIXEL_ON); } display.display(); delay(1500); // --- Filled triangles (inverse) --- display.clearDisplay(); for (int16_t i = max(display.width(), display.height()) / 2; i > 0; i -= 6) { display.fillTriangle( display.width() / 2, display.height() / 2 - i, display.width() / 2 - i, display.height() / 2 + i, display.width() / 2 + i, display.height() / 2 + i, SSD1309_PIXEL_INVERSE); } display.display(); delay(1500); }

    Schnelle Schritte

    • Kopieren Sie den Code oben und fügen Sie ihn in sketch/sketch.ino ein.
    • Klicken Sie in Arduino App Lab auf die Schaltfläche Ausführen.
    Klicken Sie in Arduino App Lab auf Arduino UNO Q auf die Schaltfläche Ausführen

    Beobachten Sie die OLED, wie sie alle Formen durchläuft — Pixel, Linien, Rechtecke, Kreise, gerundete Rechtecke und Dreiecke!

    Arduino UNO Q-Code — Hardware-Scrolling auf SSD1309 OLED

    Das SSD1309 hat eine integrierte Hardware-Scrolling-Engine, die Inhalte ohne CPU-Arbeit verschiebt. Die Bibliothek bietet vier Scroll-Richtungen: rechts, links, diagonal-rechts und diagonal-links.

    ※ Notiz:

    Rufen Sie immer display.display() auf, um Ihren Inhalt zum OLED zu übertragen, bevor Sie einen Scroll starten. Rufen Sie stopscroll() auf, bevor Sie neue Inhalte zeichnen.

    /* * Dieser Arduino UNO Q Code wurde von newbiely.de entwickelt * Dieser Arduino UNO Q Code wird der Öffentlichkeit ohne jegliche Einschränkung zur Verfügung gestellt. * Für vollständige Anleitungen und Schaltpläne besuchen Sie bitte: * https://newbiely.de/tutorials/arduino-uno-q/arduino-uno-q-ssd1309-oled-display */ #include <Wire.h> #include <Adafruit_GFX.h> #include <DIYables_OLED_SSD1309.h> #define SCREEN_WIDTH 128 #define SCREEN_HEIGHT 64 #define OLED_RESET -1 #define SCREEN_ADDRESS 0x3C DIYables_OLED_SSD1309 display(SCREEN_WIDTH, SCREEN_HEIGHT, &Wire, OLED_RESET); void setup() { Monitor.begin(9600); if (!display.begin(SSD1309_SWITCHCAPVCC, SCREEN_ADDRESS)) { Monitor.println(F("SSD1309 allocation failed")); for (;;); } display.clearDisplay(); display.setTextSize(2); display.setTextColor(SSD1309_PIXEL_ON); display.setCursor(10, 24); display.println(F("DIYables")); display.display(); delay(2000); } void loop() { // Scroll right across all pages display.startscrollright(0x00, 0x07); delay(3000); display.stopscroll(); delay(500); // Scroll left display.startscrollleft(0x00, 0x07); delay(3000); display.stopscroll(); delay(500); // Diagonal scroll right display.startscrolldiagright(0x00, 0x07); delay(3000); display.stopscroll(); delay(500); // Diagonal scroll left display.startscrolldiagleft(0x00, 0x07); delay(3000); display.stopscroll(); delay(500); }

    Schnelle Schritte

    • Kopieren Sie den Code oben und fügen Sie ihn in sketch/sketch.ino ein.
    • Klicken Sie in Arduino App Lab auf die Schaltfläche Ausführen.
    Klicken Sie in Arduino App Lab auf Arduino UNO Q auf die Schaltfläche Ausführen

    Die OLED scrollt "DIYables" nach rechts, links, diagonal-rechts und diagonal-links, sich wiederholend für immer.

    Arduino UNO Q-Code — Bitmap-Bild auf SSD1309 OLED anzeigen

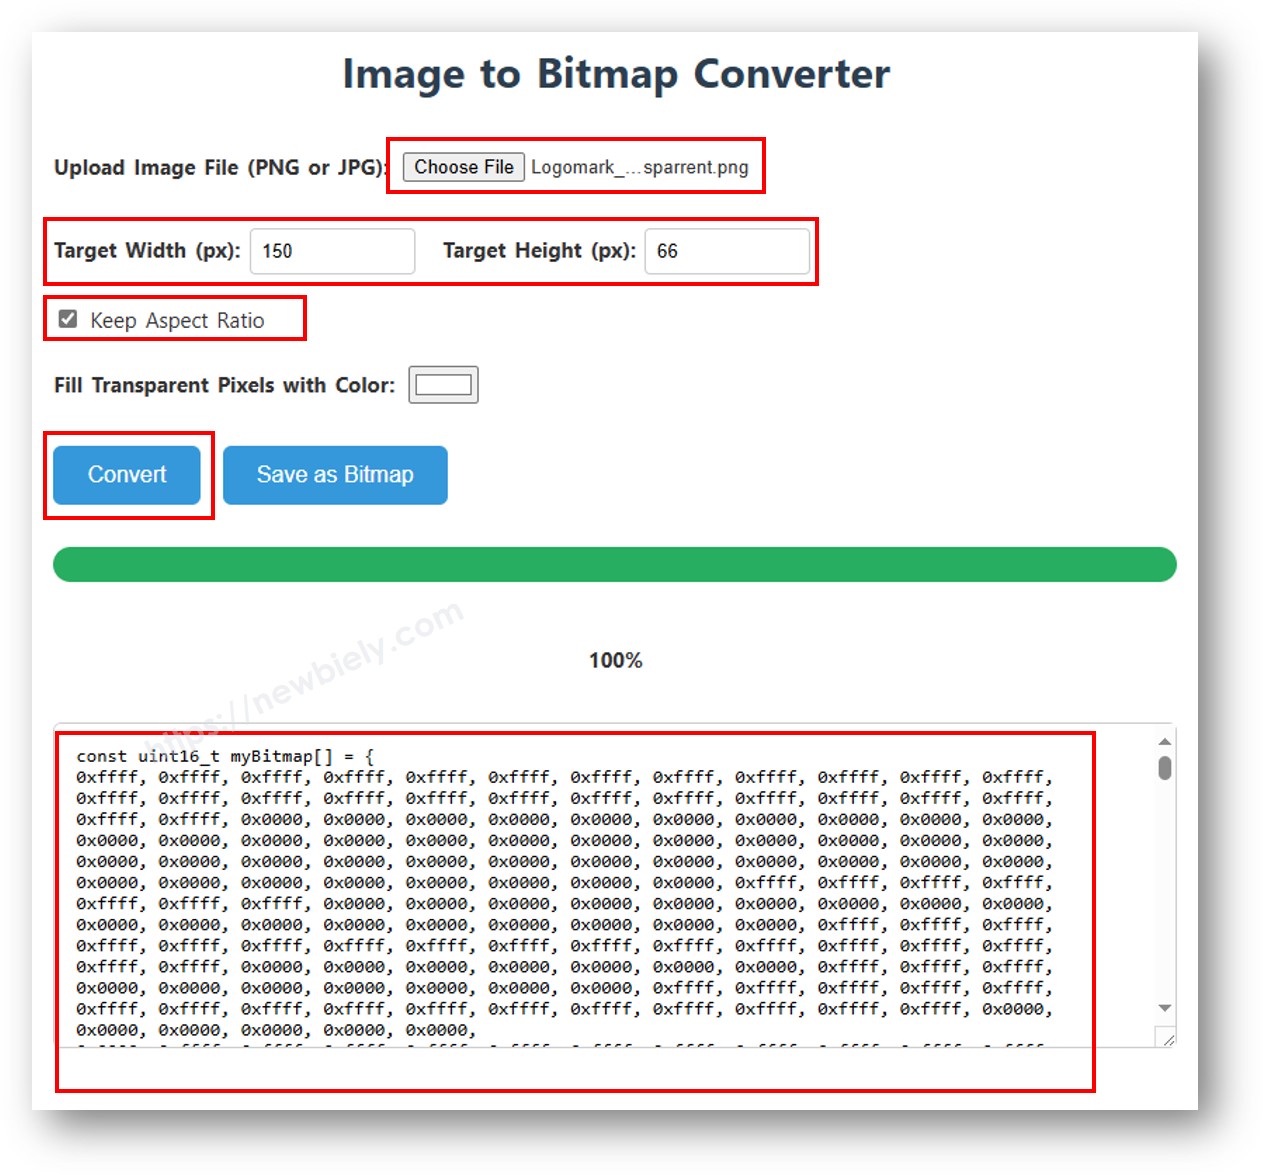
    Um ein Bitmap auf dem SSD1309 OLED anzuzeigen, müssen Sie Ihr Bild zunächst in ein C-Byte-Array konvertieren. Verwenden Sie das kostenlose Image to Bitmap Converter Tool:

    1. Laden Sie Ihre Bilddatei hoch (PNG, JPG, BMP, usw.).
    2. Stellen Sie die Leinwandgröße auf 128×64 (oder kleiner) ein.
    3. Wählen Sie Arduino code als Ausgabeformat.
    4. Kopieren Sie das generierte Array in Ihre Skizze.
    image to bitmap array

    Die folgende Skizze zeigt ein 16×16-Herz-Symbol und wechselt dann zum vollständigen 128×64-DIYables-Logo — beide als Byte-Arrays im Code gespeichert:

    /* * Dieser Arduino UNO Q Code wurde von newbiely.de entwickelt * Dieser Arduino UNO Q Code wird der Öffentlichkeit ohne jegliche Einschränkung zur Verfügung gestellt. * Für vollständige Anleitungen und Schaltpläne besuchen Sie bitte: * https://newbiely.de/tutorials/arduino-uno-q/arduino-uno-q-ssd1309-oled-display */ #include <Wire.h> #include <Adafruit_GFX.h> #include <DIYables_OLED_SSD1309.h> #define SCREEN_WIDTH 128 #define SCREEN_HEIGHT 64 #define OLED_RESET -1 #define SCREEN_ADDRESS 0x3C DIYables_OLED_SSD1309 display(SCREEN_WIDTH, SCREEN_HEIGHT, &Wire, OLED_RESET); // 16x16 heart bitmap const unsigned char heart16x16[] PROGMEM = { 0x00, 0x00, 0x03, 0xc0, 0x0f, 0xf0, 0x1f, 0xf8, 0x3f, 0xfc, 0x7f, 0xfe, 0xff, 0xff, 0xff, 0xff, 0xff, 0xff, 0xff, 0xff, 0x7f, 0xfe, 0x3f, 0xfc, 0x1f, 0xf8, 0x0f, 0xf0, 0x03, 0xc0, 0x00, 0x00 }; // 128x64 DIYables logo bitmap const unsigned char diyablesLogo[] PROGMEM = { 0xff, 0xff, 0xff, 0xff, 0xff, 0xff, 0xff, 0xff, 0xff, 0xff, 0xff, 0xff, 0xff, 0xff, 0xff, 0xff, 0xff, 0xff, 0xff, 0xff, 0xff, 0xff, 0xff, 0xff, 0xff, 0xff, 0xff, 0xff, 0xff, 0xff, 0xff, 0xff, 0xff, 0xff, 0xfe, 0x00, 0x07, 0xff, 0xff, 0xff, 0xff, 0xff, 0xff, 0x80, 0x01, 0xff, 0xff, 0xff, 0xff, 0xff, 0xe0, 0x00, 0x00, 0xff, 0xff, 0xff, 0xff, 0xff, 0xfc, 0x00, 0x00, 0x3f, 0xff, 0xff, 0xff, 0xff, 0x80, 0x00, 0x00, 0x1f, 0xff, 0xff, 0xff, 0xff, 0xe0, 0x00, 0x00, 0x07, 0xff, 0xff, 0xff, 0xfe, 0x00, 0x00, 0x00, 0x07, 0xff, 0xff, 0xff, 0xff, 0x80, 0x00, 0x00, 0x01, 0xff, 0xff, 0xff, 0xfc, 0x00, 0x00, 0x00, 0x03, 0xff, 0xff, 0xff, 0xff, 0x00, 0x00, 0x00, 0x00, 0xff, 0xff, 0xff, 0xf0, 0x00, 0x00, 0x00, 0x00, 0xff, 0xff, 0xff, 0xfc, 0x00, 0x00, 0x00, 0x00, 0x3f, 0xff, 0xff, 0xe0, 0x00, 0x00, 0x00, 0x00, 0x3f, 0xff, 0xff, 0xf0, 0x00, 0x00, 0x00, 0x00, 0x1f, 0xff, 0xff, 0xc0, 0x00, 0x00, 0x00, 0x00, 0x1f, 0xff, 0xff, 0xe0, 0x00, 0x00, 0x00, 0x00, 0x0f, 0xff, 0xff, 0x80, 0x00, 0x00, 0x00, 0x00, 0x0f, 0xff, 0xff, 0xc0, 0x00, 0x00, 0x00, 0x00, 0x07, 0xff, 0xff, 0x00, 0x00, 0x00, 0x00, 0x00, 0x03, 0xff, 0xff, 0x80, 0x00, 0x00, 0x00, 0x00, 0x03, 0xff, 0xfe, 0x00, 0x00, 0x00, 0x00, 0x00, 0x01, 0xff, 0xfe, 0x00, 0x00, 0x00, 0x00, 0x00, 0x01, 0xff, 0xfc, 0x00, 0x00, 0xff, 0xf0, 0x00, 0x00, 0xff, 0xfc, 0x00, 0x00, 0x3f, 0xfc, 0x00, 0x00, 0xff, 0xfc, 0x00, 0x03, 0xff, 0xfc, 0x00, 0x00, 0x7f, 0xf8, 0x00, 0x00, 0xff, 0xff, 0x00, 0x00, 0xff, 0xf8, 0x00, 0x0f, 0xff, 0xff, 0x00, 0x00, 0x3f, 0xf0, 0x00, 0x03, 0xff, 0xff, 0xc0, 0x00, 0x7f, 0xf0, 0x00, 0x1f, 0xff, 0xff, 0xc0, 0x00, 0x1f, 0xe0, 0x00, 0x0f, 0xff, 0xff, 0xe0, 0x00, 0x7f, 0xf0, 0x00, 0x7f, 0xff, 0xff, 0xe0, 0x00, 0x0f, 0xc0, 0x00, 0x1f, 0xff, 0xff, 0xf8, 0x00, 0x3f, 0xe0, 0x00, 0xff, 0xff, 0xff, 0xf8, 0x00, 0x07, 0x80, 0x00, 0x7f, 0xff, 0xff, 0xfc, 0x00, 0x1f, 0xe0, 0x00, 0xff, 0xff, 0xff, 0xfc, 0x00, 0x03, 0x80, 0x00, 0xff, 0xff, 0xff, 0xfc, 0x00, 0x1f, 0xc0, 0x01, 0xff, 0xff, 0xff, 0xfe, 0x00, 0x03, 0x00, 0x01, 0xff, 0xff, 0xff, 0xfe, 0x00, 0x1f, 0xc0, 0x03, 0xff, 0xff, 0xff, 0xff, 0x00, 0x00, 0x00, 0x03, 0xff, 0xff, 0xff, 0xff, 0x00, 0x0f, 0xc0, 0x03, 0xff, 0xff, 0xff, 0xff, 0x80, 0x00, 0x00, 0x07, 0xff, 0xf0, 0x7f, 0xff, 0x00, 0x0f, 0xc0, 0x07, 0xff, 0xff, 0xff, 0xff, 0xc0, 0x00, 0x00, 0x0f, 0xff, 0xf0, 0x7f, 0xff, 0x80, 0x0f, 0x80, 0x07, 0xff, 0xff, 0xff, 0xff, 0xe0, 0x00, 0x00, 0x1f, 0xff, 0xf0, 0x7f, 0xff, 0x80, 0x07, 0x80, 0x0f, 0xff, 0xff, 0xff, 0xff, 0xf0, 0x00, 0x00, 0x3f, 0xff, 0xf0, 0x7f, 0xff, 0xc0, 0x07, 0x80, 0x0f, 0xff, 0xff, 0xff, 0xff, 0xf8, 0x00, 0x00, 0x7f, 0xff, 0xf0, 0x7f, 0xff, 0xc0, 0x07, 0x80, 0x0f, 0xfe, 0x00, 0x00, 0xff, 0xfc, 0x00, 0x00, 0xff, 0xfc, 0x00, 0x03, 0xff, 0xc0, 0x07, 0x80, 0x0f, 0xfe, 0x00, 0x00, 0xff, 0xfe, 0x00, 0x01, 0xff, 0xfc, 0x00, 0x01, 0xff, 0xc0, 0x07, 0x80, 0x0f, 0xfe, 0x00, 0x00, 0xff, 0xff, 0x00, 0x03, 0xff, 0xfc, 0x00, 0x01, 0xff, 0xc0, 0x07, 0x80, 0x0f, 0xfe, 0x00, 0x00, 0xff, 0xff, 0x00, 0x03, 0xff, 0xfc, 0x00, 0x01, 0xff, 0xc0, 0x07, 0x80, 0x0f, 0xfe, 0x00, 0x00, 0xff, 0xff, 0x00, 0x03, 0xff, 0xfc, 0x00, 0x01, 0xff, 0xc0, 0x07, 0x80, 0x0f, 0xff, 0xff, 0xff, 0xff, 0xfe, 0x00, 0x01, 0xff, 0xff, 0xe0, 0x7f, 0xff, 0xc0, 0x07, 0x80, 0x0f, 0xff, 0xff, 0xff, 0xff, 0xfc, 0x00, 0x00, 0xff, 0xff, 0xf0, 0x7f, 0xff, 0xc0, 0x07, 0x80, 0x0f, 0xff, 0xff, 0xff, 0xff, 0xfc, 0x00, 0x00, 0xff, 0xff, 0xf0, 0x7f, 0xff, 0xc0, 0x07, 0x80, 0x0f, 0xff, 0xff, 0xff, 0xff, 0xf8, 0x00, 0x00, 0x7f, 0xff, 0xf0, 0x7f, 0xff, 0xc0, 0x07, 0x80, 0x0f, 0xff, 0xff, 0xff, 0xff, 0xf0, 0x00, 0x00, 0x3f, 0xff, 0xf0, 0x7f, 0xff, 0x80, 0x07, 0x80, 0x07, 0xff, 0xff, 0xff, 0xff, 0xe0, 0x00, 0x00, 0x1f, 0xff, 0xf0, 0x7f, 0xff, 0x80, 0x07, 0xc0, 0x07, 0xff, 0xff, 0xff, 0xff, 0xc0, 0x00, 0x00, 0x0f, 0xff, 0xff, 0xff, 0xff, 0x80, 0x0f, 0xc0, 0x03, 0xff, 0xff, 0xff, 0xff, 0x80, 0x00, 0x00, 0x07, 0xff, 0xff, 0xff, 0xff, 0x00, 0x0f, 0xc0, 0x03, 0xff, 0xff, 0xff, 0xff, 0x00, 0x00, 0x00, 0x03, 0xff, 0xff, 0xff, 0xff, 0x00, 0x0f, 0xe0, 0x01, 0xff, 0xff, 0xff, 0xfe, 0x00, 0x03, 0x00, 0x01, 0xff, 0xff, 0xff, 0xfe, 0x00, 0x1f, 0xe0, 0x00, 0xff, 0xff, 0xff, 0xfc, 0x00, 0x07, 0x80, 0x00, 0xff, 0xff, 0xff, 0xfc, 0x00, 0x1f, 0xe0, 0x00, 0x7f, 0xff, 0xff, 0xf0, 0x00, 0x0f, 0xc0, 0x00, 0x3f, 0xff, 0xff, 0xf8, 0x00, 0x3f, 0xf0, 0x00, 0x3f, 0xff, 0xff, 0xe0, 0x00, 0x1f, 0xe0, 0x00, 0x1f, 0xff, 0xff, 0xf0, 0x00, 0x3f, 0xf8, 0x00, 0x1f, 0xff, 0xff, 0x80, 0x00, 0x3f, 0xe0, 0x00, 0x07, 0xff, 0xff, 0xe0, 0x00, 0x7f, 0xf8, 0x00, 0x0f, 0xff, 0xff, 0x00, 0x00, 0x7f, 0xf8, 0x00, 0x03, 0xff, 0xff, 0xc0, 0x00, 0x7f, 0xfc, 0x00, 0x03, 0xff, 0xf8, 0x00, 0x00, 0xff, 0xfc, 0x00, 0x00, 0xff, 0xff, 0x00, 0x00, 0xff, 0xfe, 0x00, 0x00, 0x7f, 0xe0, 0x00, 0x01, 0xff, 0xfe, 0x00, 0x00, 0x1f, 0xf8, 0x00, 0x01, 0xff, 0xfe, 0x00, 0x00, 0x00, 0x00, 0x00, 0x03, 0xff, 0xff, 0x00, 0x00, 0x00, 0x00, 0x00, 0x03, 0xff, 0xff, 0x00, 0x00, 0x00, 0x00, 0x00, 0x07, 0xff, 0xff, 0x80, 0x00, 0x00, 0x00, 0x00, 0x03, 0xff, 0xff, 0x80, 0x00, 0x00, 0x00, 0x00, 0x0f, 0xff, 0xff, 0xc0, 0x00, 0x00, 0x00, 0x00, 0x07, 0xff, 0xff, 0xc0, 0x00, 0x00, 0x00, 0x00, 0x1f, 0xff, 0xff, 0xe0, 0x00, 0x00, 0x00, 0x00, 0x0f, 0xff, 0xff, 0xe0, 0x00, 0x00, 0x00, 0x00, 0x7f, 0xff, 0xff, 0xf8, 0x00, 0x00, 0x00, 0x00, 0x3f, 0xff, 0xff, 0xf8, 0x00, 0x00, 0x00, 0x01, 0xff, 0xff, 0xff, 0xfe, 0x00, 0x00, 0x00, 0x00, 0x7f, 0xff, 0xff, 0xff, 0xff, 0xff, 0xff, 0xff, 0xff, 0xff, 0xff, 0xff, 0xff, 0xff, 0xff, 0xff, 0xff, 0xff, 0xff, 0xff, 0xff, 0xff, 0xff, 0xff, 0xff, 0xff, 0xff, 0xff, 0xff, 0xff, 0xff, 0xff, 0xff, 0xff }; void setup() { Monitor.begin(9600); if (!display.begin(SSD1309_SWITCHCAPVCC, SCREEN_ADDRESS)) { Monitor.println(F("SSD1309 allocation failed")); for (;;); } // Show heart icon centered display.clearDisplay(); display.drawBitmap( (SCREEN_WIDTH - 16) / 2, (SCREEN_HEIGHT - 16) / 2, heart16x16, 16, 16, SSD1309_PIXEL_ON); display.display(); delay(3000); // Show full DIYables logo display.clearDisplay(); display.drawBitmap(0, 0, diyablesLogo, SCREEN_WIDTH, SCREEN_HEIGHT, SSD1309_PIXEL_ON); display.display(); } void loop() {}

    Schnelle Schritte

    • Kopieren Sie den Code oben und fügen Sie ihn in sketch/sketch.ino ein.
    • Klicken Sie in Arduino App Lab auf die Schaltfläche Ausführen.
    Klicken Sie in Arduino App Lab auf Arduino UNO Q auf die Schaltfläche Ausführen

    Die OLED zeigt das Herz-Symbol für 3 Sekunden an, dann wechselt es zum DIYables-Logo.

    ※ Notiz:

    Bitmap-Dimensionen dürfen die Bildschirmauflösung (128×64) nicht überschreiten.

    Arduino UNO Q-Code — Kontrast und Dimmen auf SSD1309 OLED

    Das SSD1309 unterstützt 256 Kontraststufen (0–255). Verwenden Sie setContrast() für feine Kontrolle und dim() für schnelle Helligkeitsumschaltung.

    /* * Dieser Arduino UNO Q Code wurde von newbiely.de entwickelt * Dieser Arduino UNO Q Code wird der Öffentlichkeit ohne jegliche Einschränkung zur Verfügung gestellt. * Für vollständige Anleitungen und Schaltpläne besuchen Sie bitte: * https://newbiely.de/tutorials/arduino-uno-q/arduino-uno-q-ssd1309-oled-display */ #include <Wire.h> #include <Adafruit_GFX.h> #include <DIYables_OLED_SSD1309.h> #define SCREEN_WIDTH 128 #define SCREEN_HEIGHT 64 #define OLED_RESET -1 #define SCREEN_ADDRESS 0x3C DIYables_OLED_SSD1309 display(SCREEN_WIDTH, SCREEN_HEIGHT, &Wire, OLED_RESET); void setup() { Monitor.begin(9600); if (!display.begin(SSD1309_SWITCHCAPVCC, SCREEN_ADDRESS)) { Monitor.println(F("SSD1309 allocation failed")); for (;;); } // Draw a test pattern so the contrast change is visible display.clearDisplay(); display.fillRect(0, 0, 64, 32, SSD1309_PIXEL_ON); display.fillRect(64, 32, 64, 32, SSD1309_PIXEL_ON); display.setTextSize(1); display.setTextColor(SSD1309_PIXEL_INVERSE); display.setCursor(16, 28); display.println(F("Contrast Demo")); display.display(); delay(2000); } void loop() { // Ramp up for (int c = 0; c <= 255; c += 5) { display.setContrast((uint8_t)c); delay(30); } delay(1000); // Ramp down for (int c = 255; c >= 0; c -= 5) { display.setContrast((uint8_t)c); delay(30); } delay(1000); // Quick dim toggle display.dim(true); // minimum brightness delay(2000); display.dim(false); // restore delay(2000); }

    Schnelle Schritte

    • Kopieren Sie den Code oben und fügen Sie ihn in sketch/sketch.ino ein.
    • Klicken Sie in Arduino App Lab auf die Schaltfläche Ausführen.
    Klicken Sie in Arduino App Lab auf Arduino UNO Q auf die Schaltfläche Ausführen

    Beobachten Sie die OLED-Helligkeit, die ansteigt und dann abnimmt, gefolgt von einem Dimm-Ein-/Dimm-Aus-Zyklus.

    Arduino UNO Q-Code — Benutzerdefinierte externe Schriftarten auf SSD1309 OLED

    Die Adafruit GFX-Bibliothek enthält viele FreeFont-Schriftarten (Serif, Sans, Mono — in mehreren Größen). Verwenden Sie diese, indem Sie die Schriftart-Kopfzeile einbinden und setFont() aufrufen.

    ※ Notiz:

    Wenn eine externe Schriftart aktiv ist, bezieht sich die Kursor-Y-Koordinate auf die Text-Grundlinie, nicht die obere linke Ecke. Dies unterscheidet sich von der integrierten 5×7-Schriftart.

    /* * Dieser Arduino UNO Q Code wurde von newbiely.de entwickelt * Dieser Arduino UNO Q Code wird der Öffentlichkeit ohne jegliche Einschränkung zur Verfügung gestellt. * Für vollständige Anleitungen und Schaltpläne besuchen Sie bitte: * https://newbiely.de/tutorials/arduino-uno-q/arduino-uno-q-ssd1309-oled-display */ #include <Wire.h> #include <Adafruit_GFX.h> #include <DIYables_OLED_SSD1309.h> #include <Fonts/FreeSerif9pt7b.h> #include <Fonts/FreeSansBold12pt7b.h> #include <Fonts/FreeMono9pt7b.h> #define SCREEN_WIDTH 128 #define SCREEN_HEIGHT 64 #define OLED_RESET -1 #define SCREEN_ADDRESS 0x3C DIYables_OLED_SSD1309 display(SCREEN_WIDTH, SCREEN_HEIGHT, &Wire, OLED_RESET); void setup() { Monitor.begin(9600); if (!display.begin(SSD1309_SWITCHCAPVCC, SCREEN_ADDRESS)) { Monitor.println(F("SSD1309 allocation failed")); for (;;); } display.clearDisplay(); display.display(); } void loop() { // ── Built-in 5×7 font ── display.clearDisplay(); display.setFont(NULL); display.setTextSize(1); display.setTextColor(SSD1309_PIXEL_ON); display.setCursor(0, 0); display.println(F("Built-in 5x7 font")); display.println(); display.setTextSize(2); display.println(F("DIYables")); display.display(); delay(3000); // ── FreeSerif 9pt ── display.clearDisplay(); display.setFont(&FreeSerif9pt7b); display.setTextSize(1); display.setTextColor(SSD1309_PIXEL_ON); display.setCursor(0, 14); // Y = baseline display.println(F("FreeSerif 9pt")); display.setCursor(0, 38); display.println(F("DIYables OLED")); display.setCursor(0, 58); display.println(F("Hello World!")); display.display(); delay(3000); // ── FreeSansBold 12pt ── display.clearDisplay(); display.setFont(&FreeSansBold12pt7b); display.setTextSize(1); display.setTextColor(SSD1309_PIXEL_ON); display.setCursor(0, 20); display.println(F("SansBold")); display.setCursor(0, 52); display.println(F("DIYables")); display.display(); delay(3000); // ── FreeMono 9pt ── display.clearDisplay(); display.setFont(&FreeMono9pt7b); display.setTextSize(1); display.setTextColor(SSD1309_PIXEL_ON); display.setCursor(0, 14); display.println(F("FreeMono 9pt")); display.setCursor(0, 34); display.println(F("0123456789")); display.setCursor(0, 54); display.println(F("!@#$%^&*()")); display.display(); delay(3000); }

    Schnelle Schritte

    • Kopieren Sie den Code oben und fügen Sie ihn in sketch/sketch.ino ein.
    • Klicken Sie in Arduino App Lab auf die Schaltfläche Ausführen.
    Klicken Sie in Arduino App Lab auf Arduino UNO Q auf die Schaltfläche Ausführen

    Die OLED durchläuft die integrierte Schriftart, FreeSerif 9pt, FreeSansBold 12pt und FreeMono 9pt.

    Linux + MCU Bridge-Programmierung

    Das Arduino UNO Q hat zwei Prozessoren, die zusammenarbeiten: die MPU (Qualcomm, führt Debian Linux aus) und die MCU (STM32, führt Zephyr OS mit Ihrer Arduino-Skizze aus). Sie kommunizieren über RPC über die Bibliothek Arduino_RouterBridge — nie über Rohserialports.

    • Das SSD1309 OLED ist mit der MCU (STM32) verbunden — über I2C (SCL/SDA). Nur die MCU kann es direkt steuern.
    • Die MPU kann das OLED nicht direkt steuern — sie ruft Bridge.call("display_text", "text") auf, was das Display aktualisiert und das Ergebnis an Monitor druckt.
    • Die MPU hat Wi-Fi — da die MPU vollständiges Debian Linux mit Wi-Fi ausführt, kann sie Telegram-Befehle empfangen und jede Nachricht auf dem OLED remote anzeigen.
    • Kommunikation: Bridge.call() auf der Linux-Seite ruft Bridge.provide_safe()-Funktionen auf der MCU-Seite auf (da OLED-Schreibvorgänge Hardware-API-Aufrufe sind).
    • ⚠️ Reserviert: /dev/ttyHS1 (Linux) und Serial1 (MCU) werden vom Arduino Router verwendet — öffnen Sie diese nie direkt.

    MCU-Skizze — SSD1309 OLED mit Bridge und Monitor-Ausgabe:

    /* * Dieser Arduino UNO Q Code wurde von newbiely.de entwickelt * Dieser Arduino UNO Q Code wird der Öffentlichkeit ohne jegliche Einschränkung zur Verfügung gestellt. * Für vollständige Anleitungen und Schaltpläne besuchen Sie bitte: * https://newbiely.de/tutorials/arduino-uno-q/arduino-uno-q-ssd1309-oled-display */ #include "Arduino_RouterBridge.h" #include <Wire.h> #include <Adafruit_GFX.h> #include <DIYables_OLED_SSD1309.h> #define SCREEN_WIDTH 128 #define SCREEN_HEIGHT 64 #define OLED_RESET -1 #define SCREEN_ADDRESS 0x3C DIYables_OLED_SSD1309 display(SCREEN_WIDTH, SCREEN_HEIGHT, &Wire, OLED_RESET); String current_text = ""; void display_text(String text) { current_text = text; display.clearDisplay(); display.setTextSize(1); display.setTextColor(SSD1309_PIXEL_ON); display.setCursor(0, 0); display.println(text); display.display(); Monitor.println("OLED: " + text); } void clear_oled() { current_text = ""; display.clearDisplay(); display.display(); Monitor.println("OLED cleared"); } void get_status() { Monitor.println("Text: " + current_text); } void setup() { Bridge.begin(); Monitor.begin(); if (!display.begin(SSD1309_SWITCHCAPVCC, SCREEN_ADDRESS)) { Monitor.println("SSD1309 init failed"); while (true); } delay(1000); display.clearDisplay(); display.setTextSize(1); display.setTextColor(SSD1309_PIXEL_ON); display.setCursor(0, 0); display.println("Bridge Ready"); display.display(); Bridge.provide_safe("display_text", display_text); Bridge.provide_safe("clear_oled", clear_oled); Bridge.provide("get_status", get_status); Monitor.println("SSD1309 OLED Bridge ready"); } void loop() {}

    Python-Skript (Arduino App Lab) — Text auf SSD1309 OLED von Linux anzeigen:

    /* * Dieser Arduino UNO Q Code wurde von newbiely.de entwickelt * Dieser Arduino UNO Q Code wird der Öffentlichkeit ohne jegliche Einschränkung zur Verfügung gestellt. * Für vollständige Anleitungen und Schaltpläne besuchen Sie bitte: * https://newbiely.de/tutorials/arduino-uno-q/arduino-uno-q-ssd1309-oled-display */ from arduino.app_utils import * import time def loop(): result = Bridge.call("display_text", "Hello UNO Q\nSSD1309 OLED\n2.42 inch") print(result) time.sleep(3) result = Bridge.call("clear_oled") print(result) time.sleep(1) result = Bridge.call("display_text", "DIYables.io") print(result) time.sleep(3) App.run(user_loop=loop)

    Schnelle Schritte

    • Neue App erstellen: Öffnen Sie Arduino App Lab, klicken Sie auf Neue App erstellen, benennen Sie sie DIYables_SSD1309_Bridge, und klicken Sie auf Erstellen.
    • MCU-Skizze einfügen: Kopieren Sie den Bridge-MCU-Code oben und fügen Sie ihn in sketch/sketch.ino ein.
    • Python-Skript einfügen: Kopieren Sie den Python-Code oben und fügen Sie ihn in die Python-Datei in der App ein.
    • App ausführen: Klicken Sie auf die Schaltfläche Ausführen — die Python-Seite durchläuft Nachrichten auf dem OLED.

    App Lab Console-Ausgabe

    DIYables_Apps
    Stop
    sketch.ino
    1#include "Arduino_RouterBridge.h"
    Serial Monitor
    Python
    Message (Enter to send a message to "Newbiely" on usb(2820070321))
    New Line
    9600 baud
    SSD1309 OLED Bridge ready OLED: Hello UNO Q OLED cleared OLED: DIYables.io

    Telegram-Integration

    Zeigen Sie jeden Text auf Ihrem SSD1309 OLED von überall über Telegram an.

    Wenn Sie noch keinen Telegram-Bot haben, lesen Sie How to Create a Telegram Bot, um Ihr Bot-Token zu erhalten, bevor Sie fortfahren.

    MCU-Skizze: Behalten Sie die gleiche MCU-Skizze aus dem vorherigen Bridge-Abschnitt — keine Änderungen erforderlich. Stellen Sie sicher, dass sie bereits auf der STM32 hochgeladen und ausgeführt wird, bevor Sie fortfahren.

    Python-Skript (Arduino App Lab) — Telegram-Bot für SSD1309 OLED:

    /* * Dieser Arduino UNO Q Code wurde von newbiely.de entwickelt * Dieser Arduino UNO Q Code wird der Öffentlichkeit ohne jegliche Einschränkung zur Verfügung gestellt. * Für vollständige Anleitungen und Schaltpläne besuchen Sie bitte: * https://newbiely.de/tutorials/arduino-uno-q/arduino-uno-q-ssd1309-oled-display */ from arduino.app_utils import * import requests import time BOT_TOKEN = "YOUR_BOT_TOKEN" API_URL = f"https://api.telegram.org/bot{BOT_TOKEN}" last_update_id = 0 def send_message(chat_id, text): requests.post(f"{API_URL}/sendMessage", json={"chat_id": chat_id, "text": text}) def get_updates(): global last_update_id resp = requests.get(f"{API_URL}/getUpdates", params={"offset": last_update_id + 1, "timeout": 5}) return resp.json().get("result", []) def loop(): global last_update_id updates = get_updates() for update in updates: last_update_id = update["update_id"] msg = update.get("message", {}) chat_id = msg.get("chat", {}).get("id") text = msg.get("text", "").strip() if text.startswith("/display "): content = text[9:] result = Bridge.call("display_text", content) print(f"[Telegram] /display: {content}") send_message(chat_id, result) elif text == "/clear": result = Bridge.call("clear_oled") print(f"[Telegram] /clear") send_message(chat_id, result) elif text == "/status": result = Bridge.call("get_status") print(f"[Telegram] /status: {result}") send_message(chat_id, result) else: send_message(chat_id, "Commands:\n/display <text> — show text on OLED\n/clear — clear the OLED\n/status — show current OLED content") App.run(user_loop=loop)
    • Hinweis: Ersetzen Sie YOUR_BOT_TOKEN mit dem Token von @BotFather auf Telegram.
    • Senden Sie /display Hello — erscheint auf dem OLED.
    • Senden Sie /clear — löscht das OLED.
    • Senden Sie /status — Bot antwortet mit dem aktuellen Text.

    App Lab Console-Ausgabe

    DIYables_Apps
    Stop
    sketch.ino
    1#include "Arduino_RouterBridge.h"
    Serial Monitor
    Python
    [2026-04-29 12:00:01] Telegram: /display Arduino UNO Q [2026-04-29 12:00:01] OLED: Arduino UNO Q [2026-04-29 12:05:10] Telegram: /status [2026-04-29 12:05:10] Text: Arduino UNO Q [2026-04-29 12:10:20] Telegram: /clear [2026-04-29 12:10:20] OLED cleared
    Telegram
    Telegram 12:45
    Welcome to Telegram!
    ArduinoBot 10:19
    Chatting with Arduino...
    telegram-botfather
    BotFather Yesterday
    Your bot has been created.

    ArduinoBot

    bot
    Today
    /display Arduino UNO Q
    10:15 AM ✓✓
    OLED: Arduino UNO Q
    10:16 AM
    /status
    10:17 AM ✓✓
    Text: Arduino UNO Q
    10:18 AM
    /clear
    10:19 AM ✓✓
    OLED cleared
    10:20 AM

    OpenClaw-Integration

    Sie können die OpenClaw an dieses Tutorial anpassen, indem Sie die Anleitung zum Arduino Uno Q - OpenClaw Tutorial beachten.

    Anwendungs-/Projektideen

    • Großtext-Alert-Anzeige: Verwenden Sie Textgröße 3 oder 4, um einen einzelnen kritischen Wert (Temperatur, Spannung) über den gesamten 2,42-Zoll-Bildschirm anzuzeigen.
    • Remote-Info-Board: Versenden Sie Nachrichten zum OLED von einer Telegram-Gruppe, um Team-Ankündigungen anzuzeigen.
    • Datenlogger-Status: Zeigen Sie den letzten Datensatz-Zeitstempel und die Zeilenanzahl auf dem OLED an, wenn die MPU in eine CSV-Datei schreibt.
    • Wi-Fi-Signalstärkemesser: Zeigen Sie SSID und RSSI-Stärke der Wi-Fi-Verbindung auf dem großen 2,42-Zoll-Bildschirm an.
    • Benutzerdefinierte Symbol-Rendering: Verwenden Sie drawBitmap(), um Logos oder Warnsymbole anzuzeigen, die als Byte-Arrays in der MCU-Skizze gespeichert sind.

    Fordern Sie sich selbst heraus

    • Einfach: Ändern Sie die Skizze, um setTextSize(2) für die erste Zeile und setTextSize(1) für nachfolgende Zeilen zu verwenden, um ein Titel-/Body-Layout zu erstellen.
    • Mittel: Fügen Sie einen /contrast <0-255> Telegram-Befehl hinzu, der display.ssd1309_command(SSD1309_SETCONTRAST) aufruft, gefolgt vom Wert, um die Bildschirmhelligkeit anzupassen.
    • Fortgeschritten: Zeigen Sie ein Echtzeit-Balkendiagramm auf dem OLED mit fillRect() an, das sich von über Bridge gesendeten Sensordaten aktualisiert.

    ※ UNSERE NACHRICHTEN

    • Sie können gerne den Link zu diesem Tutorial teilen. Bitte verwenden Sie jedoch unsere Inhalte nicht auf anderen Websites. Wir haben viel Mühe und Zeit in die Erstellung der Inhalte investiert, bitte respektieren Sie unsere Arbeit!