ESP32 - OLED

Dieses Tutorial zeigt Ihnen, wie Sie einen ESP32 mit einem OLED-128x64-I2C-Display unter MicroPython verwenden. Im Einzelnen lernen wir:

ESP32 MicroPython OLED-I2C-Display

Erforderliche Hardware

1×38-pin ESP32 ESP-WROOM-32 Dev Module - Narrow
1×(Alternativ) 38-pin ESP32 ESP-WROOM-32 Dev Module - Wide
1×(Alternativ) 30-pin ESP32 ESP-WROOM-32 Dev Module - Wide
1×(Alternativ) ESP32 Uno-form board
1×(Alternativ) ESP32 S3 Uno-form board
1×USB-Kabel Typ-A zu Typ-C (für USB-A PC)
1×USB-Kabel Typ-C zu Typ-C (für USB-C PC)
1×SSD1306 I2C OLED-Display 128x64
1×Verbindungskabel
1×(Empfohlen) Schraubklemmen-Erweiterungsboard für ESP32
1×(Empfohlen) Breakout Expansion Board for ESP32
1×(Empfohlen) Stromverteiler für ESP32

Oder Sie können die folgenden Kits kaufen:

1×DIYables ESP32 Starter-Kit (ESP32 enthalten)
1×DIYables Sensor-Kit (18 Sensoren/Displays)
Offenlegung: Einige der in diesem Abschnitt bereitgestellten Links sind Amazon-Affiliate-Links. Wir können eine Provision für Käufe erhalten, die über diese Links getätigt werden, ohne zusätzliche Kosten für Sie. Wir schätzen Ihre Unterstützung.

Kaufhinweis: Wenn Sie ein größeres OLED-Display möchten, verwenden Sie das 2.42 inch OLED Display 128x64.

Überblick über OLED Display

OLED-Displays unterscheiden sich in Kommunikationsart, Größe und Farbe.

  • Kommunikationsprotokoll: I2C, SPI
  • Größen: 128x64, 128x32
  • Verfügbare Farben: Weiß, Blau, Gelb...
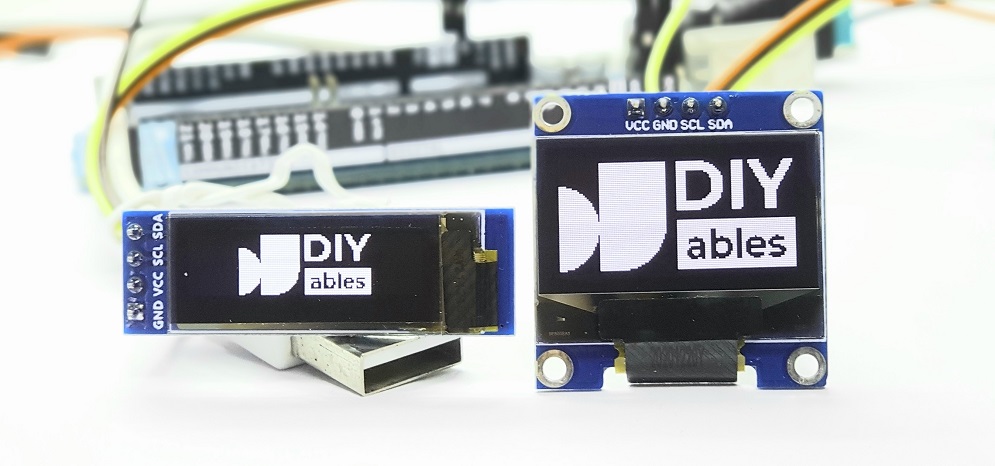
ESP32 MicroPython OLED

SPI bietet eine schnellere Datenübertragung als I2C, benötigt aber mehr Pins am ESP32. I2C hingegen verwendet nur zwei Pins und kann mehrere I2C-Geräte anbinden. Ihre Wahl hängt davon ab, ob Ihnen weniger belegte Pins oder eine höhere Geschwindigkeit wichtiger sind. Für I2C-basierte OLED-Displays sind SSD1306 und SH1106 gängige Treiber. Diese Anleitung behandelt speziell die Verwendung des 128x64-SSD1306-I2C-OLED-Displays.

Pinbelegung des I2C-OLED-Displays

  • GND-Pin: Mit der Masse (GND) des ESP32 verbinden.
  • VCC-Pin: Zur Stromversorgung mit dem 5V- oder 3,3V-Pin des ESP32 verbinden.
  • SCL-Pin: Dies ist der Takt-Pin für die I2C-Kommunikation.
  • SDA-Pin: Dies ist der Daten-Pin für die I2C-Kommunikation.
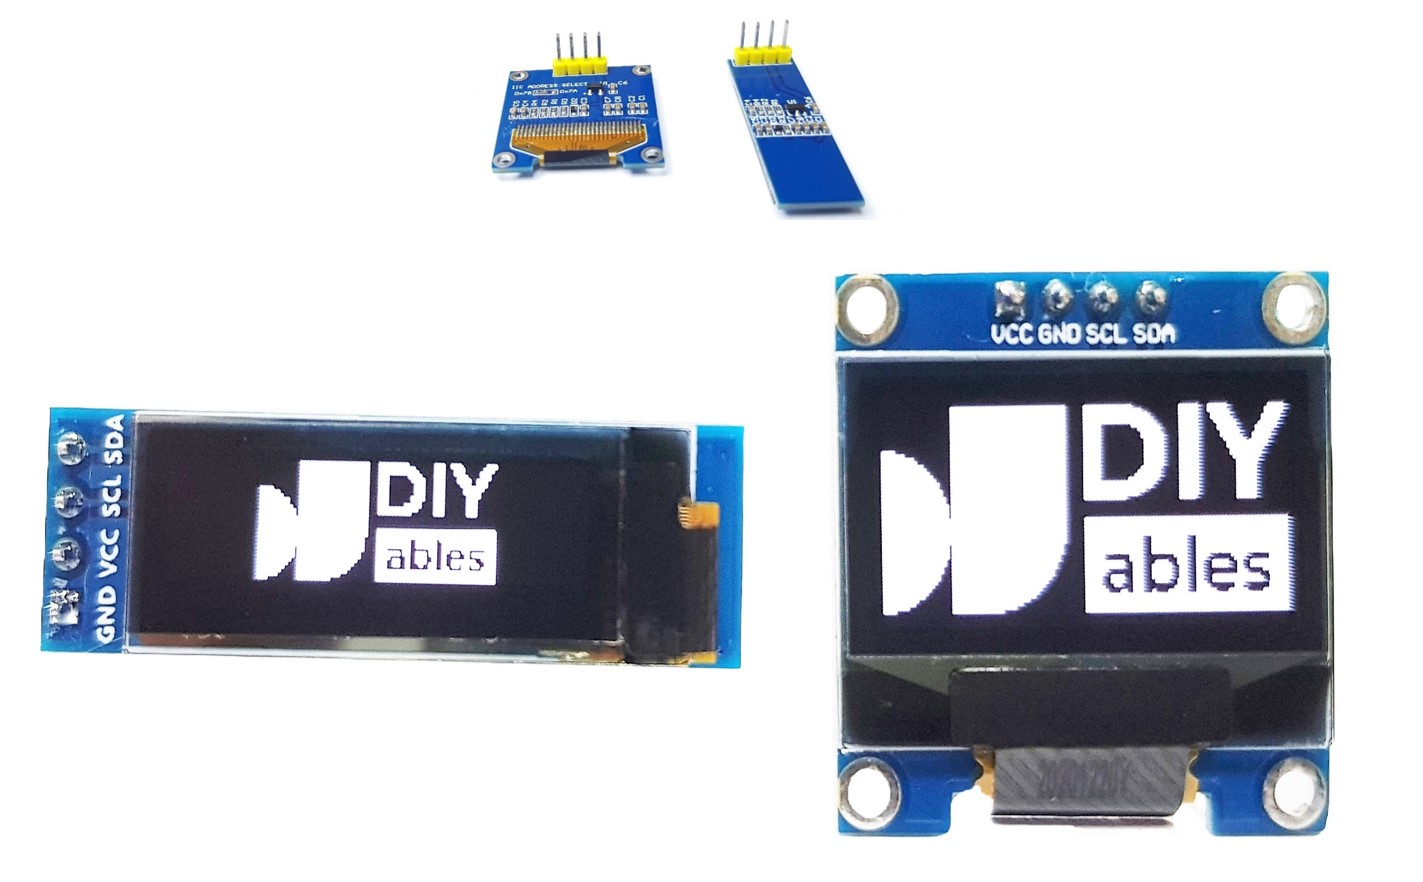
OLED Pinbelegung

※ Notiz:

Pinbelegung des OLED-Moduls

  • Die Pinbelegung variiert je nach Hersteller und Modell.
  • Richten Sie sich nach der Beschriftung auf Ihrem Modul.

Diese Anleitung verwendet den SSD1306-I2C-Treiber. Wir haben ihn mit einem DIYables-OLED-Display getestet.

Verdrahtungsdiagramm

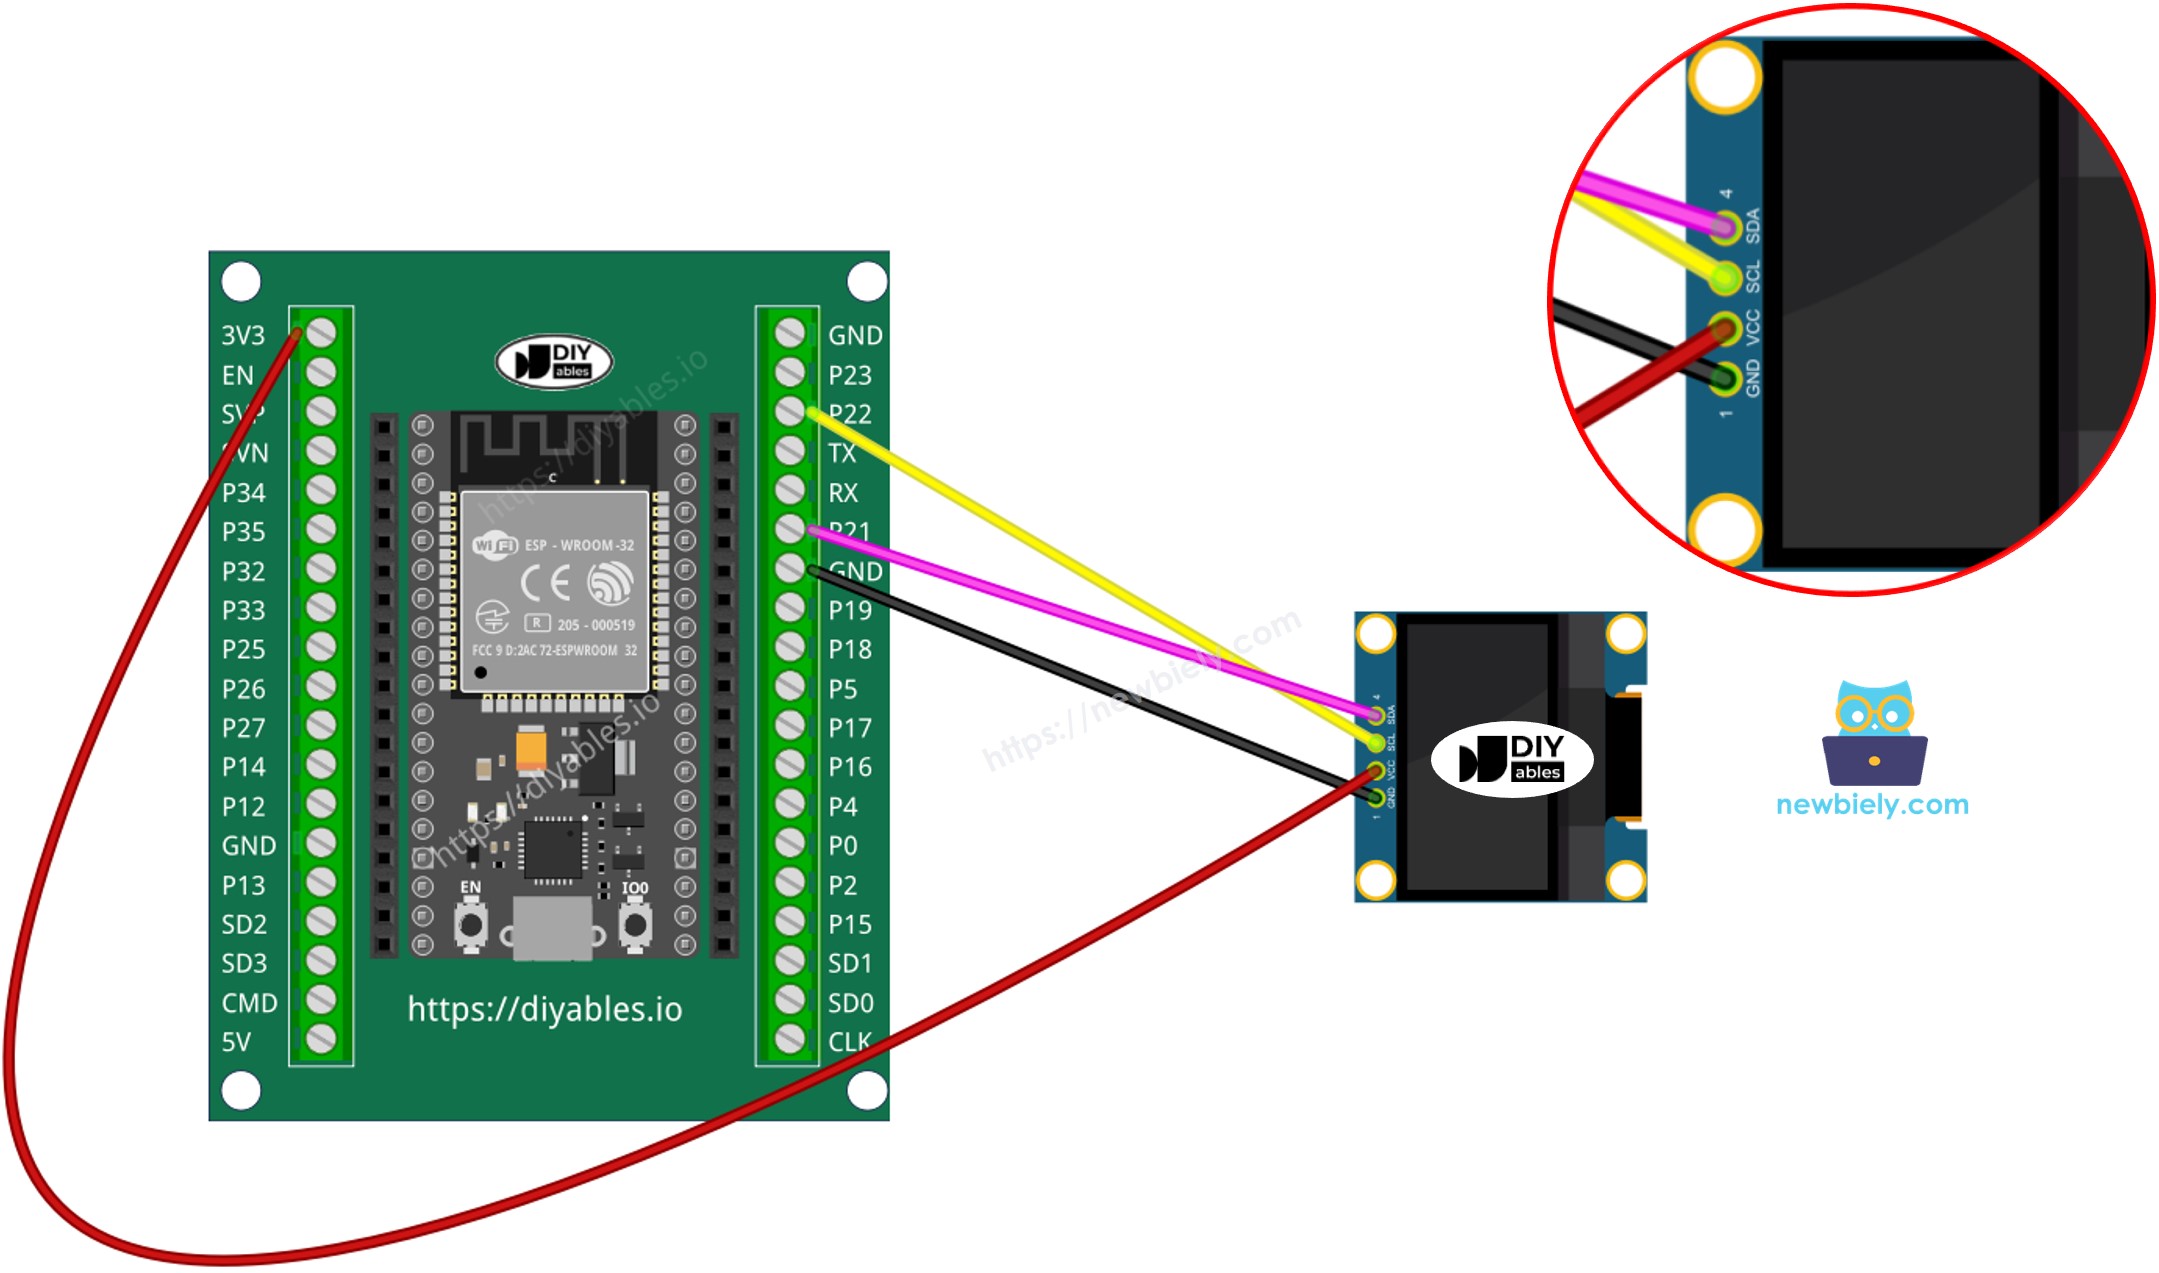
  • So verbinden Sie den ESP32 mit dem OLED-128x64-Display über ein Breadboard
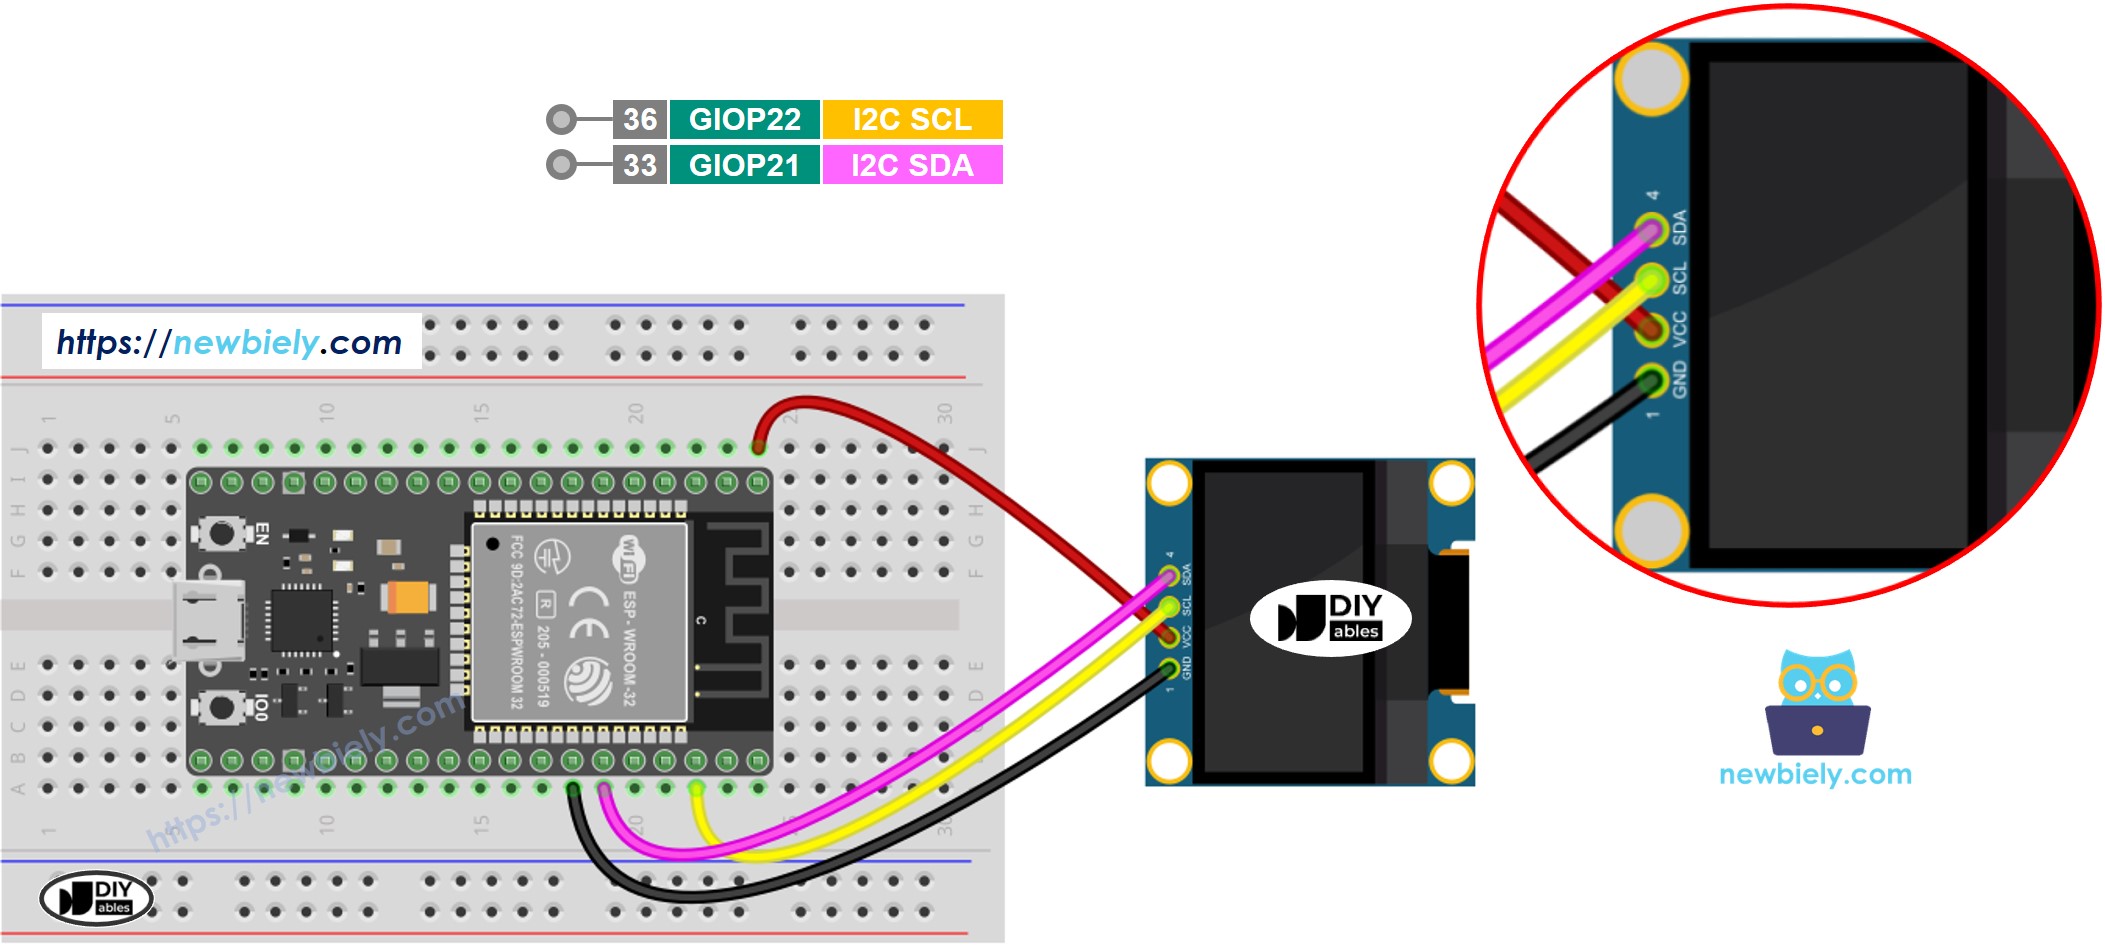
ESP32 MicroPython OLED 128x64 Schaltplan

Dieses Bild wurde mit Fritzing erstellt. Klicken Sie, um das Bild zu vergrößern.

So verbinden Sie ESP32 und OLED

In der folgenden Tabelle finden Sie Details zu anderen ESP32-Modellen.

OLED-Modul ESP32
VCC 3.3V
GND GND
SDA GPIO21
SCL GPIO22

ESP32 MicroPython-Code - Text, Ganzzahl und Gleitkommazahl auf dem OLED anzeigen

/* * Dieser ESP32 MicroPython Code wurde von newbiely.de entwickelt * Dieser ESP32 MicroPython Code wird der Öffentlichkeit ohne jegliche Einschränkung zur Verfügung gestellt. * Für vollständige Anleitungen und Schaltpläne besuchen Sie bitte: * https://newbiely.de/tutorials/esp32-micropython/esp32-micropython-oled-128x64 */ from machine import I2C, Pin from DIYables_MicroPython_OLED import OLED_SSD1306_I2C # Initialize I2C i2c = I2C(0, scl=Pin(22), sda=Pin(21), freq=400000) # Adjust ESP32 pins according to your setup # Initialize the OLED display oled = OLED_SSD1306_I2C(128, 64, i2c) # Clear the display oled.clear_display() oled.display() oled.set_text_size(2) # Print a message to the display text = "DIYables" integer_value = 123 float_value = 45.67 oled.set_cursor(0, 0) oled.println(text) oled.set_cursor(0, 25) oled.println(str(integer_value)) # Print integer and move to the next line oled.set_cursor(0, 50) oled.println("{:.2f}".format(float_value)) # Print formatted float and move to the next line oled.display() # Ensure you update the display after writing to it

Schnelle Schritte

So richten Sie Ihren MicroPython-Code auf dem ESP32 mit der Thonny IDE ein und führen ihn aus:

  • Stellen Sie sicher, dass die Thonny IDE auf Ihrem Computer installiert ist.
  • Vergewissern Sie sich, dass die MicroPython-Firmware auf Ihrem ESP32-Board installiert ist.
  • Wenn Sie zum ersten Mal einen ESP32 mit MicroPython verwenden, lesen Sie die Anleitung ESP32 MicroPython Erste Schritte mit Schritt-für-Schritt-Anweisungen.
  • Verbinden Sie das OLED-Display gemäß dem Schaltplan mit dem ESP32.
  • Verbinden Sie das ESP32-Board über ein USB-Kabel mit Ihrem Computer.
  • Öffnen Sie die Thonny IDE auf Ihrem Computer.
  • Gehen Sie in der Thonny IDE zu Tools Options.
  • Wählen Sie im Tab Interpreter aus dem Dropdown-Menü MicroPython (ESP32) aus.
  • Stellen Sie sicher, dass der richtige Port ausgewählt ist. Die Thonny IDE erkennt ihn normalerweise automatisch, eventuell müssen Sie ihn aber manuell auswählen (z. B. COM3 unter Windows oder /dev/ttyACM0 unter Linux).
  • Navigieren Sie in der Thonny IDE zu Tools Manage packages.
  • Suchen Sie nach “DIYables-MicroPython-OLED” und finden Sie die von DIYables erstellte OLED-Bibliothek.
  • Klicken Sie auf DIYables-MicroPython-OLED und dann auf die Schaltfläche Install, um die OLED-Bibliothek zu installieren.
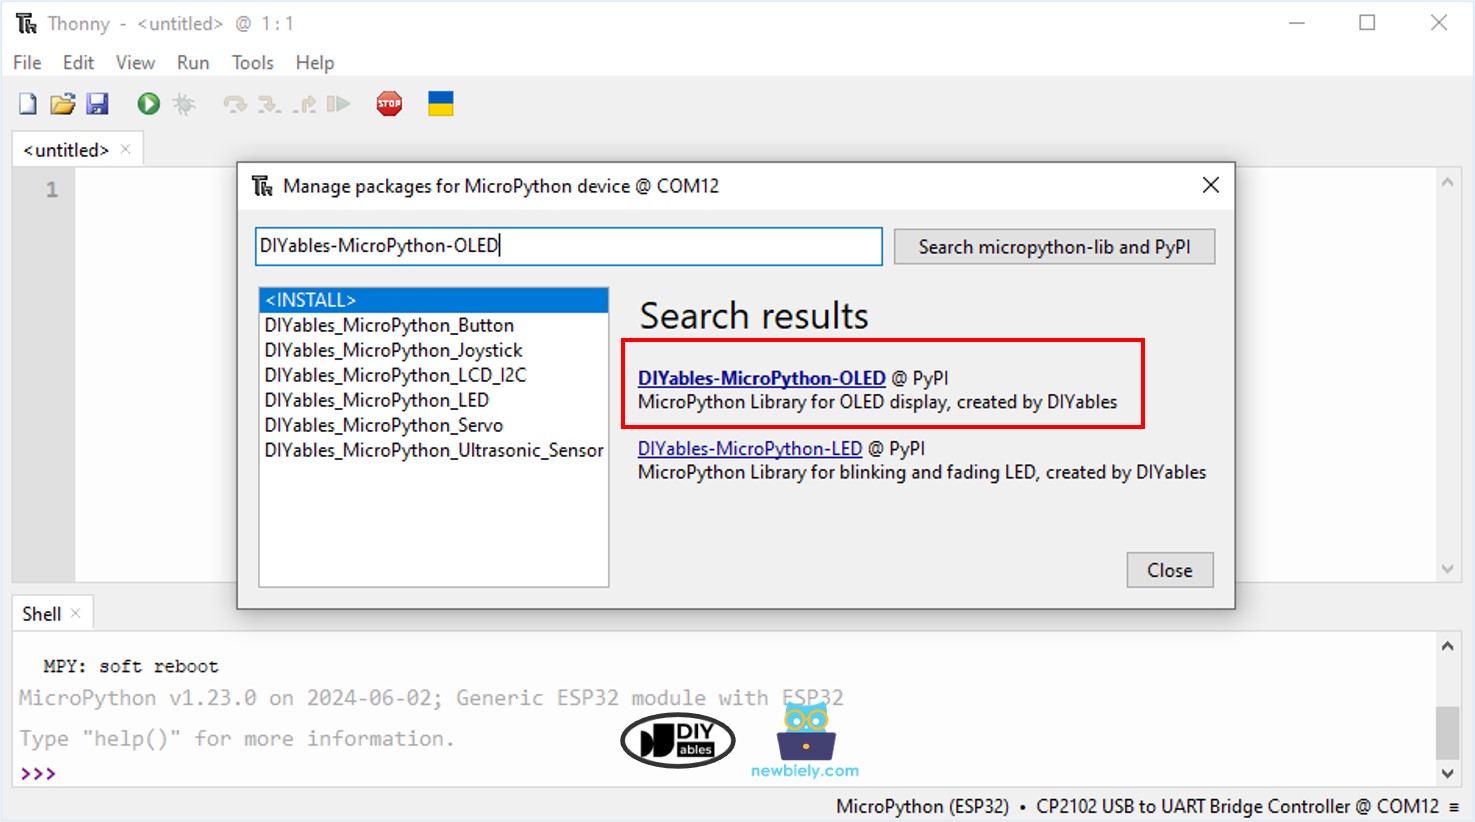
ESP32 MicroPython OLED-Bibliothek
  • Kopieren Sie den bereitgestellten MicroPython-Code und fügen Sie ihn in den Editor von Thonny ein.
  • Speichern Sie den Code auf Ihrem ESP32:
    • Klicken Sie auf die Schaltfläche Save oder drücken Sie Ctrl+S.
    • Wählen Sie im Speicherdialog MicroPython device.
    • Nennen Sie die Datei main.py.
  • Klicken Sie auf die grüne Schaltfläche Run (oder drücken Sie F5), um das Skript auszuführen.
  • Sehen Sie sich das Ergebnis auf dem OLED-Display an. Es sieht wie folgt aus:
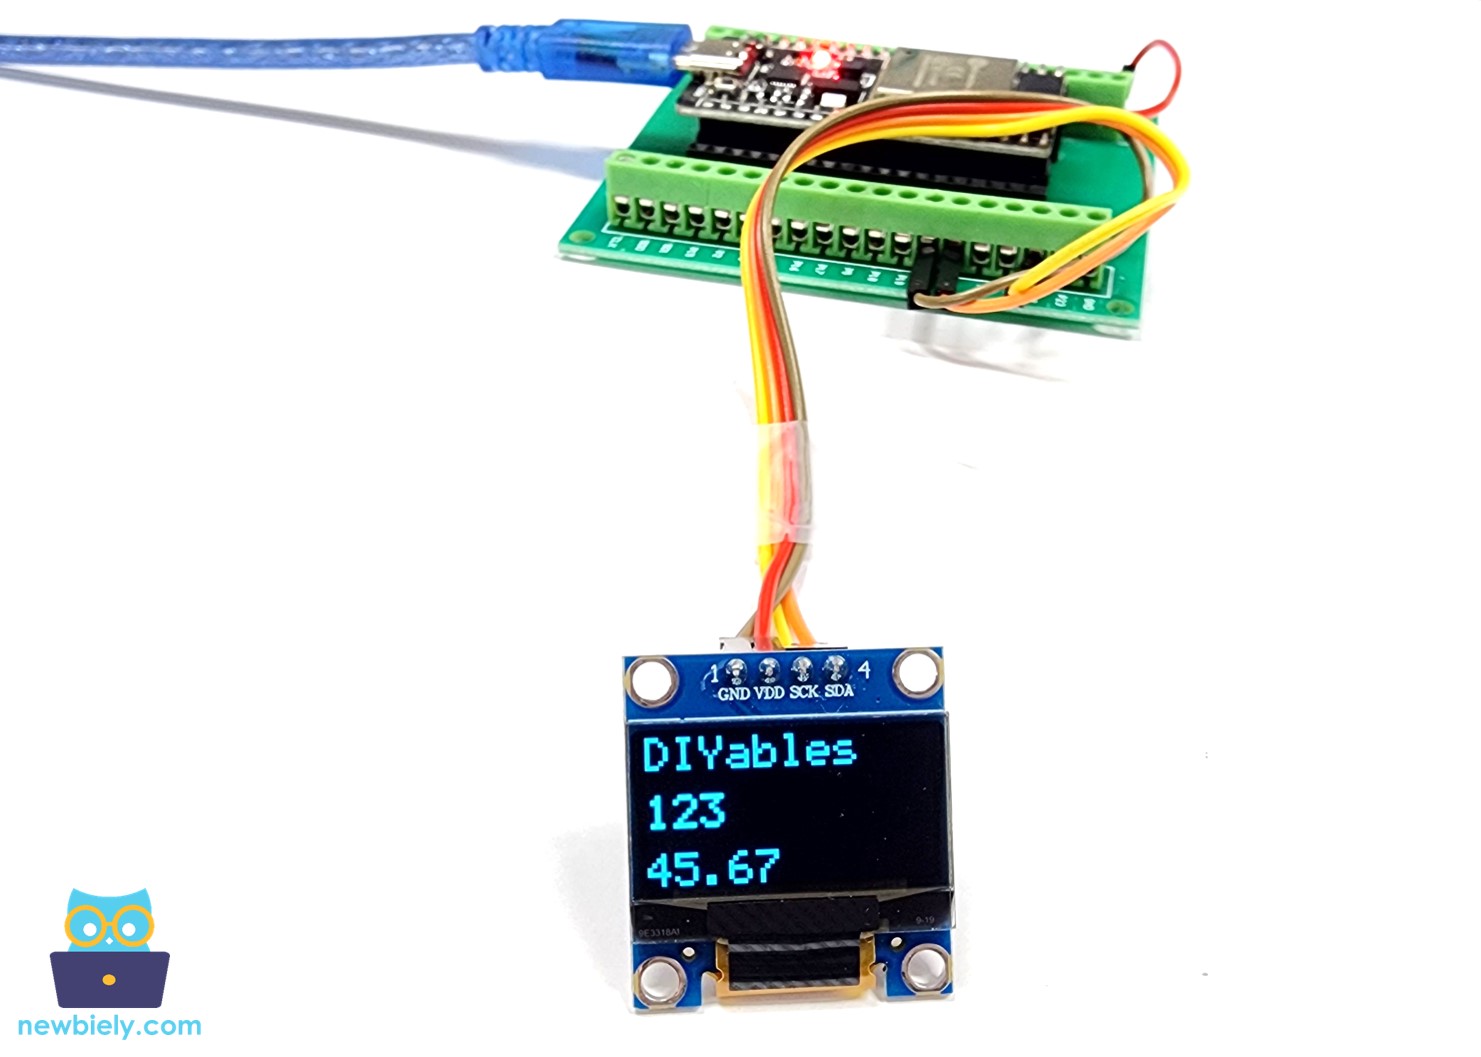
ESP32 MicroPython OLED zeigt Text, Ganzzahl und Gleitkommazahl an

So richten Sie Text/Zahlen auf dem OLED automatisch vertikal und horizontal mittig aus

Der folgende MicroPython-Code zentriert den Text automatisch sowohl vertikal als auch horizontal auf dem OLED-Display.

/* * Dieser ESP32 MicroPython Code wurde von newbiely.de entwickelt * Dieser ESP32 MicroPython Code wird der Öffentlichkeit ohne jegliche Einschränkung zur Verfügung gestellt. * Für vollständige Anleitungen und Schaltpläne besuchen Sie bitte: * https://newbiely.de/tutorials/esp32-micropython/esp32-micropython-oled-128x64 */ from machine import I2C, Pin from DIYables_MicroPython_OLED import OLED_SSD1306_I2C import utime # Initialize I2C i2c = I2C(0, scl=Pin(22), sda=Pin(21), freq=400000) # Adjust ESP32 pins according to your setup # Initialize the OLED display oled = OLED_SSD1306_I2C(128, 64, i2c) # Clear the display oled.clear_display() oled.display() def oled_display_center(oled, text): # Get the text bounds (width and height) of the string x1, y1, width, height = oled.get_text_bounds(text, 0, 0) # Set cursor to the calculated centered position cursor_x = (oled.WIDTH - width) // 2 cursor_y = (oled.HEIGHT - height) // 2 oled.set_cursor(cursor_x, cursor_y) # Print the text on the display oled.println(text) # Refresh the display to show the text oled.display() oled.set_text_size(2) oled_display_center(oled, "DIYables")

Nach dem Ausführen des Codes sehen Sie ein Quadrat, einen Kreis und ein Dreieck auf dem OLED-Bildschirm.
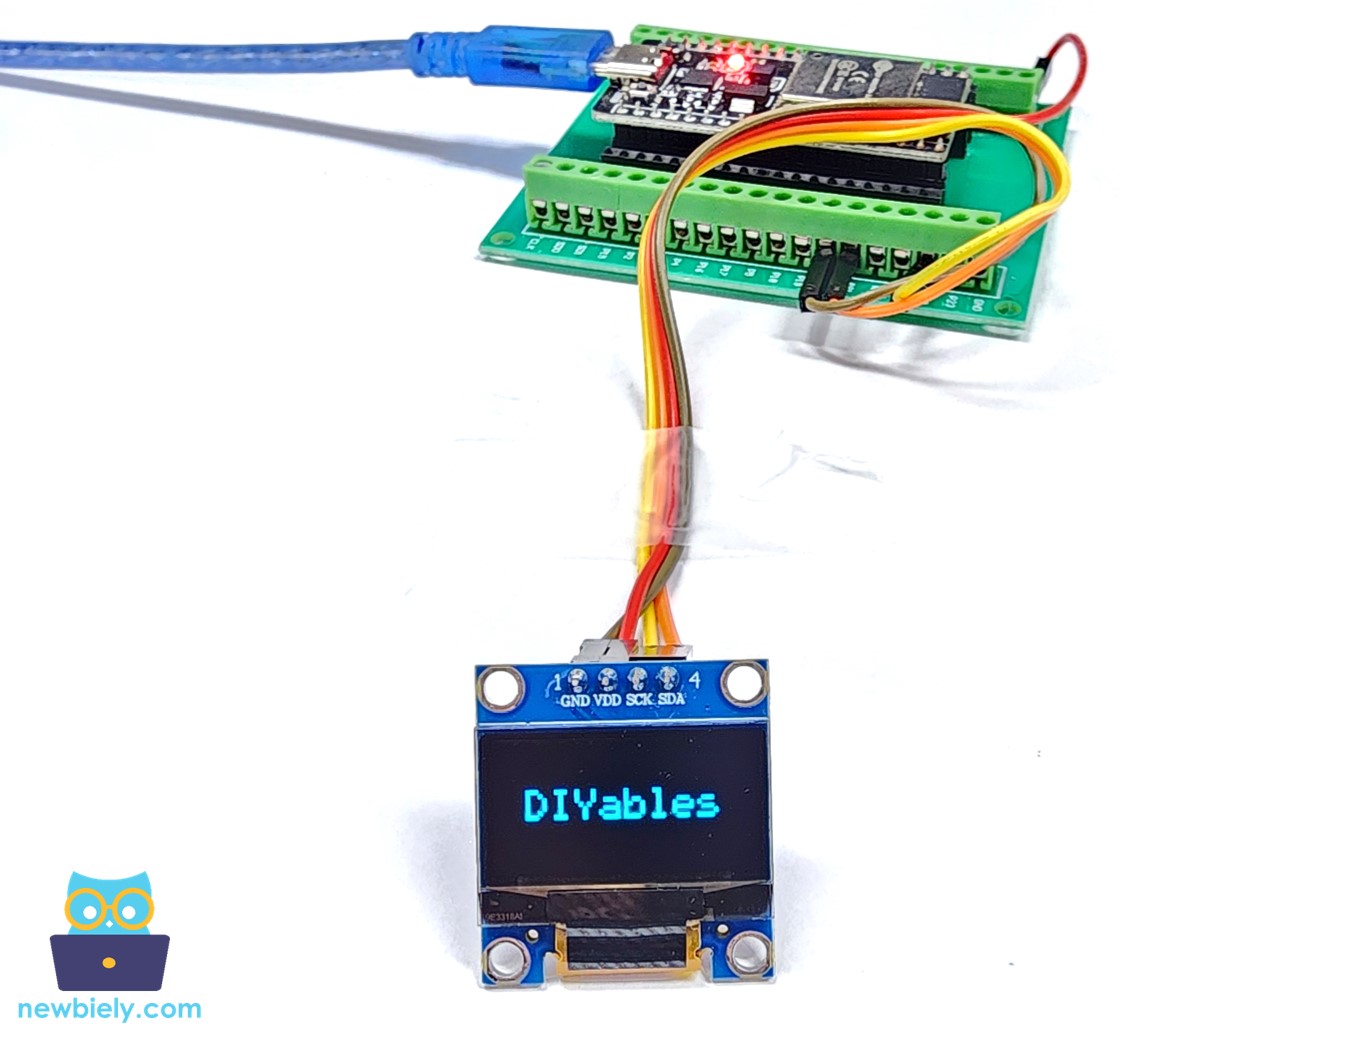
ESP32 MicroPython OLED vertikale und horizontale Zentrierung

ESP32 MicroPython-Code – Bild auf dem OLED anzeigen

Der folgende Code zeichnet ein Bild auf das Display. Das Bild ist das DIYables-Symbol.

/* * Dieser ESP32 MicroPython Code wurde von newbiely.de entwickelt * Dieser ESP32 MicroPython Code wird der Öffentlichkeit ohne jegliche Einschränkung zur Verfügung gestellt. * Für vollständige Anleitungen und Schaltpläne besuchen Sie bitte: * https://newbiely.de/tutorials/esp32-micropython/esp32-micropython-oled-128x64 */ from machine import I2C, Pin from DIYables_MicroPython_OLED import OLED_SSD1306_I2C import utime # Initialize I2C (replace with your correct pins for I2C) i2c = I2C(0, scl=Pin(22), sda=Pin(21), freq=400000) # Adjust ESP32 pins according to your setup # Create the SSD1306 display object oled = OLED_SSD1306_I2C(128, 64, i2c) # Clear the display buffer oled.clear_display() # 16x16 heart bitmap in RGB565 format heart_bitmap = [ # 'DIYables Icon', 128x57px 0x00, 0x00, 0x03, 0xff, 0xff, 0xff, 0xff, 0xc0, 0xff, 0xfe, 0x00, 0x03, 0xf1, 0xf8, 0x00, 0x3e, 0x00, 0x00, 0x03, 0xff, 0xff, 0xff, 0xff, 0xc0, 0xff, 0xff, 0xc0, 0x03, 0xf1, 0xf8, 0x00, 0x7e, 0x00, 0x00, 0x03, 0xff, 0xff, 0xff, 0xff, 0xc0, 0xff, 0xff, 0xf0, 0x03, 0xf0, 0xfc, 0x00, 0x7c, 0x00, 0x00, 0x03, 0xff, 0xff, 0xff, 0xff, 0xc0, 0xff, 0xff, 0xf8, 0x03, 0xf0, 0xfc, 0x00, 0xfc, 0x00, 0x00, 0x03, 0xff, 0xff, 0xff, 0xff, 0xc0, 0xff, 0xff, 0xfc, 0x03, 0xf0, 0x7e, 0x00, 0xf8, 0x00, 0x00, 0x03, 0xff, 0xff, 0xff, 0xff, 0xc0, 0xf8, 0x01, 0xfe, 0x03, 0xf0, 0x3f, 0x01, 0xf8, 0x00, 0x00, 0x03, 0xff, 0xff, 0xff, 0xff, 0xc0, 0xf8, 0x00, 0x7f, 0x03, 0xf0, 0x3f, 0x03, 0xf0, 0x00, 0x00, 0x03, 0xff, 0xff, 0xff, 0xff, 0xc0, 0xf8, 0x00, 0x3f, 0x03, 0xf0, 0x1f, 0x83, 0xe0, 0x00, 0x00, 0x03, 0xff, 0xff, 0xff, 0xff, 0xc0, 0xf8, 0x00, 0x3f, 0x83, 0xf0, 0x1f, 0x87, 0xe0, 0x00, 0x00, 0x03, 0xff, 0xff, 0xff, 0xff, 0xc0, 0xf8, 0x00, 0x1f, 0x83, 0xf0, 0x0f, 0xc7, 0xc0, 0x00, 0x00, 0x03, 0xff, 0xff, 0xff, 0xff, 0xc0, 0xf8, 0x00, 0x1f, 0x83, 0xf0, 0x07, 0xef, 0xc0, 0x00, 0x00, 0x03, 0xff, 0xff, 0xff, 0xff, 0xc0, 0xf8, 0x00, 0x1f, 0x83, 0xf0, 0x07, 0xff, 0x80, 0xf0, 0x00, 0x03, 0xff, 0xff, 0xff, 0xff, 0xc0, 0xf8, 0x00, 0x1f, 0x83, 0xf0, 0x03, 0xff, 0x00, 0xfe, 0x00, 0x03, 0xff, 0xff, 0xff, 0xff, 0xc0, 0xf8, 0x00, 0x1f, 0x83, 0xf0, 0x03, 0xff, 0x00, 0xff, 0xc0, 0x03, 0xff, 0xff, 0xff, 0xff, 0xc0, 0xf8, 0x00, 0x1f, 0x83, 0xf0, 0x01, 0xfe, 0x00, 0xff, 0xe0, 0x03, 0xff, 0xff, 0xff, 0xff, 0xc0, 0xf8, 0x00, 0x1f, 0x83, 0xf0, 0x00, 0xfe, 0x00, 0xff, 0xf8, 0x03, 0xff, 0xff, 0xff, 0xff, 0xc0, 0xf8, 0x00, 0x1f, 0x83, 0xf0, 0x00, 0xfc, 0x00, 0xff, 0xfc, 0x03, 0xff, 0xff, 0xff, 0xff, 0xc0, 0xf8, 0x00, 0x3f, 0x03, 0xf0, 0x00, 0xfc, 0x00, 0xff, 0xfe, 0x03, 0xff, 0xff, 0xff, 0xff, 0xc0, 0xf8, 0x00, 0x7f, 0x03, 0xf0, 0x00, 0xfc, 0x00, 0xff, 0xff, 0x03, 0xff, 0xff, 0xff, 0xff, 0xc0, 0xf8, 0x00, 0xff, 0x03, 0xf0, 0x00, 0xfc, 0x00, 0xff, 0xff, 0x83, 0xff, 0xff, 0xff, 0xff, 0xc0, 0xf8, 0x03, 0xfe, 0x03, 0xf0, 0x00, 0xfc, 0x00, 0xff, 0xff, 0xc3, 0xff, 0xff, 0xff, 0xff, 0xc0, 0xff, 0xff, 0xfc, 0x03, 0xf0, 0x00, 0xfc, 0x00, 0xff, 0xff, 0xc3, 0xff, 0xff, 0xff, 0xff, 0xc0, 0xff, 0xff, 0xf8, 0x03, 0xf0, 0x00, 0xfc, 0x00, 0xff, 0xff, 0xe3, 0xff, 0xff, 0xff, 0xff, 0xc0, 0xff, 0xff, 0xe0, 0x03, 0xf0, 0x00, 0xfc, 0x00, 0xff, 0xff, 0xe3, 0xff, 0xff, 0xff, 0xff, 0xc0, 0xff, 0xff, 0x80, 0x03, 0xf0, 0x00, 0xfc, 0x00, 0xff, 0xff, 0xf3, 0xff, 0xff, 0xff, 0xff, 0xc0, 0xff, 0xf8, 0x00, 0x03, 0xe0, 0x00, 0xfc, 0x00, 0xff, 0xff, 0xf3, 0xff, 0xff, 0xff, 0xff, 0xc0, 0x00, 0x00, 0x00, 0x00, 0x00, 0x00, 0x00, 0x00, 0xff, 0xff, 0xfb, 0xff, 0xff, 0xff, 0xff, 0xc0, 0x00, 0x00, 0x00, 0x00, 0x00, 0x00, 0x00, 0x00, 0xff, 0xff, 0xfb, 0xff, 0xff, 0xff, 0xff, 0xc0, 0x00, 0x00, 0x00, 0x00, 0x00, 0x00, 0x00, 0x00, 0xff, 0xff, 0xfb, 0xff, 0xff, 0xff, 0xff, 0xc0, 0x00, 0x00, 0x00, 0x00, 0x00, 0x00, 0x00, 0x00, 0xff, 0xff, 0xfb, 0xff, 0xff, 0xff, 0xff, 0xc0, 0x00, 0x00, 0x00, 0x00, 0x00, 0x00, 0x00, 0x00, 0xff, 0xff, 0xff, 0xff, 0xff, 0xff, 0xff, 0xc0, 0xff, 0xff, 0xff, 0xff, 0xff, 0xff, 0xff, 0xff, 0xff, 0xff, 0xff, 0xff, 0xff, 0xff, 0xff, 0xc0, 0xff, 0xff, 0xff, 0xff, 0xff, 0xff, 0xff, 0xff, 0xff, 0xff, 0xff, 0xff, 0xff, 0xff, 0xff, 0xc0, 0xff, 0xff, 0xff, 0xff, 0xff, 0xff, 0xff, 0xff, 0xff, 0xff, 0xff, 0xff, 0xff, 0xff, 0xff, 0xc0, 0xff, 0xff, 0xff, 0xff, 0xff, 0xff, 0xff, 0xff, 0xff, 0xff, 0xff, 0xff, 0xff, 0xff, 0xff, 0xc0, 0xff, 0xff, 0xff, 0xff, 0xff, 0xff, 0xff, 0xff, 0xff, 0xff, 0xff, 0xff, 0xff, 0xff, 0xff, 0xc0, 0xff, 0xff, 0xc7, 0xff, 0x1f, 0xff, 0xff, 0xff, 0xff, 0xff, 0xff, 0xff, 0xff, 0xff, 0xff, 0xc0, 0xff, 0xff, 0xc7, 0xff, 0x1f, 0xff, 0xff, 0xff, 0xff, 0xff, 0xfb, 0xff, 0xff, 0xff, 0xff, 0x80, 0xff, 0xff, 0xc7, 0xff, 0x1f, 0xff, 0xff, 0xff, 0xff, 0xff, 0xfb, 0xff, 0xff, 0xff, 0xff, 0x80, 0xff, 0xff, 0xc7, 0xff, 0x1f, 0xff, 0xff, 0xff, 0xff, 0xff, 0xfb, 0xff, 0xff, 0xff, 0xff, 0x80, 0xff, 0x9f, 0xc6, 0x7f, 0x1f, 0xdf, 0xf9, 0xff, 0xff, 0xff, 0xfb, 0xff, 0xff, 0xff, 0xff, 0x00, 0xfc, 0x03, 0xc0, 0x0f, 0x1e, 0x03, 0xe0, 0x3f, 0xff, 0xff, 0xf3, 0xff, 0xff, 0xff, 0xff, 0x00, 0xfc, 0x03, 0xc0, 0x07, 0x1c, 0x01, 0xc0, 0x3f, 0xff, 0xff, 0xf3, 0xff, 0xff, 0xff, 0xfe, 0x00, 0xfd, 0xf1, 0xc3, 0xc7, 0x18, 0xf8, 0x8f, 0xff, 0xff, 0xff, 0xe3, 0xff, 0xff, 0xff, 0xfe, 0x00, 0xff, 0xf1, 0xc7, 0xe3, 0x18, 0xf8, 0x8f, 0xff, 0xff, 0xff, 0xe3, 0xff, 0xff, 0xff, 0xfc, 0x00, 0xfe, 0x01, 0xc7, 0xe3, 0x18, 0x00, 0xc0, 0xff, 0xff, 0xff, 0xc3, 0xff, 0xff, 0xff, 0xfc, 0x00, 0xfc, 0x01, 0xc7, 0xe3, 0x18, 0x00, 0xe0, 0x3f, 0xff, 0xff, 0xc3, 0xff, 0xff, 0xff, 0xf8, 0x00, 0xf8, 0xf1, 0xc7, 0xe3, 0x18, 0xff, 0xfe, 0x1f, 0xff, 0xff, 0x83, 0xff, 0xff, 0xff, 0xf0, 0x00, 0xf8, 0xf1, 0xc3, 0xc7, 0x18, 0xff, 0xff, 0x1f, 0xff, 0xff, 0x03, 0xff, 0xff, 0xff, 0xe0, 0x00, 0xf8, 0x61, 0xc0, 0x07, 0x1c, 0x01, 0xc0, 0x3f, 0xff, 0xfe, 0x03, 0xff, 0xff, 0xff, 0xc0, 0x00, 0xfc, 0x01, 0xc0, 0x0f, 0x1e, 0x01, 0x80, 0x3f, 0xff, 0xfc, 0x03, 0xff, 0xff, 0xff, 0x80, 0x00, 0xfe, 0x19, 0xc4, 0x3f, 0x1f, 0x87, 0xe0, 0xff, 0xff, 0xf8, 0x03, 0xff, 0xff, 0xff, 0x00, 0x00, 0xff, 0xff, 0xff, 0xff, 0xff, 0xff, 0xff, 0xff, 0xff, 0xe0, 0x03, 0xff, 0xff, 0xfc, 0x00, 0x00, 0xff, 0xff, 0xff, 0xff, 0xff, 0xff, 0xff, 0xff, 0xff, 0xc0, 0x03, 0xff, 0xff, 0xf0, 0x00, 0x00, 0xff, 0xff, 0xff, 0xff, 0xff, 0xff, 0xff, 0xff, 0xff, 0x00, 0x03, 0xff, 0xff, 0xc0, 0x00, 0x00, 0xff, 0xff, 0xff, 0xff, 0xff, 0xff, 0xff, 0xff, 0xf0, 0x00, 0x03, 0xff, 0xfc, 0x00, 0x00, 0x00, 0xff, 0xff, 0xff, 0xff, 0xff, 0xff, 0xff, 0xff ] # Draw the bitmap on the display oled.draw_bitmap(0, 0, heart_bitmap, 128, 57, 1) # Update the display with the new image oled.display() utime.sleep(3) #oled.invert_display(True)

Wenn Sie den obigen Code ausführen, wird das Bild auf dem OLED angezeigt, wie unten zu sehen.
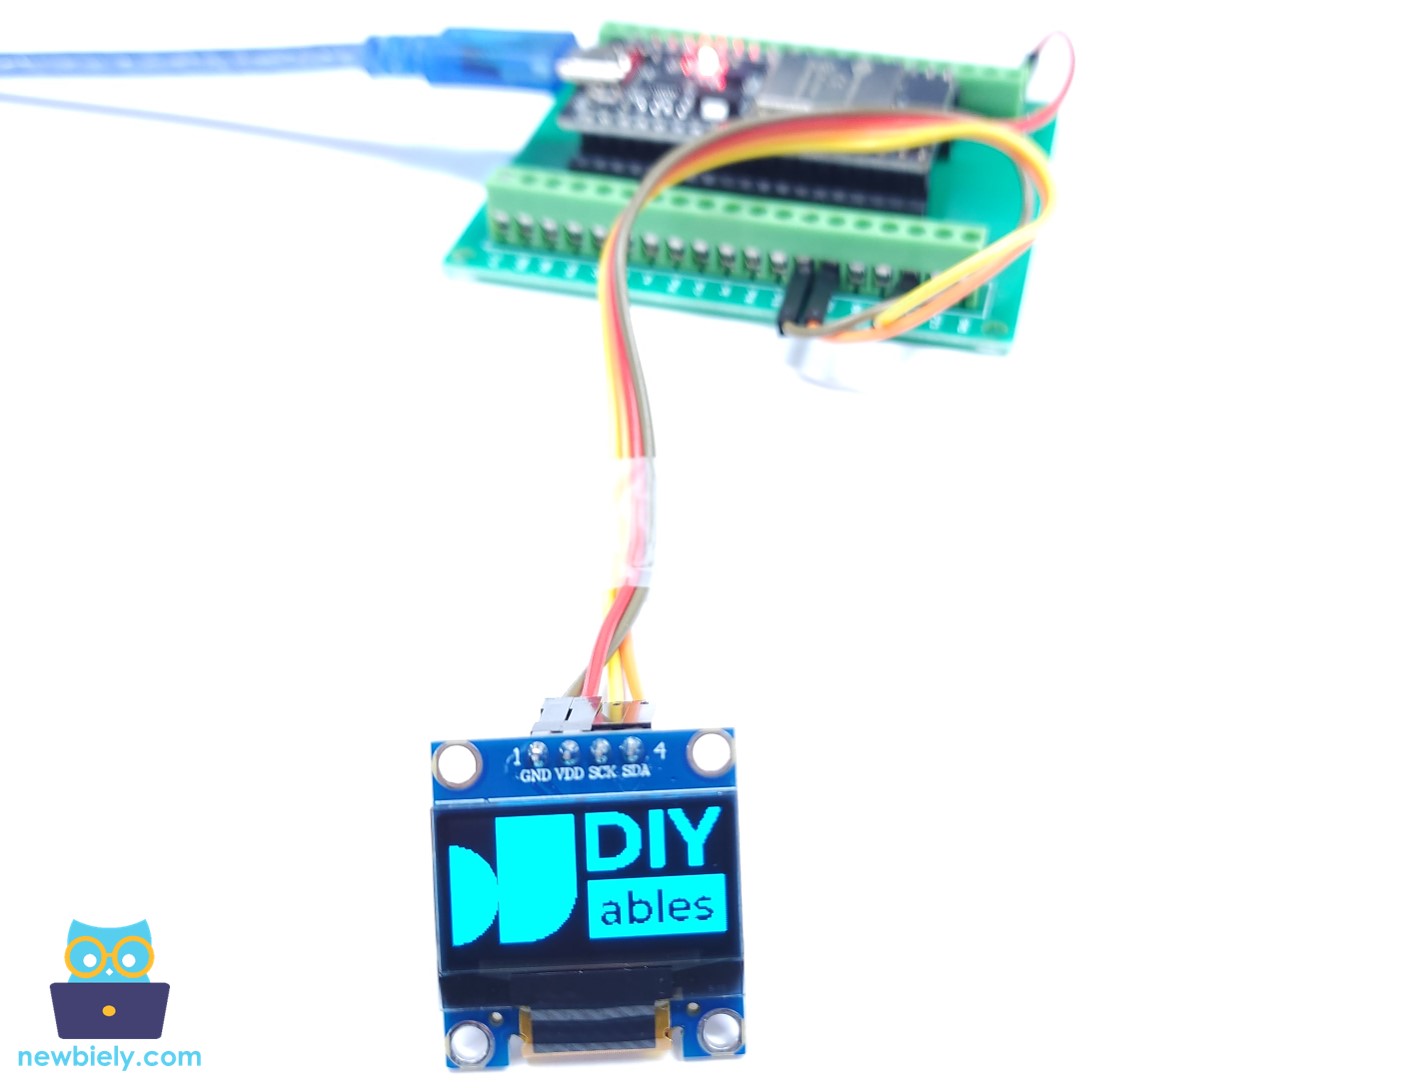
ESP32 MicroPython Bild auf dem OLED anzeigen

Um ein anderes Bild auf einem OLED-Bildschirm anzuzeigen, gehen Sie wie folgt vor:

  • Wandeln Sie das Bild (in einem beliebigen Format) in ein Bitmap-Array um. Sie können dafür das Tool Image to Bitmap Converter verwenden. Im Bild unten sehen Sie, wie ein Bild in ein Bitmap-Array umgewandelt wird. Ich habe das ESP32-Symbol in ein Bitmap-Array umgewandelt.
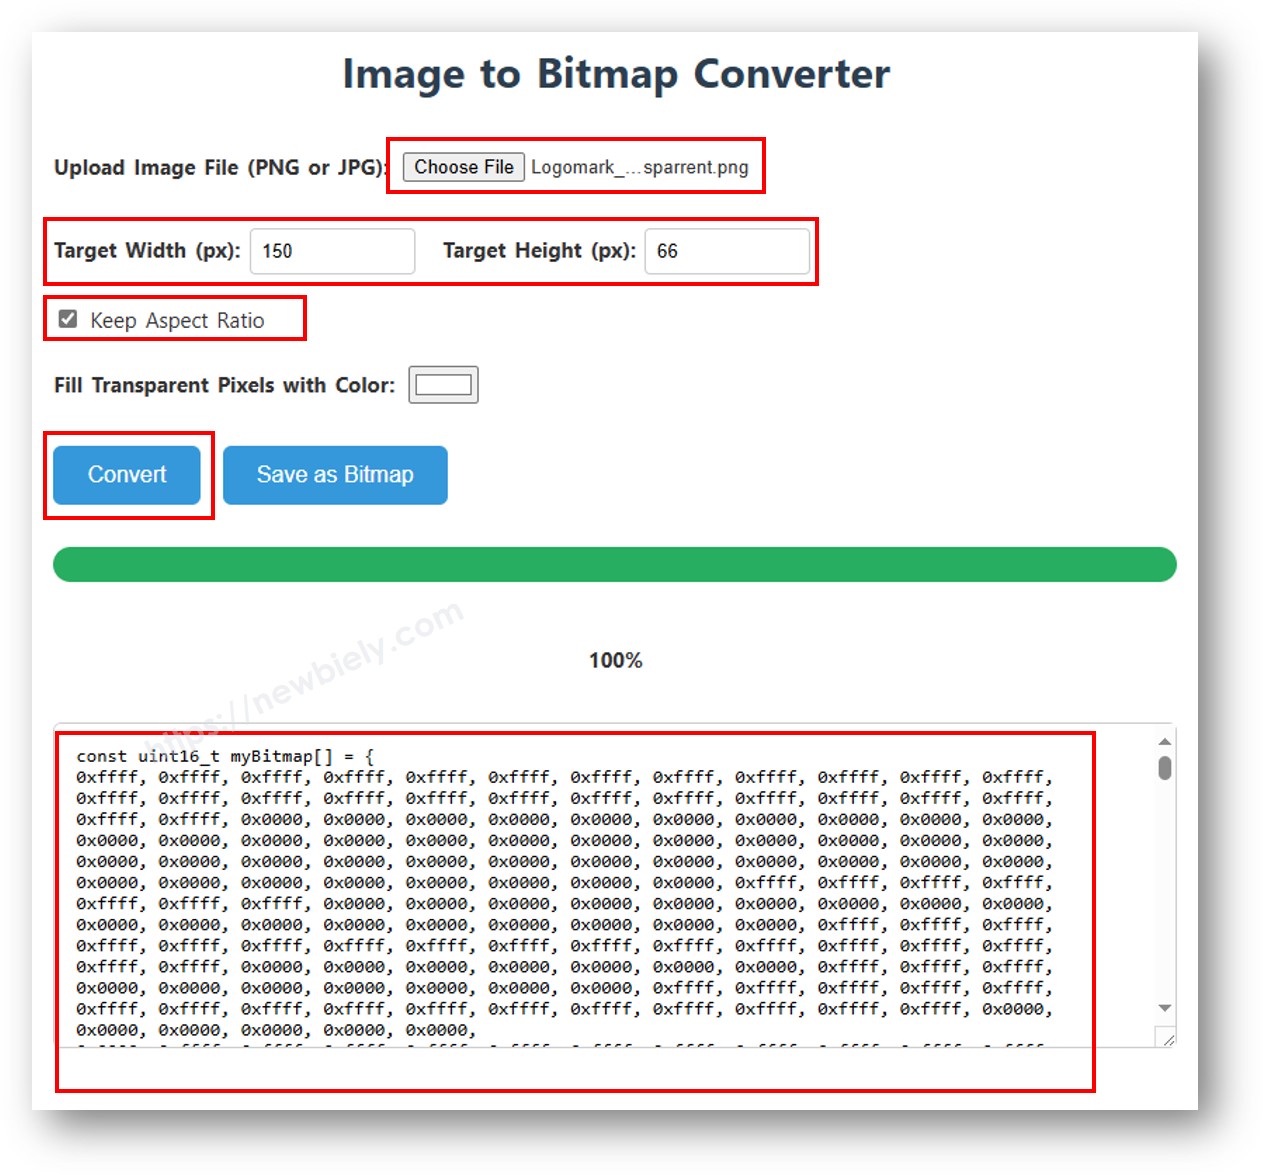
Bild in Bitmap-Array
  • Übernehmen Sie das umgewandelte Bitmap-Array als neuen Array-Code in den ESP32-MicroPython-Code.
  • Ändern Sie Breite und Höhe des Bildes im ESP32-MicroPython-Code entsprechend den Abmessungen des Bildes.

Bitte beachten Sie, dass die Bildgröße gleich oder kleiner als die Bildschirmgröße sein sollte.

ESP32 MicroPython-Code - Formen auf dem OLED zeichnen

/* * Dieser ESP32 MicroPython Code wurde von newbiely.de entwickelt * Dieser ESP32 MicroPython Code wird der Öffentlichkeit ohne jegliche Einschränkung zur Verfügung gestellt. * Für vollständige Anleitungen und Schaltpläne besuchen Sie bitte: * https://newbiely.de/tutorials/esp32-micropython/esp32-micropython-oled-128x64 */ from machine import I2C, Pin from DIYables_MicroPython_OLED import OLED_SSD1306_I2C # Initialize I2C i2c = I2C(0, scl=Pin(22), sda=Pin(21), freq=400000) # Adjust ESP32 pins according to your setup # Initialize the OLED display oled = OLED_SSD1306_I2C(128, 64, i2c) # Clear the display oled.clear_display() oled.display() # Draw a rectangle oled.draw_rect(0, 0, 40, 25, 1) #oled.fill_rect(0, 0, 40, 25, 1) oled.display() # Draw a circle #oled.draw_circle(64, 32, 20, 1) oled.fill_circle(64, 32, 20, 1) oled.display() # Draw a triangle oled.draw_triangle(80, 62, 128, 62, 104, 32, 1) #oled.fill_triangle(80, 62, 128, 62, 104, 32, 1) oled.display()

Nach dem Ausführen des Codes sehen Sie ein Rechteck, einen Kreis und ein Dreieck auf dem OLED-Bildschirm.
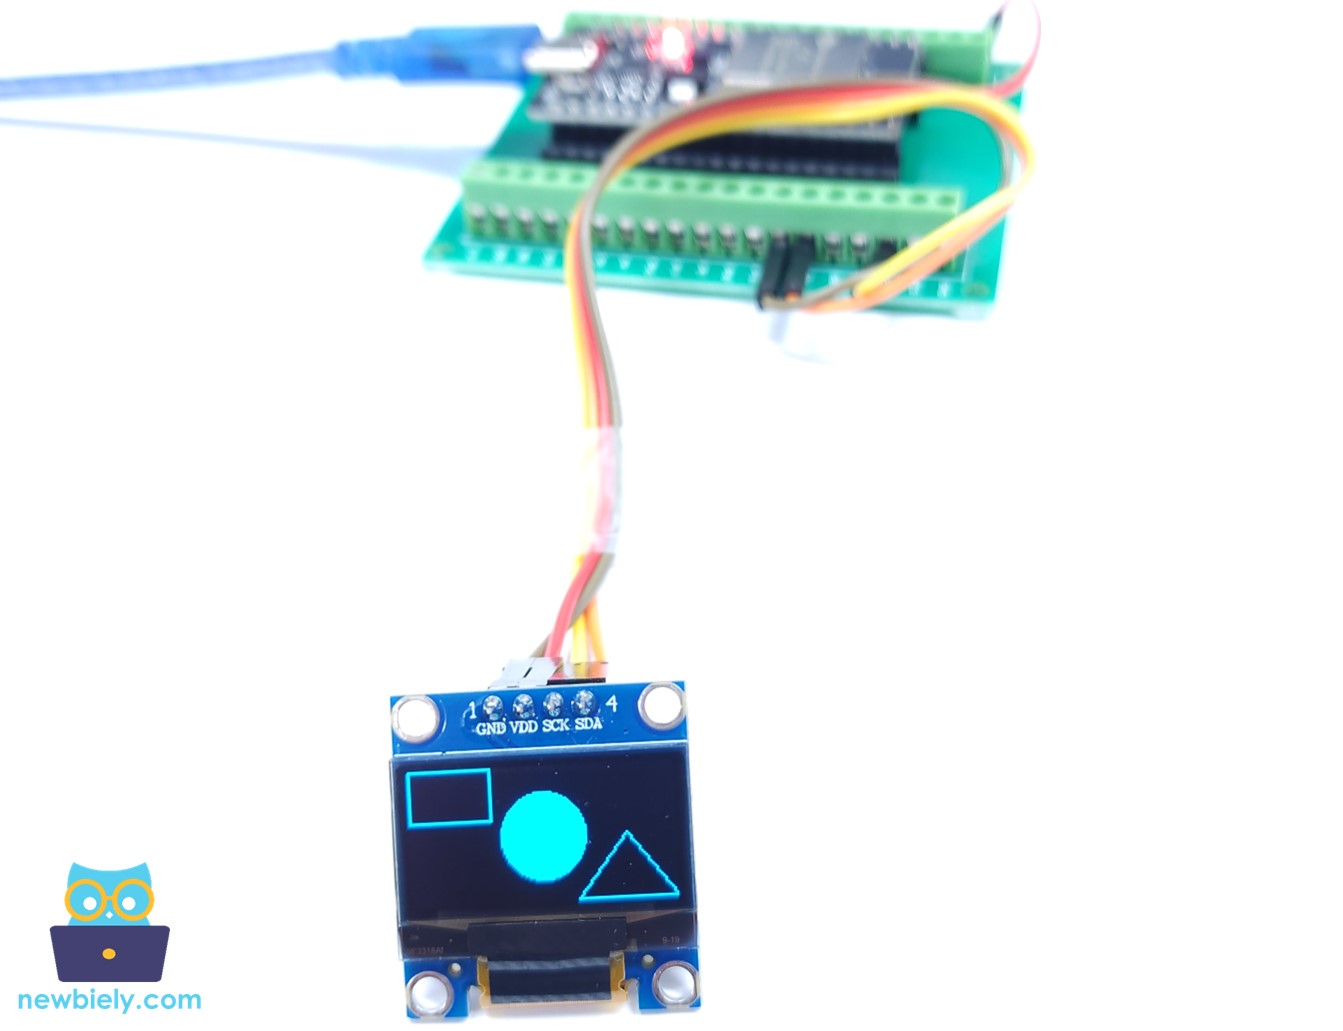
ESP32 MicroPython Rechteck, Kreis und Dreieck auf dem OLED zeichnen

OLED-Fehlerbehebung

Wenn auf dem OLED-Bildschirm nichts angezeigt wird, gehen Sie bitte wie folgt vor:

  • Prüfen Sie, ob die Verdrahtung korrekt ist.
  • Stellen Sie sicher, dass Ihr I2C-OLED einen SSD1306-Treiber hat.
  • Ermitteln Sie die I2C-Adresse Ihres OLED mit diesem I2C-Adressscanner-Code auf dem ESP32.
from machine import I2C, Pin import utime i2c = I2C(1, scl=Pin(22), sda=Pin(21)) print('Scanning I2C bus...') devices = i2c.scan() if len(devices) == 0: print("No I2C devices found") else: print('I2C devices found:',len(devices)) for device in devices: print("Decimal address: ",device," | Hex address: ",hex(device)) utime.sleep(2)

Ausgabe in der Shell unten in Thonny:

Shell x
>>> %Run -c $EDITOR_CONTENT
MPY: soft reboot Scanning... I2C device found at address 0x3C ! done Scanning... I2C device found at address 0x3C ! done
MicroPython (ESP32) • CP2102 USB To UART Bridge Controller @ COM12 ≡

※ UNSERE NACHRICHTEN

  • Sie können gerne den Link zu diesem Tutorial teilen. Bitte verwenden Sie jedoch unsere Inhalte nicht auf anderen Websites. Wir haben viel Mühe und Zeit in die Erstellung der Inhalte investiert, bitte respektieren Sie unsere Arbeit!