
ESP32 MicroPython - OLED SSD1309
Der ESP32 ist ein leistungsstarker, WLAN-fähiger Mikrocontroller, der in IoT- und Embedded-Projekten weit verbreitet ist. In Kombination mit MicroPython und der DIYables-Bibliothek OLED SSD1309 können Sie Ihrem Projekt ganz einfach ein gestochen scharfes monochromes OLED-Display hinzufügen.
Dieses Tutorial führt Sie durch:
- Den Anschluss des OLED SSD1309 an einen ESP32 — es werden nur 2 Datenpins benötigt (I2C).
- Die Anzeige von Text und Zahlen.
- Das Zeichnen von Formen: Pixel, Linien, Rechtecke und Bitmaps.
- Die Verwendung von Hardware-Scrolling.
- Die Einstellung des Kontrasts und das Dimmen des Displays.
Benötigte Komponenten
Oder Sie können die folgenden Kits kaufen:
| 1 | × | DIYables ESP32 Starter-Kit (ESP32 enthalten) | |
| 1 | × | DIYables Sensor-Kit (18 Sensoren/Displays) |
Das OLED SSD1309
Der SSD1309 ist ein Single-Chip-CMOS-OLED/PLED-Treiber mit Controller für grafische Punktmatrix-Anzeigesysteme mit organischen bzw. Polymer-Leuchtdioden. Er wird über das I2C-Protokoll (Zweidraht) mit einem Mikrocontroller verbunden, was die Verdrahtung minimal hält — neben der Stromversorgung werden nur die Leitungen SDA und SCL benötigt.
Das Display ist selbstleuchtend (keine Hintergrundbeleuchtung nötig), bietet hohen Kontrast, einen weiten Betrachtungswinkel und ist sowohl in heller als auch in dunkler Umgebung gut lesbar. Es ist üblicherweise in Varianten mit 128×64 und 128×32 Pixeln erhältlich.
Hauptmerkmale:
- I2C-Schnittstelle (Standardadresse 0x3C)
- Auflösung von 128×64 Pixeln (oder 128×32, 96×16, 64×48, 64×32)
- Eingebautes Hardware-Scrolling in horizontaler und diagonaler Richtung
- Einstellbarer Kontrast (0–255)
- Erweitert framebuf.FrameBuffer — alle MicroPython-Zeichenfunktionen funktionieren sofort
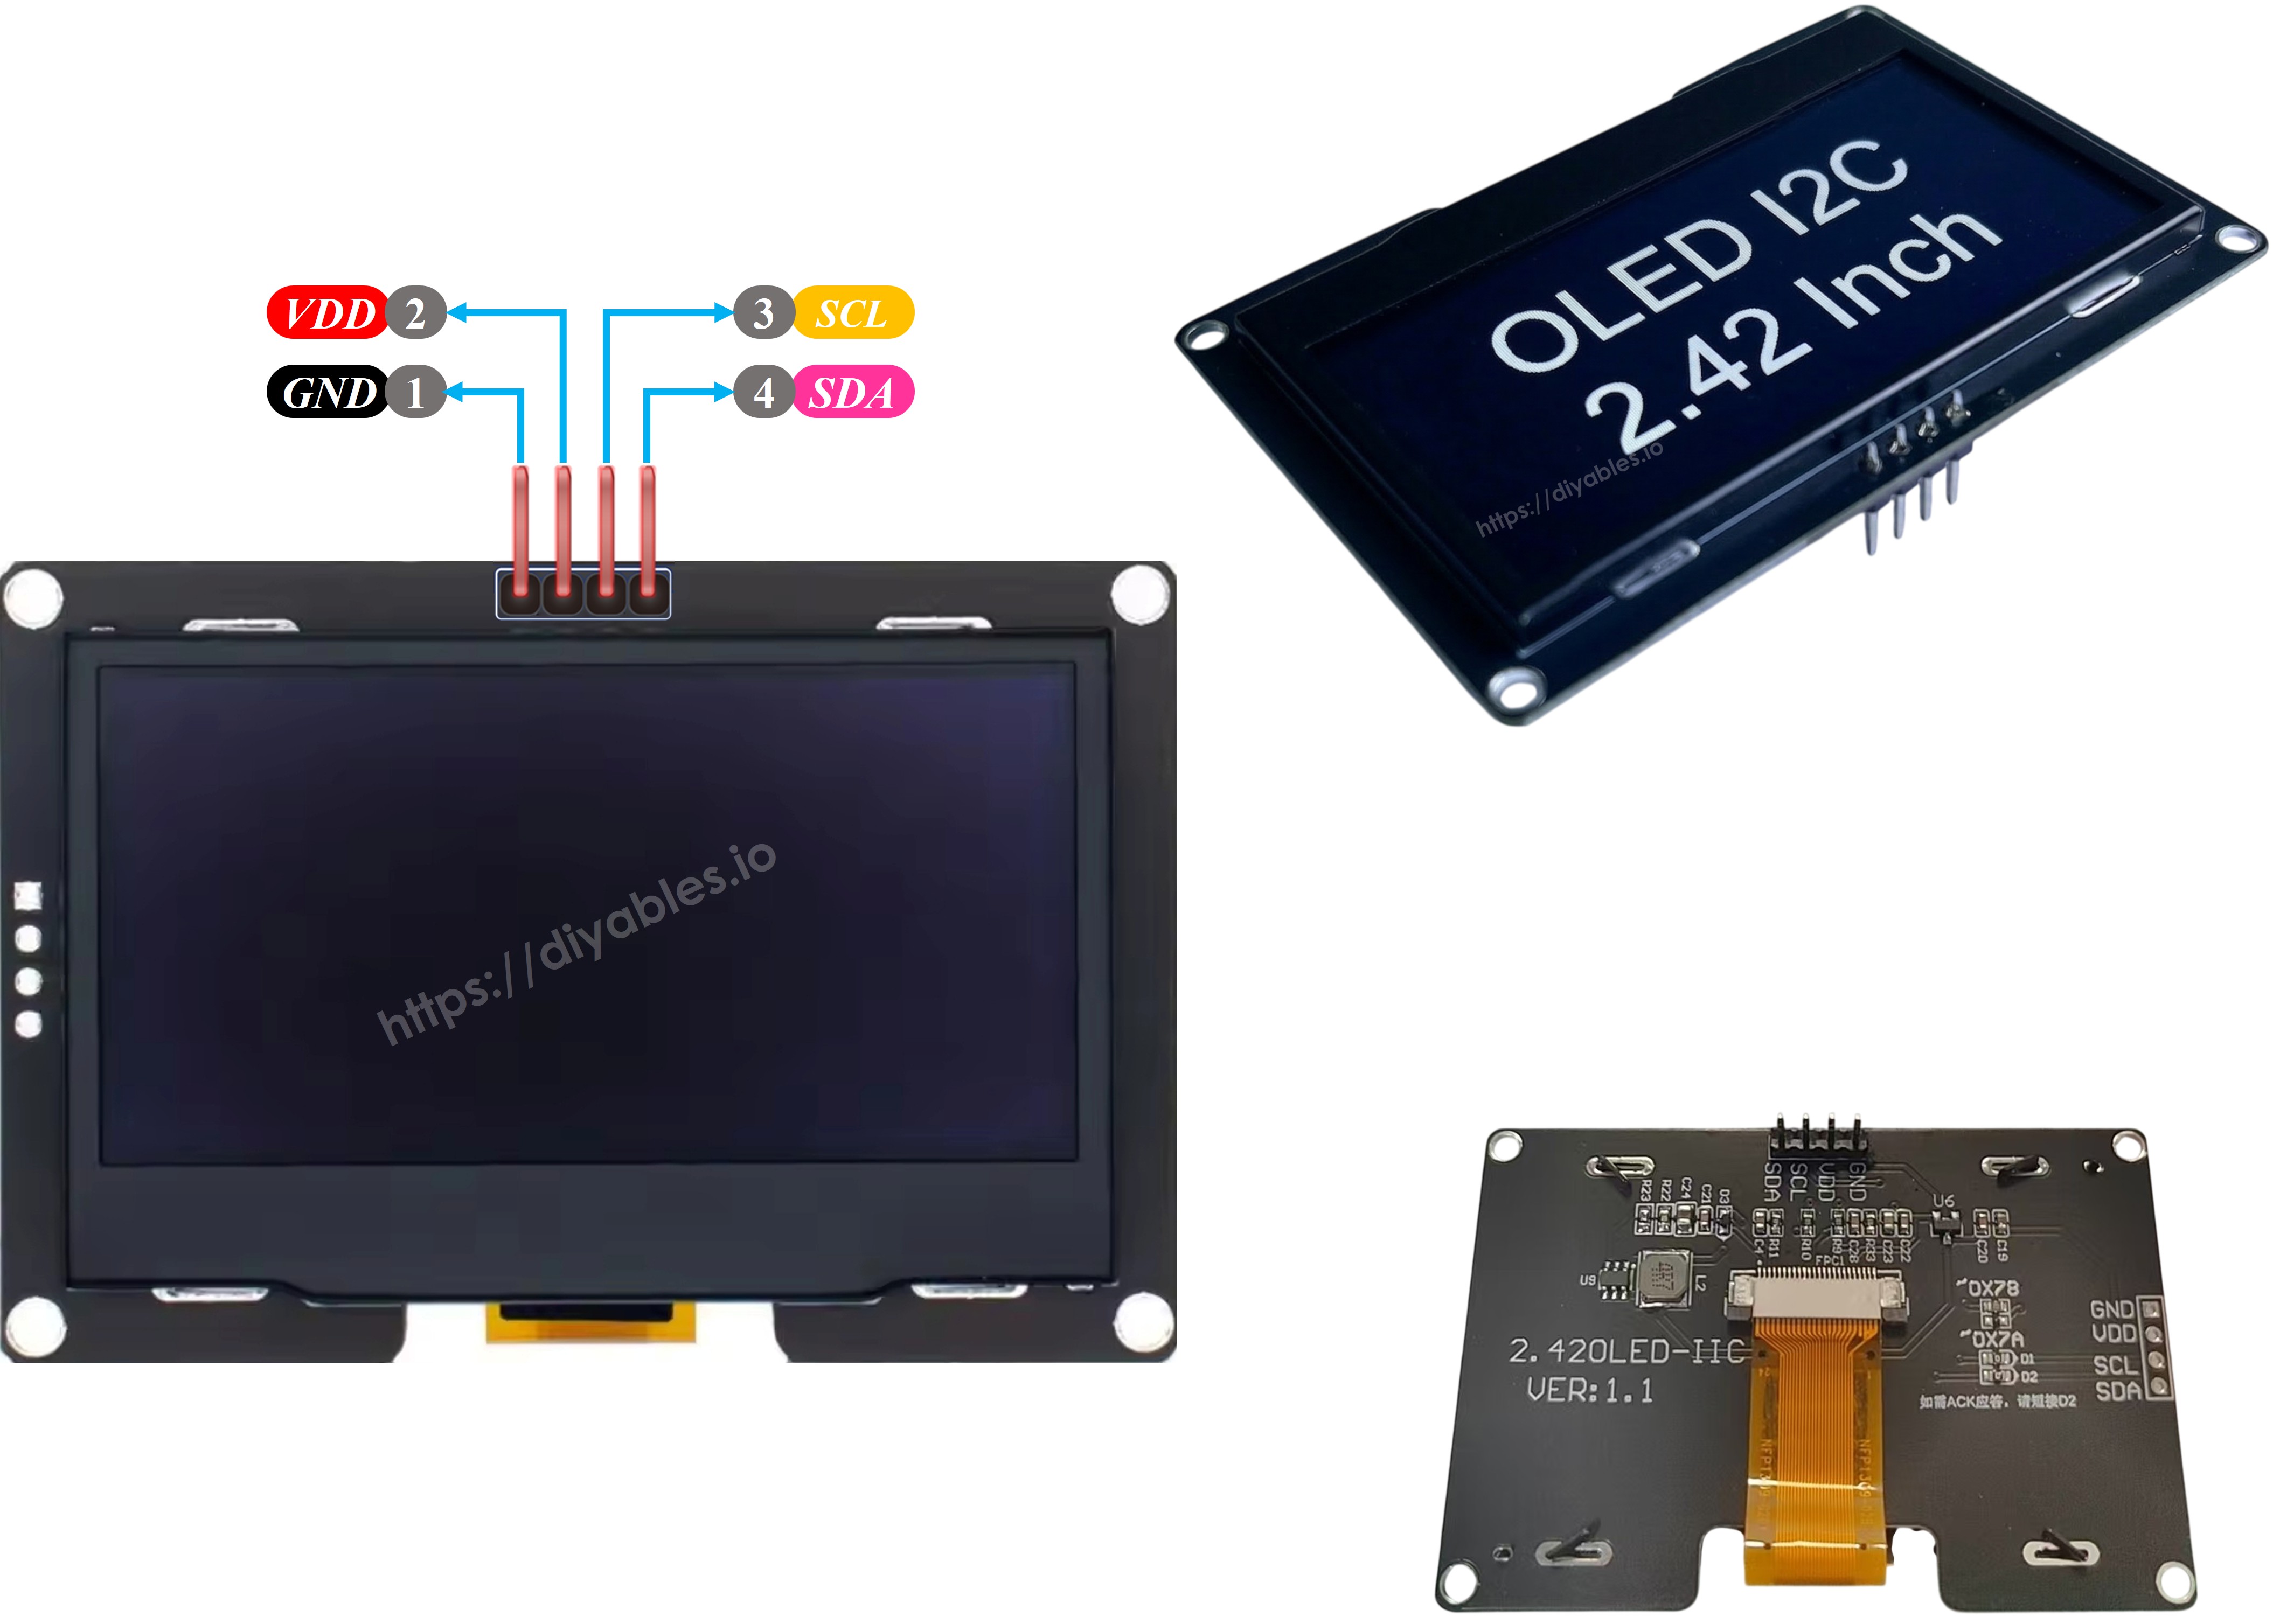
Pin-Beschreibung
| Pin | Zweck | ESP32-Anschluss |
|---|---|---|
| SDA | I2C-Datenleitung | Mit GPIO21 verbinden |
| SCL | I2C-Taktleitung | Mit GPIO22 verbinden |
| VCC | Stromeingang 3,3 V bis 5 V | Mit 3.3V verbinden |
| GND | Masse | Mit GND verbinden |
Verdrahtung
Der ESP32 arbeitet mit 3,3-V-Logik, die mit dem SSD1309-Display kompatibel ist.
| OLED SSD1309 | ESP32 | Hinweise |
|---|---|---|
| SDA | GPIO21 | I2C-Daten |
| SCL | GPIO22 | I2C-Takt |
| VCC | 3.3V | Stromversorgung |
| GND | GND | Masse |
- So verbinden Sie den ESP32 mit dem SSD1309 OLED 128x64 Display mithilfe eines Steckbretts
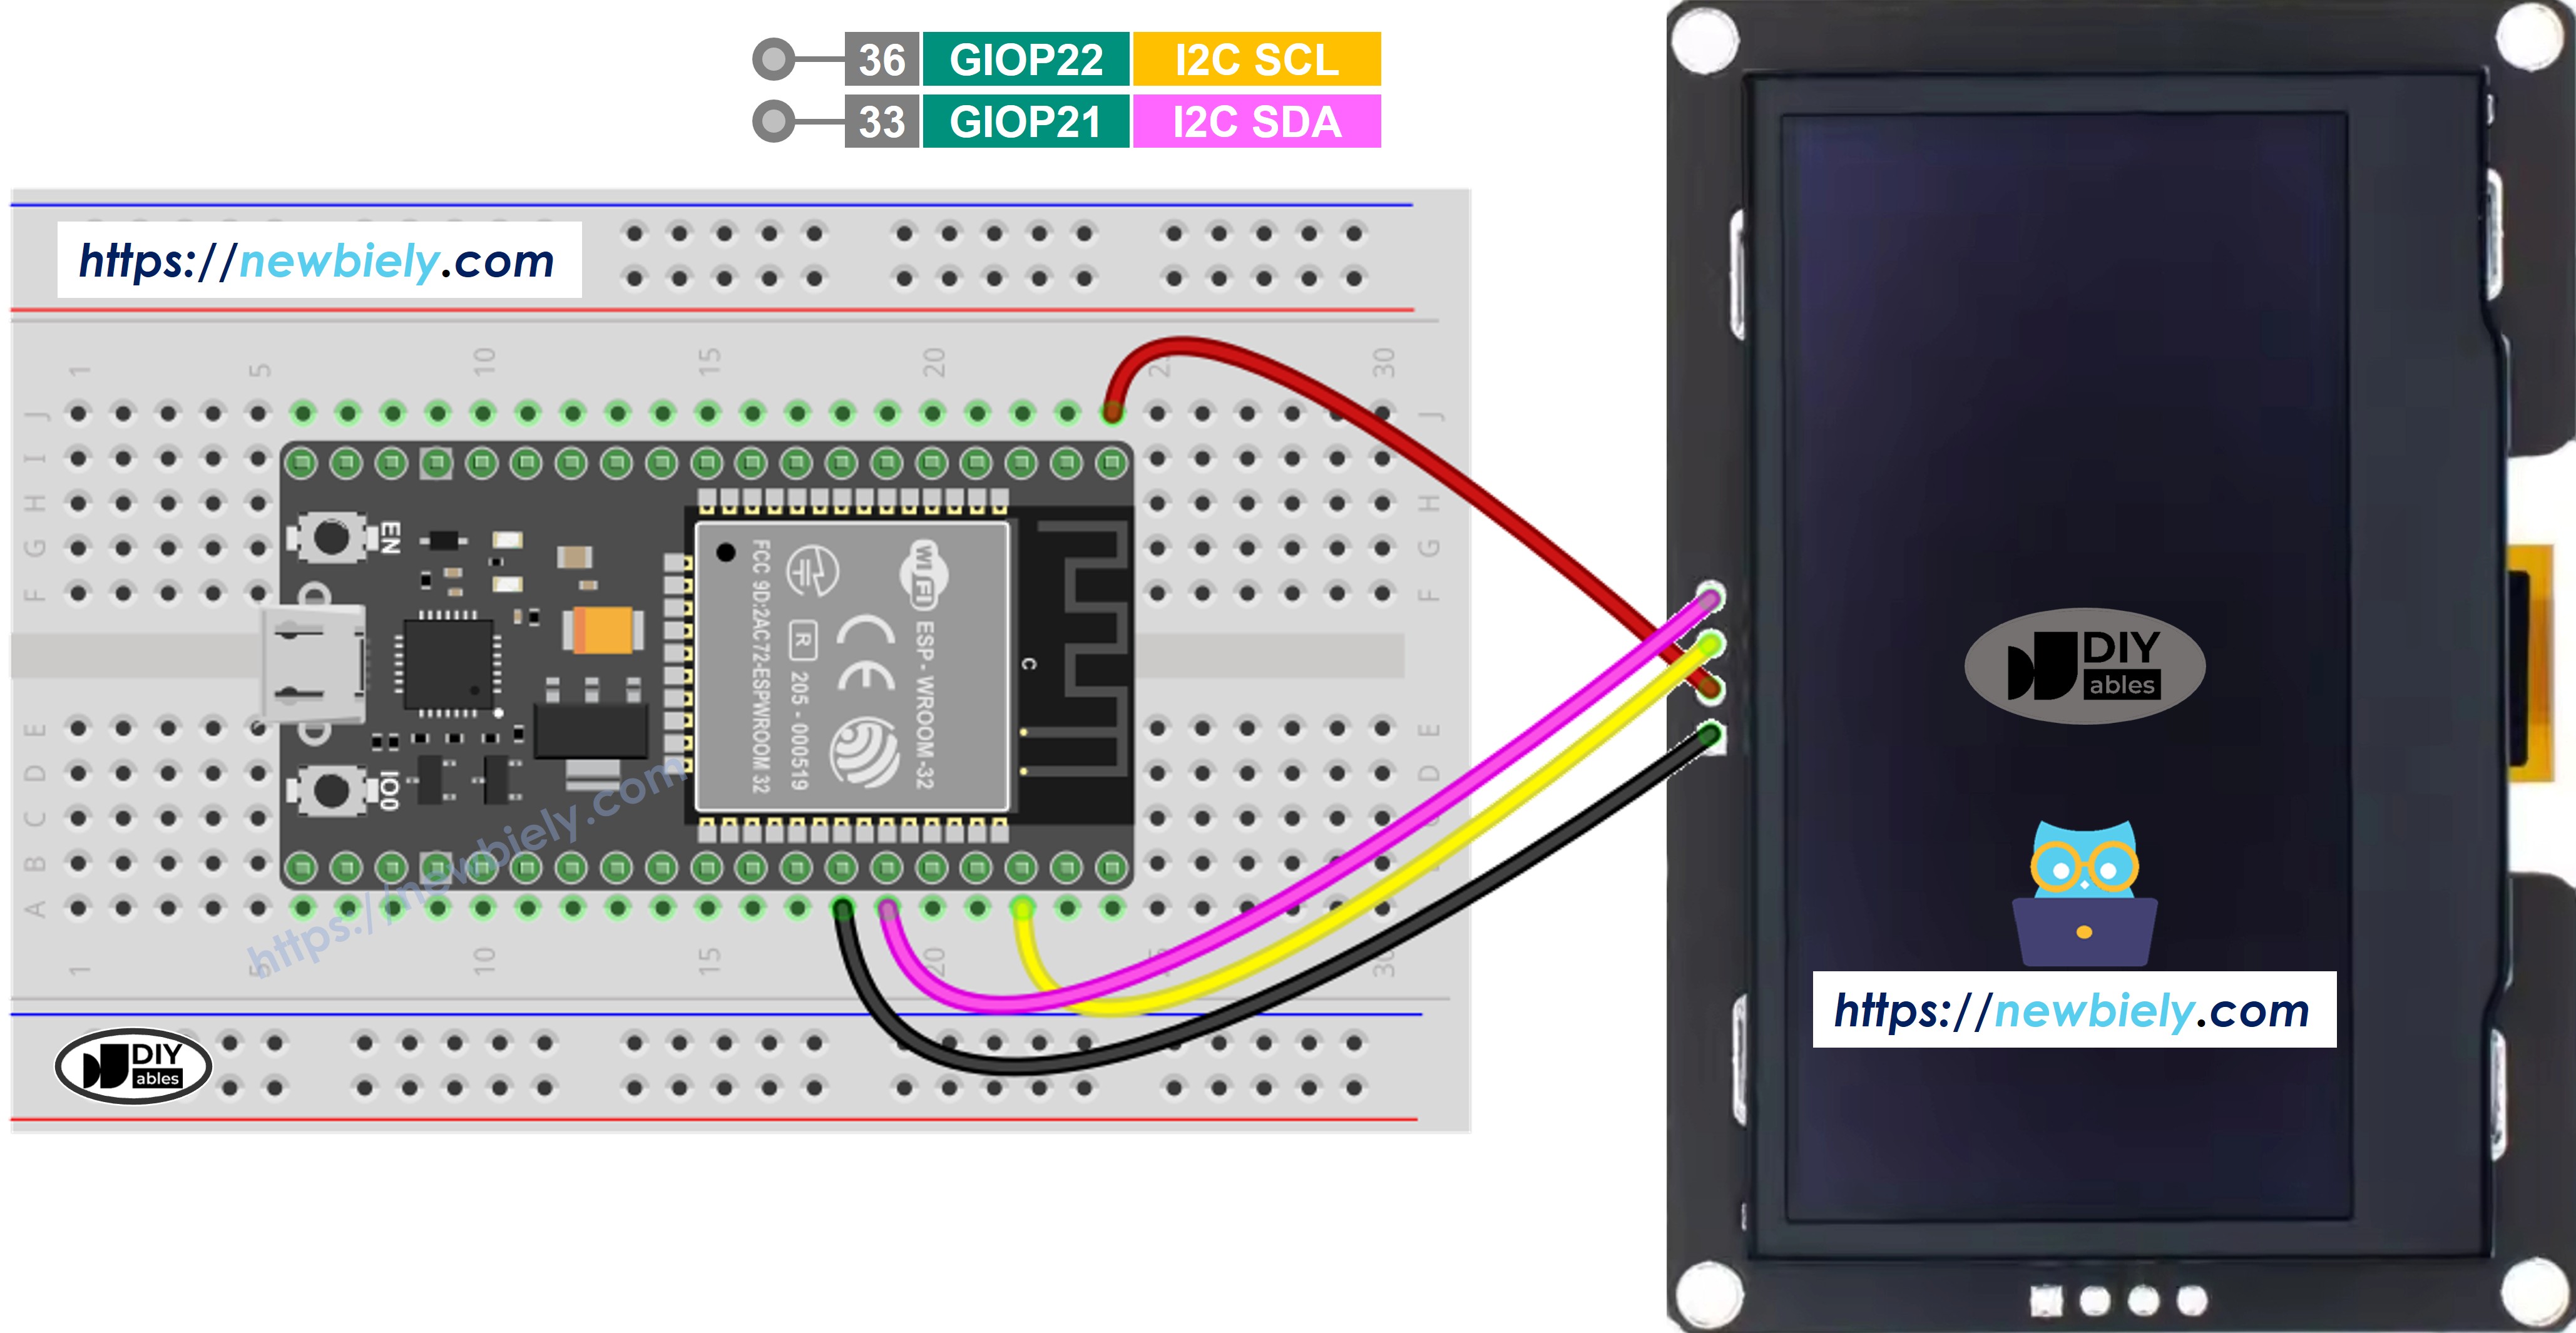
Dieses Bild wurde mit Fritzing erstellt. Klicken Sie, um das Bild zu vergrößern.
- So verbinden Sie den ESP32 mit dem SSD1309 OLED 128x64 Display mithilfe einer Schraubklemmen-Breakout-Platine
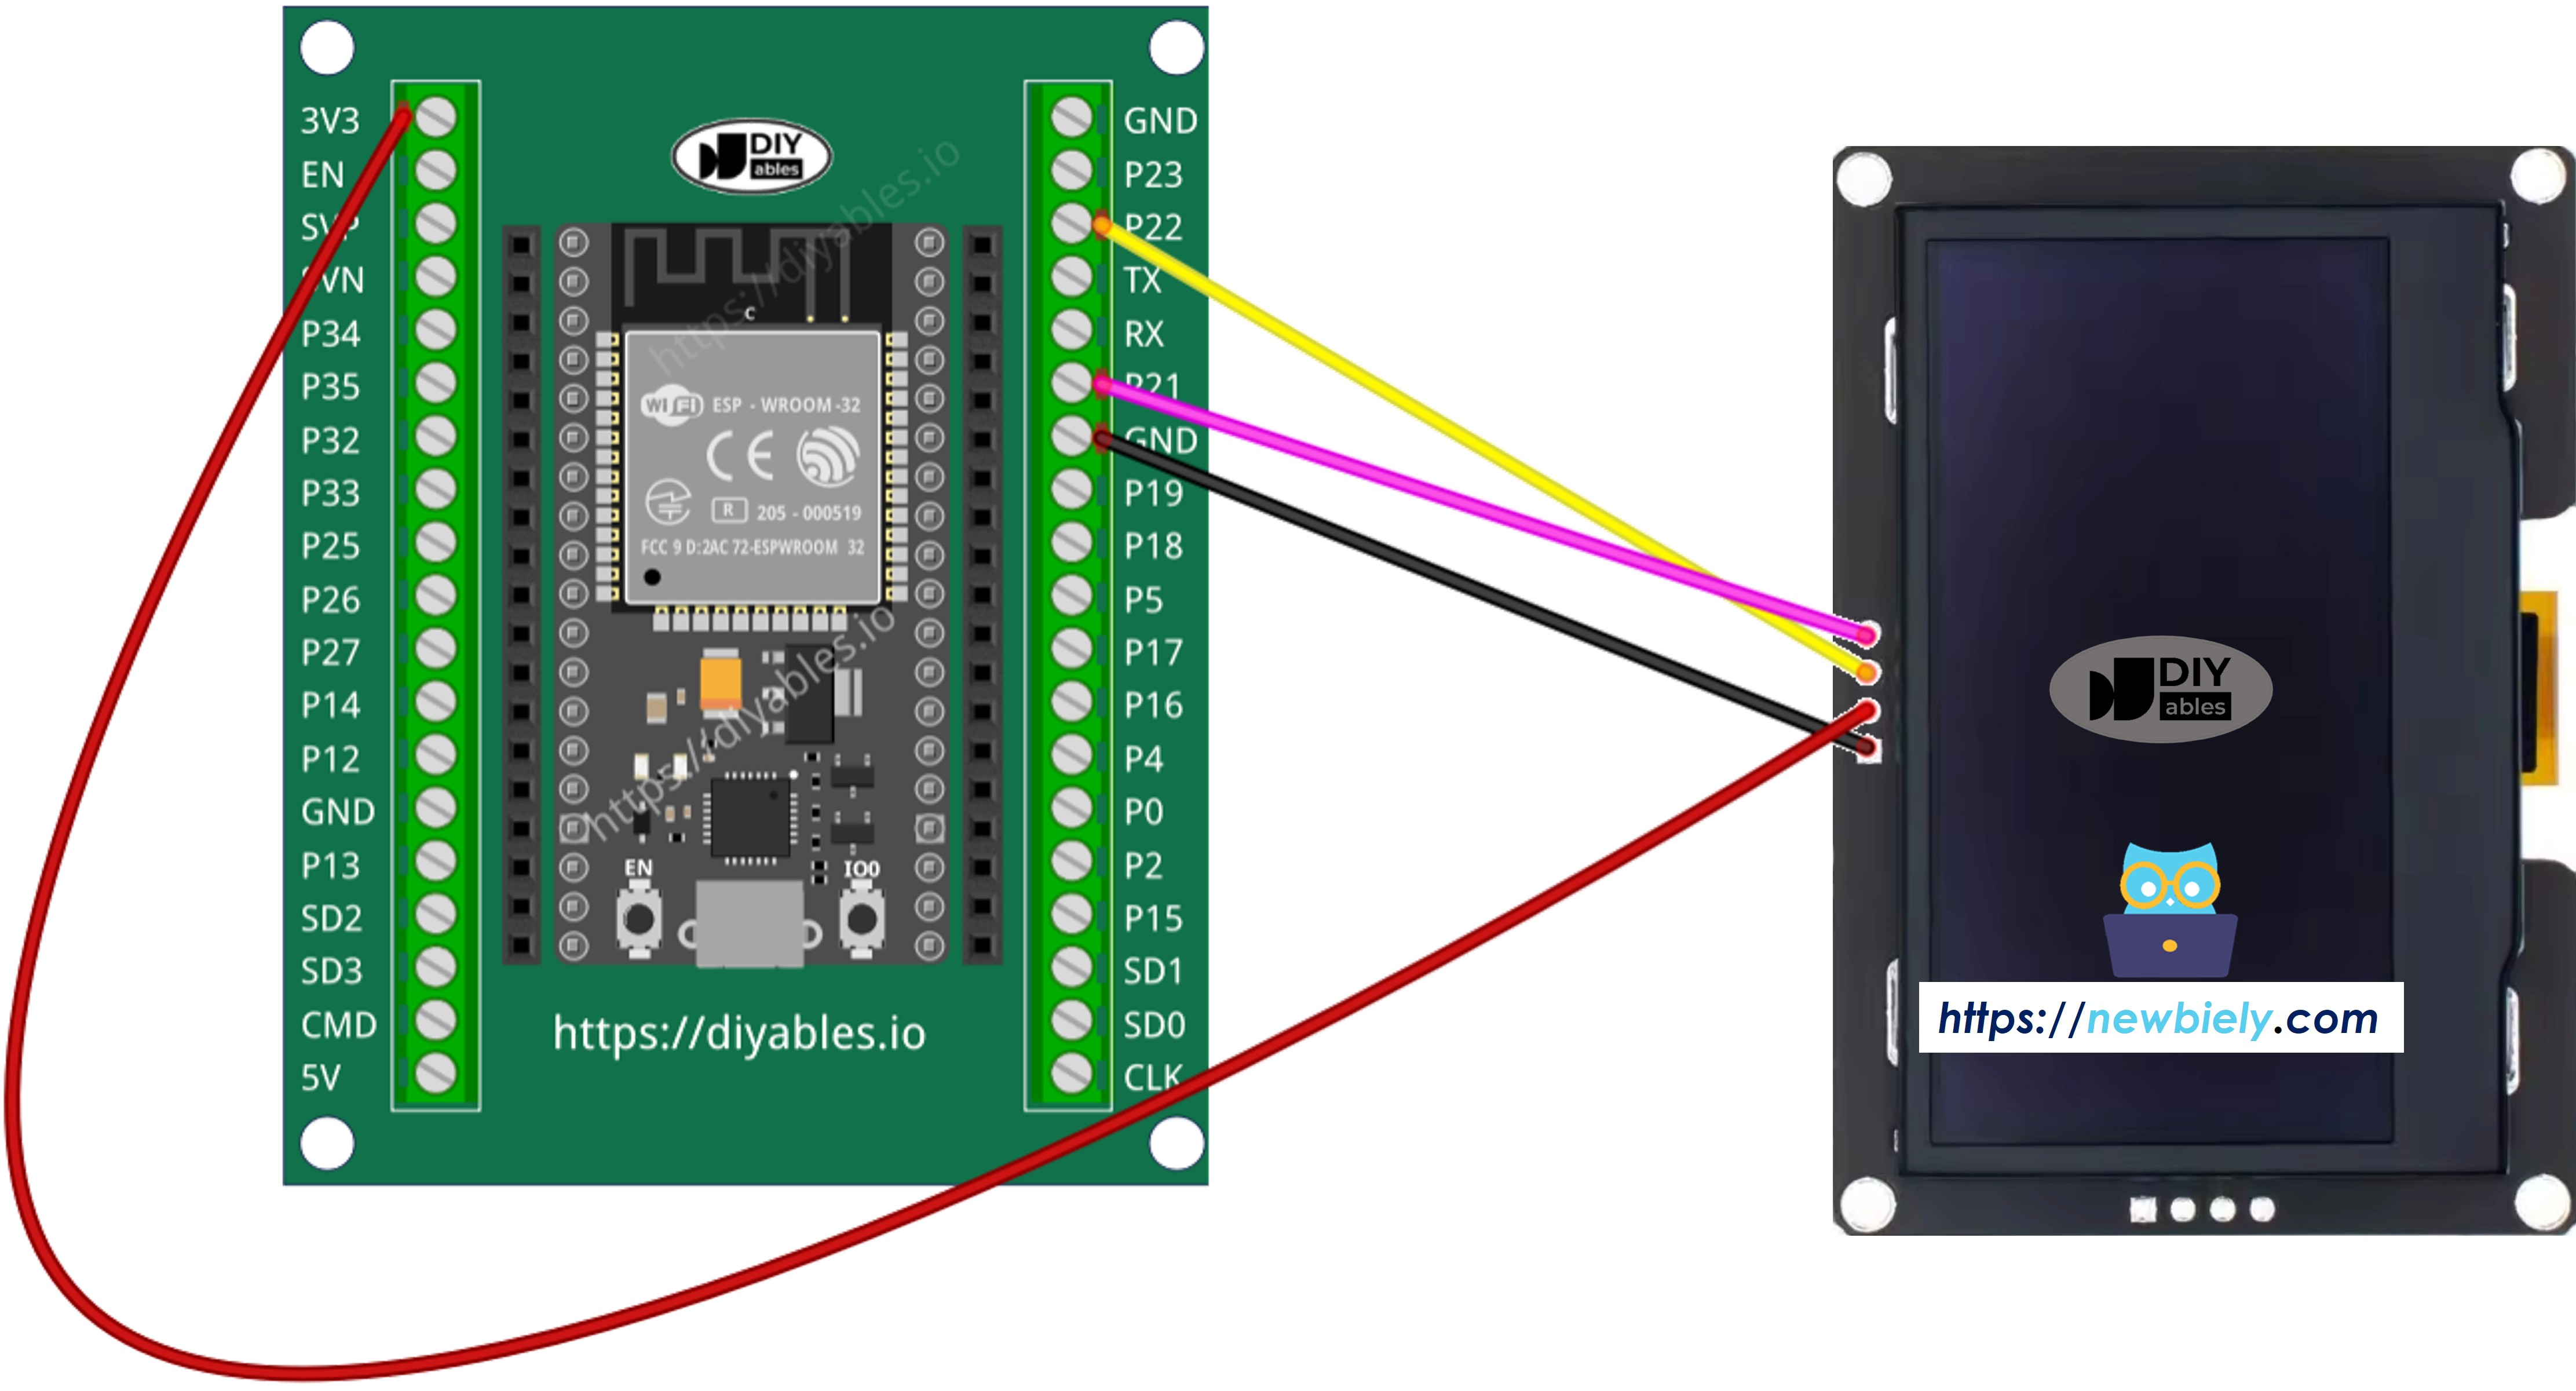
Dieses Bild wurde mit Fritzing erstellt. Klicken Sie, um das Bild zu vergrößern.
Tipp: Sie können beliebige verfügbare I2C-fähige GPIO-Pins des ESP32 verwenden. Passen Sie einfach die Werte SCL_PIN und SDA_PIN im Code an.
Schnelle Schritte
Hier finden Sie eine Anleitung, wie Sie Ihren MicroPython-Code auf dem ESP32 mit der Thonny IDE einrichten und ausführen:
- Stellen Sie sicher, dass Thonny IDE auf Ihrem Computer installiert ist.
- Vergewissern Sie sich, dass die MicroPython-Firmware auf Ihrem ESP32-Board geladen ist.
- Wenn Sie zum ersten Mal einen ESP32 mit MicroPython verwenden, lesen Sie die Anleitung ESP32 MicroPython Erste Schritte für eine Schritt-für-Schritt-Anleitung.
- Verbinden Sie das ESP32-Board gemäß dem bereitgestellten Schaltplan mit dem OLED SSD1309.
- Verbinden Sie das ESP32-Board mit einem USB-Kabel mit Ihrem Computer.
- Öffnen Sie Thonny IDE auf Ihrem Computer.
- Gehen Sie in Thonny IDE zu Tools Options.
- Wählen Sie im Tab Interpreter aus dem Dropdown-Menü MicroPython (ESP32).
- Stellen Sie sicher, dass der richtige Port ausgewählt ist. Thonny IDE erkennt ihn normalerweise automatisch, aber möglicherweise müssen Sie ihn manuell auswählen (z. B. COM3 unter Windows oder /dev/ttyUSB0 unter Linux).
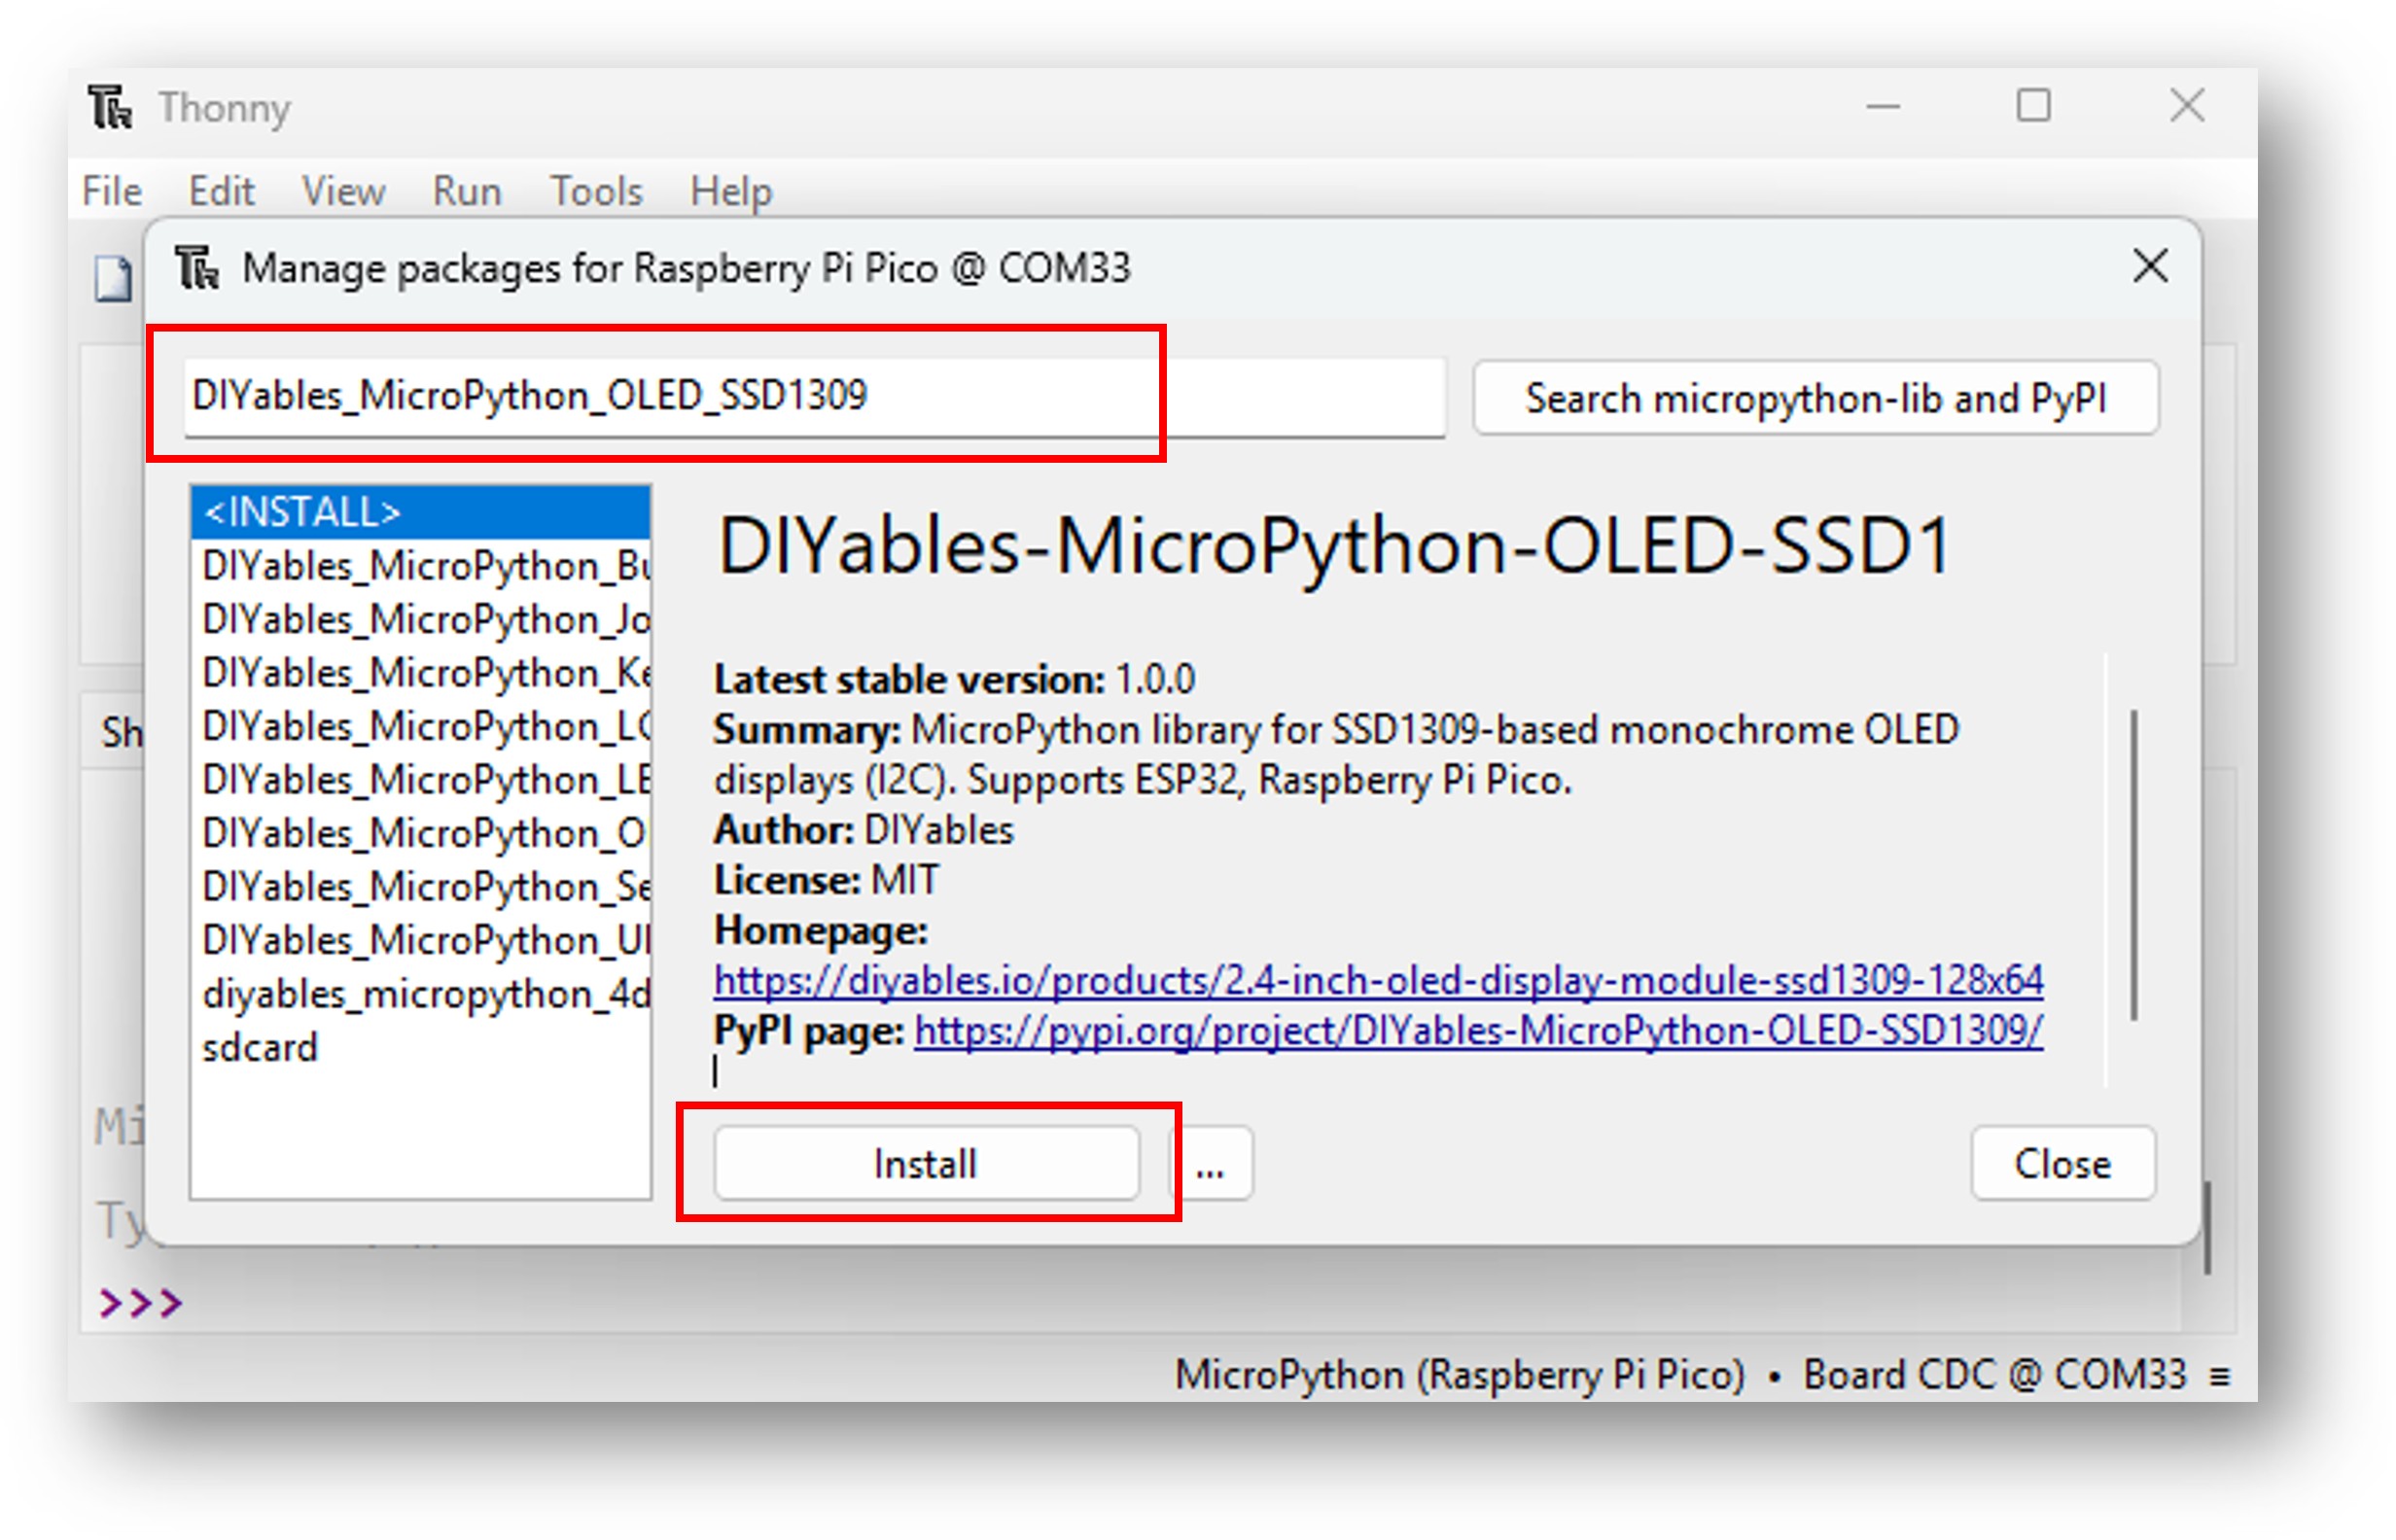
- Navigieren Sie in Thonny IDE zu Tools Manage packages.
- Suchen Sie nach "DIYables-MicroPython-OLED-SSD1309" und finden Sie dann die von DIYables erstellte OLED-SSD1309-Bibliothek.
- Klicken Sie auf DIYables-MicroPython-OLED-SSD1309 und dann auf den Button Install, um die Bibliothek zu installieren.
- Kopieren Sie den bereitgestellten MicroPython-Code und fügen Sie ihn in den Editor von Thonny ein.
- Speichern Sie den Code auf Ihrem ESP32:
- Klicken Sie auf den Save-Button oder drücken Sie Ctrl+S.
- Wählen Sie im Speicherdialog MicroPython device.
- Nennen Sie die Datei main.py.
- Klicken Sie auf den grünen Run-Button (oder drücken Sie F5), um das Skript auszuführen.
- Beobachten Sie das Ergebnis — Text und Grafiken sollten auf dem OLED-Display erscheinen.
Code-Vorlage für den Einstieg
ESP32 Code — Hello World
Ausprobieren
- Verdrahten Sie das OLED SSD1309 gemäß dem obigen Schaltplan mit dem ESP32.
- Laden Sie den Code mit der Thonny IDE hoch.
- Sie sollten "Hello, World!", "DIYables" und "SSD1309 OLED 128 x 64" auf dem Bildschirm sehen.
Referenz zum Zeichnen von Text
| Methodenaufruf | Funktion | Hinweise |
|---|---|---|
| oled.fill(0) | Löscht den gesamten Bildschirm (alle Pixel aus) | Immer vor dem Zeichnen eines neuen Bildes aufrufen |
| oled.text("Hello!", 0, 0) | Zeichnet Text in Spalte 0, Zeile 0 | Eingebaute 8×8-Pixel-Schrift; 16 Zeichen pro Zeile, 8 Zeilen bei 64-px-Display |
| oled.text("Line 2", 0, 16) | Zeichnet Text in der zweiten Zeile | Zeilen sind 8 px hoch; die nächste Zeile ist y+8 oder y+16 für Abstand |
| oled.show() | Überträgt den Framebuffer auf das physische Display | Nichts ist sichtbar, bis show() aufgerufen wird |
ESP32 Code — Formen zeichnen
Ausprobieren
- Laden Sie den Code mit der Thonny IDE hoch.
- Das Display durchläuft mehrere Demos: diagonale Pixel, Linienfächer, Gitterlinien, Rechteckumrisse und gefüllte Rechtecke.
Referenz der Zeichenmethoden
| Methodenaufruf | Was gezeichnet wird | Hinweise |
|---|---|---|
| oled.pixel(x, y, 1) | Einzelnes Pixel bei (x, y) | 0 = aus, 1 = an |
| oled.line(x1, y1, x2, y2, 1) | Linie zwischen zwei Punkten | Bresenham-Algorithmus |
| oled.hline(x, y, w, 1) | Horizontale Linie der Breite w | Schneller als line() für horizontale Linien |
| oled.vline(x, y, h, 1) | Vertikale Linie der Höhe h | Schneller als line() für vertikale Linien |
| oled.rect(x, y, w, h, 1) | Rechteckumriss | Obere linke Ecke bei (x, y) |
| oled.fill_rect(x, y, w, h, 1) | Gefülltes Rechteck | Gleiche Parameter wie rect() |
ESP32 Code — Text scrollen
Ausprobieren
- Laden Sie den Code mit der Thonny IDE hoch.
- Das Display scrollt nach rechts, dann nach links, dann diagonal nach rechts, dann diagonal nach links und wiederholt dies.
Referenz zum Hardware-Scrolling
| Methodenaufruf | Scrollrichtung | Hinweise |
|---|---|---|
| oled.scroll_right(0x00, 0x07) | Rechts | Pages 0–7 = alle Zeilen bei einem 64-px-Display |
| oled.scroll_left(0x00, 0x07) | Links | Pages 0–7 decken die volle Bildschirmhöhe ab |
| oled.scroll_diag_right(0x00, 0x07) | Diagonal rechts (rechts + unten) | Kombiniert horizontales und vertikales Scrollen |
| oled.scroll_diag_left(0x00, 0x07) | Diagonal links (links + unten) | Kombiniert horizontales und vertikales Scrollen |
| oled.stop_scroll() | Scrollen stoppen | Vor dem Zeichnen neuer Inhalte aufrufen |
Hinweis: Ändern Sie den Framebuffer (z. B. durch Aufruf von oled.fill() + oled.show()), bevor Sie ein neues Scrollen starten, um den scrollenden Inhalt zu aktualisieren. Rufen Sie immer stop_scroll() auf, bevor Sie neue Zeichenbefehle senden.
ESP32 Code — Kontrast & Dimmen
Ausprobieren
- Laden Sie den Code mit der Thonny IDE hoch.
- Beobachten Sie, wie die Helligkeit des Displays auf- und abschwillt und dann zwischen gedimmter und voller Helligkeit wechselt.
Referenz zu Kontrast & Dimmen
| Methodenaufruf | Wirkung | Hinweise |
|---|---|---|
| oled.set_contrast(0) | Minimale Helligkeit | Wertebereich 0–255 |
| oled.set_contrast(128) | Mittlere Helligkeit | Der Wert wird intern für dim/restore gespeichert |
| oled.set_contrast(255) | Maximale Helligkeit | Standardwert nach der Initialisierung ist 0xCF (207) |
| oled.dim(True) | Senkt den Kontrast auf 0 (gedimmt) | Ändert den gespeicherten Kontrastwert nicht |
| oled.dim(False) | Stellt den gespeicherten Kontrast wieder her | Stellt den mit set_contrast() gesetzten Wert wieder her |
| oled.invert(True) | Invertiert alle Pixel auf Hardwareebene | Keine Änderung am Framebuffer |
| oled.invert(False) | Stellt die normale Pixelpolarität wieder her | — |
ESP32 Code — Bitmap
Ausprobieren
- Laden Sie den Code mit der Thonny IDE hoch.
- Ein 16×16-Herzsymbol erscheint zentriert auf dem Display. Es pulsiert durch abwechselnd normale und invertierte Bilder.
Referenz zum Zeichnen von Bitmaps
| Methodenaufruf | Beschreibung | Hinweise |
|---|---|---|
| framebuf.FrameBuffer(data, w, h, framebuf.MONO_HMSB) | Verpackt Rohbytes als Bitmap-FrameBuffer | MONO_HMSB für zeilenweise Daten mit MSB zuerst verwenden |
| oled.blit(icon_fb, x, y) | Kopiert die Bitmap bei (x, y) in den Display-Framebuffer | Alle Pixel werden kopiert (keine Transparenz) |
| oled.blit(icon_fb, x, y, 1) | Blit mit key=1 — Pixel mit dem Wert 1 werden übersprungen | Nützlich für XOR-artige Effekte auf gefüllten Hintergründen |
So werden Bitmap-Daten gespeichert: Jede Zeile wird von links nach rechts gespeichert, das höchstwertige Bit zuerst (MONO_HMSB). Die Anzahl der Bytes pro Zeile ist ceil(width / 8). Bei einem 16 Pixel breiten Bild sind das 2 Bytes pro Zeile.
Bibliotheksreferenz
Unter DIYables MicroPython OLED SSD1309 Library Reference finden Sie die vollständige API-Dokumentation mit allen Konstruktoren, Methoden und Konstanten.
Nächste Schritte
- Kombinieren Sie es mit einem DHT11- oder DHT22-Sensor, um Temperatur und Luftfeuchtigkeit in Echtzeit anzuzeigen.
- Fügen Sie einen Taster hinzu, um zwischen mehreren Bildschirmansichten zu wechseln.
- Verwenden Sie framebuf.FrameBuffer.blit(), um eine animierte Sprite-Anzeige zu erstellen.