Arduino Mega - OLED 128x32

Diese Anleitung zeigt Ihnen, wie Sie ein Arduino Mega mit einem 128x32 OLED-Display über I2C verwenden. Sie lernen:

Arduino Mega OLED I2C Display

Benötigte Hardware

1×Arduino Mega
1×USB 2.0 Kabel Typ A/B
1×SSD1306 I2C OLED-Display 128x32
1×Jumper Wires (Verbindungskabel)
1×(Empfohlen) Screw Terminal Block Shield for Arduino Uno/Mega
1×(Empfohlen) Breadboard Shield for Arduino Mega
1×(Empfohlen) Enclosure for Arduino Mega

Oder Sie können die folgenden Kits kaufen:

1×DIYables Sensor-Kit (30 Sensoren/Displays)
1×DIYables Sensor-Kit (18 Sensoren/Displays)
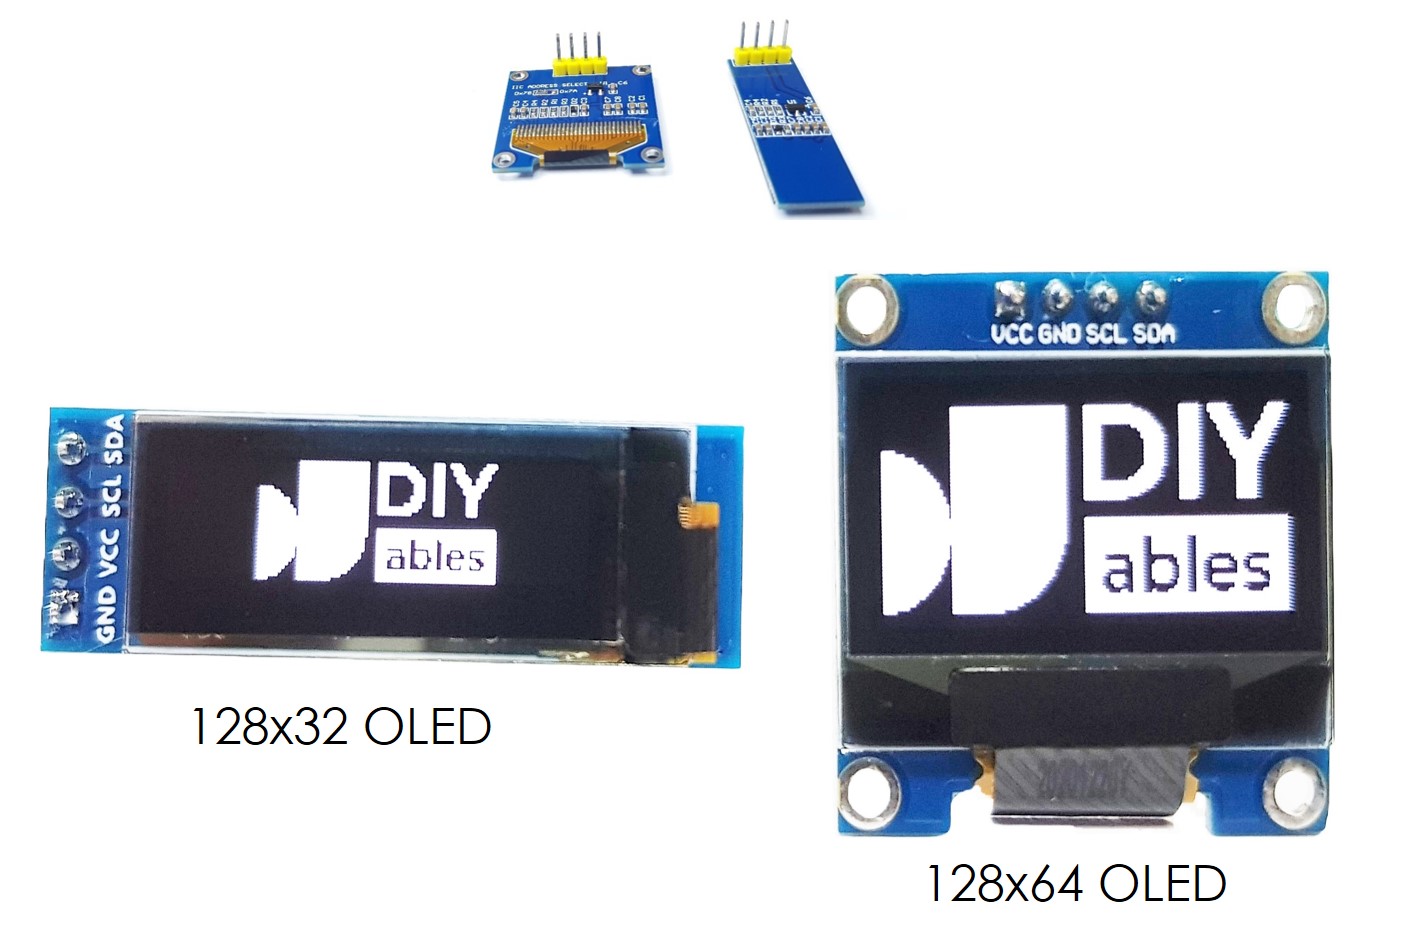
Offenlegung: Einige der in diesem Abschnitt bereitgestellten Links sind Amazon-Affiliate-Links. Wir können eine Provision für Käufe erhalten, die über diese Links getätigt werden, ohne zusätzliche Kosten für Sie. Wir schätzen Ihre Unterstützung.

Über OLED-Displays

I2C OLED Display Pinout

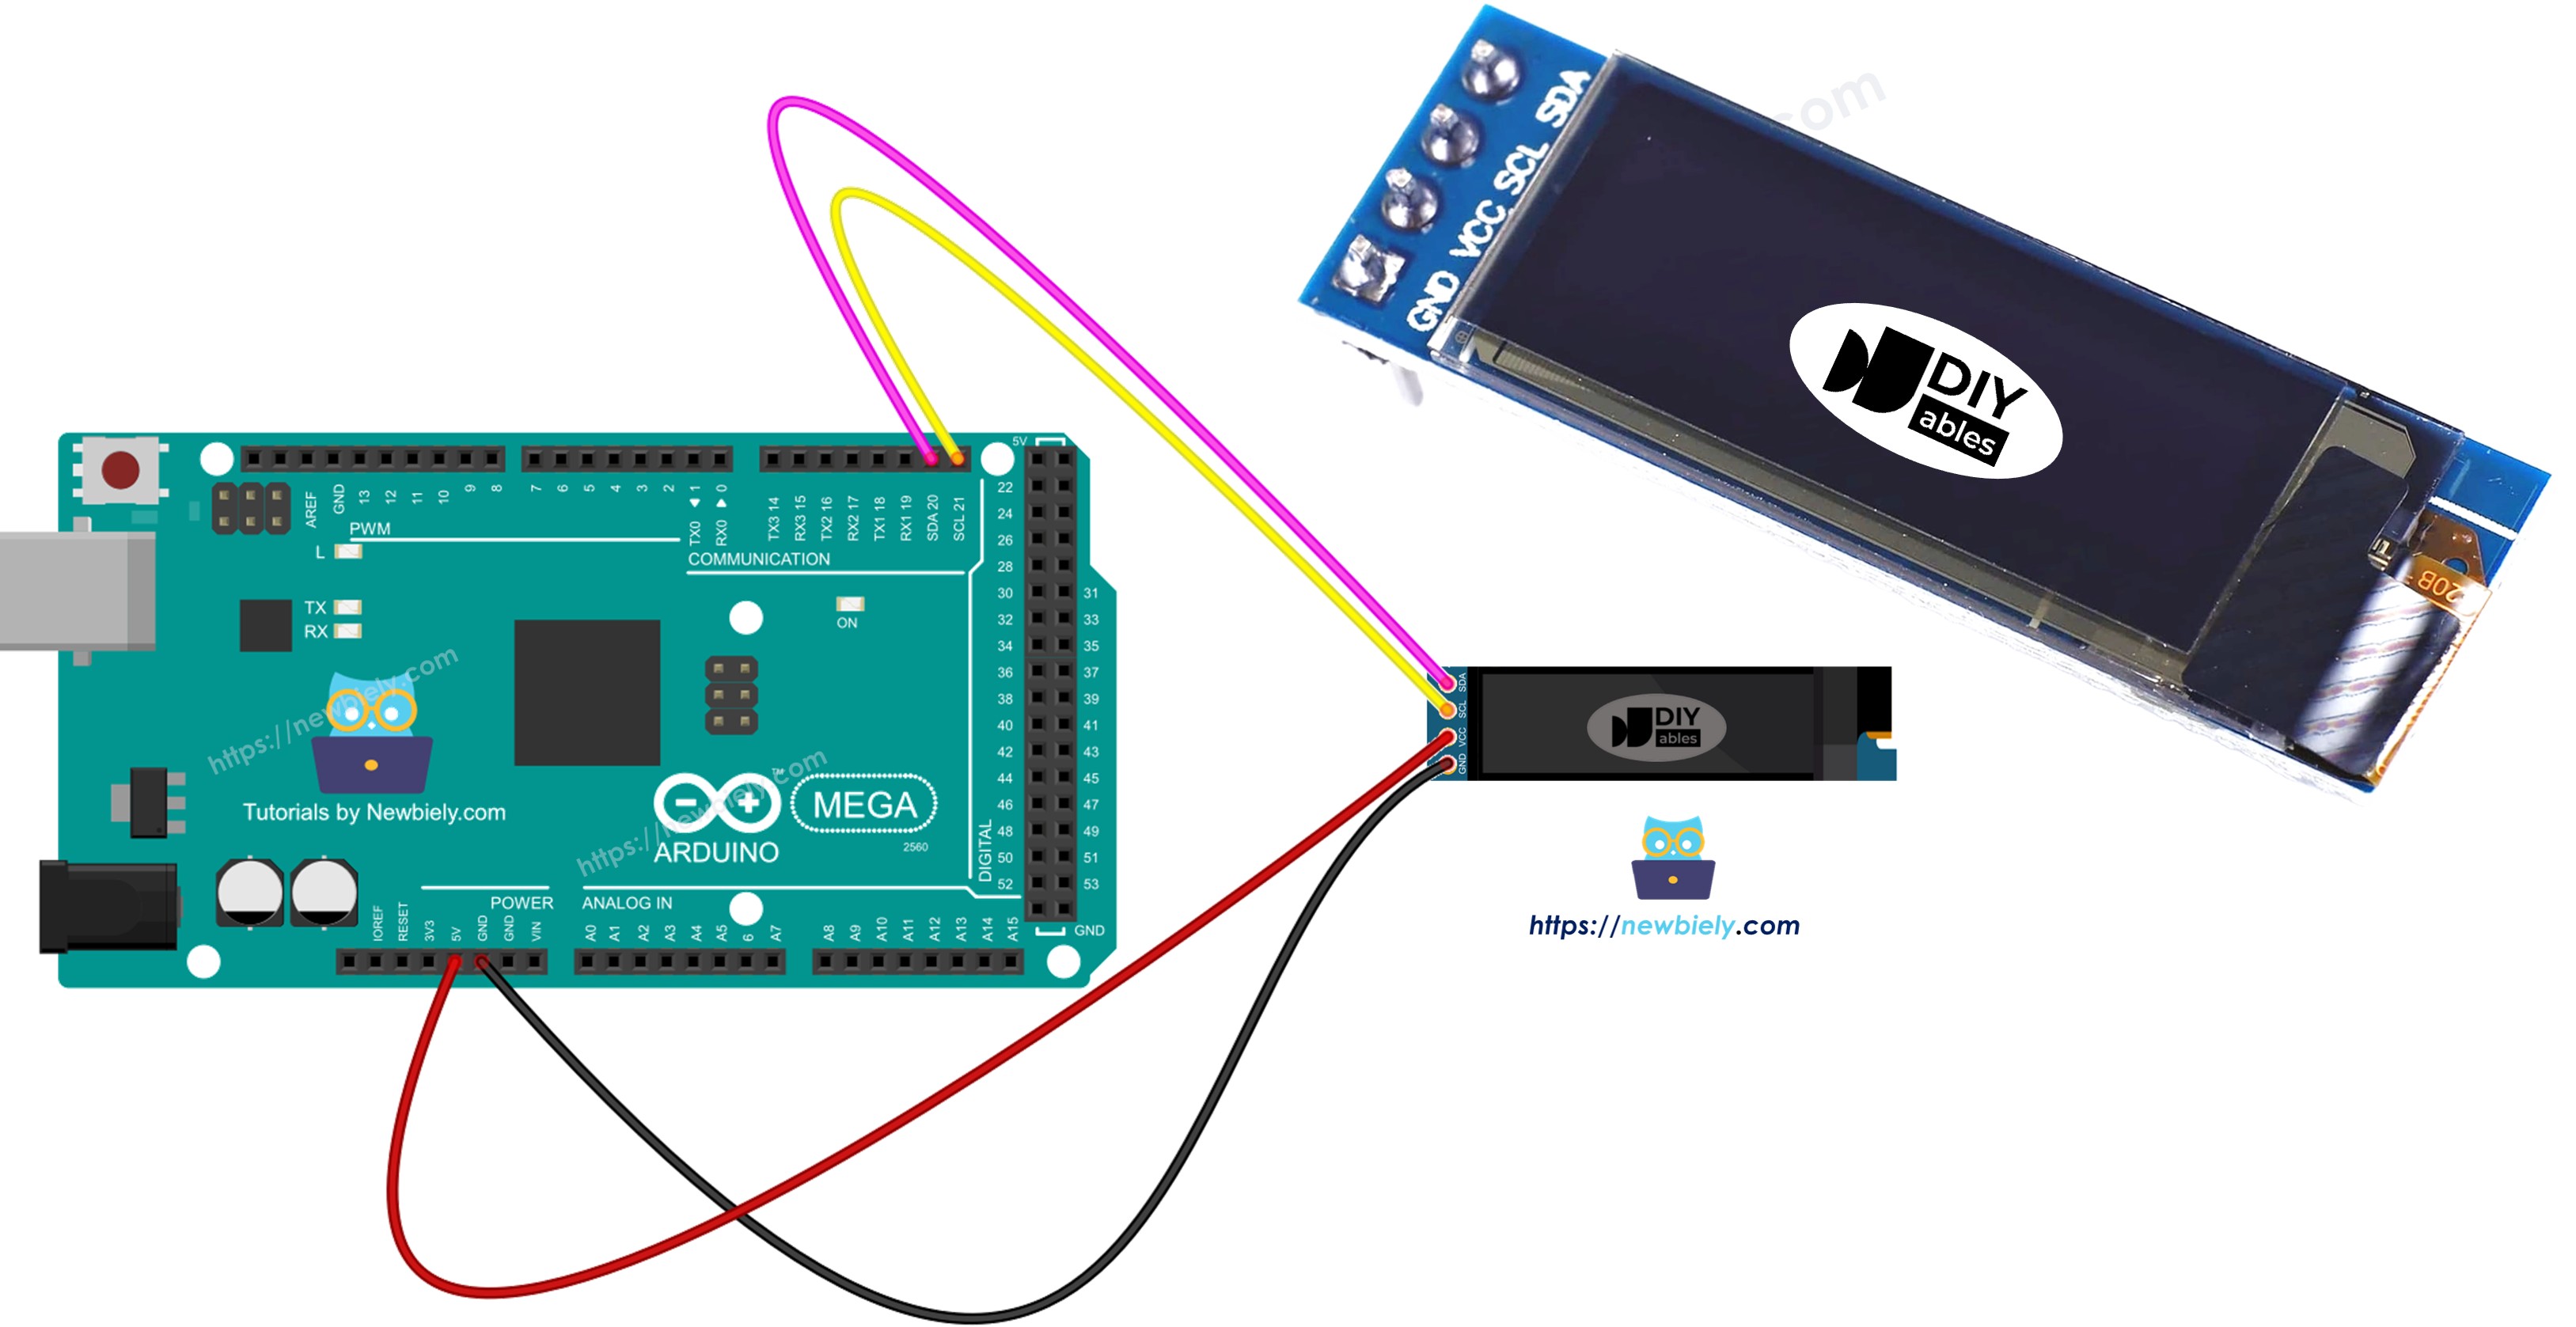
  • GND Pin: Mit der Arduino Mega Masse verbinden.
  • VCC Pin: Stromversorgung für das Display; mit dem Arduino Mega 5V Pin verbinden.
  • SCL Pin: I2C Taktleitung.
  • SDA Pin: I2C Datenleitung.
OLED Pinout

※ Notiz:

Das Pin-Layout eines OLED-Moduls kann je nach Hersteller und Modell unterschiedlich sein. Überprüfen Sie immer die Beschriftungen auf dem OLED-Modul und folgen Sie diesen. Seien Sie aufmerksam!

Diese Anleitung ist für ein OLED-Display, das den SSD1306 I2C Treiber verwendet. Wir haben es mit einem OLED-Display von DIYables getestet. Es funktioniert einwandfrei, ohne Probleme.

Schaltplan

Arduino Mega OLED 128x32 Schaltplan

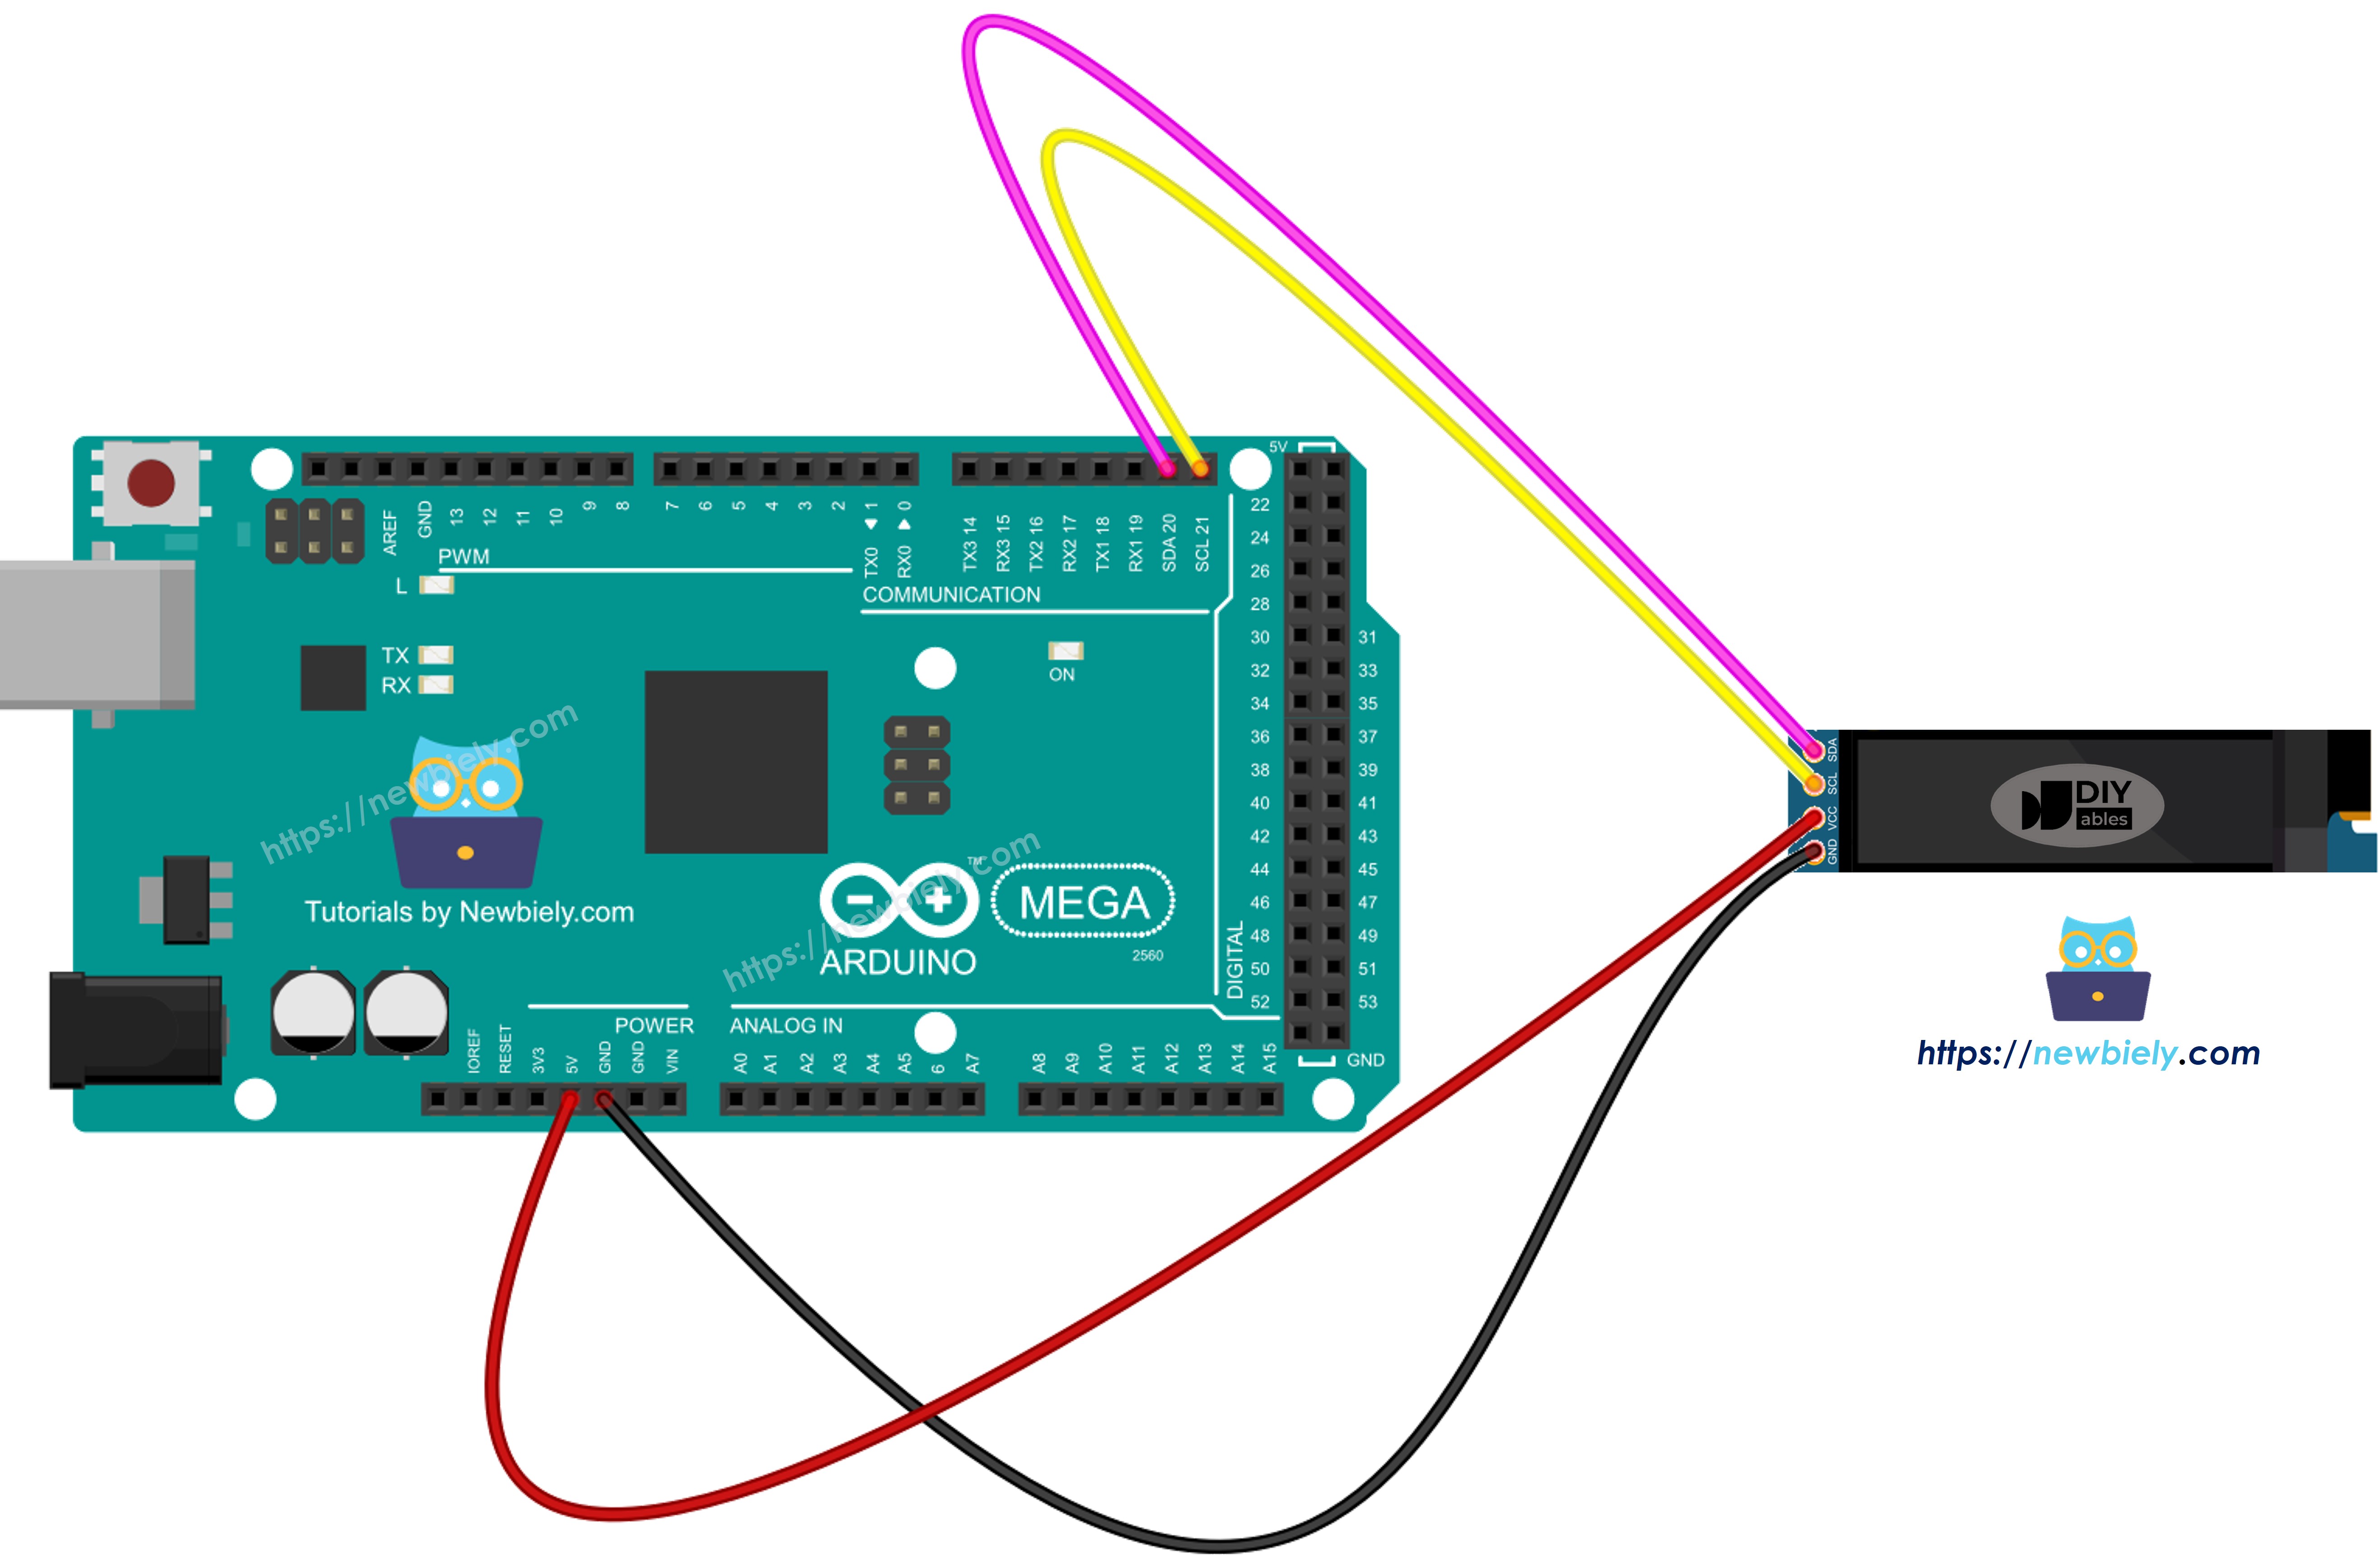
Dieses Bild wurde mit Fritzing erstellt. Klicken Sie, um das Bild zu vergrößern.

Wenn Sie ein anderes Arduino Mega verwenden, wird das Pin-Layout anders sein als beim Uno. Siehe die Tabelle unten für Informationen über andere Arduino Mega Modelle.

128x32 OLED Modul Arduino Mega
Vin 5V
GND GND
SDA A4
SCL A5

Wie Sie OLED mit Arduino Mega verwenden

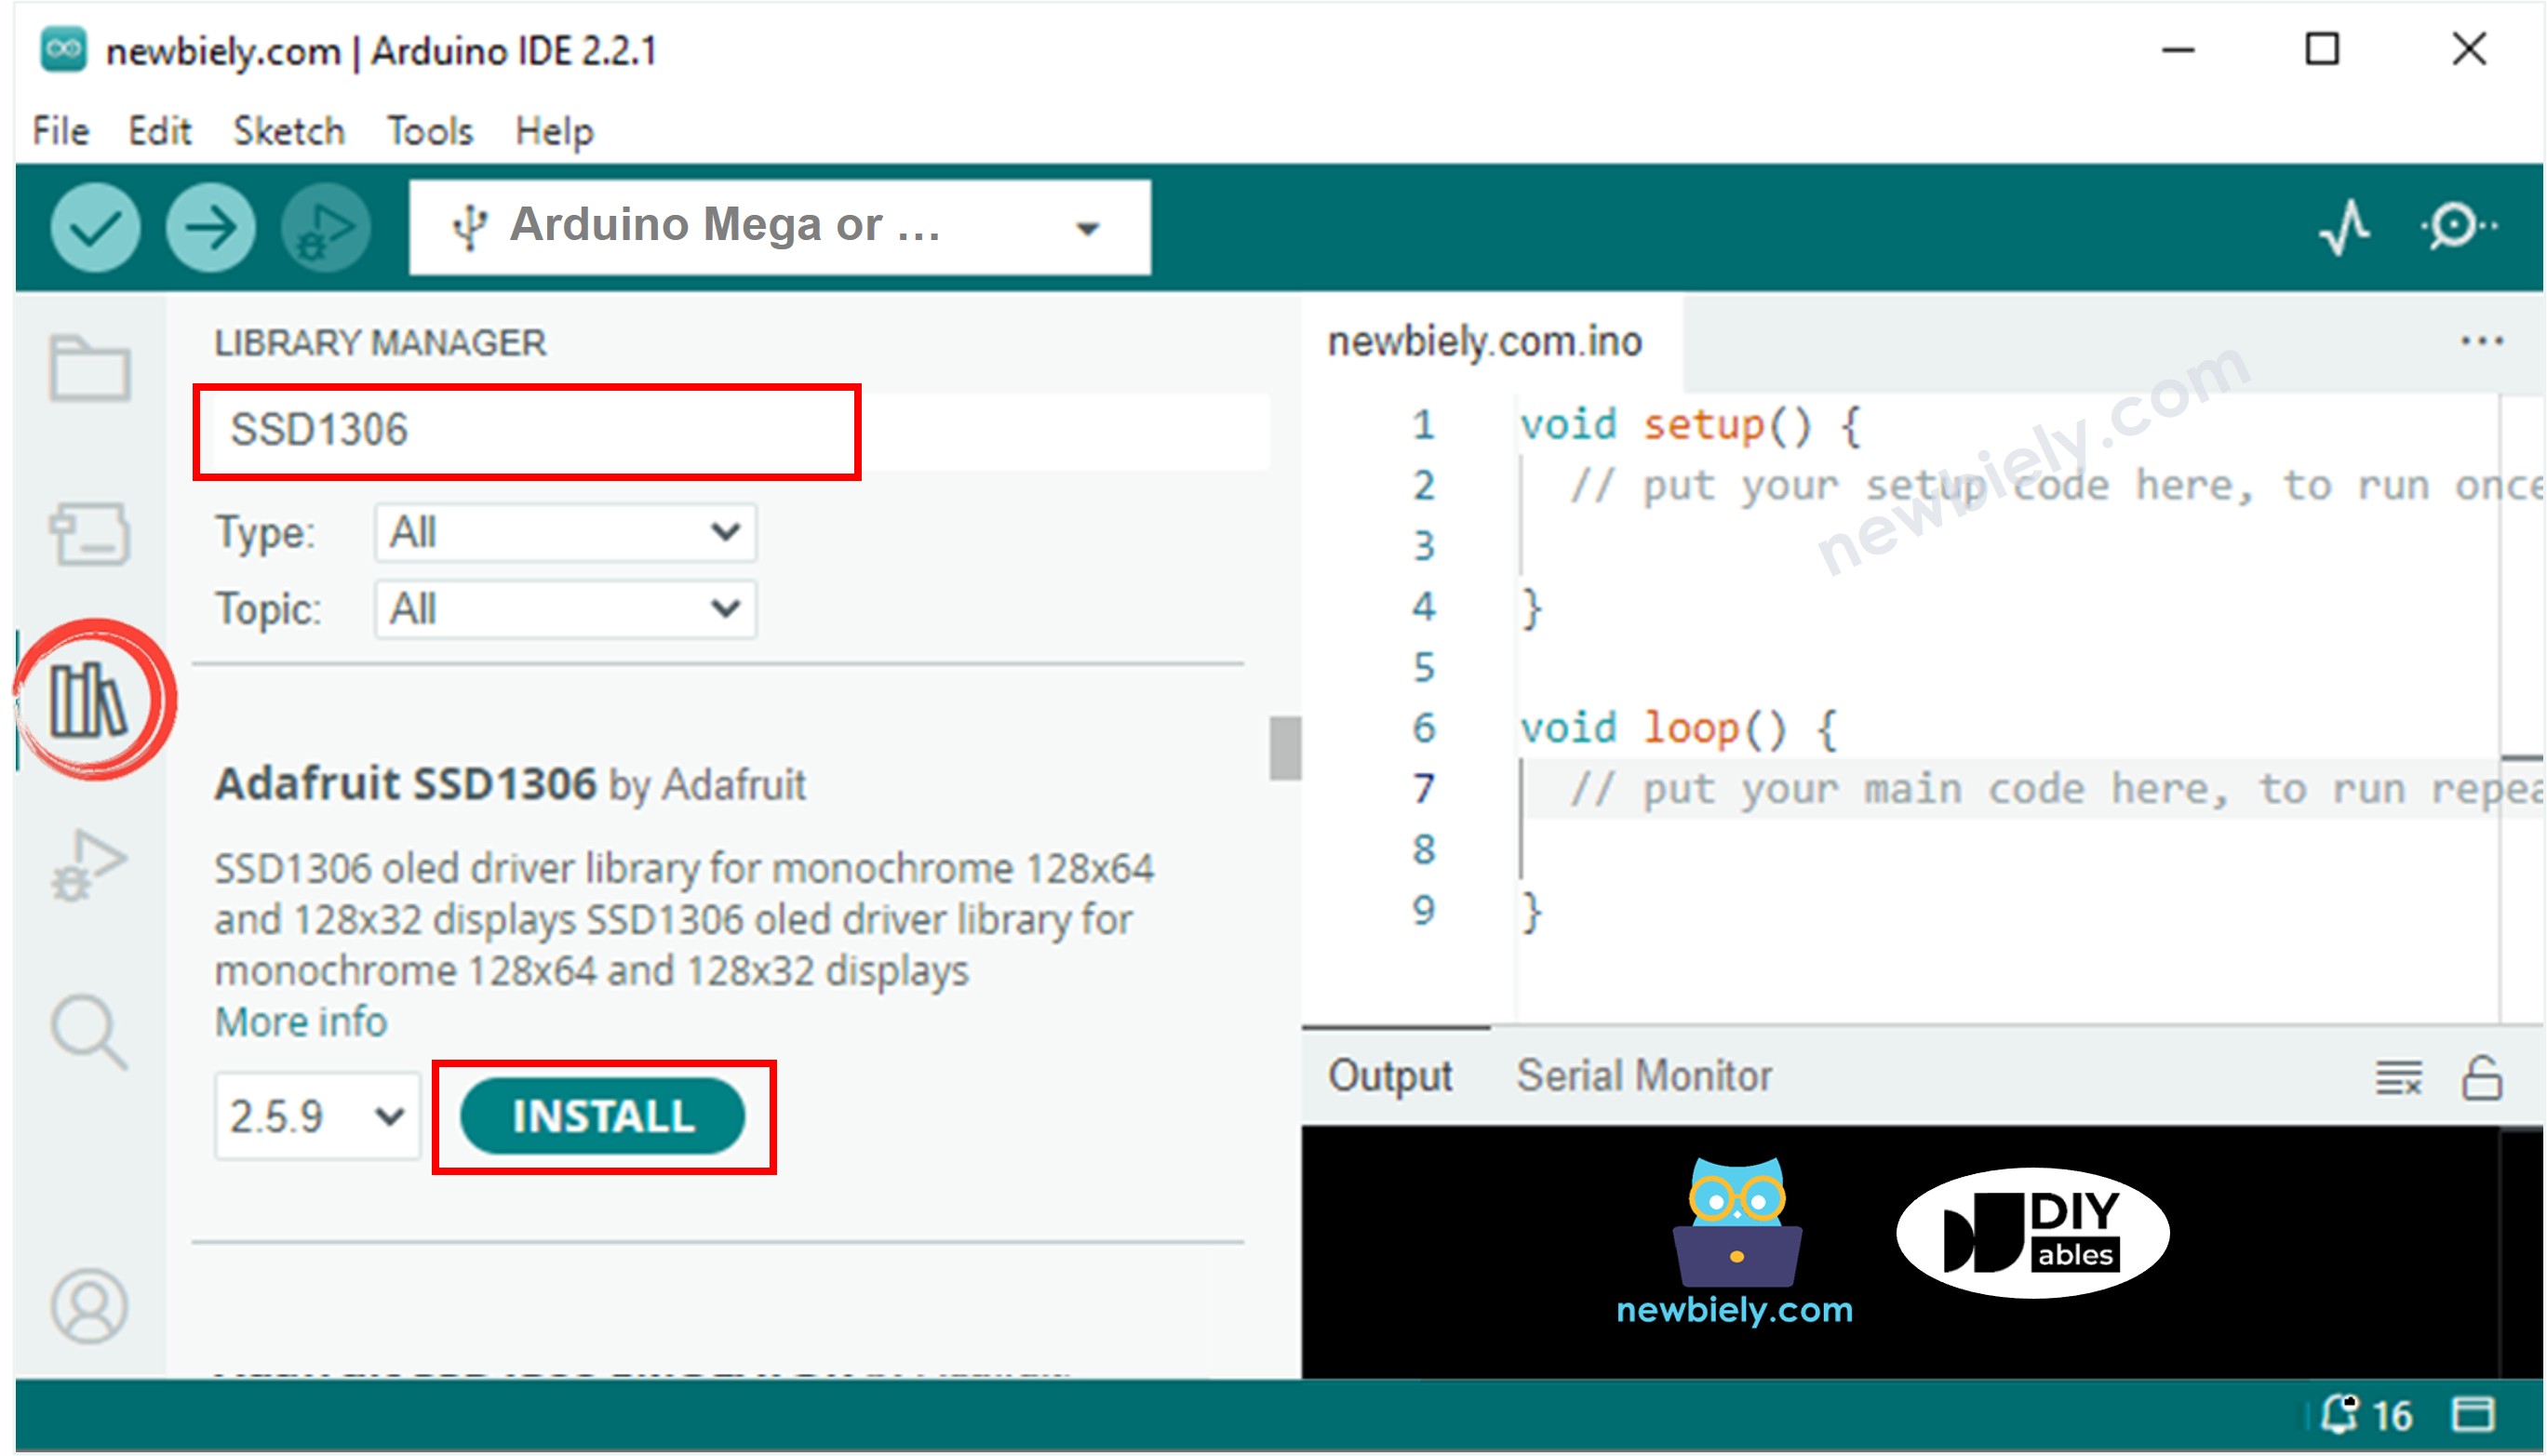
SSD1306 OLED Bibliothek installieren

  • Finden Sie das Bibliotheken-Symbol auf der linken Seite der Arduino IDE.
  • Geben Sie "SSD1306" in das Suchfeld ein und finden Sie die SSD1306 Bibliothek von Adafruit.
  • Klicken Sie auf Installieren, um die Bibliothek hinzuzufügen.
Arduino Mega OLED Bibliothek
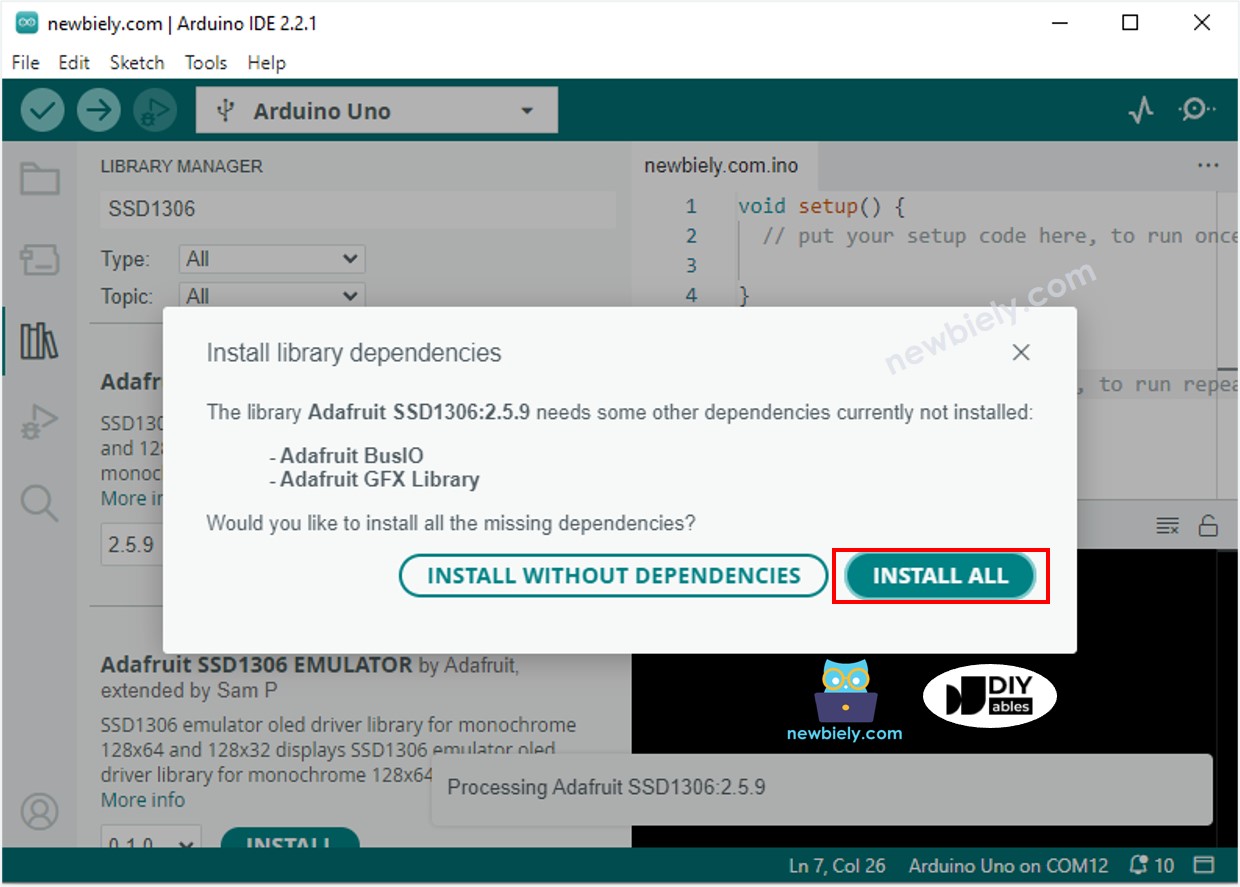
  • Sie müssen einige zusätzliche Bibliotheken installieren.
  • Klicken Sie auf die Schaltfläche "Alle installieren", um alle benötigten Bibliotheken zu installieren.
Arduino Mega Adafruit GFX Sensor Bibliothek

Wie Sie für OLED programmieren

  • Bibliothek hinzufügen.
#include <Wire.h> #include <Adafruit_GFX.h> #include <Adafruit_SSD1306.h>
  • Stellen Sie die Bildschirmgröße auf OLED 128 mal 32 ein.
#define SCREEN_WIDTH 128 // OLED display width in pixels #define SCREEN_HEIGHT 32 // OLED display height in pixels
  • Erstellen Sie ein SSD1306 OLED-Display.
// Instantiate the SSD1306 OLED object for I2C communication (no reset pin) Adafruit_SSD1306 oled(SCREEN_WIDTH, SCREEN_HEIGHT, &Wire, -1);
  • In der setup() Funktion bereiten Sie das OLED-Display vor.
// Initialize OLED display using I2C address 0x3C for a 128x32 display if (!oled.begin(SSD1306_SWITCHCAPVCC, 0x3C)) { Serial.println(F("SSD1306 allocation failed")); // Output error message if initialization fails while (true); // Stay in an endless loop to stop further processing }
  • Dann können Sie Text, Bilder anzeigen und Linien zeichnen.

Arduino Mega Code - Text auf OLED anzeigen

/* * Dieser Arduino Mega Code wurde von newbiely.de entwickelt * Dieser Arduino Mega Code wird der Öffentlichkeit ohne jegliche Einschränkung zur Verfügung gestellt. * Für vollständige Anleitungen und Schaltpläne besuchen Sie bitte: * https://newbiely.de/tutorials/arduino-mega/arduino-mega-oled-128x32-display */ #include <Wire.h> #include <Adafruit_GFX.h> #include <Adafruit_SSD1306.h> #define SCREEN_WIDTH 128 // OLED display width, in pixels #define SCREEN_HEIGHT 32 // OLED display height, in pixels // declare an SSD1306 display object connected to I2C Adafruit_SSD1306 oled(SCREEN_WIDTH, SCREEN_HEIGHT, &Wire, -1); void setup() { Serial.begin(9600); // initialize OLED display with address 0x3C for 128x32 if (!oled.begin(SSD1306_SWITCHCAPVCC, 0x3C)) { Serial.println(F("SSD1306 allocation failed")); while (true); } delay(2000); // wait for initializing oled.clearDisplay(); // clear display oled.setTextSize(1); // text size oled.setTextColor(WHITE); // text color oled.setCursor(0, 10); // position to display oled.println("Hello World!"); // text to display oled.display(); // show on OLED } void loop() { }

Dies sind einige Funktionen, die Sie verwenden können, um Text auf dem OLED-Display anzuzeigen:

  • Oled.clearDisplay(): schaltet alle Pixel aus.
  • Oled.drawPixel(x, y, color): zeichnet einen Punkt an Position x, y.
  • Oled.setTextSize(n): ändert die Textgröße; wählen Sie von 1 bis 8.
  • Oled.setCursor(x, y): legt fest, wo Text beginnt.
  • Oled.setTextColor(WHITE): macht die Textfarbe weiß.
  • Oled.setTextColor(BLACK, WHITE): macht den Text schwarz und den Hintergrund weiß.
  • Oled.println("message"): zeigt Text an.
  • Oled.println(number): zeigt eine Zahl an.
  • Oled.println(number, HEX): zeigt eine Zahl in hex (Basis-16) an.
  • Oled.display(): aktualisiert den Bildschirm, um Änderungen anzuzeigen.
  • Oled.startscrollright(start, stop): bewegt Text von links nach rechts.
  • Oled.startscrollleft(start, stop): bewegt Text von rechts nach links.
  • Oled.startscrolldiagright(start, stop): bewegt Text diagonal von unten links nach oben rechts.
  • Oled.startscrolldiagleft(start, stop): bewegt Text diagonal von unten rechts nach oben links.
  • Oled.stopscroll(): stoppt jeglichen scrollenden Text.

Arduino Mega Code - Auf OLED zeichnen

/* * Dieser Arduino Mega Code wurde von newbiely.de entwickelt * Dieser Arduino Mega Code wird der Öffentlichkeit ohne jegliche Einschränkung zur Verfügung gestellt. * Für vollständige Anleitungen und Schaltpläne besuchen Sie bitte: * https://newbiely.de/tutorials/arduino-mega/arduino-mega-oled-128x32-display */ #include <Wire.h> #include <Adafruit_GFX.h> #include <Adafruit_SSD1306.h> #define SCREEN_WIDTH 128 // OLED display width, in pixels #define SCREEN_HEIGHT 32 // OLED display height, in pixels // declare an SSD1306 display object connected to I2C Adafruit_SSD1306 oled(SCREEN_WIDTH, SCREEN_HEIGHT, &Wire, -1); void setup() { Serial.begin(9600); // initialize OLED display with address 0x3C for 128x32 if (!oled.begin(SSD1306_SWITCHCAPVCC, 0x3C)) { Serial.println(F("SSD1306 allocation failed")); while (true); } delay(2000); // wait for initializing oled.setCursor(0, 0); } void loop() { // draw rectangle oled.clearDisplay(); oled.drawRect(0, 15, 60, 40, WHITE); oled.display(); delay(2000); // fill rectangle oled.clearDisplay(); oled.fillRect(0, 15, 60, 40, WHITE); oled.display(); delay(2000); // draw the round rectangle oled.clearDisplay(); oled.drawRoundRect(0, 15, 60, 40, 8, WHITE); oled.display(); delay(2000); // fill the round rectangle oled.clearDisplay(); oled.fillRoundRect(0, 15, 60, 40, 8, WHITE); oled.display(); delay(2000); // draw circle oled.clearDisplay(); oled.drawCircle(20, 35, 20, WHITE); oled.display(); delay(2000); // fill circle oled.clearDisplay(); oled.fillCircle(20, 35, 20, WHITE); oled.display(); delay(2000); // draw triangle oled.clearDisplay(); oled.drawTriangle(30, 15, 0, 60, 60, 60, WHITE); oled.display(); delay(2000); // fill triangle oled.clearDisplay(); oled.fillTriangle(30, 15, 0, 60, 60, 60, WHITE); oled.display(); delay(2000); }

Arduino Mega Code – Bild anzeigen

Um ein Bild auf einem OLED-Display anzuzeigen, wandeln Sie zuerst das Bild (beliebiges Format) in ein Bitmap-Array um. Sie können dieses Image to Bitmap Converter Tool verwenden, um es zu konvertieren. Schauen Sie sich das Bild unten an, um zu sehen, wie man ein Bild in ein Bitmap-Array umwandelt. Ich habe das Arduino-Symbol in ein Bitmap-Array umgewandelt.

image to bitmap array

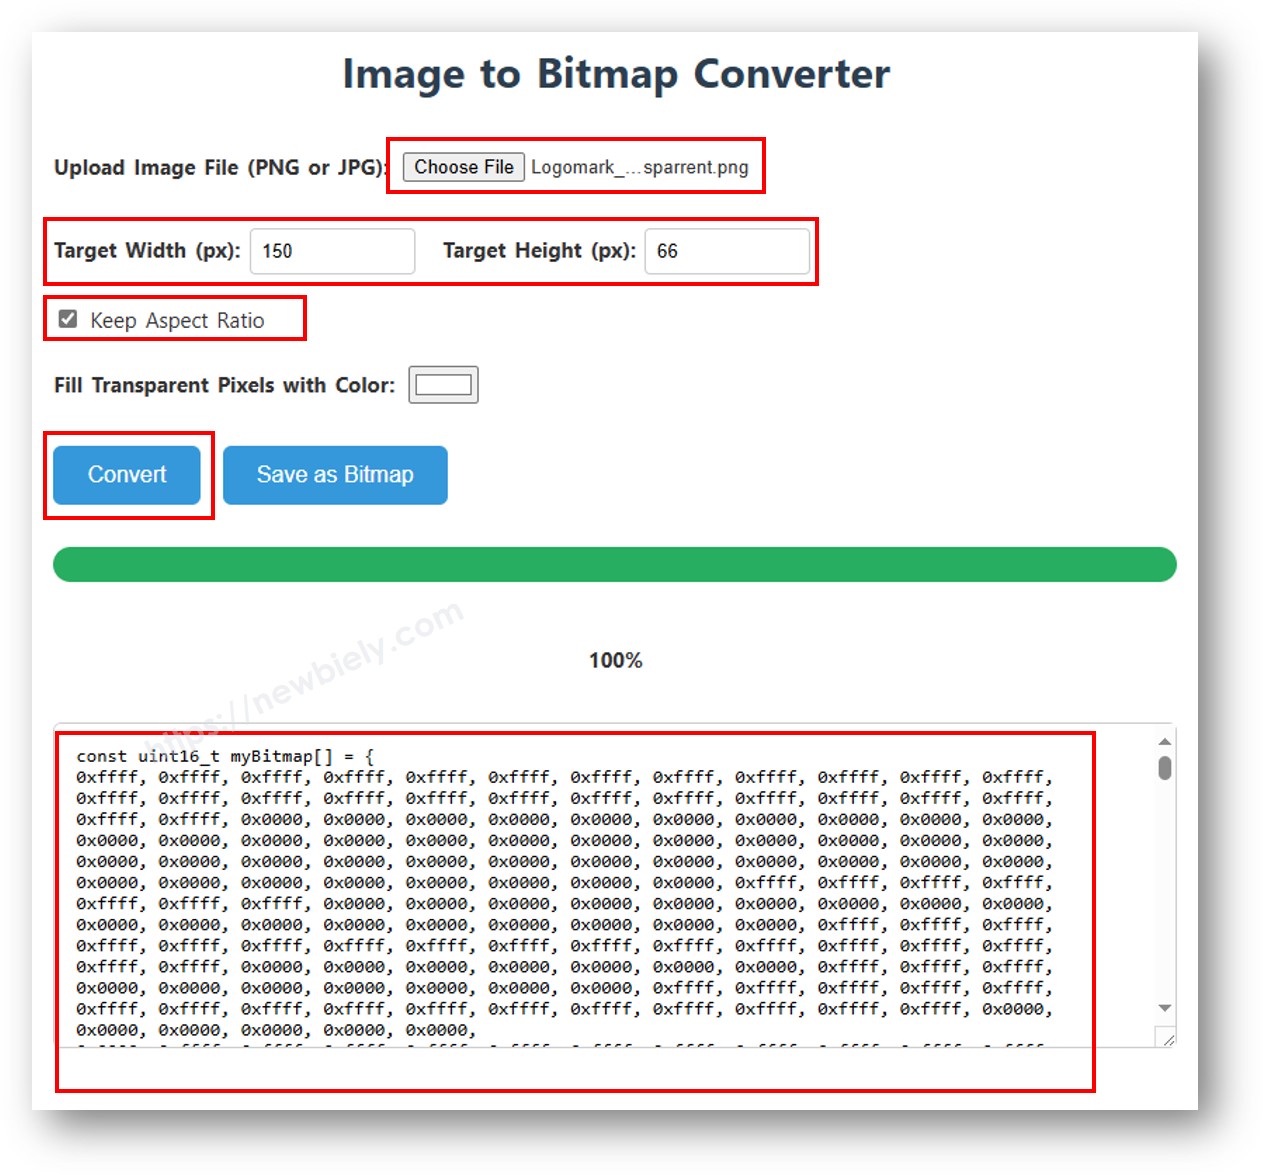
Kopieren Sie den neuen Array-Code und fügen Sie ihn in das Arduino-Symbol-Array im Code unten ein.

Das Video unten zeigt, wie es mit einem OLED 128x64 Display, einem Arduino Uno und dem Arduino-Logo gemacht wird.

Wir können es auf dieselbe Weise machen, damit es mit Arduino Mega und dem 128x32 OLED funktioniert. Der Code unten zeigt das DIYables-Symbol auf dem 128x32 OLED an.

/* * Dieser Arduino Mega Code wurde von newbiely.de entwickelt * Dieser Arduino Mega Code wird der Öffentlichkeit ohne jegliche Einschränkung zur Verfügung gestellt. * Für vollständige Anleitungen und Schaltpläne besuchen Sie bitte: * https://newbiely.de/tutorials/arduino-mega/arduino-mega-oled-128x32-display */ #include <Wire.h> #include <Adafruit_GFX.h> #include <Adafruit_SSD1306.h> #define SCREEN_WIDTH 128 // OLED display width, in pixels #define SCREEN_HEIGHT 32 // OLED display height, in pixels // declare an SSD1306 display object connected to I2C Adafruit_SSD1306 oled(SCREEN_WIDTH, SCREEN_HEIGHT, &Wire, -1); // bitmap of DIYable-icon image int bitmap_width = 72; // MUST match to bitmap image size int bitmap_height = 32; // MUST match to bitmap image size const unsigned char bitmap_DIYables [] PROGMEM = { // 'DIYables Icon', 72x32 0x00, 0x0f, 0xff, 0xff, 0x8f, 0xf8, 0x07, 0x38, 0x07, 0x00, 0x0f, 0xff, 0xff, 0x8f, 0xfe, 0x07, 0x1c, 0x0e, 0x00, 0x0f, 0xff, 0xff, 0x8f, 0xff, 0x07, 0x1c, 0x1c, 0x00, 0x0f, 0xff, 0xff, 0x8e, 0x07, 0x87, 0x0e, 0x1c, 0x00, 0x0f, 0xff, 0xff, 0x8e, 0x03, 0xc7, 0x0f, 0x38, 0x00, 0x0f, 0xff, 0xff, 0x8e, 0x01, 0xc7, 0x07, 0x38, 0x00, 0x0f, 0xff, 0xff, 0x8e, 0x01, 0xc7, 0x03, 0xf0, 0xf0, 0x0f, 0xff, 0xff, 0x8e, 0x01, 0xc7, 0x03, 0xe0, 0xfc, 0x0f, 0xff, 0xff, 0x8e, 0x01, 0xc7, 0x01, 0xe0, 0xfe, 0x0f, 0xff, 0xff, 0x8e, 0x03, 0xc7, 0x01, 0xc0, 0xff, 0x8f, 0xff, 0xff, 0x8e, 0x03, 0x87, 0x01, 0xc0, 0xff, 0x8f, 0xff, 0xff, 0x8e, 0x0f, 0x87, 0x01, 0xc0, 0xff, 0xcf, 0xff, 0xff, 0x8f, 0xff, 0x07, 0x01, 0xc0, 0xff, 0xef, 0xff, 0xff, 0x8f, 0xfc, 0x07, 0x01, 0xc0, 0xff, 0xef, 0xff, 0xff, 0x80, 0x00, 0x00, 0x00, 0x00, 0xff, 0xff, 0xff, 0xff, 0x80, 0x00, 0x00, 0x00, 0x00, 0xff, 0xff, 0xff, 0xff, 0x80, 0x00, 0x00, 0x00, 0x00, 0xff, 0xff, 0xff, 0xff, 0x80, 0x00, 0x00, 0x00, 0x00, 0xff, 0xff, 0xff, 0xff, 0x8f, 0xff, 0xff, 0xff, 0xff, 0xff, 0xff, 0xff, 0xff, 0x8f, 0xff, 0xff, 0xff, 0xff, 0xff, 0xff, 0xff, 0xff, 0x0f, 0xfc, 0xfd, 0xff, 0xff, 0xff, 0xff, 0xff, 0xff, 0x0f, 0xfc, 0xfc, 0xff, 0xff, 0xff, 0xff, 0xff, 0xff, 0x0f, 0xfc, 0xfc, 0xff, 0xff, 0xff, 0xef, 0xff, 0xff, 0x0e, 0x0c, 0x0c, 0xc3, 0x07, 0xff, 0xef, 0xff, 0xfe, 0x0f, 0xec, 0xec, 0x99, 0x7f, 0xff, 0xef, 0xff, 0xfe, 0x0f, 0x04, 0xe4, 0x81, 0x0f, 0xff, 0xcf, 0xff, 0xfc, 0x0e, 0x32, 0xe4, 0x9f, 0xc7, 0xff, 0x8f, 0xff, 0xf8, 0x0e, 0x32, 0x4c, 0x9b, 0x67, 0xff, 0x0f, 0xff, 0xf0, 0x0e, 0x04, 0x0c, 0xc3, 0x0f, 0xfe, 0x0f, 0xff, 0xe0, 0x0f, 0xff, 0xff, 0xff, 0xff, 0xfc, 0x0f, 0xff, 0x80, 0x0f, 0xff, 0xff, 0xff, 0xff, 0xe0, 0x0f, 0xfc, 0x00, 0x0f, 0xff, 0xff, 0xff, 0xff }; void setup() { Serial.begin(9600); // initialize OLED display with address 0x3C for 128x32 if (!oled.begin(SSD1306_SWITCHCAPVCC, 0x3C)) { Serial.println(F("SSD1306 allocation failed")); while (true); } delay(2000); // wait for initializing } void loop() { oled.clearDisplay(); // display bitmap to the center int x = (SCREEN_WIDTH - bitmap_width) / 2; int y = (SCREEN_HEIGHT - bitmap_height) / 2; oled.drawBitmap(x, y, bitmap_DIYables, bitmap_width, bitmap_height, WHITE); oled.display(); delay(2000); }

※ Notiz:

  • Das Bild sollte auf den Bildschirm passen oder kleiner sein.
  • Wenn Sie den Code mit einem OLED 128x32 verwenden möchten, müssen Sie die Bildgröße ändern und die Breite und Höhe in der oled.drawBitmap() Funktion anpassen.

Wie Sie Text/Zahlen vertikal und horizontal auf OLED zentrieren

/* * Dieser Arduino Mega Code wurde von newbiely.de entwickelt * Dieser Arduino Mega Code wird der Öffentlichkeit ohne jegliche Einschränkung zur Verfügung gestellt. * Für vollständige Anleitungen und Schaltpläne besuchen Sie bitte: * https://newbiely.de/tutorials/arduino-mega/arduino-mega-oled-128x32-display */ #include <Wire.h> #include <Adafruit_GFX.h> #include <Adafruit_SSD1306.h> #define SCREEN_WIDTH 128 // OLED display width, in pixels #define SCREEN_HEIGHT 32 // OLED display height, in pixels Adafruit_SSD1306 oled(SCREEN_WIDTH, SCREEN_HEIGHT, &Wire, -1); // // create SSD1306 display object connected to I2C void setup() { Serial.begin(9600); // initialize OLED display with address 0x3C for 128x32 if (!oled.begin(SSD1306_SWITCHCAPVCC, 0x3C)) { Serial.println(F("SSD1306 allocation failed")); while (true); } delay(2000); // wait for initializing oled.clearDisplay(); // clear display oled.setTextSize(2); // text size oled.setTextColor(WHITE); // text color oled.setCursor(0, 10); // position to display } void loop() { // display string String text = "DIYables"; oledDisplayCenter(text); delay(2000); // display number int number = 21; String str = String(number); oledDisplayCenter(str); delay(2000); } void oledDisplayCenter(String text) { int16_t x1; int16_t y1; uint16_t width; uint16_t height; oled.getTextBounds(text, 0, 0, &x1, &y1, &width, &height); // display on horizontal and vertical center oled.clearDisplay(); // clear display oled.setCursor((SCREEN_WIDTH - width) / 2, (SCREEN_HEIGHT - height) / 2); oled.println(text); // text to display oled.display(); }

OLED Fehlerbehebung

Wenn das OLED-Display leer ist, befolgen Sie bitte diese Schritte:

  • Stellen Sie sicher, dass die Verkabelung korrekt ist.
  • Überprüfen Sie, dass Ihr I2C OLED einen SSD1306 Treiber verwendet.
  • Überprüfen Sie die I2C-Adresse Ihres OLED mit dem I2C Address Scanner Code auf dem Arduino Mega Board.
// I2C address scanner program #include <Wire.h> void setup() { Wire.begin(); Serial.begin(9600); Serial.println("I2C Scanner"); } void loop() { byte error, address; int nDevices; Serial.println("Scanning..."); nDevices = 0; for(address = 1; address < 127; address++ ) { Wire.beginTransmission(address); error = Wire.endTransmission(); if (error == 0) { Serial.print("I2C device found at address 0x"); if (address < 16) Serial.print("0"); Serial.print(address,HEX); Serial.println(" !"); nDevices++; } else if (error==4) { Serial.print("Unknown error at address 0x"); if (address < 16) Serial.print("0"); Serial.println(address,HEX); } } if (nDevices == 0) Serial.println("No I2C devices found"); else Serial.println("done"); delay(5000); // wait 5 seconds for next scan }

Was Sie im Serial Monitor sehen:

COM6
Send
Scanning... I2C device found at address 0x3C ! done Scanning... I2C device found at address 0x3C ! done
Autoscroll Show timestamp
Clear output
9600 baud  
Newline  

※ UNSERE NACHRICHTEN

  • Sie können gerne den Link zu diesem Tutorial teilen. Bitte verwenden Sie jedoch unsere Inhalte nicht auf anderen Websites. Wir haben viel Mühe und Zeit in die Erstellung der Inhalte investiert, bitte respektieren Sie unsere Arbeit!