Arduino Mega - SSD1309 OLED Display 128x64 | 2.42 Zoll I2C OLED Tutorial

Diese Anleitung zeigt Ihnen, wie Sie einen Arduino Mega mit einem 2.42 Zoll (2.4") SSD1309 I2C OLED Display (128×64 Auflösung) verwenden. Hier lernen wir im Detail:

Arduino Mega SSD1309 OLED I2C display

Erforderliche Hardware

1×Arduino Mega
1×USB 2.0 Kabel Typ A/B
1×SSD1309 I2C OLED Display 2.42 Zoll 128x64
1×Jumper Kabel
1×(Empfohlen) Screw Terminal Block Shield for Arduino Uno/Mega
1×(Empfohlen) Breadboard Shield for Arduino Mega
1×(Empfohlen) Enclosure for Arduino Mega

Oder Sie können die folgenden Kits kaufen:

1×DIYables Sensor-Kit (30 Sensoren/Displays)
1×DIYables Sensor-Kit (18 Sensoren/Displays)
Offenlegung: Einige der in diesem Abschnitt bereitgestellten Links sind Amazon-Affiliate-Links. Wir können eine Provision für Käufe erhalten, die über diese Links getätigt werden, ohne zusätzliche Kosten für Sie. Wir schätzen Ihre Unterstützung.

Über das SSD1309 OLED Display

Der SSD1309 ist ein monochrom OLED Display-Treiber-Chip. Die 2.42 Zoll Version bietet eine 128×64 Pixel Auflösung. Es kommuniziert über das I2C-Protokoll und benötigt nur zwei Pins (SDA und SCL) plus Stromversorgungsanschlüsse. Das macht es ideal für Projekte mit begrenzter Pin-Verfügbarkeit.

Hauptmerkmale des SSD1309 OLED:

  • Display-Größe: 2.42 Zoll (diagonal)
  • Auflösung: 128×64 Pixel
  • Kommunikation: I2C (2-Draht-Schnittstelle)
  • Standard I2C-Adresse: 0x3C
  • Betriebsspannung: 3.3V oder 5V kompatibel
  • Integrierte Hardware-Scrolling-Unterstützung
  • Einstellbarer Kontrast/Helligkeit
  • Niedriger Stromverbrauch

SSD1309 OLED Display Pinout

Das 2.42 Zoll SSD1309 I2C OLED Modul hat normalerweise 4 Pins:

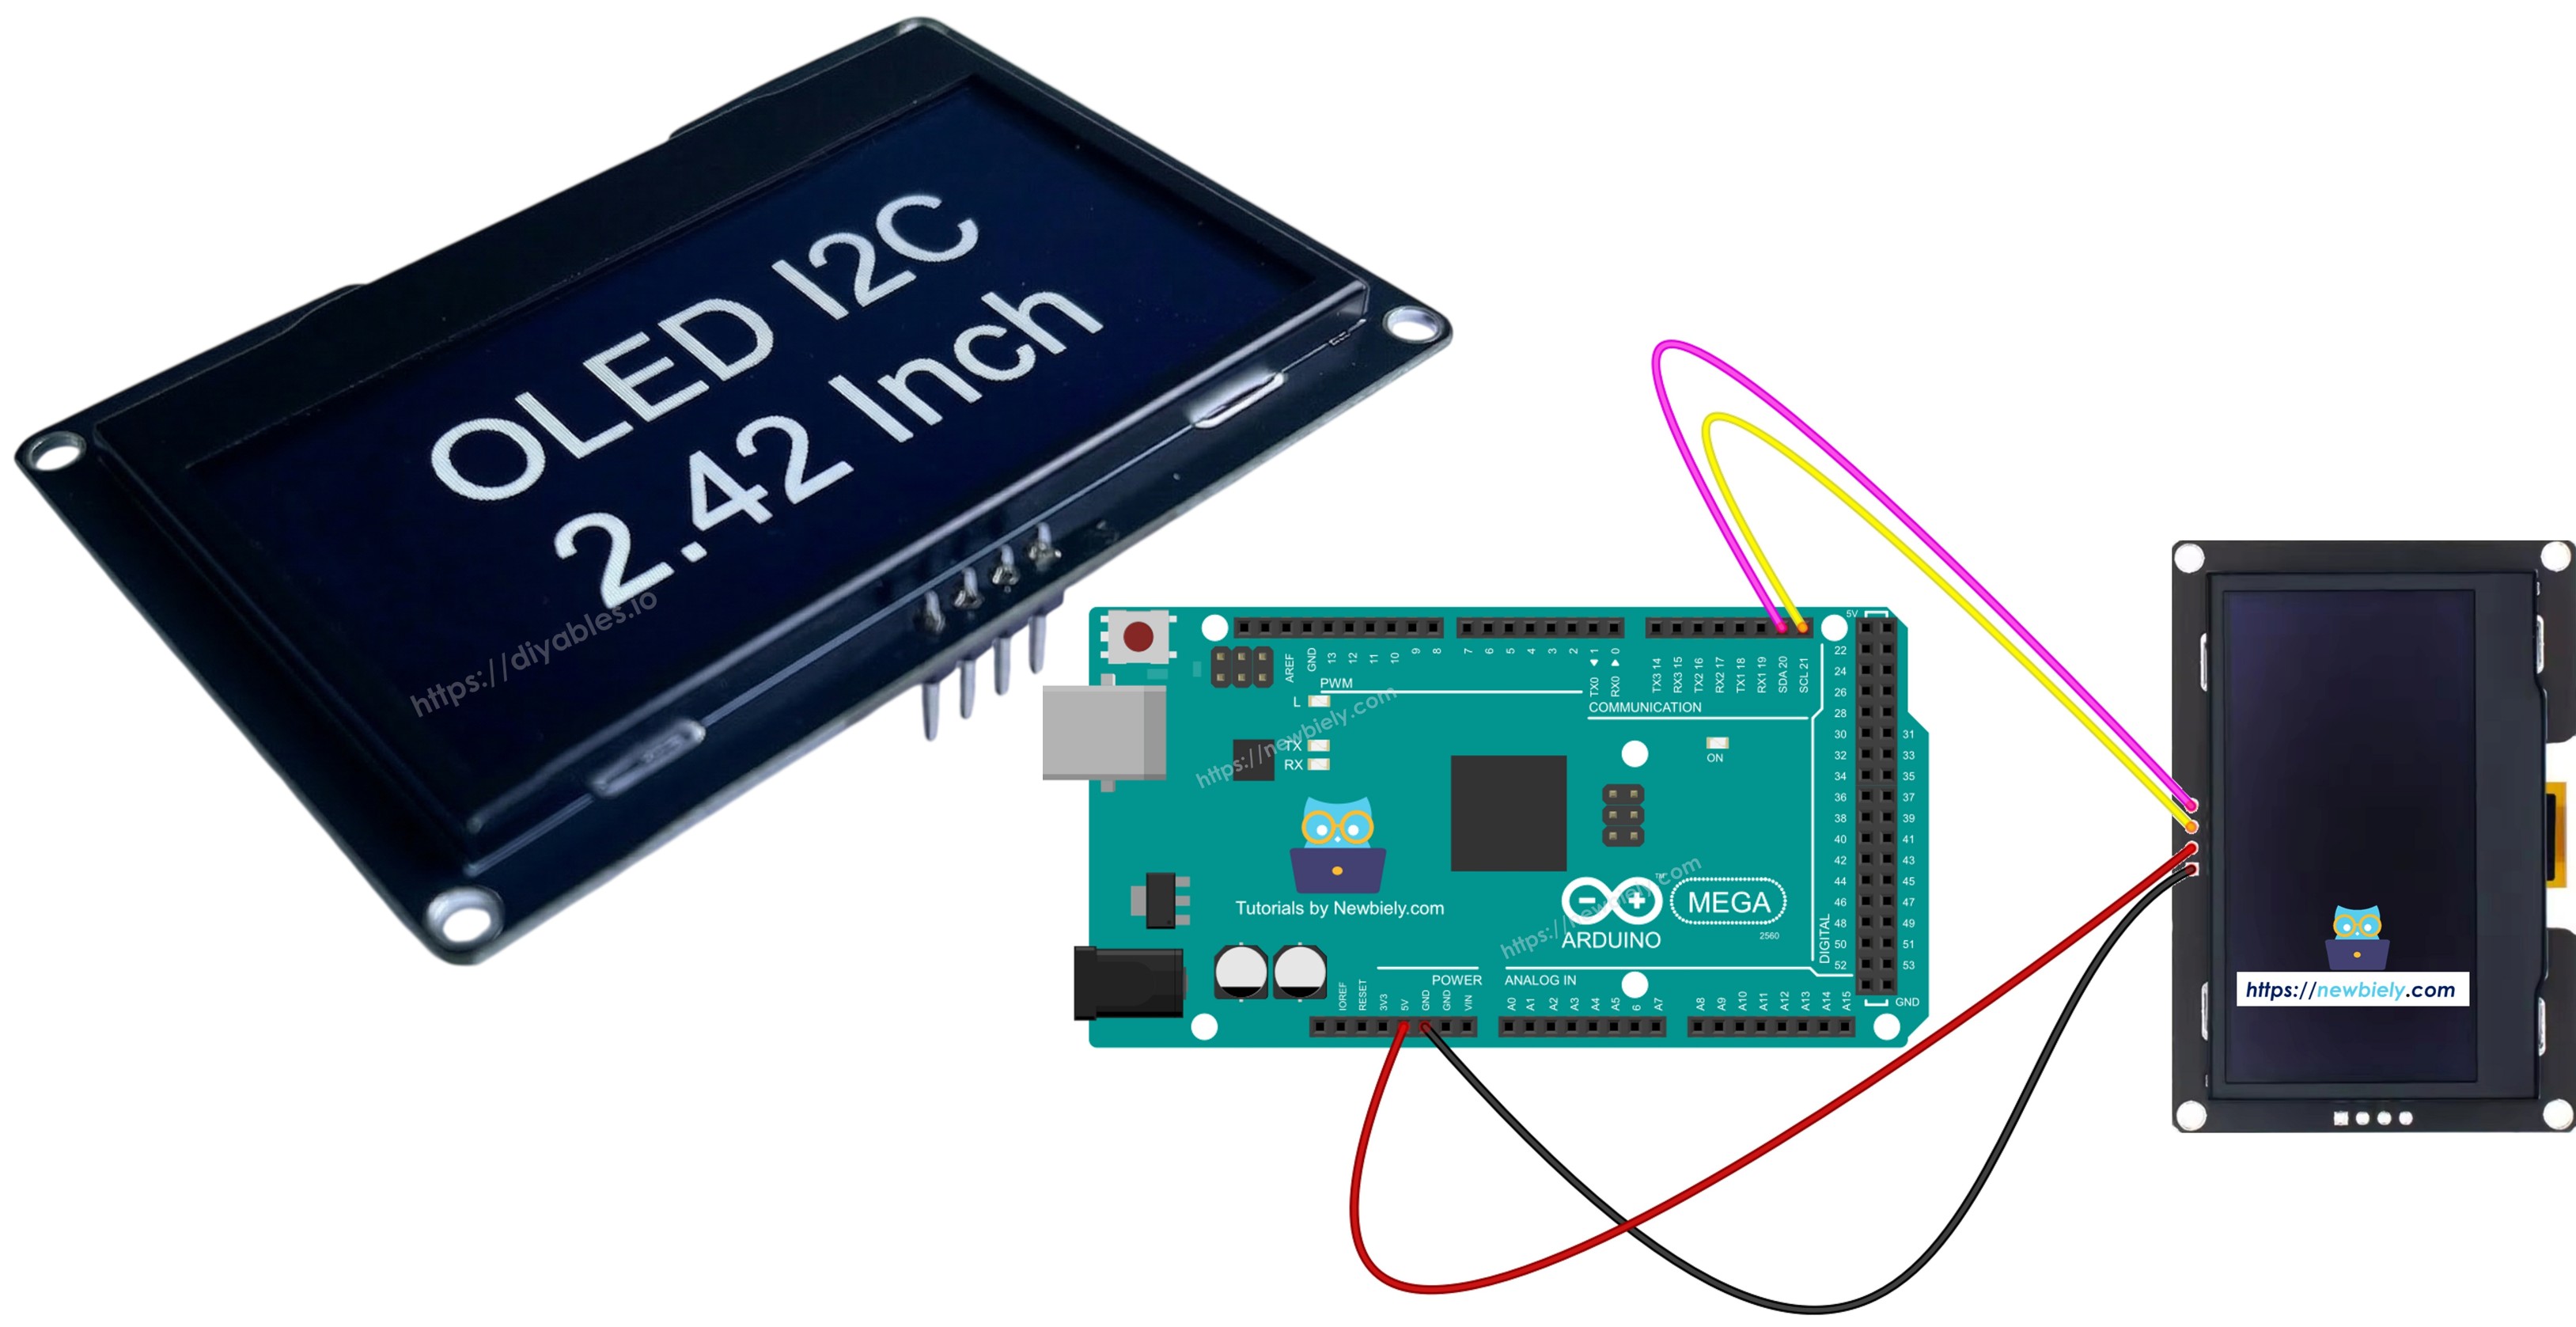
  • GND: Masse-Pin - mit Arduino Mega GND verbinden
  • VCC: Stromversorgungs-Pin - mit Arduino Mega 5V verbinden
  • SDA: I2C Datenleitung - mit Arduino Mega Pin 20 (SDA) verbinden
  • SCL: I2C Taktleitung - mit Arduino Mega Pin 21 (SCL) verbinden
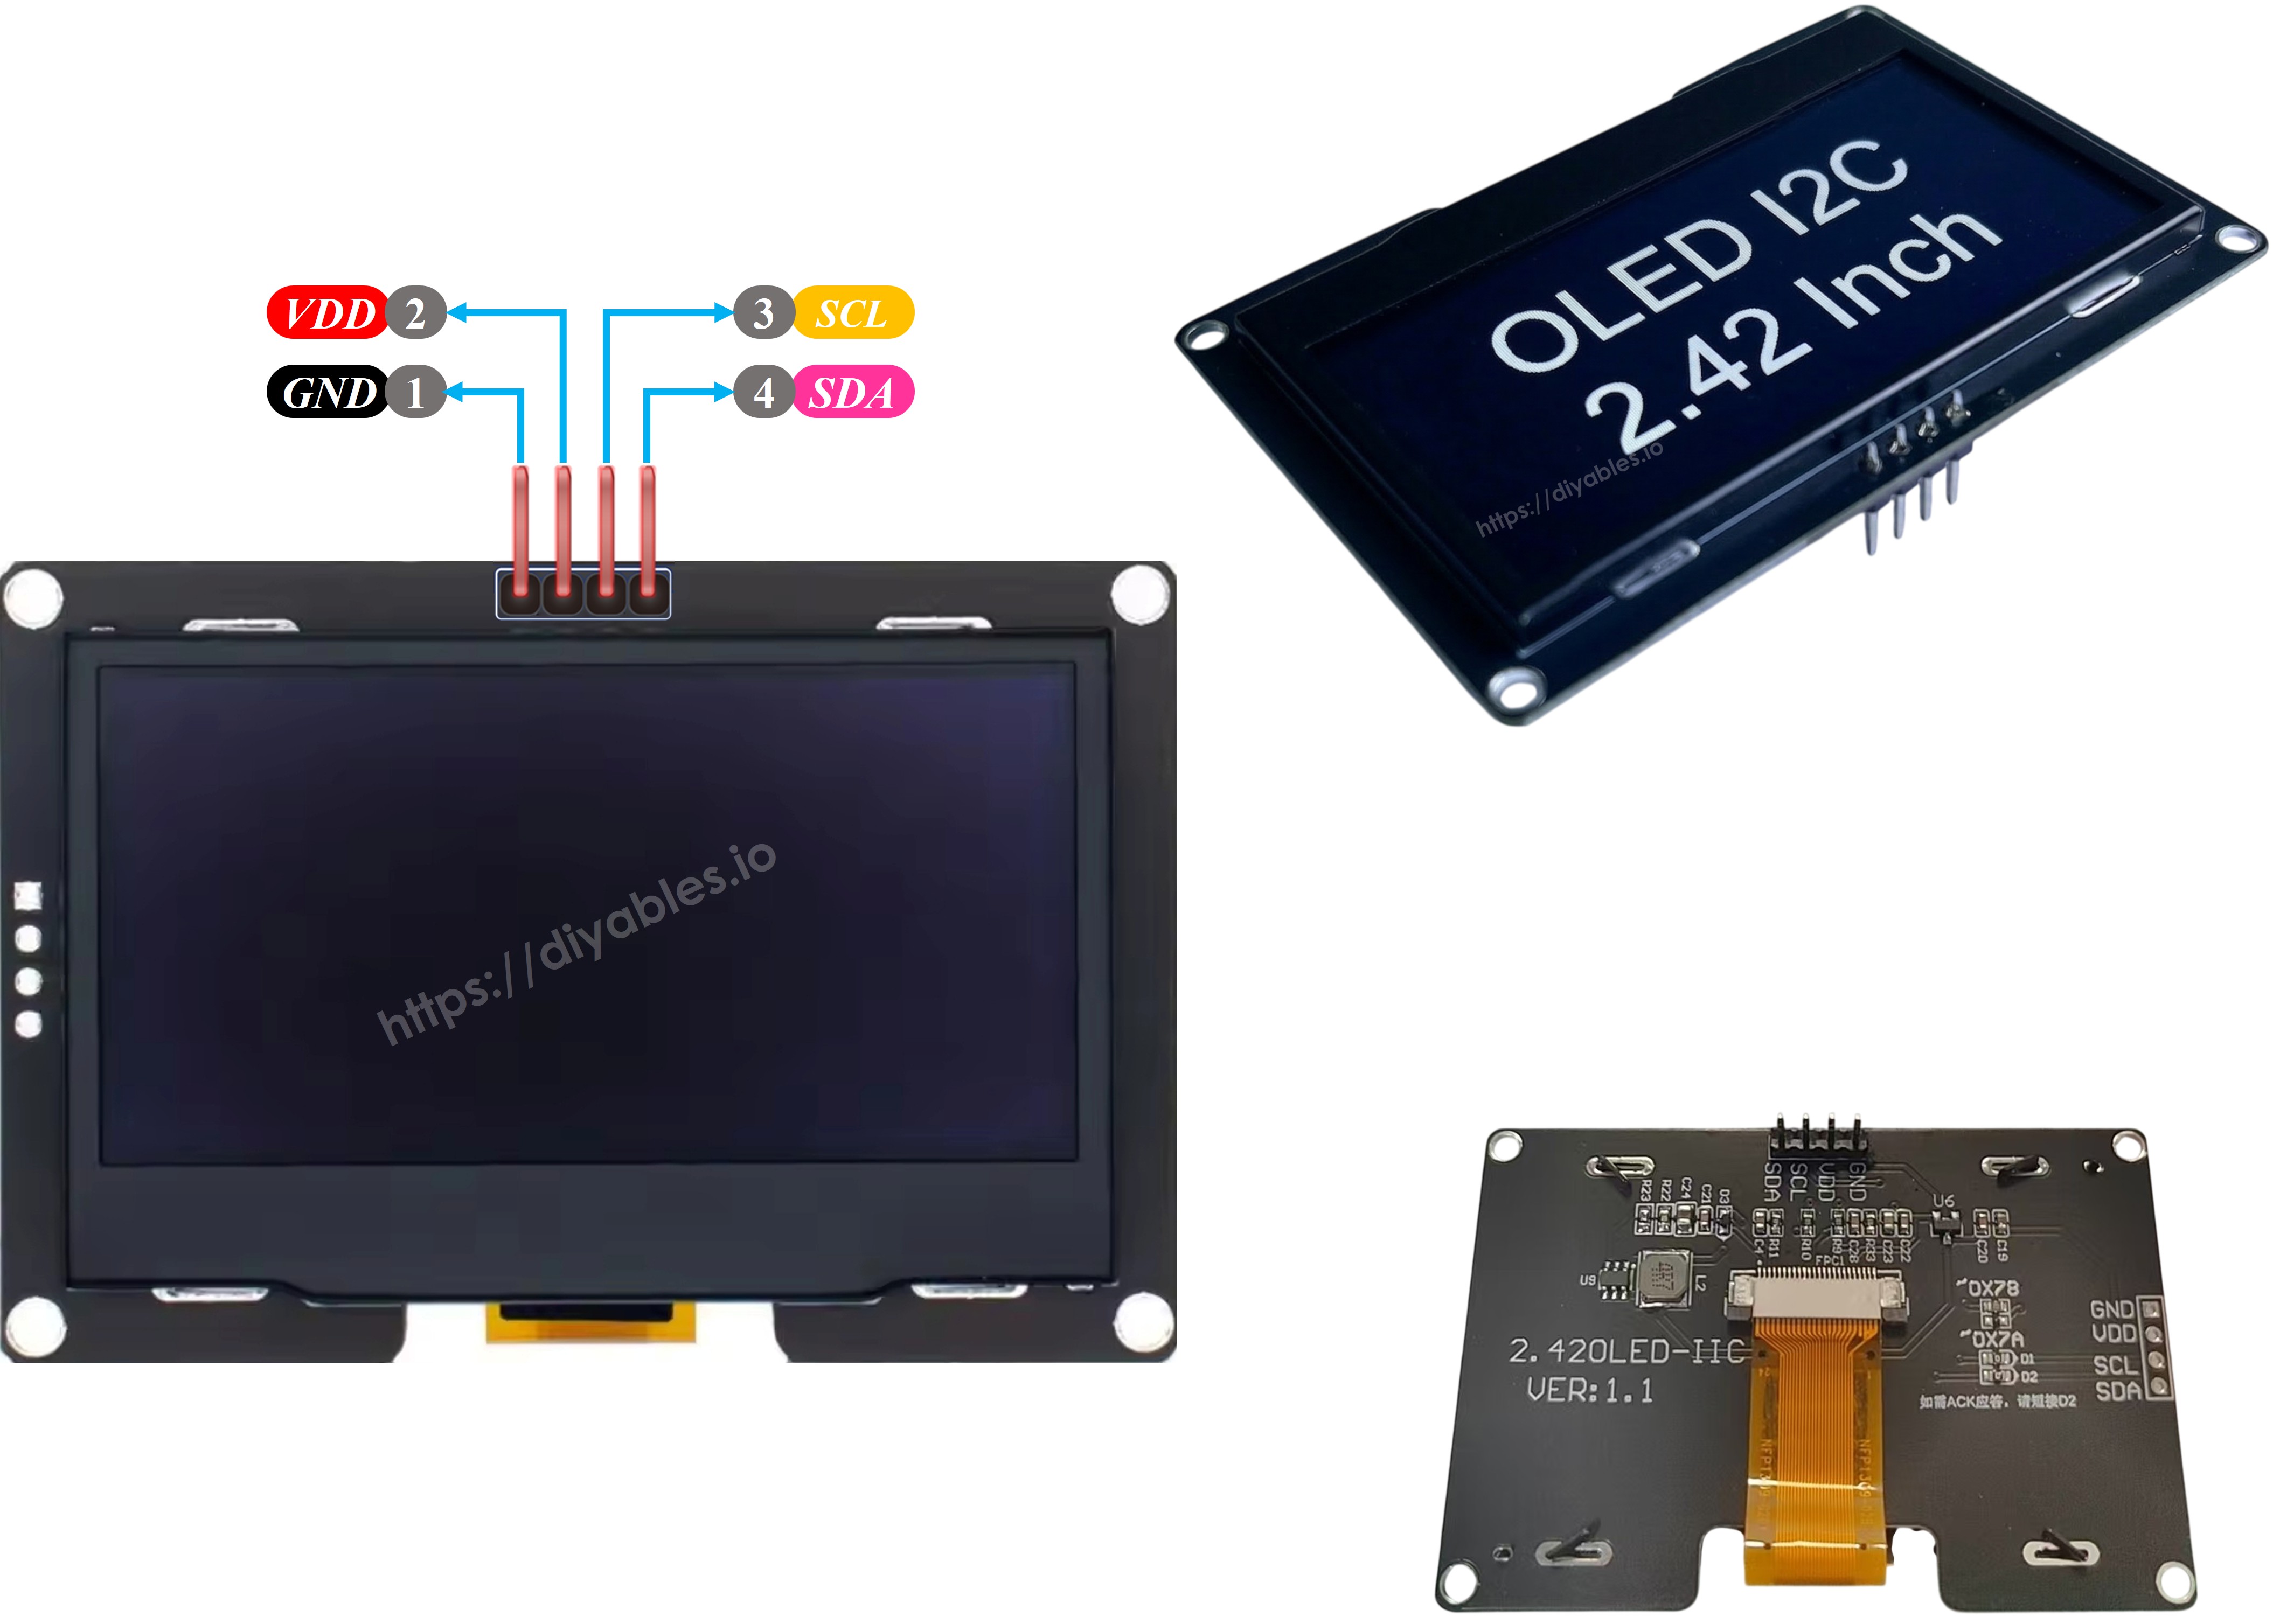
SSD1309 OLED Pinout

※ Notiz:

Die Pin-Anordnung an einem OLED Modul kann je nach Hersteller und Modell unterschiedlich sein. Überprüfen Sie immer die auf Ihrem spezifischen OLED Modul aufgedruckten Beschriftungen und folgen Sie diesen. Aufgepasst!

Diese Anleitung ist für ein OLED Display, das den SSD1309 I2C Treiber verwendet. Wir haben es mit einem SSD1309 OLED Display von DIYables getestet. Es funktioniert gut, ohne Probleme.

Schaltplan

Verbinden Sie das 2.42 Zoll SSD1309 OLED Display mit Arduino Mega gemäß dieser Verdrahtung:

Arduino Mega SSD1309 OLED wiring diagram

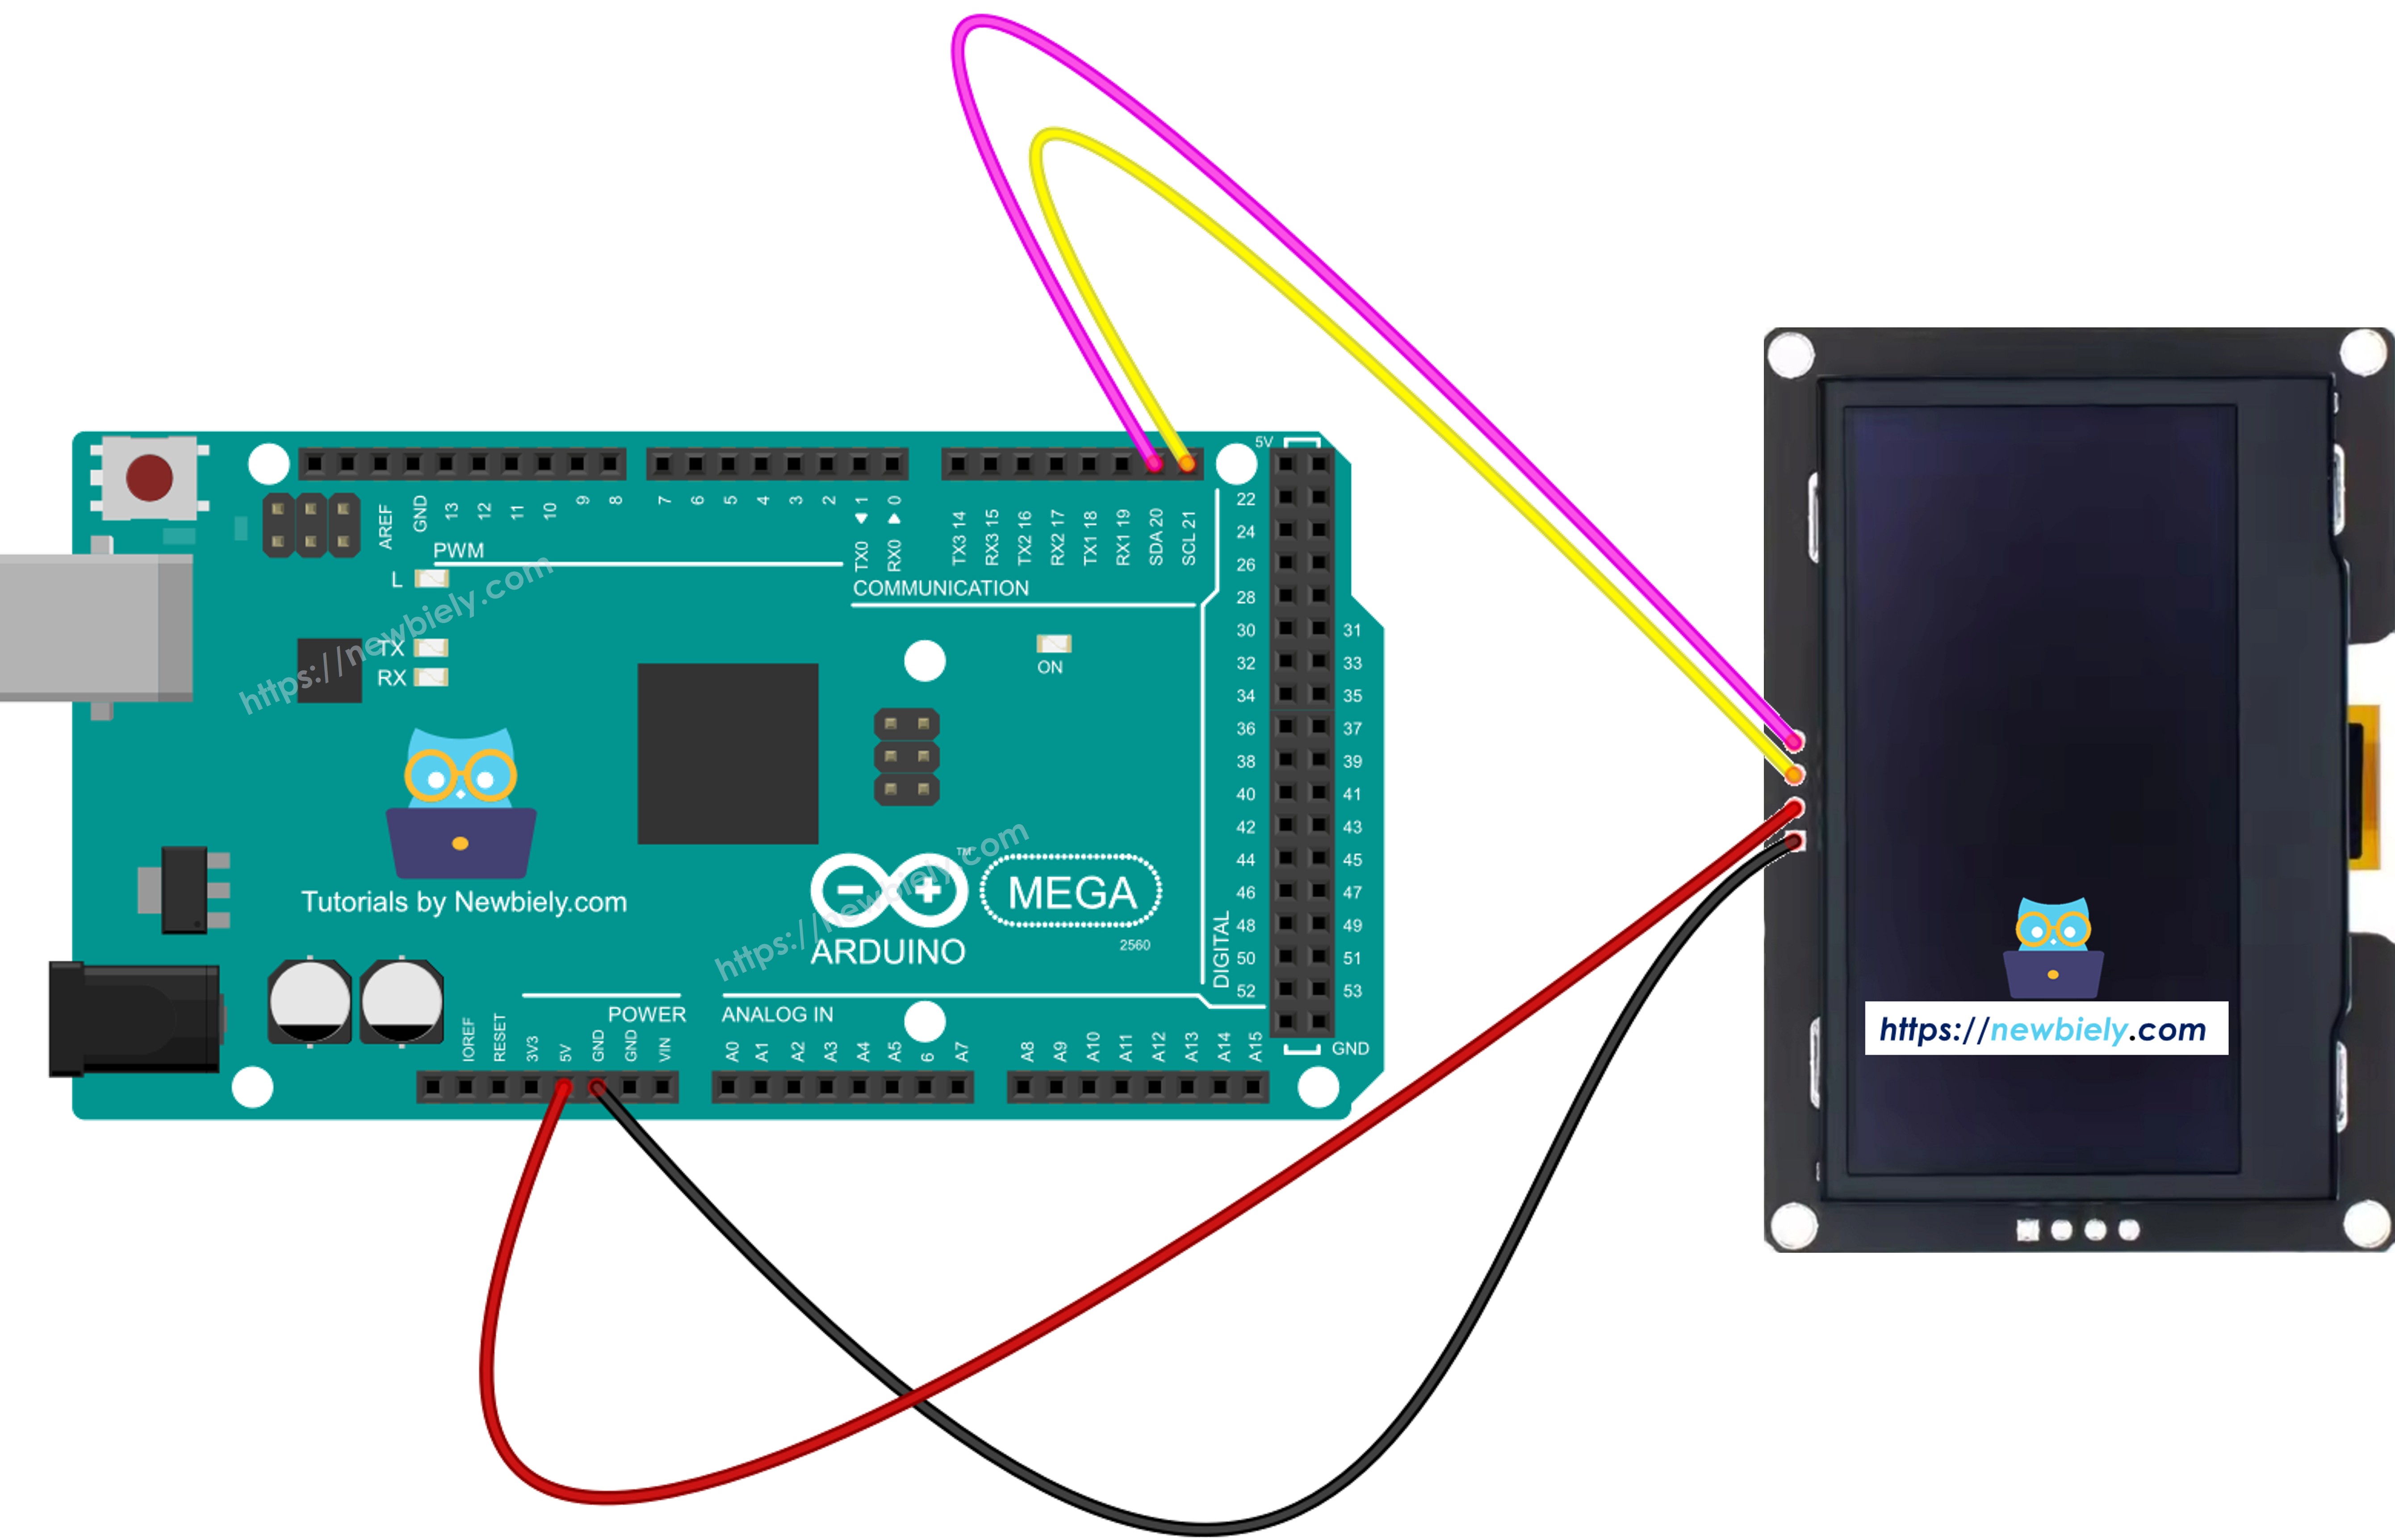
Dieses Bild wurde mit Fritzing erstellt. Klicken Sie, um das Bild zu vergrößern.

SSD1309 OLED Arduino Mega
VCC 5V
GND GND
SDA 20 (SDA)
SCL 21 (SCL)

Wie man SSD1309 OLED mit Arduino Mega verwendet

Installation der DIYables_OLED_SSD1309 Bibliothek

  • Gehen Sie zum Bibliotheken-Symbol auf der linken Seite der Arduino IDE.
  • Geben Sie DIYables_OLED_SSD1309 in das Suchfeld ein und suchen Sie nach der Bibliothek von DIYables.
  • Klicken Sie auf den Installieren-Button, um die Bibliothek hinzuzufügen.
Arduino Mega SSD1309 OLED library

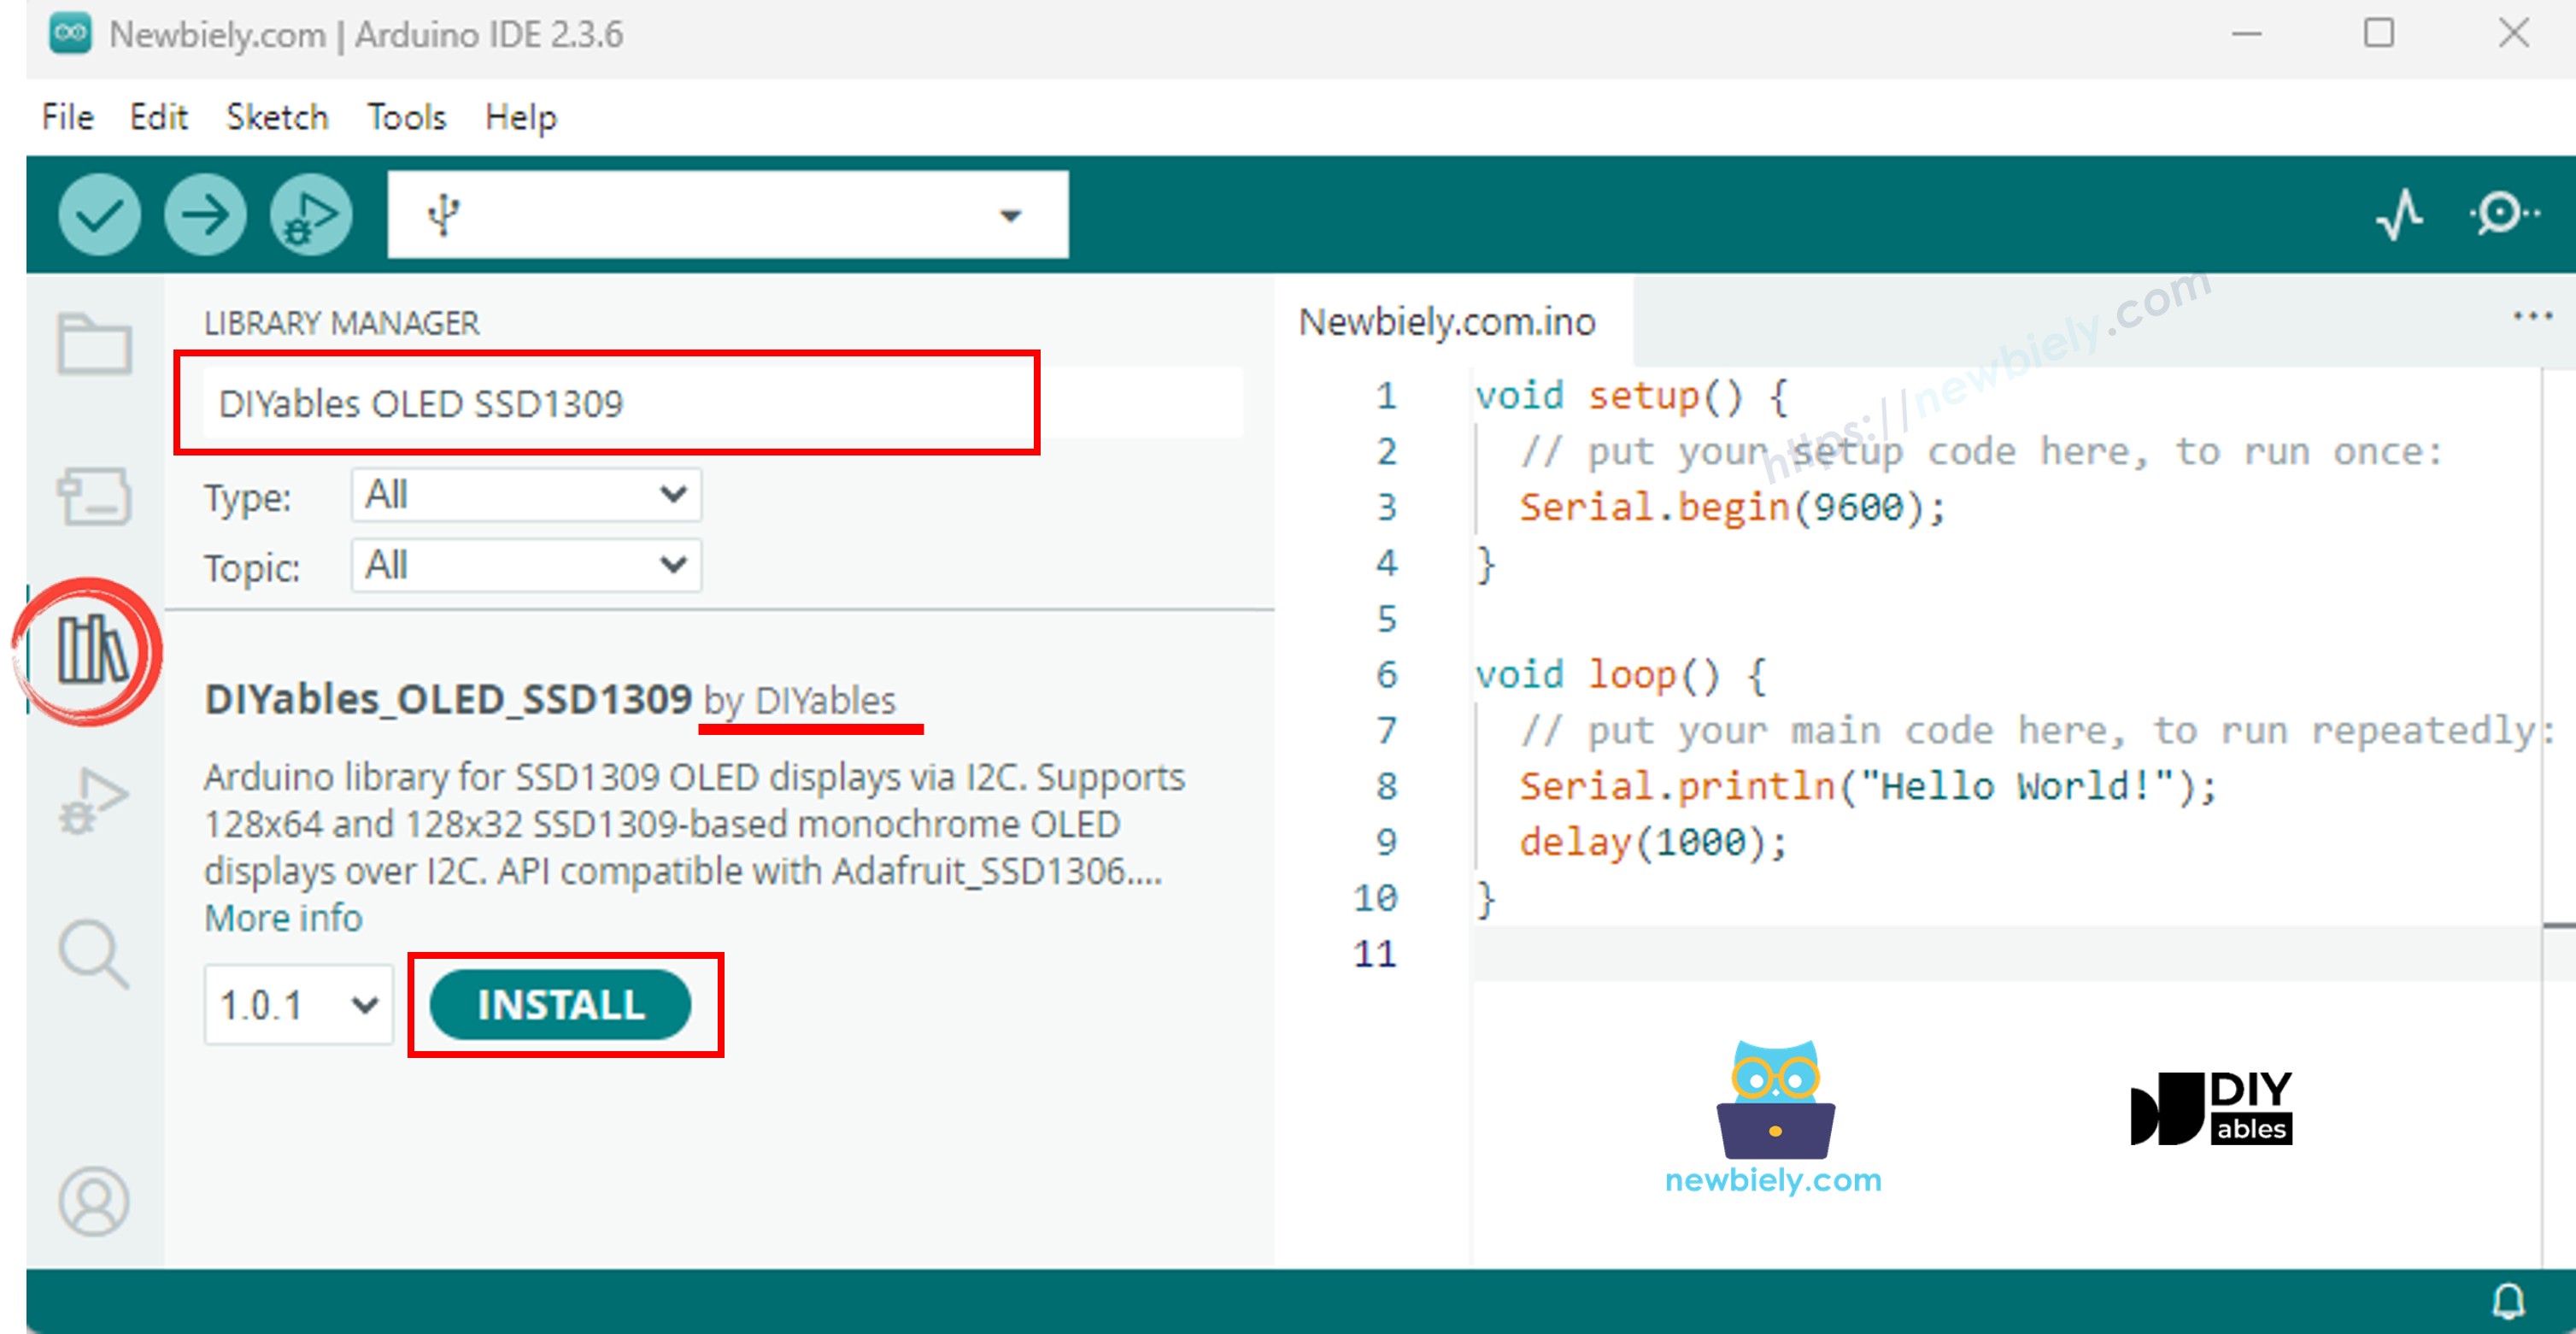
Die DIYables_OLED_SSD1309 Bibliothek hängt von der Adafruit_GFX Bibliothek ab. Falls Adafruit_GFX noch nicht installiert ist, wird die Arduino IDE Sie automatisch zur Installation auffordern, wenn Sie DIYables_OLED_SSD1309 installieren.

Arduino Mega Code - "Hello World" auf SSD1309 OLED anzeigen

Der folgende Code zeigt, wie Sie Text auf dem 2.42 Zoll SSD1309 OLED Display anzeigen:

/* * Dieser Arduino Mega Code wurde von newbiely.de entwickelt * Dieser Arduino Mega Code wird der Öffentlichkeit ohne jegliche Einschränkung zur Verfügung gestellt. * Für vollständige Anleitungen und Schaltpläne besuchen Sie bitte: * https://newbiely.de/tutorials/arduino-mega/arduino-mega-ssd1309-oled-display */ /* * DIYables OLED SSD1309 – Hello World * Prints text in two sizes on the 2.42 inch 128x64 I2C OLED with Arduino Mega. */ #include <Wire.h> #include <Adafruit_GFX.h> #include <DIYables_OLED_SSD1309.h> #define SCREEN_WIDTH 128 #define SCREEN_HEIGHT 64 #define OLED_RESET -1 #define SCREEN_ADDRESS 0x3C DIYables_OLED_SSD1309 display(SCREEN_WIDTH, SCREEN_HEIGHT, &Wire, OLED_RESET); void setup() { Serial.begin(9600); if (!display.begin(SSD1309_SWITCHCAPVCC, SCREEN_ADDRESS)) { Serial.println(F("SSD1309 allocation failed")); for (;;); } display.clearDisplay(); display.setTextSize(1); // 6x8 pixels per character display.setTextColor(SSD1309_PIXEL_ON); // turn pixels on display.setCursor(0, 0); display.println(F("Hello, World!")); display.println(); display.setTextSize(2); // 12x16 pixels per character display.println(F("DIYables")); display.setTextSize(1); display.println(); display.println(F("SSD1309 OLED 128x64")); display.display(); // push buffer to screen } void loop() { }

Erklärung

  • Notwendige Bibliotheken einbinden und Konstanten definieren
  • Display-Objekt mit I2C-Adresse 0x3C erstellen
  • Display in setup() initialisieren
  • Textgröße, Farbe und Cursor-Position einstellen
  • Text zum Display-Puffer mit print() und println() hinzufügen
  • Display.display() aufrufen, um Pufferinhalt auf den Bildschirm zu übertragen

※ Notiz:

Das F() Makro speichert Strings im Flash-Speicher anstatt im RAM. Dies spart wertvollen RAM auf dem Arduino Mega.

Arduino Mega Code - Text mit verschiedenen Formaten anzeigen

Dieser Code demonstriert Textanzeige mit verschiedenen Größen und Zahlenformatierung:

/* * Dieser Arduino Mega Code wurde von newbiely.de entwickelt * Dieser Arduino Mega Code wird der Öffentlichkeit ohne jegliche Einschränkung zur Verfügung gestellt. * Für vollständige Anleitungen und Schaltpläne besuchen Sie bitte: * https://newbiely.de/tutorials/arduino-mega/arduino-mega-ssd1309-oled-display */ /* * DIYables OLED SSD1309 – Display Text * Displays text in various sizes and formats on the 2.42" SSD1309 OLED with Arduino Mega. */ #include <Wire.h> #include <Adafruit_GFX.h> #include <DIYables_OLED_SSD1309.h> #define SCREEN_WIDTH 128 #define SCREEN_HEIGHT 64 #define OLED_RESET -1 #define SCREEN_ADDRESS 0x3C DIYables_OLED_SSD1309 display(SCREEN_WIDTH, SCREEN_HEIGHT, &Wire, OLED_RESET); void setup() { Serial.begin(9600); if (!display.begin(SSD1309_SWITCHCAPVCC, SCREEN_ADDRESS)) { Serial.println(F("SSD1309 allocation failed")); for (;;); } display.clearDisplay(); // Various text sizes display.setTextSize(1); display.setTextColor(SSD1309_PIXEL_ON); display.setCursor(0, 0); display.println(F("Size 1 - DIYables")); display.setTextSize(2); display.println(F("Size 2")); display.setTextSize(3); display.println(F("Sz3")); display.display(); delay(3000); // Number formatting display.clearDisplay(); display.setTextSize(1); display.setCursor(0, 0); int value = 42; float pi = 3.14159; display.print(F("Integer: ")); display.println(value); display.print(F("Float: ")); display.println(pi, 2); // 2 decimal places display.print(F("Hex: 0x")); display.println(value, HEX); display.print(F("Binary: 0b")); display.println(value, BIN); display.display(); } void loop() { }

Arduino Mega Code - Formen auf SSD1309 OLED zeichnen

Der folgende Code zeigt, wie Sie Pixel, Linien, Rechtecke, Kreise und Dreiecke zeichnen:

/* * Dieser Arduino Mega Code wurde von newbiely.de entwickelt * Dieser Arduino Mega Code wird der Öffentlichkeit ohne jegliche Einschränkung zur Verfügung gestellt. * Für vollständige Anleitungen und Schaltpläne besuchen Sie bitte: * https://newbiely.de/tutorials/arduino-mega/arduino-mega-ssd1309-oled-display */ /* * DIYables OLED SSD1309 – Draw Shapes * Demonstrates drawing pixels, lines, rectangles, circles, and triangles on the 2.42" OLED with Arduino Mega. */ #include <Wire.h> #include <Adafruit_GFX.h> #include <DIYables_OLED_SSD1309.h> #define SCREEN_WIDTH 128 #define SCREEN_HEIGHT 64 #define OLED_RESET -1 #define SCREEN_ADDRESS 0x3C DIYables_OLED_SSD1309 display(SCREEN_WIDTH, SCREEN_HEIGHT, &Wire, OLED_RESET); void setup() { Serial.begin(9600); if (!display.begin(SSD1309_SWITCHCAPVCC, SCREEN_ADDRESS)) { Serial.println(F("SSD1309 allocation failed")); for (;;); } display.clearDisplay(); display.display(); } void loop() { // Draw pixels display.clearDisplay(); for (int i = 0; i < 20; i++) { display.drawPixel(random(SCREEN_WIDTH), random(SCREEN_HEIGHT), SSD1309_PIXEL_ON); } display.display(); delay(2000); // Draw lines display.clearDisplay(); for (int y = 0; y < SCREEN_HEIGHT; y += 8) { display.drawLine(0, 0, SCREEN_WIDTH - 1, y, SSD1309_PIXEL_ON); } display.display(); delay(2000); // Draw rectangles display.clearDisplay(); display.drawRect(10, 10, 40, 30, SSD1309_PIXEL_ON); // outline display.fillRect(60, 10, 40, 30, SSD1309_PIXEL_ON); // filled display.drawRoundRect(10, 45, 40, 15, 5, SSD1309_PIXEL_ON); // rounded corners display.display(); delay(2000); // Draw circles display.clearDisplay(); display.drawCircle(32, 32, 20, SSD1309_PIXEL_ON); // outline display.fillCircle(96, 32, 20, SSD1309_PIXEL_ON); // filled display.display(); delay(2000); // Draw triangles display.clearDisplay(); display.drawTriangle(20, 10, 10, 50, 30, 50, SSD1309_PIXEL_ON); // outline display.fillTriangle(90, 10, 70, 50, 110, 50, SSD1309_PIXEL_ON); // filled display.display(); delay(2000); }

Verfügbare Zeichenfunktionen:

  • drawPixel(x, y, color) - Einen einzelnen Pixel zeichnen
  • drawLine(x0, y0, x1, y1, color) - Eine Linie zeichnen
  • drawRect(x, y, w, h, color) - Rechteck-Umriss zeichnen
  • fillRect(x, y, w, h, color) - Gefülltes Rechteck zeichnen
  • drawRoundRect(x, y, w, h, radius, color) - Abgerundetes Rechteck zeichnen
  • drawCircle(x, y, radius, color) - Kreis-Umriss zeichnen
  • fillCircle(x, y, radius, color) - Gefüllten Kreis zeichnen
  • drawTriangle(x0, y0, x1, y1, x2, y2, color) - Dreieck-Umriss zeichnen
  • fillTriangle(x0, y0, x1, y1, x2, y2, color) - Gefülltes Dreieck zeichnen

Arduino Mega Code - Hardware-Scrolling auf SSD1309 OLED

Der SSD1309 unterstützt hardwarebasiertes Scrolling. Dieser Code demonstriert alle vier Scroll-Richtungen:

/* * Dieser Arduino Mega Code wurde von newbiely.de entwickelt * Dieser Arduino Mega Code wird der Öffentlichkeit ohne jegliche Einschränkung zur Verfügung gestellt. * Für vollständige Anleitungen und Schaltpläne besuchen Sie bitte: * https://newbiely.de/tutorials/arduino-mega/arduino-mega-ssd1309-oled-display */ /* * DIYables OLED SSD1309 – Scroll Text * Demonstrates all four hardware scroll directions on the 2.42" OLED with Arduino Mega. */ #include <Wire.h> #include <Adafruit_GFX.h> #include <DIYables_OLED_SSD1309.h> #define SCREEN_WIDTH 128 #define SCREEN_HEIGHT 64 #define OLED_RESET -1 #define SCREEN_ADDRESS 0x3C DIYables_OLED_SSD1309 display(SCREEN_WIDTH, SCREEN_HEIGHT, &Wire, OLED_RESET); void setup() { Serial.begin(9600); if (!display.begin(SSD1309_SWITCHCAPVCC, SCREEN_ADDRESS)) { Serial.println(F("SSD1309 allocation failed")); for (;;); } display.clearDisplay(); display.setTextSize(2); display.setTextColor(SSD1309_PIXEL_ON); display.setCursor(10, 24); display.println(F("DIYables")); display.display(); delay(2000); } void loop() { // Scroll right across all pages display.startscrollright(0x00, 0x07); delay(3000); display.stopscroll(); delay(500); // Scroll left display.startscrollleft(0x00, 0x07); delay(3000); display.stopscroll(); delay(500); // Diagonal scroll right display.startscrolldiagright(0x00, 0x07); delay(3000); display.stopscroll(); delay(500); // Diagonal scroll left display.startscrolldiagleft(0x00, 0x07); delay(3000); display.stopscroll(); delay(500); }

Scrolling-Funktionen:

  • startscrollright(start, stop) - Nach rechts scrollen
  • startscrollleft(start, stop) - Nach links scrollen
  • startscrolldiagright(start, stop) - Diagonal nach rechts scrollen
  • startscrolldiagleft(start, stop) - Diagonal nach links scrollen
  • stopscroll() - Scrolling stoppen

Die start- und stop-Parameter definieren den Seitenbereich (0x00 bis 0x07 für den gesamten Bildschirm).

Arduino Mega Code - Bitmap-Bild auf SSD1309 OLED anzeigen

Dieser Code zeigt, wie Sie Bitmap-Bilder anzeigen, die im Programmspeicher gespeichert sind:

/* * Dieser Arduino Mega Code wurde von newbiely.de entwickelt * Dieser Arduino Mega Code wird der Öffentlichkeit ohne jegliche Einschränkung zur Verfügung gestellt. * Für vollständige Anleitungen und Schaltpläne besuchen Sie bitte: * https://newbiely.de/tutorials/arduino-mega/arduino-mega-ssd1309-oled-display */ /* * DIYables OLED SSD1309 – Display Bitmap Image * Shows a 16x16 heart icon and 128x64 DIYables logo on the 2.42" OLED with Arduino Mega. */ #include <Wire.h> #include <Adafruit_GFX.h> #include <DIYables_OLED_SSD1309.h> #define SCREEN_WIDTH 128 #define SCREEN_HEIGHT 64 #define OLED_RESET -1 #define SCREEN_ADDRESS 0x3C DIYables_OLED_SSD1309 display(SCREEN_WIDTH, SCREEN_HEIGHT, &Wire, OLED_RESET); // 16x16 heart icon bitmap const unsigned char heart_icon[] PROGMEM = { 0x00, 0x00, 0x0c, 0x30, 0x1e, 0x78, 0x3f, 0xfc, 0x7f, 0xfe, 0xff, 0xff, 0xff, 0xff, 0xff, 0xff, 0xff, 0xff, 0xff, 0xff, 0x7f, 0xfe, 0x3f, 0xfc, 0x1f, 0xf8, 0x0f, 0xf0, 0x03, 0xc0, 0x00, 0x00 }; // 128x64 DIYables logo bitmap const unsigned char diyables_logo[] PROGMEM = { 0xff, 0xff, 0xff, 0xff, 0xff, 0xff, 0xff, 0xff, 0xff, 0xff, 0xff, 0xff, 0xff, 0xff, 0xff, 0xff, 0xff, 0xff, 0xff, 0xff, 0xff, 0xff, 0xff, 0xff, 0xff, 0xff, 0xff, 0xff, 0xff, 0xff, 0xff, 0xff, 0xff, 0xff, 0xff, 0xff, 0xff, 0xff, 0xff, 0xff, 0xff, 0xff, 0xff, 0xff, 0xff, 0xff, 0xff, 0xff, 0xff, 0xff, 0xff, 0xff, 0xff, 0xff, 0xff, 0xff, 0xff, 0xff, 0xff, 0xff, 0xff, 0xff, 0xff, 0xff, 0xff, 0xff, 0xff, 0xff, 0xff, 0xff, 0xff, 0xff, 0xff, 0xff, 0xff, 0xff, 0xff, 0xff, 0xff, 0xff, 0xff, 0xff, 0xff, 0xff, 0xff, 0xff, 0xff, 0xff, 0xff, 0xff, 0xff, 0xff, 0xff, 0xff, 0xff, 0xff, 0xff, 0xff, 0xff, 0xff, 0xff, 0xff, 0xff, 0xff, 0xff, 0xff, 0xff, 0xff, 0xff, 0xff, 0xff, 0xff, 0xff, 0xff, 0xff, 0xff, 0xff, 0xff, 0xff, 0xff, 0xff, 0xff, 0xff, 0xff, 0xff, 0xff, 0xff, 0xff, 0xff, 0xff, 0xff, 0xff, 0xff, 0xff, 0xff, 0xff, 0xff, 0xff, 0xff, 0xff, 0xff, 0xff, 0xff, 0xff, 0xff, 0xff, 0xff, 0xff, 0xff, 0xff, 0xff, 0xff, 0xff, 0xff, 0xff, 0xff, 0xff, 0xff, 0xff, 0xff, 0xff, 0xff, 0xff, 0xff, 0xff, 0xff, 0xff, 0xff, 0xff, 0xff, 0xff, 0xff, 0xff, 0xff, 0xff, 0xff, 0xff, 0xff, 0xff, 0xff, 0xff, 0xff, 0xff, 0xff, 0xff, 0xff, 0xff, 0xff, 0xff, 0xff, 0xff, 0xff, 0xff, 0xff, 0xff, 0xff, 0xff, 0xff, 0xff, 0xff, 0xff, 0xff, 0xff, 0xff, 0xff, 0xff, 0xff, 0xff, 0xff, 0xff, 0xff, 0xff, 0xff, 0xff, 0xff, 0xff, 0xff, 0xff, 0xff, 0xff, 0xff, 0xff, 0xff, 0xff, 0xff, 0xff, 0xff, 0xff, 0xff, 0xff, 0xff, 0xff, 0xff, 0xff, 0xff, 0xff, 0xff, 0xff, 0xff, 0xff, 0xff, 0xff, 0xff, 0xff, 0xff, 0xff, 0xff, 0xff, 0xff, 0xff, 0xff, 0xff, 0xff, 0xff, 0xff, 0xff, 0xff, 0xff, 0xff, 0xf0, 0x00, 0x00, 0x00, 0x00, 0x00, 0x00, 0x00, 0x00, 0x00, 0x00, 0x0f, 0xff, 0xff, 0xff, 0xff, 0x80, 0x00, 0x00, 0x00, 0x00, 0x00, 0x00, 0x00, 0x00, 0x00, 0x00, 0x01, 0xff, 0xff, 0xff, 0xff, 0x00, 0x00, 0x00, 0x00, 0x00, 0x00, 0x00, 0x00, 0x00, 0x00, 0x00, 0x00, 0xff, 0xff, 0xff, 0xfe, 0x00, 0x07, 0xff, 0xc1, 0xff, 0xe0, 0x7f, 0xf0, 0x1f, 0xfc, 0x03, 0x00, 0x7f, 0xff, 0xff, 0xfc, 0x00, 0x1f, 0xff, 0xf7, 0xff, 0xf9, 0xff, 0xfc, 0x7f, 0xff, 0x0f, 0x80, 0x3f, 0xff, 0xff, 0xf8, 0x00, 0x3f, 0xff, 0xff, 0xff, 0xfd, 0xff, 0xfe, 0xff, 0xff, 0x9f, 0xc0, 0x1f, 0xff, 0xff, 0xf8, 0x00, 0x7f, 0x80, 0xff, 0x00, 0x7f, 0xc0, 0x3f, 0xf0, 0x0f, 0xfc, 0x00, 0x1f, 0xff, 0xff, 0xf0, 0x00, 0xfe, 0x00, 0x7f, 0x00, 0x3f, 0x80, 0x1f, 0xe0, 0x07, 0xf8, 0x00, 0x0f, 0xff, 0xff, 0xe0, 0x01, 0xfc, 0x00, 0x3e, 0x00, 0x1f, 0x00, 0x0f, 0xc0, 0x03, 0xf0, 0x00, 0x0f, 0xff, 0xff, 0xe0, 0x03, 0xf8, 0x00, 0x3e, 0x00, 0x1f, 0x00, 0x0f, 0xc0, 0x03, 0xf0, 0x00, 0x07, 0xff, 0xff, 0xc0, 0x07, 0xf8, 0x00, 0x3e, 0x00, 0x1f, 0x00, 0x0f, 0xc0, 0x03, 0xf0, 0x00, 0x03, 0xff, 0xff, 0xc0, 0x0f, 0xf8, 0x00, 0x3e, 0x00, 0x1f, 0x00, 0x0f, 0xc0, 0x03, 0xf0, 0x00, 0x03, 0xff, 0xff, 0x80, 0x0f, 0xf8, 0x00, 0x3e, 0x00, 0x1f, 0x00, 0x0f, 0xc0, 0x03, 0xf0, 0x00, 0x01, 0xff, 0xff, 0x80, 0x1f, 0xf8, 0x00, 0x3e, 0x00, 0x1f, 0x00, 0x0f, 0xc0, 0x03, 0xf0, 0x00, 0x01, 0xff, 0xff, 0x00, 0x3f, 0xf8, 0x00, 0x3e, 0x00, 0x1f, 0x00, 0x0f, 0xc0, 0x03, 0xf0, 0x00, 0x00, 0xff, 0xff, 0x00, 0x3f, 0xf8, 0x00, 0x3e, 0x00, 0x1f, 0x00, 0x0f, 0xc0, 0x03, 0xf0, 0x00, 0x00, 0xff, 0xfe, 0x00, 0x7f, 0xf8, 0x00, 0x3e, 0x00, 0x1f, 0x00, 0x0f, 0xc0, 0x03, 0xf0, 0x00, 0x00, 0xff, 0xfe, 0x00, 0x7f, 0xf8, 0x00, 0x3e, 0x00, 0x1f, 0x00, 0x0f, 0xc0, 0x03, 0xf0, 0x00, 0x00, 0xff, 0xfc, 0x00, 0xff, 0xf8, 0x00, 0x3e, 0x00, 0x1f, 0x00, 0x0f, 0xc0, 0x03, 0xf0, 0x00, 0x00, 0xff, 0xfc, 0x00, 0xff, 0xf8, 0x00, 0x3e, 0x00, 0x1f, 0x00, 0x0f, 0xc0, 0x03, 0xf0, 0x00, 0x00, 0xff, 0xfc, 0x01, 0xff, 0xf8, 0x00, 0x3e, 0x00, 0x1f, 0x00, 0x0f, 0xc0, 0x03, 0xf0, 0x00, 0x00, 0xff, 0xf8, 0x01, 0xff, 0xf8, 0x00, 0x3e, 0x00, 0x1f, 0x00, 0x0f, 0xc0, 0x03, 0xf0, 0x00, 0x00, 0xff, 0xf8, 0x03, 0xff, 0xf8, 0x00, 0x3e, 0x00, 0x1f, 0x00, 0x0f, 0xc0, 0x03, 0xf0, 0x00, 0x00, 0xff, 0xf0, 0x03, 0xff, 0xfc, 0x00, 0x7e, 0x00, 0x1f, 0x80, 0x1f, 0xe0, 0x07, 0xf8, 0x00, 0x00, 0xff, 0xf0, 0x07, 0xff, 0x7f, 0x80, 0xff, 0x00, 0x7f, 0xc0, 0x3f, 0xf0, 0x0f, 0xfc, 0x00, 0x00, 0xff, 0xf0, 0x07, 0xfe, 0x3f, 0xff, 0xff, 0xff, 0xfd, 0xff, 0xfe, 0xff, 0xff, 0x9f, 0xc0, 0x00, 0xff, 0xe0, 0x0f, 0xfc, 0x1f, 0xff, 0xf7, 0xff, 0xf9, 0xff, 0xfc, 0x7f, 0xff, 0x0f, 0x80, 0x00, 0xff, 0xe0, 0x0f, 0xf8, 0x07, 0xff, 0xc1, 0xff, 0xe0, 0x7f, 0xf0, 0x1f, 0xfc, 0x03, 0x00, 0x00, 0xff, 0xe0, 0x1f, 0xf0, 0x00, 0x00, 0x00, 0x00, 0x00, 0x00, 0x00, 0x00, 0x00, 0x00, 0x00, 0x00, 0xff, 0xc0, 0x1f, 0xe0, 0x00, 0x00, 0x00, 0x00, 0x00, 0x00, 0x00, 0x00, 0x00, 0x00, 0x00, 0x00, 0xff, 0xc0, 0x3f, 0xc0, 0x00, 0x00, 0x00, 0x00, 0x00, 0x00, 0x00, 0x00, 0x00, 0x00, 0x00, 0x00, 0xff, 0xc0, 0x3f, 0x80, 0x00, 0x00, 0x00, 0x00, 0x00, 0x00, 0x00, 0x00, 0x00, 0x00, 0x00, 0x00, 0xff, 0x80, 0x7f, 0x00, 0xff, 0xff, 0xff, 0xff, 0xff, 0xff, 0xff, 0xff, 0xff, 0xff, 0xff, 0xff, 0xff, 0x80, 0x7f, 0x00, 0xff, 0xff, 0xff, 0xff, 0xff, 0xff, 0xff, 0xff, 0xff, 0xff, 0xff, 0xff, 0xff, 0x80, 0xfe, 0x00, 0xff, 0xff, 0xff, 0xff, 0xff, 0xff, 0xff, 0xff, 0xff, 0xff, 0xff, 0xff, 0xff, 0x00, 0xfc, 0x00, 0xff, 0xff, 0xff, 0xff, 0xff, 0xff, 0xff, 0xff, 0xff, 0xff, 0xff, 0xff, 0xff, 0x01, 0xf8, 0x00, 0xff, 0xff, 0xff, 0xff, 0xff, 0xff, 0xff, 0xff, 0xff, 0xff, 0xff, 0xff, 0xff, 0x01, 0xf0, 0x00, 0xff, 0xff, 0xff, 0xff, 0xff, 0xff, 0xff, 0xff, 0xff, 0xff, 0xff, 0xff, 0xfe, 0x03, 0xe0, 0x00, 0xff, 0xff, 0xff, 0xff, 0xff, 0xff, 0xff, 0xff, 0xff, 0xff, 0xff, 0xff, 0xfe, 0x07, 0xc0, 0x00, 0xff, 0xff, 0xff, 0xff, 0xff, 0xff, 0xff, 0xff, 0xff, 0xff, 0xff, 0xff, 0xfc, 0x0f, 0x80, 0x00, 0xff, 0xff, 0xff, 0xff, 0xff, 0xff, 0xff, 0xff, 0xff, 0xff, 0xff, 0xff, 0xf8, 0x1f, 0x00, 0x00, 0xff, 0xff, 0xff, 0xff, 0xff, 0xff, 0xff, 0xff, 0xff, 0xff, 0xff, 0xff, 0xf0, 0x3e, 0x00, 0x00, 0xff, 0xff, 0xff, 0xff, 0xff, 0xff, 0xff, 0xff, 0xff, 0xff, 0xff, 0xff, 0xe0, 0x7c, 0x00, 0x00, 0xff, 0xff, 0xff, 0xff, 0xff, 0xff, 0xff, 0xff, 0xff, 0xff, 0xff, 0xff, 0xc0, 0xf8, 0x00, 0x00, 0xff, 0xff, 0xff, 0xff, 0xff, 0xff, 0xff, 0xff, 0xff, 0xff, 0xff, 0xff, 0x81, 0xf0, 0x00, 0x00, 0xff, 0xff, 0xff, 0xff, 0xff, 0xff, 0xff, 0xff, 0xff, 0xff, 0xff, 0xff, 0x03, 0xe0, 0x00, 0x00, 0xff, 0xff, 0xff, 0xff, 0xff, 0xff, 0xff, 0xff, 0xff, 0xff, 0xff, 0xff }; void setup() { Serial.begin(9600); if (!display.begin(SSD1309_SWITCHCAPVCC, SCREEN_ADDRESS)) { Serial.println(F("SSD1309 allocation failed")); for (;;); } display.clearDisplay(); display.display(); } void loop() { // Display small heart icon centered display.clearDisplay(); display.drawBitmap((SCREEN_WIDTH - 16) / 2, (SCREEN_HEIGHT - 16) / 2, heart_icon, 16, 16, SSD1309_PIXEL_ON); display.display(); delay(3000); // Display full-screen DIYables logo display.clearDisplay(); display.drawBitmap(0, 0, diyables_logo, SCREEN_WIDTH, SCREEN_HEIGHT, SSD1309_PIXEL_ON); display.display(); delay(3000); // Invert display display.invertDisplay(true); delay(2000); display.invertDisplay(false); delay(1000); }

Um Bilder anzuzeigen:

  • Konvertieren Sie Ihr Bild zu einem monochromen Bitmap-Array (verwenden Sie Online-Tools oder image2cpp)
  • Speichern Sie das Array in PROGMEM, um RAM zu sparen
  • Verwenden Sie drawBitmap(x, y, bitmap, width, height, color) zur Anzeige

Arduino Mega Code - Helligkeit/Kontrast anpassen

Steuern Sie die Helligkeit und den Kontrast des SSD1309 OLED Displays:

/* * Dieser Arduino Mega Code wurde von newbiely.de entwickelt * Dieser Arduino Mega Code wird der Öffentlichkeit ohne jegliche Einschränkung zur Verfügung gestellt. * Für vollständige Anleitungen und Schaltpläne besuchen Sie bitte: * https://newbiely.de/tutorials/arduino-mega/arduino-mega-ssd1309-oled-display */ /* * DIYables OLED SSD1309 – Contrast & Dim * Sweeps contrast from 0→255→0 then toggles dim mode on the 2.42" OLED with Arduino Mega. */ #include <Wire.h> #include <Adafruit_GFX.h> #include <DIYables_OLED_SSD1309.h> #define SCREEN_WIDTH 128 #define SCREEN_HEIGHT 64 #define OLED_RESET -1 #define SCREEN_ADDRESS 0x3C DIYables_OLED_SSD1309 display(SCREEN_WIDTH, SCREEN_HEIGHT, &Wire, OLED_RESET); void setup() { Serial.begin(9600); if (!display.begin(SSD1309_SWITCHCAPVCC, SCREEN_ADDRESS)) { Serial.println(F("SSD1309 allocation failed")); for (;;); } // Draw a test pattern so the contrast changes are visible display.clearDisplay(); display.fillRect(0, 0, 64, 32, SSD1309_PIXEL_ON); display.fillRect(64, 32, 64, 32, SSD1309_PIXEL_ON); display.setTextSize(1); display.setTextColor(SSD1309_PIXEL_INVERSE); display.setCursor(16, 28); display.println(F("Contrast Demo")); display.display(); delay(2000); } void loop() { // Ramp up for (int c = 0; c <= 255; c += 5) { display.setContrast((uint8_t)c); delay(30); } delay(1000); // Ramp down for (int c = 255; c >= 0; c -= 5) { display.setContrast((uint8_t)c); delay(30); } delay(1000); // Quick dim toggle display.dim(true); // minimum brightness delay(2000); display.dim(false); // restore delay(2000); }

Helligkeitssteuerungs-Funktionen:

  • setContrast(value) - Kontrastlevel einstellen (0-255, höher = heller)
  • dim(true/false) - Schneller Wechsel zwischen gedimmt und normaler Helligkeit
  • invertDisplay(true/false) - Alle Pixel invertieren (schwarz↔weiß)

Arduino Mega Code - Externe Schriftarten verwenden

Die Adafruit_GFX Bibliothek beinhaltet FreeFont-Schriftarten. Dieser Code demonstriert drei verschiedene Schriftarten:

/* * Dieser Arduino Mega Code wurde von newbiely.de entwickelt * Dieser Arduino Mega Code wird der Öffentlichkeit ohne jegliche Einschränkung zur Verfügung gestellt. * Für vollständige Anleitungen und Schaltpläne besuchen Sie bitte: * https://newbiely.de/tutorials/arduino-mega/arduino-mega-ssd1309-oled-display */ /* * DIYables OLED SSD1309 – External Fonts * Cycles through three FreeFont typefaces on the 2.42" SSD1309 OLED with Arduino Mega. */ #include <Wire.h> #include <Adafruit_GFX.h> #include <DIYables_OLED_SSD1309.h> #include <Fonts/FreeSerif9pt7b.h> #include <Fonts/FreeSansBold12pt7b.h> #include <Fonts/FreeMono9pt7b.h> #define SCREEN_WIDTH 128 #define SCREEN_HEIGHT 64 #define OLED_RESET -1 #define SCREEN_ADDRESS 0x3C DIYables_OLED_SSD1309 display(SCREEN_WIDTH, SCREEN_HEIGHT, &Wire, OLED_RESET); void setup() { Serial.begin(9600); if (!display.begin(SSD1309_SWITCHCAPVCC, SCREEN_ADDRESS)) { Serial.println(F("SSD1309 allocation failed")); for (;;); } display.clearDisplay(); display.display(); } void loop() { // ── Built-in 5×7 font ── display.clearDisplay(); display.setFont(NULL); display.setTextSize(1); display.setTextColor(SSD1309_PIXEL_ON); display.setCursor(0, 0); display.println(F("Built-in 5x7 font")); display.println(); display.setTextSize(2); display.println(F("DIYables")); display.display(); delay(3000); // ── FreeSerif 9pt ── display.clearDisplay(); display.setFont(&FreeSerif9pt7b); display.setTextSize(1); display.setTextColor(SSD1309_PIXEL_ON); display.setCursor(0, 14); // Y = baseline display.println(F("FreeSerif 9pt")); display.setCursor(0, 38); display.println(F("DIYables OLED")); display.setCursor(0, 58); display.println(F("Hello World!")); display.display(); delay(3000); // ── FreeSansBold 12pt ── display.clearDisplay(); display.setFont(&FreeSansBold12pt7b); display.setTextSize(1); display.setTextColor(SSD1309_PIXEL_ON); display.setCursor(0, 20); display.println(F("SansBold")); display.setCursor(0, 52); display.println(F("DIYables")); display.display(); delay(3000); // ── FreeMono 9pt ── display.clearDisplay(); display.setFont(&FreeMono9pt7b); display.setTextSize(1); display.setTextColor(SSD1309_PIXEL_ON); display.setCursor(0, 14); display.println(F("FreeMono 9pt")); display.setCursor(0, 34); display.println(F("0123456789")); display.setCursor(0, 54); display.println(F("!@#$%^&*()")); display.display(); delay(3000); }

※ Notiz:

FreeFont-Dateien sind groß. Arduino Mega hat 256KB Flash-Speicher, was für mehrere Schriftarten ausreicht. Wenn Sie jedoch Platz sparen müssen, verwenden Sie nur die Schriftarten, die Sie benötigen.

Schriftarten-Verwendung:

  • Schriftarten-Header einbinden: #include <Fonts/FreeSans9pt7b.h>
  • Schriftart einstellen: display.setFont(&FreeSans9pt7b)
  • Auf Standard zurücksetzen: display.setFont(NULL)
  • Bei externen Schriftarten repräsentiert die Y-Koordinate die Grundlinie, nicht die Oberseite

Fehlerbehebung

Wenn das OLED Display nicht funktioniert, versuchen Sie diese Schritte:

I2C-Adresse überprüfen

Die Standard-I2C-Adresse ist 0x3C, aber einige Module verwenden 0x3D. Führen Sie diesen I2C-Scanner aus, um die korrekte Adresse zu finden:

#include <Wire.h> void setup() { Serial.begin(9600); Wire.begin(); Serial.println("I2C Scanner"); byte count = 0; for (byte i = 1; i < 127; i++) { Wire.beginTransmission(i); if (Wire.endTransmission() == 0) { Serial.print("Found I2C device at 0x"); if (i < 16) Serial.print("0"); Serial.println(i, HEX); count++; } } Serial.print("Found "); Serial.print(count); Serial.println(" device(s)"); } void loop() {}

Wenn Ihr Display 0x3D verwendet, ändern Sie SCREEN_ADDRESS zu 0x3D im Code.

Verdrahtung überprüfen

Verbindungen verifizieren:

  • VCC → 5V
  • GNDGND
  • SDA → Pin 20 (SDA)
  • SCL → Pin 21 (SCL)

Stromversorgung überprüfen

Stellen Sie sicher, dass der Arduino Mega ausreichend Strom über das USB-Kabel oder externes Netzteil erhält.

Video Tutorial

...VIDEO LINK_VIDEO_ARDUINO_MEGA_SSD1309_OLED_DISPLAY

※ UNSERE NACHRICHTEN

  • Sie können gerne den Link zu diesem Tutorial teilen. Bitte verwenden Sie jedoch unsere Inhalte nicht auf anderen Websites. Wir haben viel Mühe und Zeit in die Erstellung der Inhalte investiert, bitte respektieren Sie unsere Arbeit!