Raspberry Pi - Piezo Buzzer
Diese Anleitung zeigt Ihnen, wie Sie Raspberry Pi zur Steuerung des Piezo-Buzzers verwenden. Im Detail werden wir lernen:
- Wie ein Piezo-Buzzer funktioniert
- Wie Sie den Piezo-Buzzer an ein Raspberry Pi Board anschließen
- Wie Sie das Raspberry Pi programmieren, um den Piezo-Buzzer Töne erzeugen zu lassen.
- Wie Sie das Raspberry Pi programmieren, um den Piezo-Buzzer eine Melodie eines Liedes spielen zu lassen
Hardware-Anforderungen
Oder Sie können die folgenden Kits kaufen:
| 1 | × | DIYables Sensor-Kit (18 Sensoren/Displays) |
Über den Piezo-Buzzer
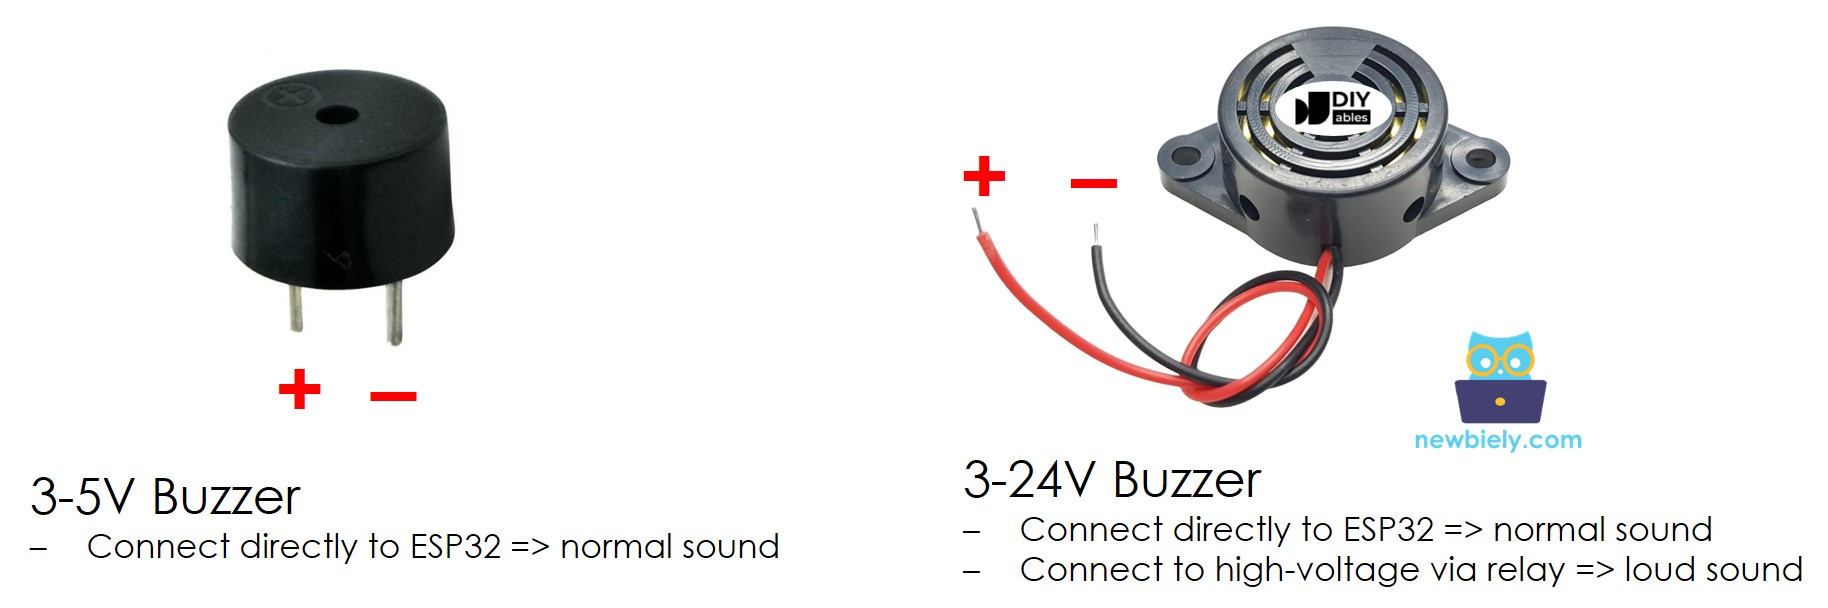
Ein Piezo-Buzzer wird verwendet, um Töne, Pieptöne oder sogar eine Melodie eines Liedes zu erzeugen.
Auf dem Markt erhältlich ist ein 3V-24V aktiver Buzzer, der einen doppelten Zweck erfüllt: Er funktioniert sowohl als 3-5V aktiver Buzzer als auch als Hochspannungs-Buzzer (12V und darüber).
- Wenn Sie diesen Buzzer direkt an einen Arduino-Pin anschließen, erzeugt er einen Standardton, was ihn ideal für Anwendungen wie Tonindikatoren macht, zum Beispiel Tastatur-Töne.
- Andererseits gibt er, wenn er über ein Relais an eine Hochspannung angeschlossen wird, einen lauten Ton von sich, wodurch er für Warnsignale geeignet ist.
Die Piezo-Buzzer Pinbelegung
Piezo-Buzzer haben normalerweise zwei Pins:
- Der Negative (-) Pin sollte mit GND (0V) verbunden werden
- Der Positive (+) Pin erhält das Steuersignal vom Raspberry Pi (direkt oder indirekt über Relais)
Wie der Piezo-Buzzer funktioniert
Verkabelungsdiagramm
- Das Verkabelungsdiagramm zwischen Raspberry Pi und Piezo-Buzzer
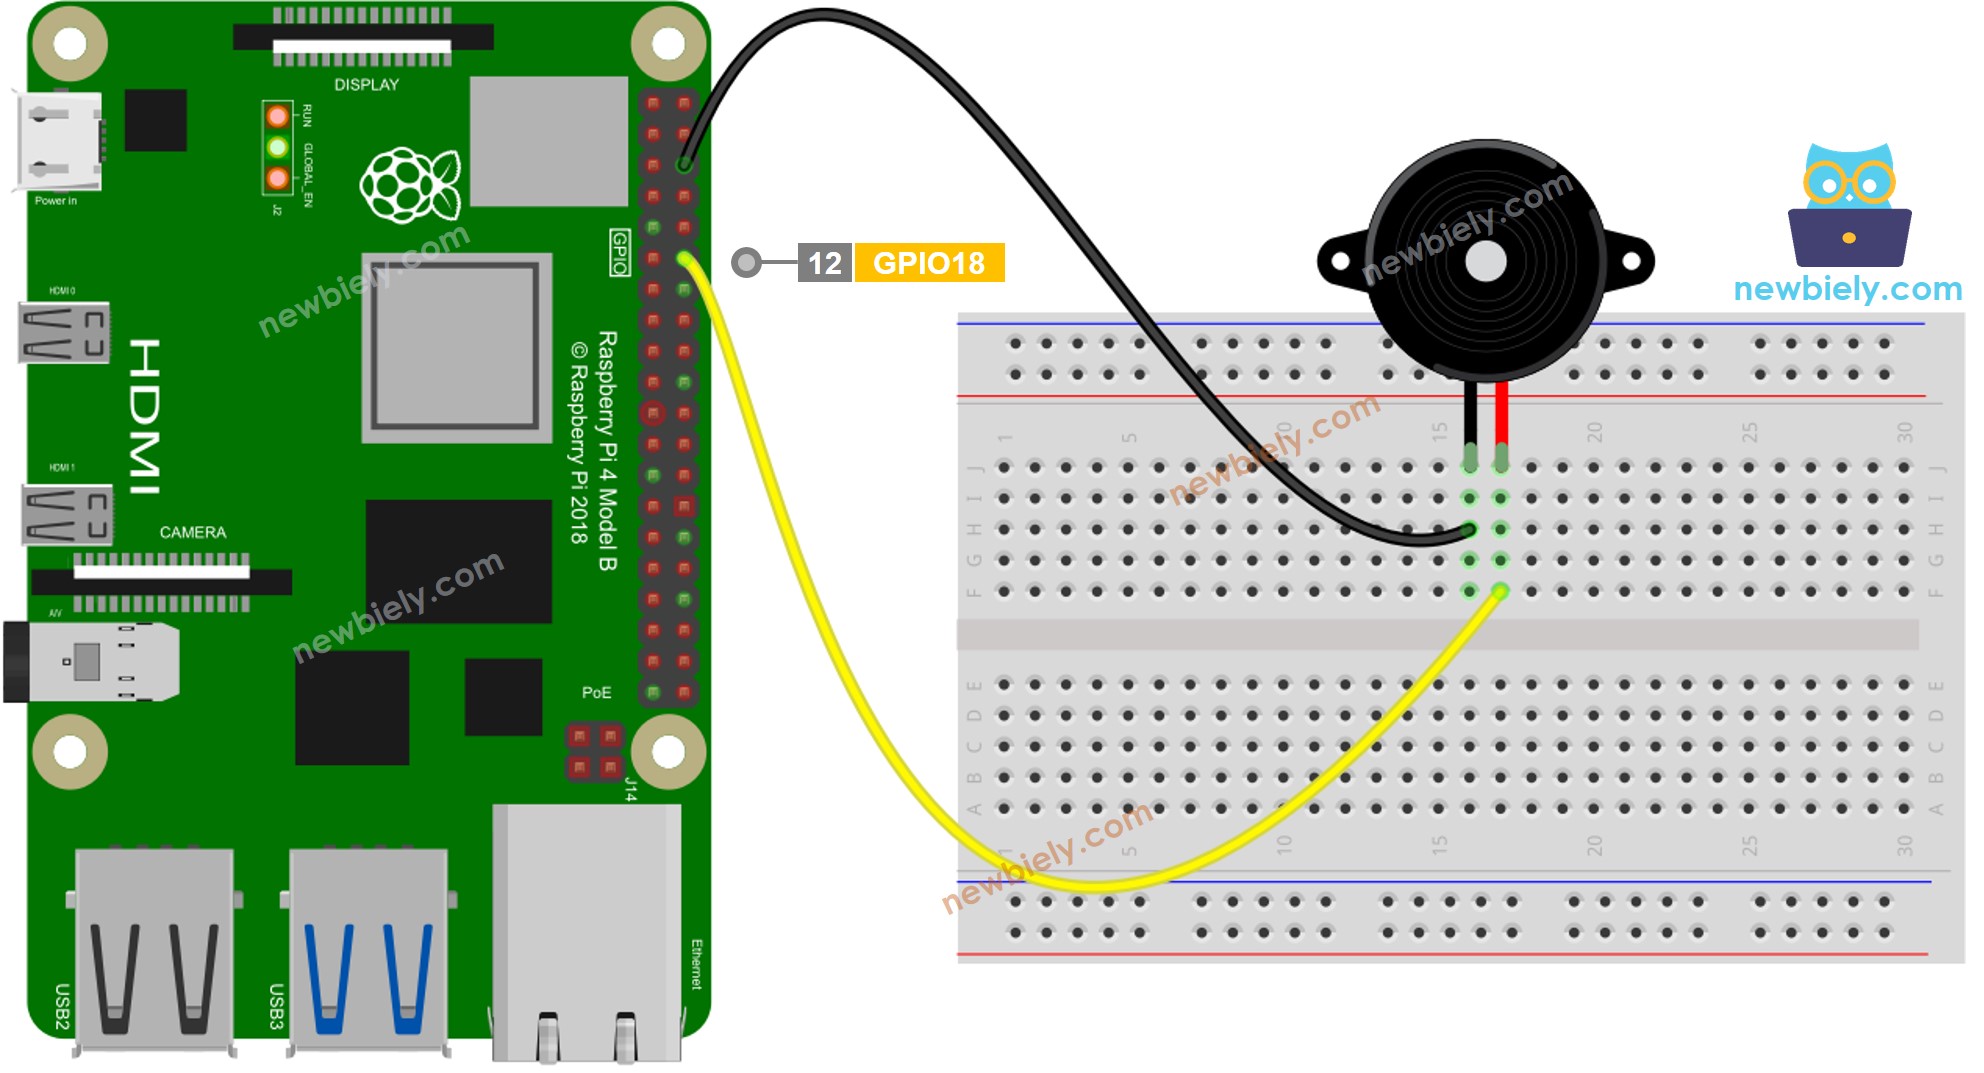
Dieses Bild wurde mit Fritzing erstellt. Klicken Sie, um das Bild zu vergrößern.
- Das Verkabelungsdiagramm zwischen Raspberry Pi und Piezo-Buzzer Modul
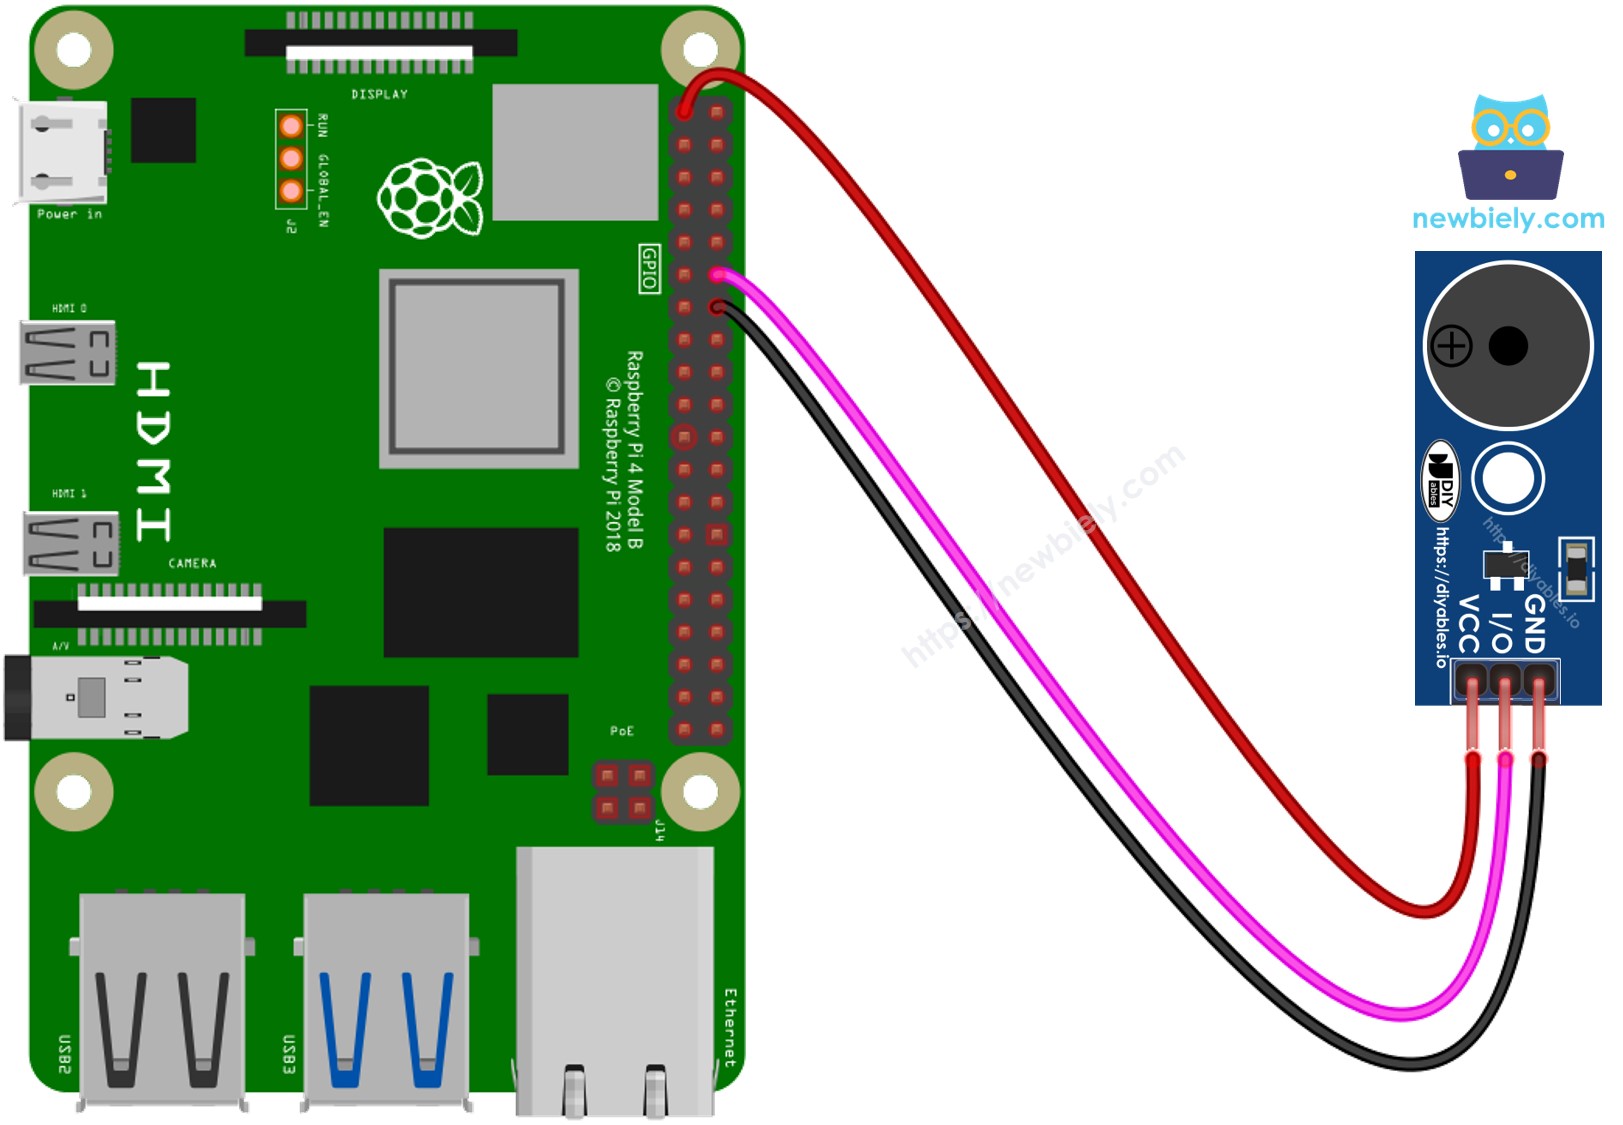
Dieses Bild wurde mit Fritzing erstellt. Klicken Sie, um das Bild zu vergrößern.
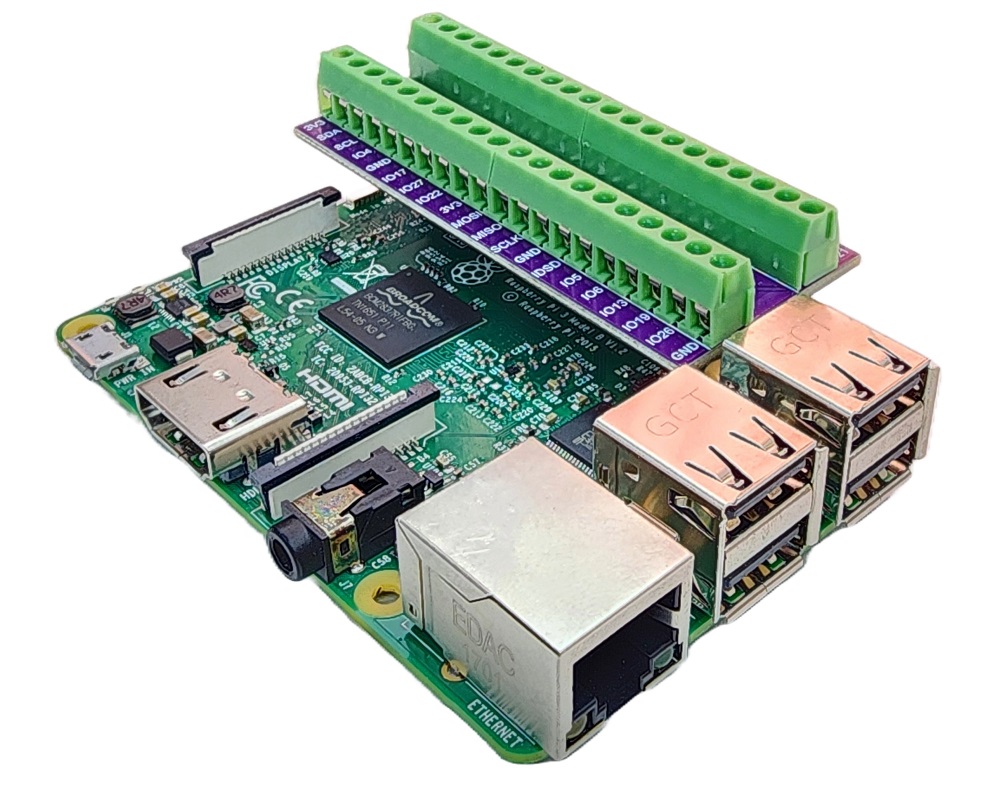
Um Ihren Verdrahtungsaufbau zu vereinfachen und zu organisieren, empfehlen wir die Verwendung eines Schraubklemmenblock-Shields für Raspberry Pi. Dieses Shield gewährleistet sicherere und besser verwaltbare Verbindungen, wie unten gezeigt:
Raspberry Pi Code
Schnelle Schritte
- Stellen Sie sicher, dass Sie Raspbian oder ein anderes Raspberry Pi-kompatibles Betriebssystem auf Ihrem Pi installiert haben.
- Stellen Sie sicher, dass Ihr Raspberry Pi mit demselben lokalen Netzwerk wie Ihr PC verbunden ist.
- Stellen Sie sicher, dass Ihr Raspberry Pi mit dem Internet verbunden ist, falls Sie einige Bibliotheken installieren müssen.
- Falls dies das erste Mal ist, dass Sie Raspberry Pi verwenden, siehe wie Sie das Raspberry Pi einrichten
- Verbinden Sie Ihren PC über SSH mit dem Raspberry Pi unter Verwendung des integrierten SSH-Clients auf Linux und macOS oder PuTTY auf Windows. Siehe wie Sie Ihren PC über SSH mit Raspberry Pi verbinden.
- Stellen Sie sicher, dass Sie die RPi.GPIO Bibliothek installiert haben. Falls nicht, installieren Sie sie mit folgendem Befehl:
- Erstellen Sie eine Python-Skript-Datei buzzer.py und fügen Sie folgenden Code hinzu:
- Speichern Sie die Datei und führen Sie das Python-Skript aus, indem Sie folgenden Befehl im Terminal ausführen:
- Hören Sie sich die Melodie eines Liedes an, die vom Piezo-Buzzer ausgegeben wird.
Das Skript läuft in einer Endlosschleife kontinuierlich, bis Sie Strg + C im Terminal drücken.
Raspberry Pi Code Modifizieren
Jetzt werden wir den Code ändern, um das Lied "Jingle Bells" zu spielen.
- Erstellen Sie eine Python-Skript-Datei buzzer_Jingle_Bells.py und fügen Sie folgenden Code hinzu:
- Speichern Sie die Datei und führen Sie das Python-Skript aus, indem Sie folgenden Befehl im Terminal ausführen:
- Sie können diesen Code mit dem vorherigen Code vergleichen, um die Unterschiede zu sehen
Mit dieser Änderung wird der Code nun die Melodie von "Jingle Bells" mit dem am Raspberry Pi angeschlossenen Piezo-Buzzer spielen. Genießen Sie die festliche Melodie!
Video Tutorial
Wir erwägen die Erstellung von Video-Tutorials. Wenn Sie Video-Tutorials für wichtig halten, abonnieren Sie bitte unseren YouTube-Kanal , um uns zu motivieren, die Videos zu erstellen.
Fordern Sie sich selbst heraus
- Verwenden Sie einen Piezo-Buzzer, um Ihr Lieblingslied zu spielen.
- Nutzen Sie einen Raspberry Pi Bewegungssensor, um automatisch einen Alarm auszulösen, wenn sich jemand Ihren wertvollen Gegenständen nähert. Siehe Raspberry Pi - Bewegungssensor für weitere Informationen.