Raspberry Pi - Verkehrsampel

In diesem Tutorial lernen wir, wie Sie den Raspberry Pi zur Steuerung eines Verkehrsampel-Moduls verwenden. Im Detail werden wir lernen:

Erforderliche Hardware

1×Raspberry Pi 5
1×Ampel-Modul
1×Verbindungskabel
1×(Empfohlen) Schraubklemmenblock-Shield für Raspberry Pi
1×(Empfohlen) Raspberry Pi Prototyping-Grundplatte & Breadboard-Kit
1×(Empfohlen) HDMI-Touchscreen-Monitor für Raspberry Pi

Oder Sie können die folgenden Kits kaufen:

1×DIYables Sensor-Kit (30 Sensoren/Displays)
1×DIYables Sensor-Kit (18 Sensoren/Displays)
Offenlegung: Einige der in diesem Abschnitt bereitgestellten Links sind Amazon-Affiliate-Links. Wir können eine Provision für Käufe erhalten, die über diese Links getätigt werden, ohne zusätzliche Kosten für Sie. Wir schätzen Ihre Unterstützung.

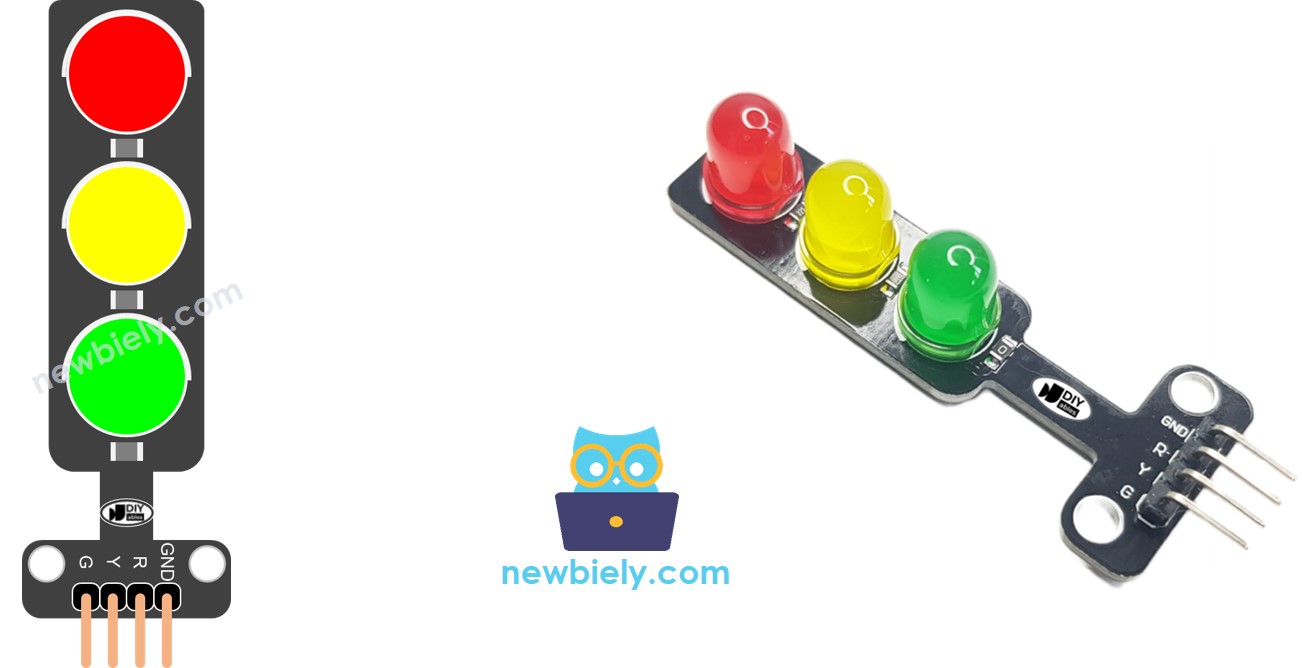
Über das Verkehrsampel-Modul

Pinout

Ein Verkehrsampel-Modul verfügt über 4 Pins:

  • GND Pin: Der Masse-Pin, verbinden Sie diesen Pin mit GND des Raspberry Pi.
  • R Pin: Der Pin zur Steuerung des roten Lichts, verbinden Sie diesen Pin mit einem digitalen Ausgang des Raspberry Pi.
  • Y Pin: Der Pin zur Steuerung des gelben Lichts, verbinden Sie diesen Pin mit einem digitalen Ausgang des Raspberry Pi.
  • G Pin: Der Pin zur Steuerung des grünen Lichts, verbinden Sie diesen Pin mit einem digitalen Ausgang des Raspberry Pi.
Traffic Light Pinout

Wie es funktioniert

Schaltplan

Raspberry Pi traffic light Wiring Diagram

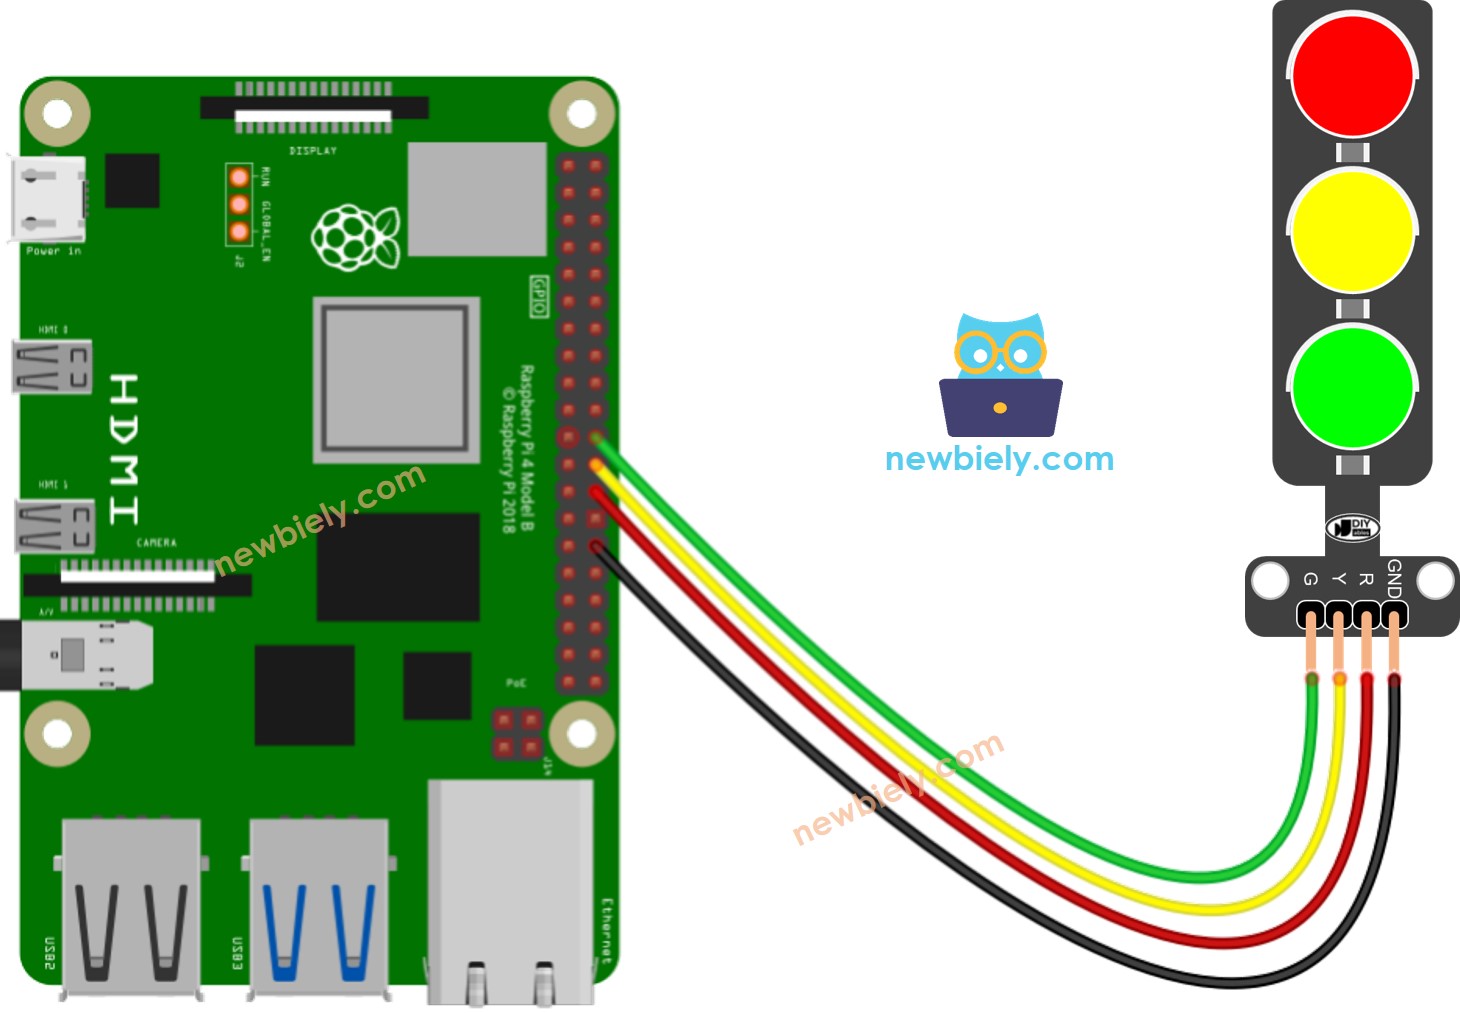
Dieses Bild wurde mit Fritzing erstellt. Klicken Sie, um das Bild zu vergrößern.

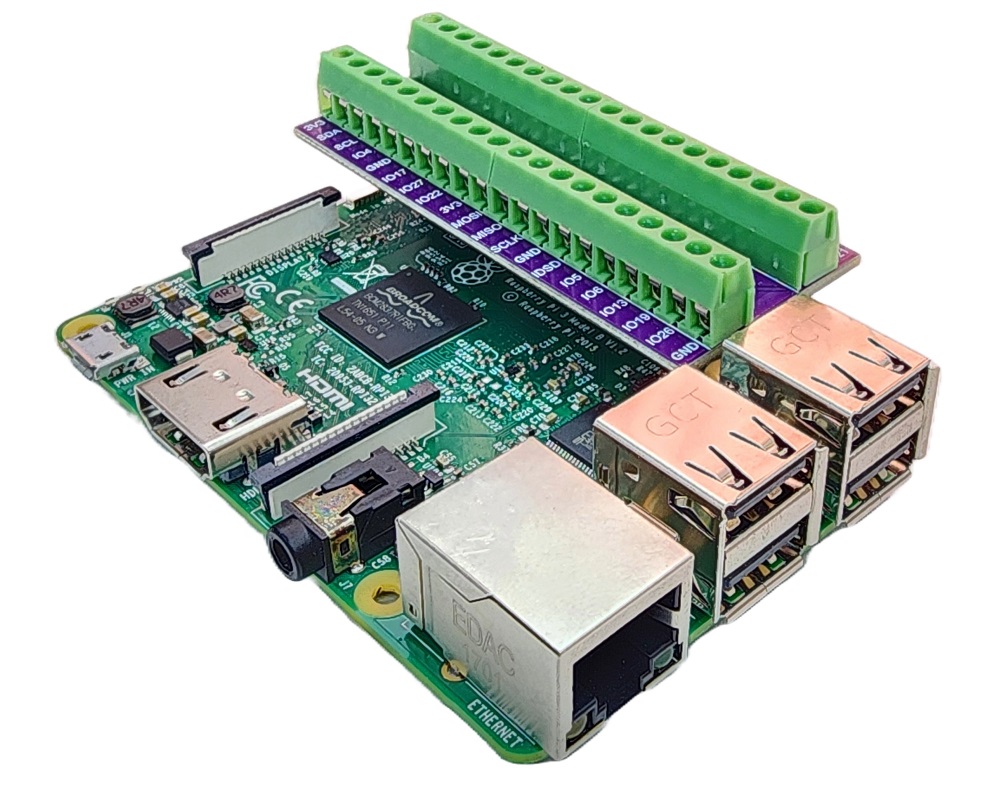
Um Ihren Verdrahtungsaufbau zu vereinfachen und zu organisieren, empfehlen wir die Verwendung eines Schraubklemmenblock-Shields für Raspberry Pi. Dieses Shield gewährleistet sicherere und besser verwaltbare Verbindungen, wie unten gezeigt:

Raspberry Pi Schraubklemmenblock-Shield

Raspberry Pi Code

# Dieser Raspberry Pi Code wurde von newbiely.de entwickelt # Dieser Raspberry Pi Code wird der Öffentlichkeit ohne jegliche Einschränkung zur Verfügung gestellt. # Für vollständige Anleitungen und Schaltpläne besuchen Sie bitte: # https://newbiely.de/tutorials/raspberry-pi/raspberry-pi-traffic-light import RPi.GPIO as GPIO import time # Define GPIO pins PIN_RED = 7 # The Raspberry Pi GPIO pin connected to the R pin of the traffic light module PIN_YELLOW = 8 # The Raspberry Pi GPIO pin connected to the Y pin of the traffic light module PIN_GREEN = 25 # The Raspberry Pi GPIO pin connected to the G pin of the traffic light module # Define time durations RED_TIME = 4 # RED time in seconds YELLOW_TIME = 4 # YELLOW time in seconds GREEN_TIME = 4 # GREEN time in seconds # Set up GPIO GPIO.setmode(GPIO.BCM) GPIO.setup(PIN_RED, GPIO.OUT) GPIO.setup(PIN_YELLOW, GPIO.OUT) GPIO.setup(PIN_GREEN, GPIO.OUT) try: while True: # Red light on GPIO.output(PIN_RED, GPIO.HIGH) GPIO.output(PIN_YELLOW, GPIO.LOW) GPIO.output(PIN_GREEN, GPIO.LOW) time.sleep(RED_TIME) # Yellow light on GPIO.output(PIN_RED, GPIO.LOW) GPIO.output(PIN_YELLOW, GPIO.HIGH) GPIO.output(PIN_GREEN, GPIO.LOW) time.sleep(YELLOW_TIME) # Green light on GPIO.output(PIN_RED, GPIO.LOW) GPIO.output(PIN_YELLOW, GPIO.LOW) GPIO.output(PIN_GREEN, GPIO.HIGH) time.sleep(GREEN_TIME) except KeyboardInterrupt: # Clean up GPIO on exit GPIO.cleanup()

Schnelle Schritte

  • Stellen Sie sicher, dass Sie Raspbian oder ein anderes Raspberry Pi-kompatibles Betriebssystem auf Ihrem Pi installiert haben.
  • Stellen Sie sicher, dass Ihr Raspberry Pi mit demselben lokalen Netzwerk wie Ihr PC verbunden ist.
  • Stellen Sie sicher, dass Ihr Raspberry Pi mit dem Internet verbunden ist, falls Sie Bibliotheken installieren müssen.
  • Neu bei Raspberry Pi? Beginnen Sie mit unserem Raspberry Pi Getting Started Leitfaden, um zuerst die Grundlagen zu lernen.
  • Verbinden Sie Ihren PC über SSH mit dem Raspberry Pi, indem Sie den integrierten SSH-Client unter Linux und macOS oder PuTTY unter Windows verwenden. Siehe wie Sie Ihren PC über SSH mit dem Raspberry Pi verbinden.
  • Stellen Sie sicher, dass Sie die RPi.GPIO-Bibliothek installiert haben. Falls nicht, installieren Sie sie mit folgendem Befehl:
sudo apt-get update sudo apt-get install python3-rpi.gpio
  • Erstellen Sie eine Python-Skript-Datei traffic_light.py und fügen Sie folgenden Code hinzu:
# Dieser Raspberry Pi Code wurde von newbiely.de entwickelt # Dieser Raspberry Pi Code wird der Öffentlichkeit ohne jegliche Einschränkung zur Verfügung gestellt. # Für vollständige Anleitungen und Schaltpläne besuchen Sie bitte: # https://newbiely.de/tutorials/raspberry-pi/raspberry-pi-traffic-light import RPi.GPIO as GPIO import time # Define GPIO pins PIN_RED = 7 # The Raspberry Pi GPIO pin connected to the R pin of the traffic light module PIN_YELLOW = 8 # The Raspberry Pi GPIO pin connected to the Y pin of the traffic light module PIN_GREEN = 25 # The Raspberry Pi GPIO pin connected to the G pin of the traffic light module # Define time durations RED_TIME = 4 # RED time in seconds YELLOW_TIME = 4 # YELLOW time in seconds GREEN_TIME = 4 # GREEN time in seconds # Set up GPIO GPIO.setmode(GPIO.BCM) GPIO.setup(PIN_RED, GPIO.OUT) GPIO.setup(PIN_YELLOW, GPIO.OUT) GPIO.setup(PIN_GREEN, GPIO.OUT) try: while True: # Red light on GPIO.output(PIN_RED, GPIO.HIGH) GPIO.output(PIN_YELLOW, GPIO.LOW) GPIO.output(PIN_GREEN, GPIO.LOW) time.sleep(RED_TIME) # Yellow light on GPIO.output(PIN_RED, GPIO.LOW) GPIO.output(PIN_YELLOW, GPIO.HIGH) GPIO.output(PIN_GREEN, GPIO.LOW) time.sleep(YELLOW_TIME) # Green light on GPIO.output(PIN_RED, GPIO.LOW) GPIO.output(PIN_YELLOW, GPIO.LOW) GPIO.output(PIN_GREEN, GPIO.HIGH) time.sleep(GREEN_TIME) except KeyboardInterrupt: # Clean up GPIO on exit GPIO.cleanup()
  • Speichern Sie die Datei und führen Sie das Python-Skript aus, indem Sie folgenden Befehl im Terminal ausführen:
python3 traffic_light.py

Das Skript läuft in einer Endlosschleife kontinuierlich weiter, bis Sie Ctrl + C im Terminal drücken.

  • Testen Sie das Verkehrsampel-Modul

Es ist wichtig zu beachten, dass die genaue Funktionsweise einer Verkehrsampel je nach spezifischem Design und verwendeter Technologie in verschiedenen Regionen und Kreuzungen variieren kann. Die oben beschriebenen Prinzipien bieten ein allgemeines Verständnis dafür, wie Verkehrsampeln funktionieren, um den Verkehr zu regeln und die Sicherheit auf den Straßen zu verbessern.

Der obige Code demonstriert die individuelle Lichtsteuerung. Lassen Sie uns nun den Code für eine bessere Optimierung erweitern.

Raspberry Pi Code-Optimierung

  • Lassen Sie uns den Code verbessern, indem wir eine Funktion für die Lichtsteuerung implementieren.
# Dieser Raspberry Pi Code wurde von newbiely.de entwickelt # Dieser Raspberry Pi Code wird der Öffentlichkeit ohne jegliche Einschränkung zur Verfügung gestellt. # Für vollständige Anleitungen und Schaltpläne besuchen Sie bitte: # https://newbiely.de/tutorials/raspberry-pi/raspberry-pi-traffic-light import RPi.GPIO as GPIO import time # Define GPIO pins PIN_RED = 7 # The Raspberry Pi GPIO pin connected to the R pin of the traffic light module PIN_YELLOW = 8 # The Raspberry Pi GPIO pin connected to the Y pin of the traffic light module PIN_GREEN = 25 # The Raspberry Pi GPIO pin connected to the G pin of the traffic light module # Define time durations in seconds RED_TIME = 2 # RED time in seconds YELLOW_TIME = 1 # YELLOW time in seconds GREEN_TIME = 2 # GREEN time in seconds # Define indices for the light states RED = 0 YELLOW = 1 GREEN = 2 # Create lists for pins and times pins = [PIN_RED, PIN_YELLOW, PIN_GREEN] times = [RED_TIME, YELLOW_TIME, GREEN_TIME] # Set up GPIO GPIO.setmode(GPIO.BCM) GPIO.setup(PIN_RED, GPIO.OUT) GPIO.setup(PIN_YELLOW, GPIO.OUT) GPIO.setup(PIN_GREEN, GPIO.OUT) def traffic_light_on(light): for i in range(len(pins)): if i == light: GPIO.output(pins[i], GPIO.HIGH) # turn on else: GPIO.output(pins[i], GPIO.LOW) # turn off try: while True: # Red light on traffic_light_on(RED) time.sleep(times[RED]) # keep red light on during a period of time # Yellow light on traffic_light_on(YELLOW) time.sleep(times[YELLOW]) # keep yellow light on during a period of time # Green light on traffic_light_on(GREEN) time.sleep(times[GREEN]) # keep green light on during a period of time except KeyboardInterrupt: # Clean up GPIO on exit GPIO.cleanup()
  • Lassen Sie uns den Code verbessern, indem wir eine for-Schleife verwenden.
# Dieser Raspberry Pi Code wurde von newbiely.de entwickelt # Dieser Raspberry Pi Code wird der Öffentlichkeit ohne jegliche Einschränkung zur Verfügung gestellt. # Für vollständige Anleitungen und Schaltpläne besuchen Sie bitte: # https://newbiely.de/tutorials/raspberry-pi/raspberry-pi-traffic-light import RPi.GPIO as GPIO import time # Define GPIO pins PIN_RED = 7 # The Raspberry Pi GPIO pin connected to the R pin of the traffic light module PIN_YELLOW = 8 # The Raspberry Pi GPIO pin connected to the Y pin of the traffic light module PIN_GREEN = 25 # The Raspberry Pi GPIO pin connected to the G pin of the traffic light module # Define time durations in seconds RED_TIME = 2 # RED time in seconds YELLOW_TIME = 1 # YELLOW time in seconds GREEN_TIME = 2 # GREEN time in seconds # Define indices for the light states RED = 0 YELLOW = 1 GREEN = 2 # Create lists for pins and times pins = [PIN_RED, PIN_YELLOW, PIN_GREEN] times = [RED_TIME, YELLOW_TIME, GREEN_TIME] # Set up GPIO GPIO.setmode(GPIO.BCM) GPIO.setup(PIN_RED, GPIO.OUT) GPIO.setup(PIN_YELLOW, GPIO.OUT) GPIO.setup(PIN_GREEN, GPIO.OUT) def traffic_light_on(light): for i in range(len(pins)): if i == light: GPIO.output(pins[i], GPIO.HIGH) # turn on else: GPIO.output(pins[i], GPIO.LOW) # turn off try: while True: for light in range(RED, GREEN + 1): traffic_light_on(light) time.sleep(times[light]) # keep light on during a period of time except KeyboardInterrupt: # Clean up GPIO on exit GPIO.cleanup()
  • Lassen Sie uns den Code verbessern, indem wir die millis()-Funktion anstelle von delay() verwenden.
# Dieser Raspberry Pi Code wurde von newbiely.de entwickelt # Dieser Raspberry Pi Code wird der Öffentlichkeit ohne jegliche Einschränkung zur Verfügung gestellt. # Für vollständige Anleitungen und Schaltpläne besuchen Sie bitte: # https://newbiely.de/tutorials/raspberry-pi/raspberry-pi-traffic-light import RPi.GPIO as GPIO import time # Define GPIO pins PIN_RED = 7 # The Raspberry Pi GPIO pin connected to the R pin of the traffic light module PIN_YELLOW = 8 # The Raspberry Pi GPIO pin connected to the Y pin of the traffic light module PIN_GREEN = 25 # The Raspberry Pi GPIO pin connected to the G pin of the traffic light module # Define time durations in seconds RED_TIME = 2 # RED time in seconds YELLOW_TIME = 1 # YELLOW time in seconds GREEN_TIME = 2 # GREEN time in seconds # Define indices for the light states RED = 0 YELLOW = 1 GREEN = 2 # Create lists for pins and times pins = [PIN_RED, PIN_YELLOW, PIN_GREEN] times = [RED_TIME, YELLOW_TIME, GREEN_TIME] # Set up GPIO GPIO.setmode(GPIO.BCM) GPIO.setup(PIN_RED, GPIO.OUT) GPIO.setup(PIN_YELLOW, GPIO.OUT) GPIO.setup(PIN_GREEN, GPIO.OUT) light = RED # start with RED light last_time = time.time() def traffic_light_on(light): for i in range(len(pins)): if i == light: GPIO.output(pins[i], GPIO.HIGH) # turn on else: GPIO.output(pins[i], GPIO.LOW) # turn off try: while True: if (time.time() - last_time) > times[light]: light += 1 if light >= 3: light = RED # new circle traffic_light_on(light) last_time = time.time() # TO DO: your other code except KeyboardInterrupt: # Clean up GPIO on exit GPIO.cleanup()

Video Tutorial

Wir erwägen die Erstellung von Video-Tutorials. Wenn Sie Video-Tutorials für wichtig halten, abonnieren Sie bitte unseren YouTube-Kanal , um uns zu motivieren, die Videos zu erstellen.

※ UNSERE NACHRICHTEN

  • Sie können gerne den Link zu diesem Tutorial teilen. Bitte verwenden Sie jedoch unsere Inhalte nicht auf anderen Websites. Wir haben viel Mühe und Zeit in die Erstellung der Inhalte investiert, bitte respektieren Sie unsere Arbeit!