Arduino Mega - Mini MP3-Player
Der Arduino Mega 2560 verfügt über vier Hardware-Serienverbindungen, was ihn zu einer ausgezeichneten Wahl für die Arbeit mit UART-Peripheriegeräten wie dem DIYables Mini MP3-Player-Modul macht. Dieses Tutorial zeigt, wie man den Mini MP3-Player mit dem Mega verbindet und programmiert, wobei der dedizierte Serial1-Port genutzt wird, so dass Sie sich nie mit SoftwareSerial beschäftigen müssen.
Was dieses Tutorial behandelt:
- Verdrahtung des Mini MP3-Players zum Serial1-Port des Mega.
- Formatierung und Laden der SD-Karte.
- Code für: Wiedergabe, Pause, Fortsetzen, Stopp, Nächster, Vorheriger.
- Lautstärke erhöhen/verringern mit Tasten.
- Titelwiederholung, Shuffle und Ordner-basierte Wiedergabe.
- Serial-Monitor-Steuerung zum schnellen Testen.
- Statusabfragen zum Lesen von Lautstärke, Titelnummer und mehr.
Teileliste
Oder Sie können die folgenden Kits kaufen:
| 1 | × | DIYables Sensor-Kit (18 Sensoren/Displays) |
Über das Mini MP3-Player-Modul
Der DIYables Mini MP3-Player nutzt den YX5200-24SS-Decodier-Chip zum Lesen und Abspielen von MP3-Dateien von einer Micro-SD-Karte. Es hat einen eingebauten Verstärker, der einen kleinen Lautsprecher direkt antreiben kann (bis zu 3W), sowie DAC-Ausgänge, wenn Sie Audio an einen externen Verstärker leiten möchten.
Der Mega kommuniziert mit dem Modul über UART mit 9600 Baud. Die verfügbaren Funktionen sind:
- Vollständige Transportregelung: Wiedergabe, Pause, Fortsetzen, Stopp, Nächster, Vorheriger
- Lautstärkebereich: 0 (Stumm) bis 30 (Maximum)
- EQ-Voreinstellungen: Normal, Pop, Rock, Jazz, Klassik, Bass
- Wiederholungsoptionen: Einen Titel wiederholen, einen Ordner wiederholen, alles wiederholen, Shuffle
- Ordner-Wiedergabe: Organisieren Sie Titel in nummerierten Verzeichnissen
- Ankündigungsmodus: Unterbrechen und Fortsetzen des vorherigen Titels
- Statusabfragen: Welcher Titel wird abgespielt, aktuelle Lautstärke, Gesamttitelanzahl
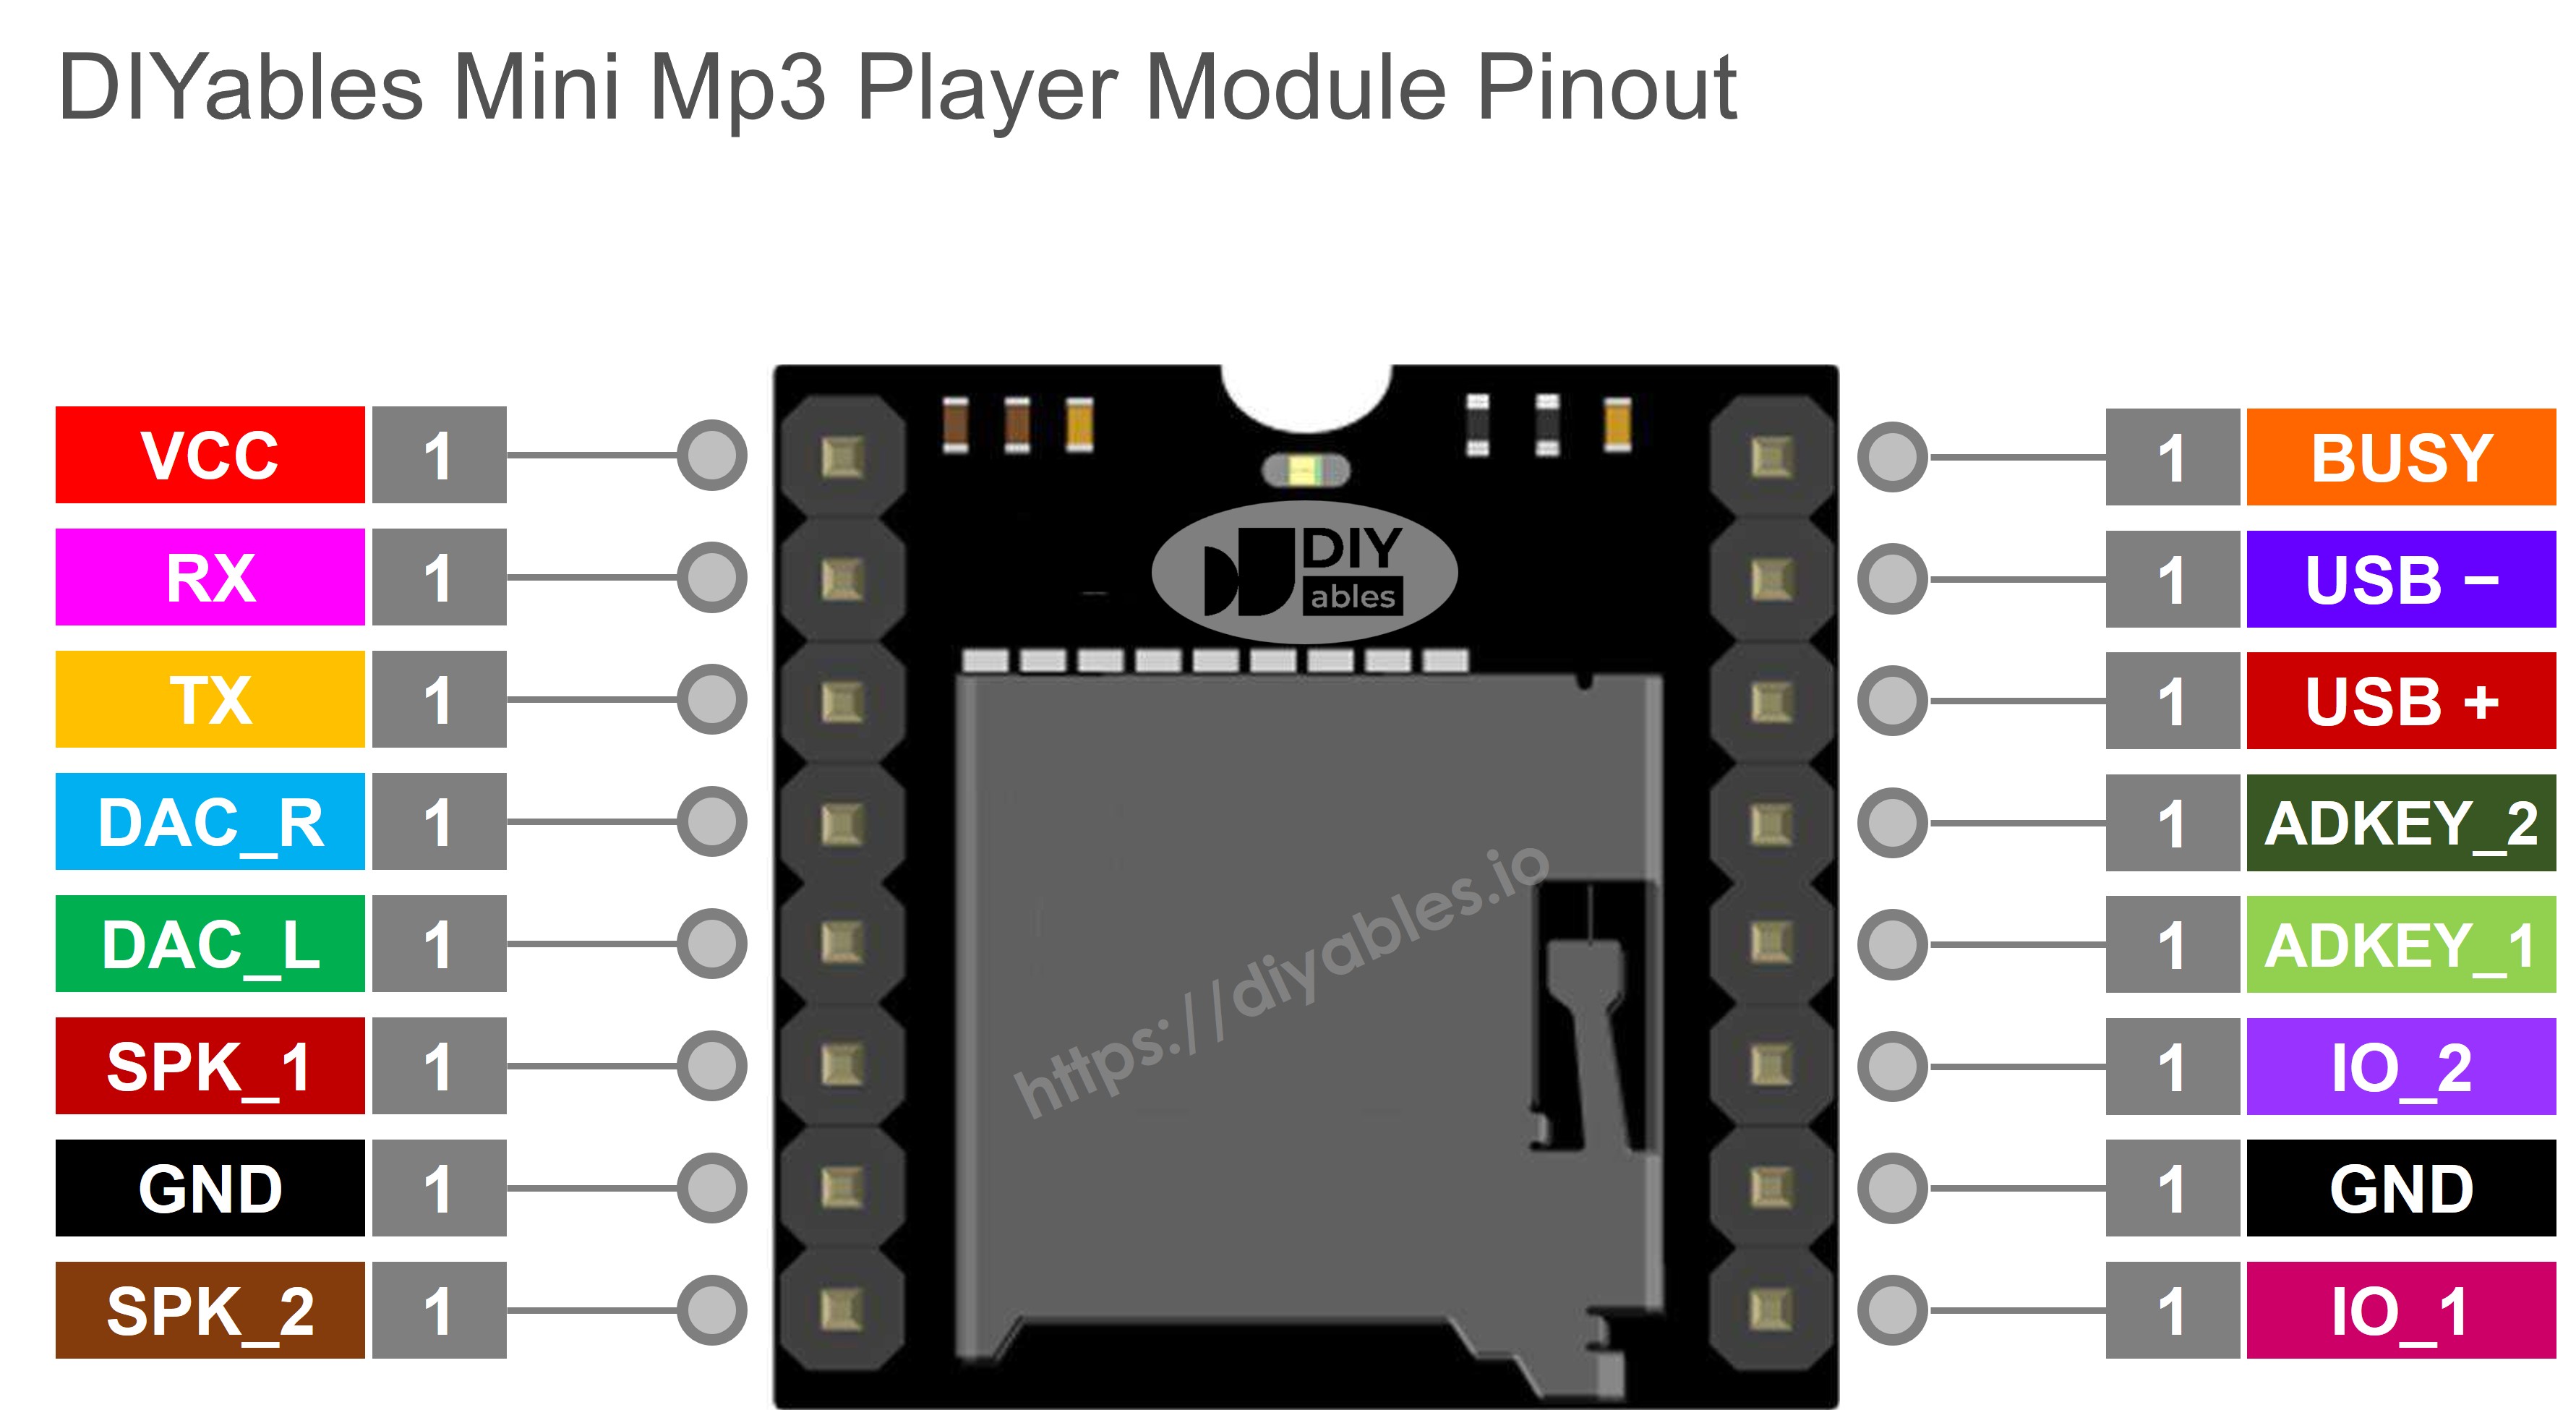
Pin-Referenz
| Pin | Funktion | |
|---|---|---|
| VCC | Stromversorgung (3,2V–5,0V) | |
| GND | Masse | |
| RX | Serienempfang — mit Mega TX1 über 1-kΩ-Widerstand verbinden | |
| TX | Serienübertragung — mit Mega RX1 verbinden | |
| SPK_1 | Lautsprecherplus (integrierter Verstärker, 3W max) | |
| SPK_2 | Lautsprecherminus | |
| DAC_R | Rechter Kanal-Audioausgang (Line-Level) | |
| DAC_L | Linker Kanal-Audioausgang (Line-Level) | |
| BUSY | LOW während Audiowiedergabe, HIGH wenn gestoppt | |
| IO_1 | Physischer Auslöser | Kurz=Vorheriger, Lang=Lautstärke runter |
| IO_2 | Physischer Auslöser | Kurz=Nächster, Lang=Lautstärke rauf |
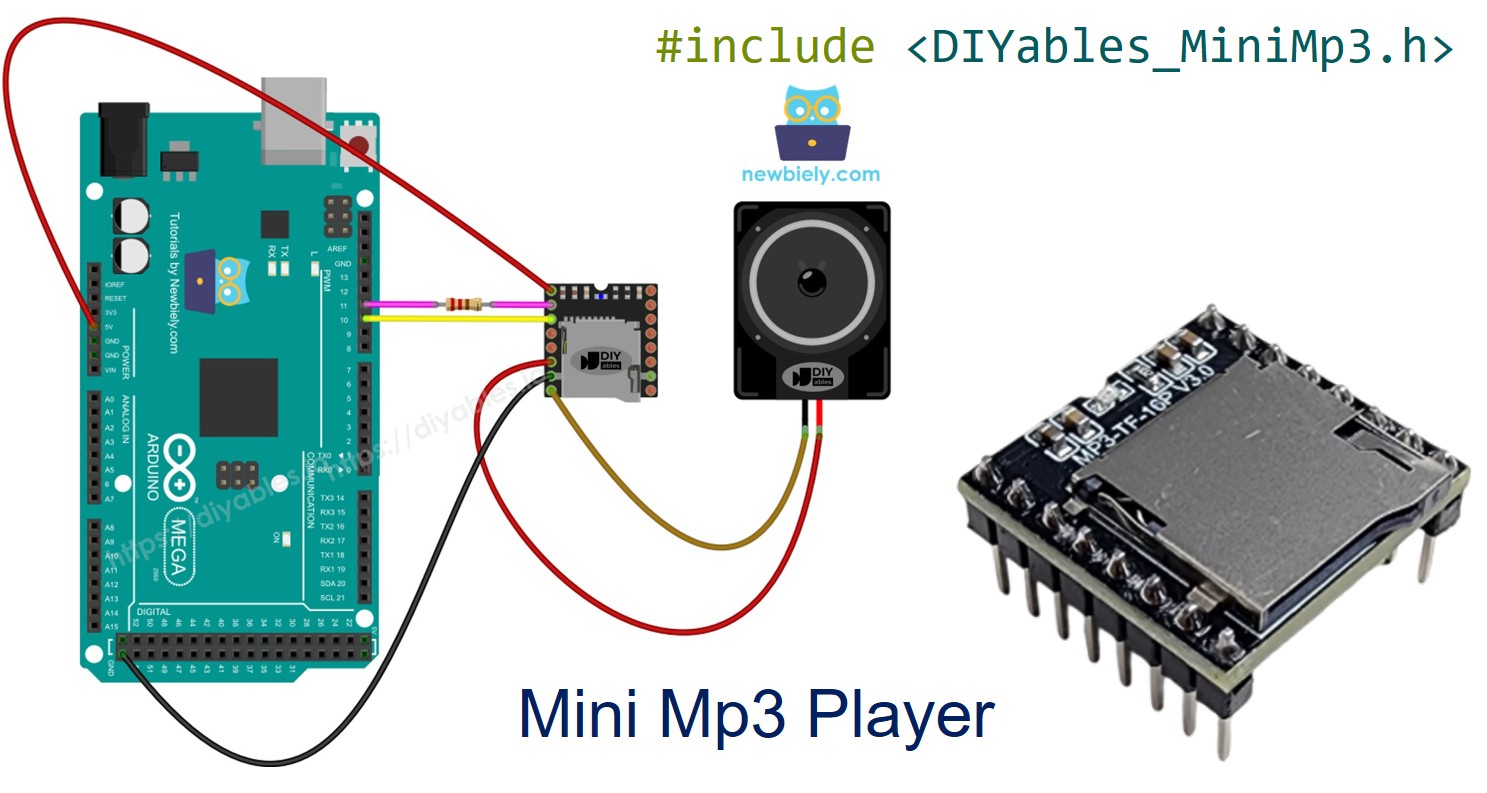
Verdrahtung
Der Mega ist ein 5V-Board, daher ist ein 1-kΩ-Seriewiderstand auf der RX-Leitung des Moduls erforderlich, um seinen 3,3V-Eingang zu schützen.
Wir verwenden Serial1 (TX1 = Pin 18, RX1 = Pin 19) für das MP3-Modul und lassen die Haupt-Serienverbindung (Pins 0 und 1) frei zum Debuggen über den Serial Monitor.
| Mini MP3-Player | Arduino Mega | Anmerkungen |
|---|---|---|
| VCC | 5V | |
| GND | GND | |
| RX | Pin 18 (TX1) | Über einen 1-kΩ-Widerstand |
| TX | Pin 19 (RX1) | Direktverbindung |
| SPK_1 | Lautsprecher + | |
| SPK_2 | Lautsprecher − |
Sie können auch Serial2 (Pins 16/17) oder Serial3 (Pins 14/15) verwenden, wenn Serial1 belegt ist.
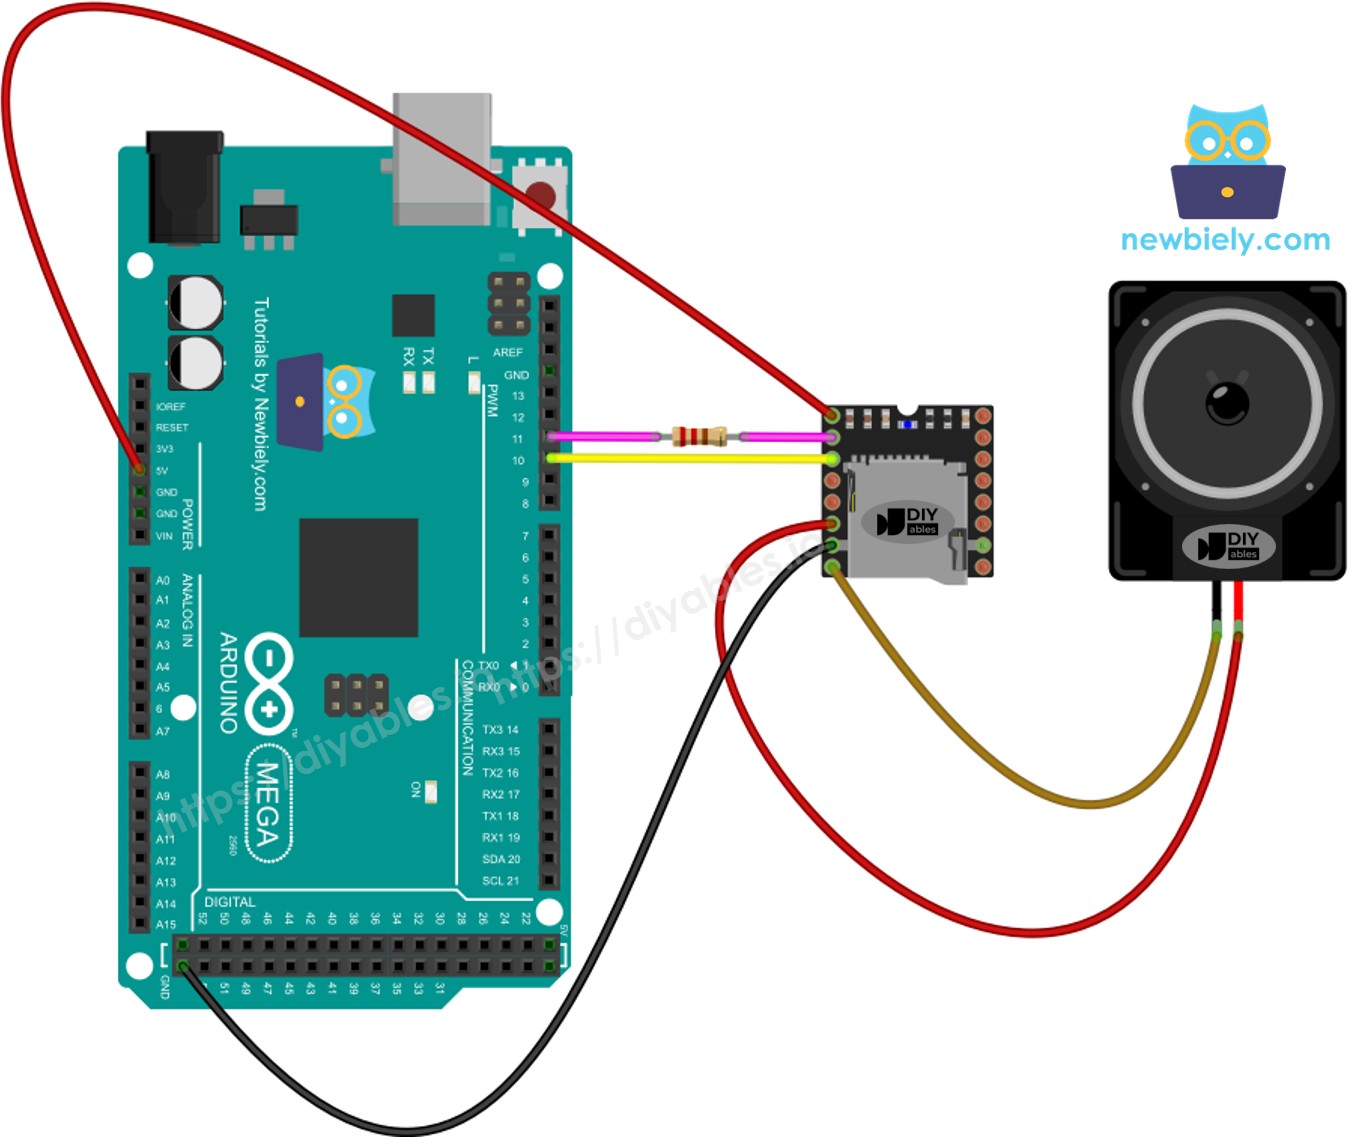
Dieses Bild wurde mit Fritzing erstellt. Klicken Sie, um das Bild zu vergrößern.
SD-Kartenvorbereitung
Formatieren Sie die Karte als FAT16 oder FAT32, dann fügen Sie MP3-Dateien mit Nullen aufgefüllt hinzu:
Für Ordner-Wiedergabe erstellen Sie nummerierte Verzeichnisse:
Wichtige Details:
- Nummerierung beginnt bei 1.
- Das Modul verwendet die Kopierreihenfolge, um Titelnummern zuzuweisen, nicht den Dateinamen. Kopieren Sie Dateien einzeln nach dem Formatieren.
- Ordnernamen: 2 Ziffern (01–99). Dateinamen: 3 Ziffern (001–255).
Bibliotheksinstallation
- Verbinden Sie den Mega mit Ihrem PC über das USB-Kabel.
- In der Arduino IDE wählen Sie Arduino Mega oder Mega 2560 und den richtigen Port.
- Öffnen Sie das Panel Bibliotheken.
- Suchen Sie nach "DIYables_MiniMp3" und installieren Sie es.

Keine Abhängigkeiten erforderlich.
Grundlegende Codestruktur (Hardware-Serienverbindung)
Der Mega verfügt über viele Hardware-Serienverbindungen, daher ignorieren Sie SoftwareSerial vollständig:
Mega-Code — Einen Titel abspielen
Zur Ausführung
- Richten Sie die SD-Karte ein, verbinden Sie das Modul mit Serial1 und laden Sie hoch. Titel 001.mp3 wird über den Lautsprecher abgespielt.
Wiedergabefunktionen
| Funktion | Aktion | Code |
|---|---|---|
| play(n) | Titel n abspielen | mp3.play(1) |
| playNext() | Nächster Titel | mp3.playNext() |
| playPrevious() | Vorheriger Titel | mp3.playPrevious() |
| pause() | Pause | mp3.pause() |
| resume() | Fortsetzen | mp3.resume() |
| stop() | Stopp | mp3.stop() |
Mega-Code — Mehrere Titel in Reihenfolge
Mega-Code — Lautstärketasten
Lautstärkefunktionen
| Funktion | Beschreibung | Code |
|---|---|---|
| setVolume(v) | Direkt festlegen (0–30) | mp3.setVolume(20) |
| volumeUp() | +1 | mp3.volumeUp() |
| volumeDown() | −1 | mp3.volumeDown() |
| getVolume() | Aktuelle Lautstärke lesen | mp3.getVolume() |
Mega-Code — Nächste/Vorherige Tasten
Mega-Code — Pause/Fortsetzen
Mega-Code — Titel wiederholen
Wiederholungs- und Shuffle-Funktionen
| Funktion | Beschreibung | Code |
|---|---|---|
| loopTrack(n) | Einen Titel wiederholen | mp3.loopTrack(1) |
| loopFolder(f) | Alle in Ordner wiederholen | mp3.loopFolder(1) |
| loopAll() | Alles wiederholen | mp3.loopAll() |
| stopLoop() | Wiederholung beenden | mp3.stopLoop() |
| shuffle() | Zufällige Reihenfolge | mp3.shuffle() |
Mega-Code — Ordner-Wiedergabe
Ordner-Funktionen
| Funktion | Beschreibung | Code |
|---|---|---|
| playFolder(f, t) | Ordner f, Titel t (99 Ordner, 255 Titel) | mp3.playFolder(1, 1) |
| playLargeFolder(f, t) | Großer Modus (15 Ordner, 3000 Titel) | mp3.playLargeFolder(1, 500) |
| playFromMP3Folder(t) | Aus /mp3 Ordner | mp3.playFromMP3Folder(1) |
Mega-Code — Serial-Monitor-Steuerung
| Taste | Aktion |
|---|---|
| 1–9 | Titel nach Nummer abspielen |
| + / − | Lautstärke rauf / runter |
| p | Pause |
| r | Fortsetzen |
| s | Stopp |
| n | Nächster |
| b | Vorheriger |
| ? | Statusbericht |
EQ-Modi
| Konstante | Wert | Klang |
|---|---|---|
| DIYables_MiniMp3::EQ_NORMAL | 0 | Flach |
| DIYables_MiniMp3::EQ_POP | 1 | Pop |
| DIYables_MiniMp3::EQ_ROCK | 2 | Rock |
| DIYables_MiniMp3::EQ_JAZZ | 3 | Jazz |
| DIYables_MiniMp3::EQ_CLASSIC | 4 | Klassisch |
| DIYables_MiniMp3::EQ_BASS | 5 | Bassanhebung |
Statusabfragen
Blockierende Aufrufe (bis zu 100 ms pro Aufruf). Geben Sie −1 bei Fehler zurück.
| Funktion | Typ | Was es zurückgibt |
|---|---|---|
| isPlaying() | bool | true während Wiedergabe |
| getVolume() | int16_t | 0–30 |
| getEQ() | int16_t | 0–5 |
| getTrackCount() | int16_t | Titel auf Karte |
| getCurrentTrack() | int16_t | Aktueller Titelnummer |
| getFolderCount() | int16_t | Ordner auf Karte |
| getTrackCountInFolder(f) | int16_t | Titel in Ordner f |