Arduino UNO R4 WiFi Bluetooth RTC Beispiel - Echtzeituhr-Synchronisation via BLE Tutorial
Überblick
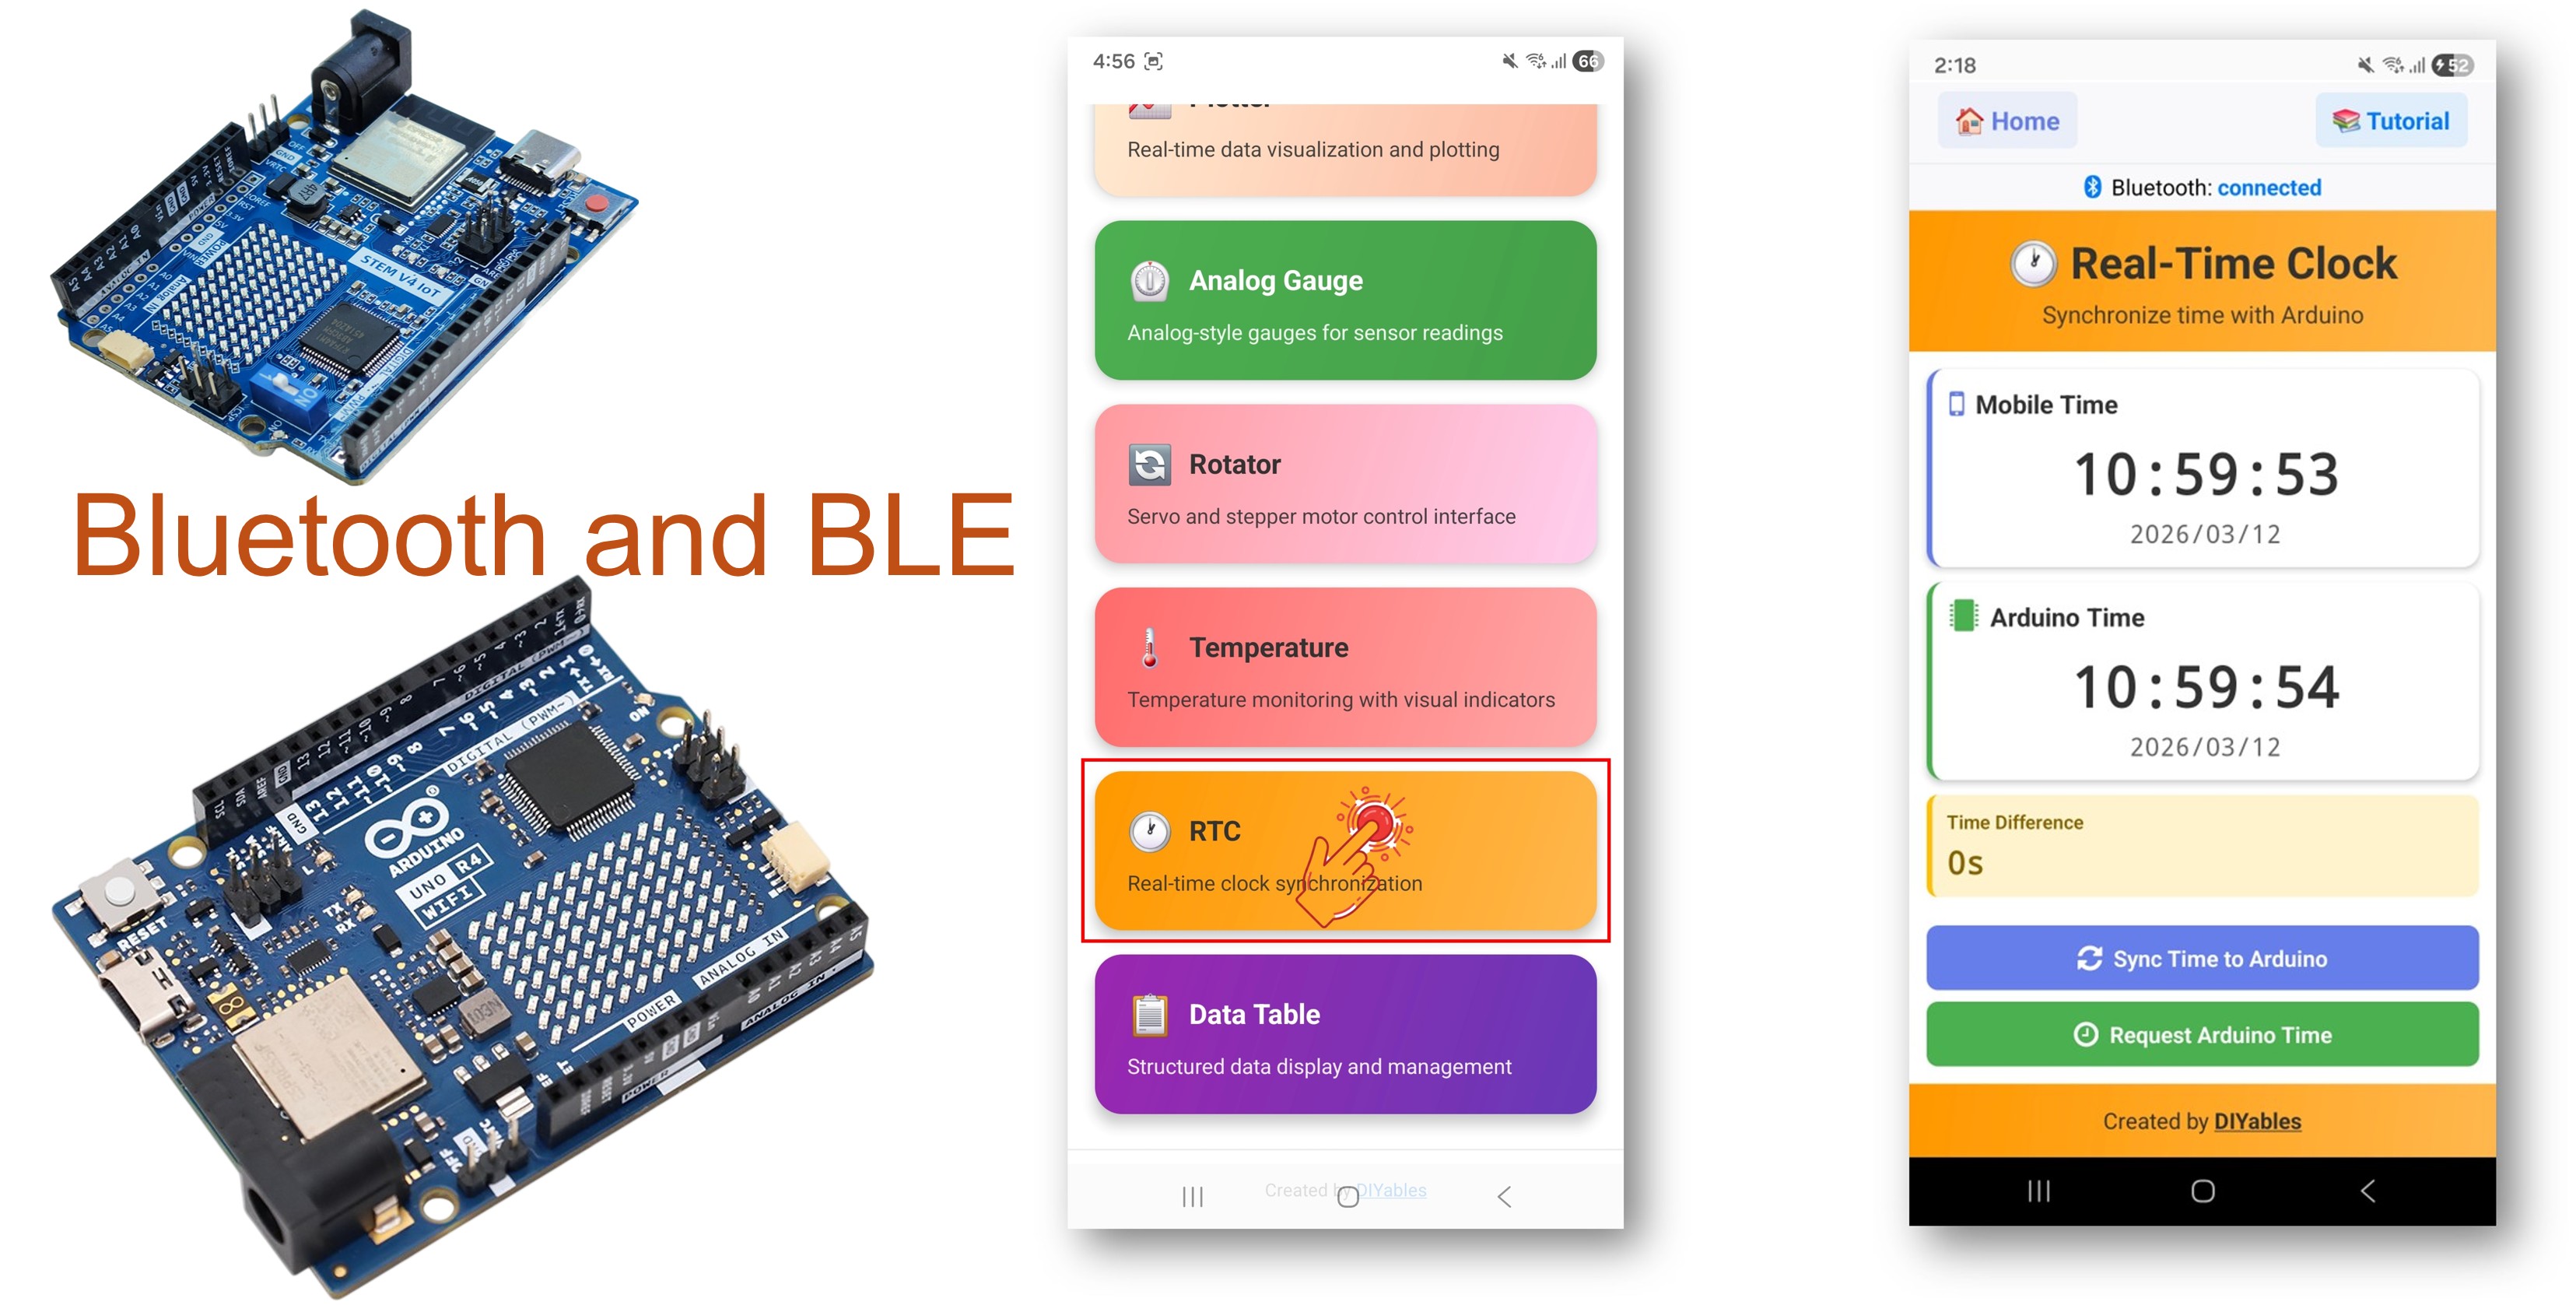
Das Bluetooth RTC Beispiel bietet Echtzeituhr-Synchronisation über die DIYables Bluetooth STEM App. Entwickelt für Arduino UNO R4 WiFi unter Verwendung von BLE (Bluetooth Low Energy) zur Synchronisation der integrierten Hardware-RTC des Boards mit der Uhr Ihres Smartphones und zur Zeitanzeige. Der Arduino UNO R4 WiFi verfügt über ein integriertes RTC-Modul, was ihn ideal für Zeitmessungsprojekte macht, ohne externe RTC-Hardware zu benötigen. Perfekt für Uhren, Datenprotokollierung mit Zeitstempeln, geplante Automatisierung und zeitbasierte Projekte.
Hinweis: Der Arduino UNO R4 WiFi unterstützt nur BLE (Bluetooth Low Energy). Er unterstützt kein Classic Bluetooth. Die DIYables Bluetooth App unterstützt sowohl BLE als auch Classic Bluetooth auf Android und BLE auf iOS. Da dieses Board BLE verwendet, funktioniert die App auf Android und iOS.
Funktionen
Integrierte Hardware-RTC: Verwendet die Onboard-RTC des Arduino UNO R4 WiFi — kein externes Modul erforderlich
Telefon-Zeitsynchronisation: Zeit vom Smartphone über Unix Timestamp oder lokale Zeitkomponenten synchronisieren
Echtzeit-Anzeige: Aktuelle Zeit in der App anzeigen, jede Sekunde aktualisiert
Zeit-Anfrage: App kann aktuelle Zeit vom Board anfordern
Persistente Zeitmessung: RTC hält die Zeit, während das Board mit Strom versorgt wird
Funktioniert auf Android & iOS: BLE wird auf beiden Plattformen unterstützt
Keine Kopplung erforderlich: BLE verbindet sich automatisch ohne manuelle Kopplung
Offenlegung: Einige der in diesem Abschnitt bereitgestellten Links sind Amazon-Affiliate-Links. Wir können eine Provision für Käufe erhalten, die über diese Links getätigt werden, ohne zusätzliche Kosten für Sie. Wir schätzen Ihre Unterstützung.
Hinweis: Kein externes RTC-Modul erforderlich! Der Arduino UNO R4 WiFi verfügt über eine integrierte Hardware-RTC, die über die RTC.h Bibliothek zugänglich ist.
Arduino UNO R4 WiFi Code
Schnelle Schritte
Befolgen Sie diese Anweisungen Schritt für Schritt:
Verbinden Sie das Arduino UNO R4 WiFi Board über ein USB-Kabel mit Ihrem Computer.
Starten Sie die Arduino IDE auf Ihrem Computer.
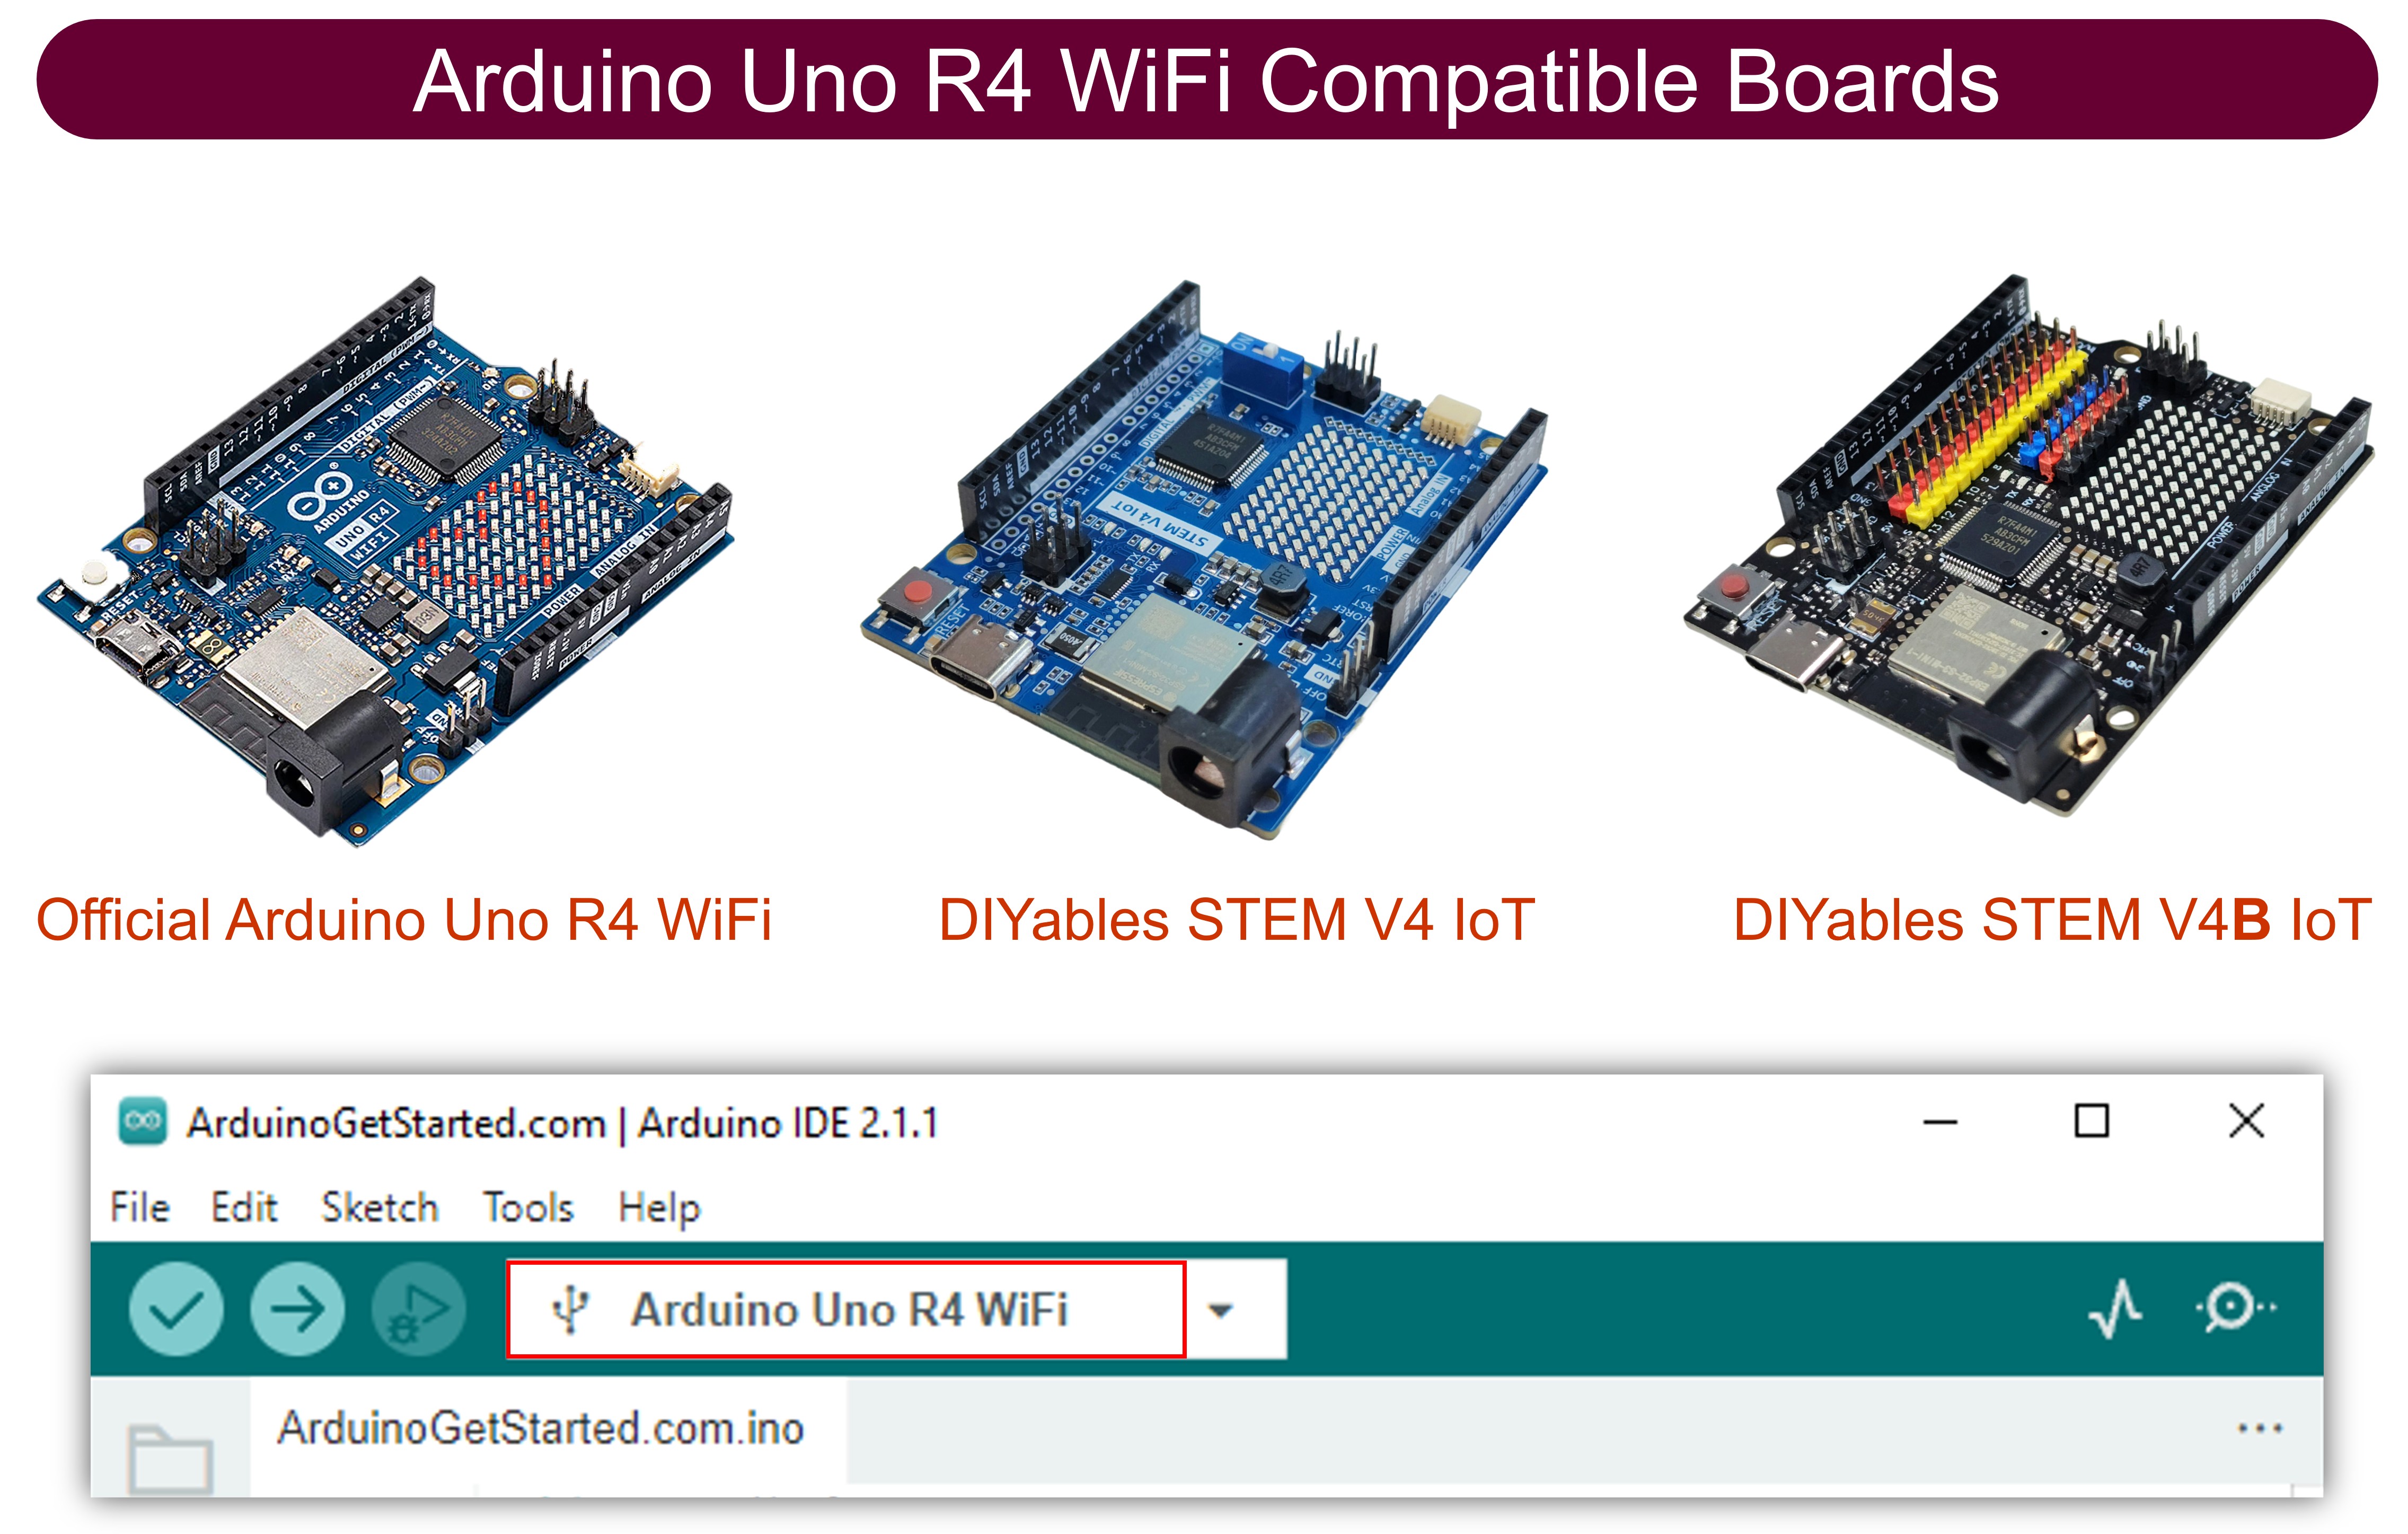
Wählen Sie das Arduino UNO R4 WiFi Board und den entsprechenden COM-Port aus.
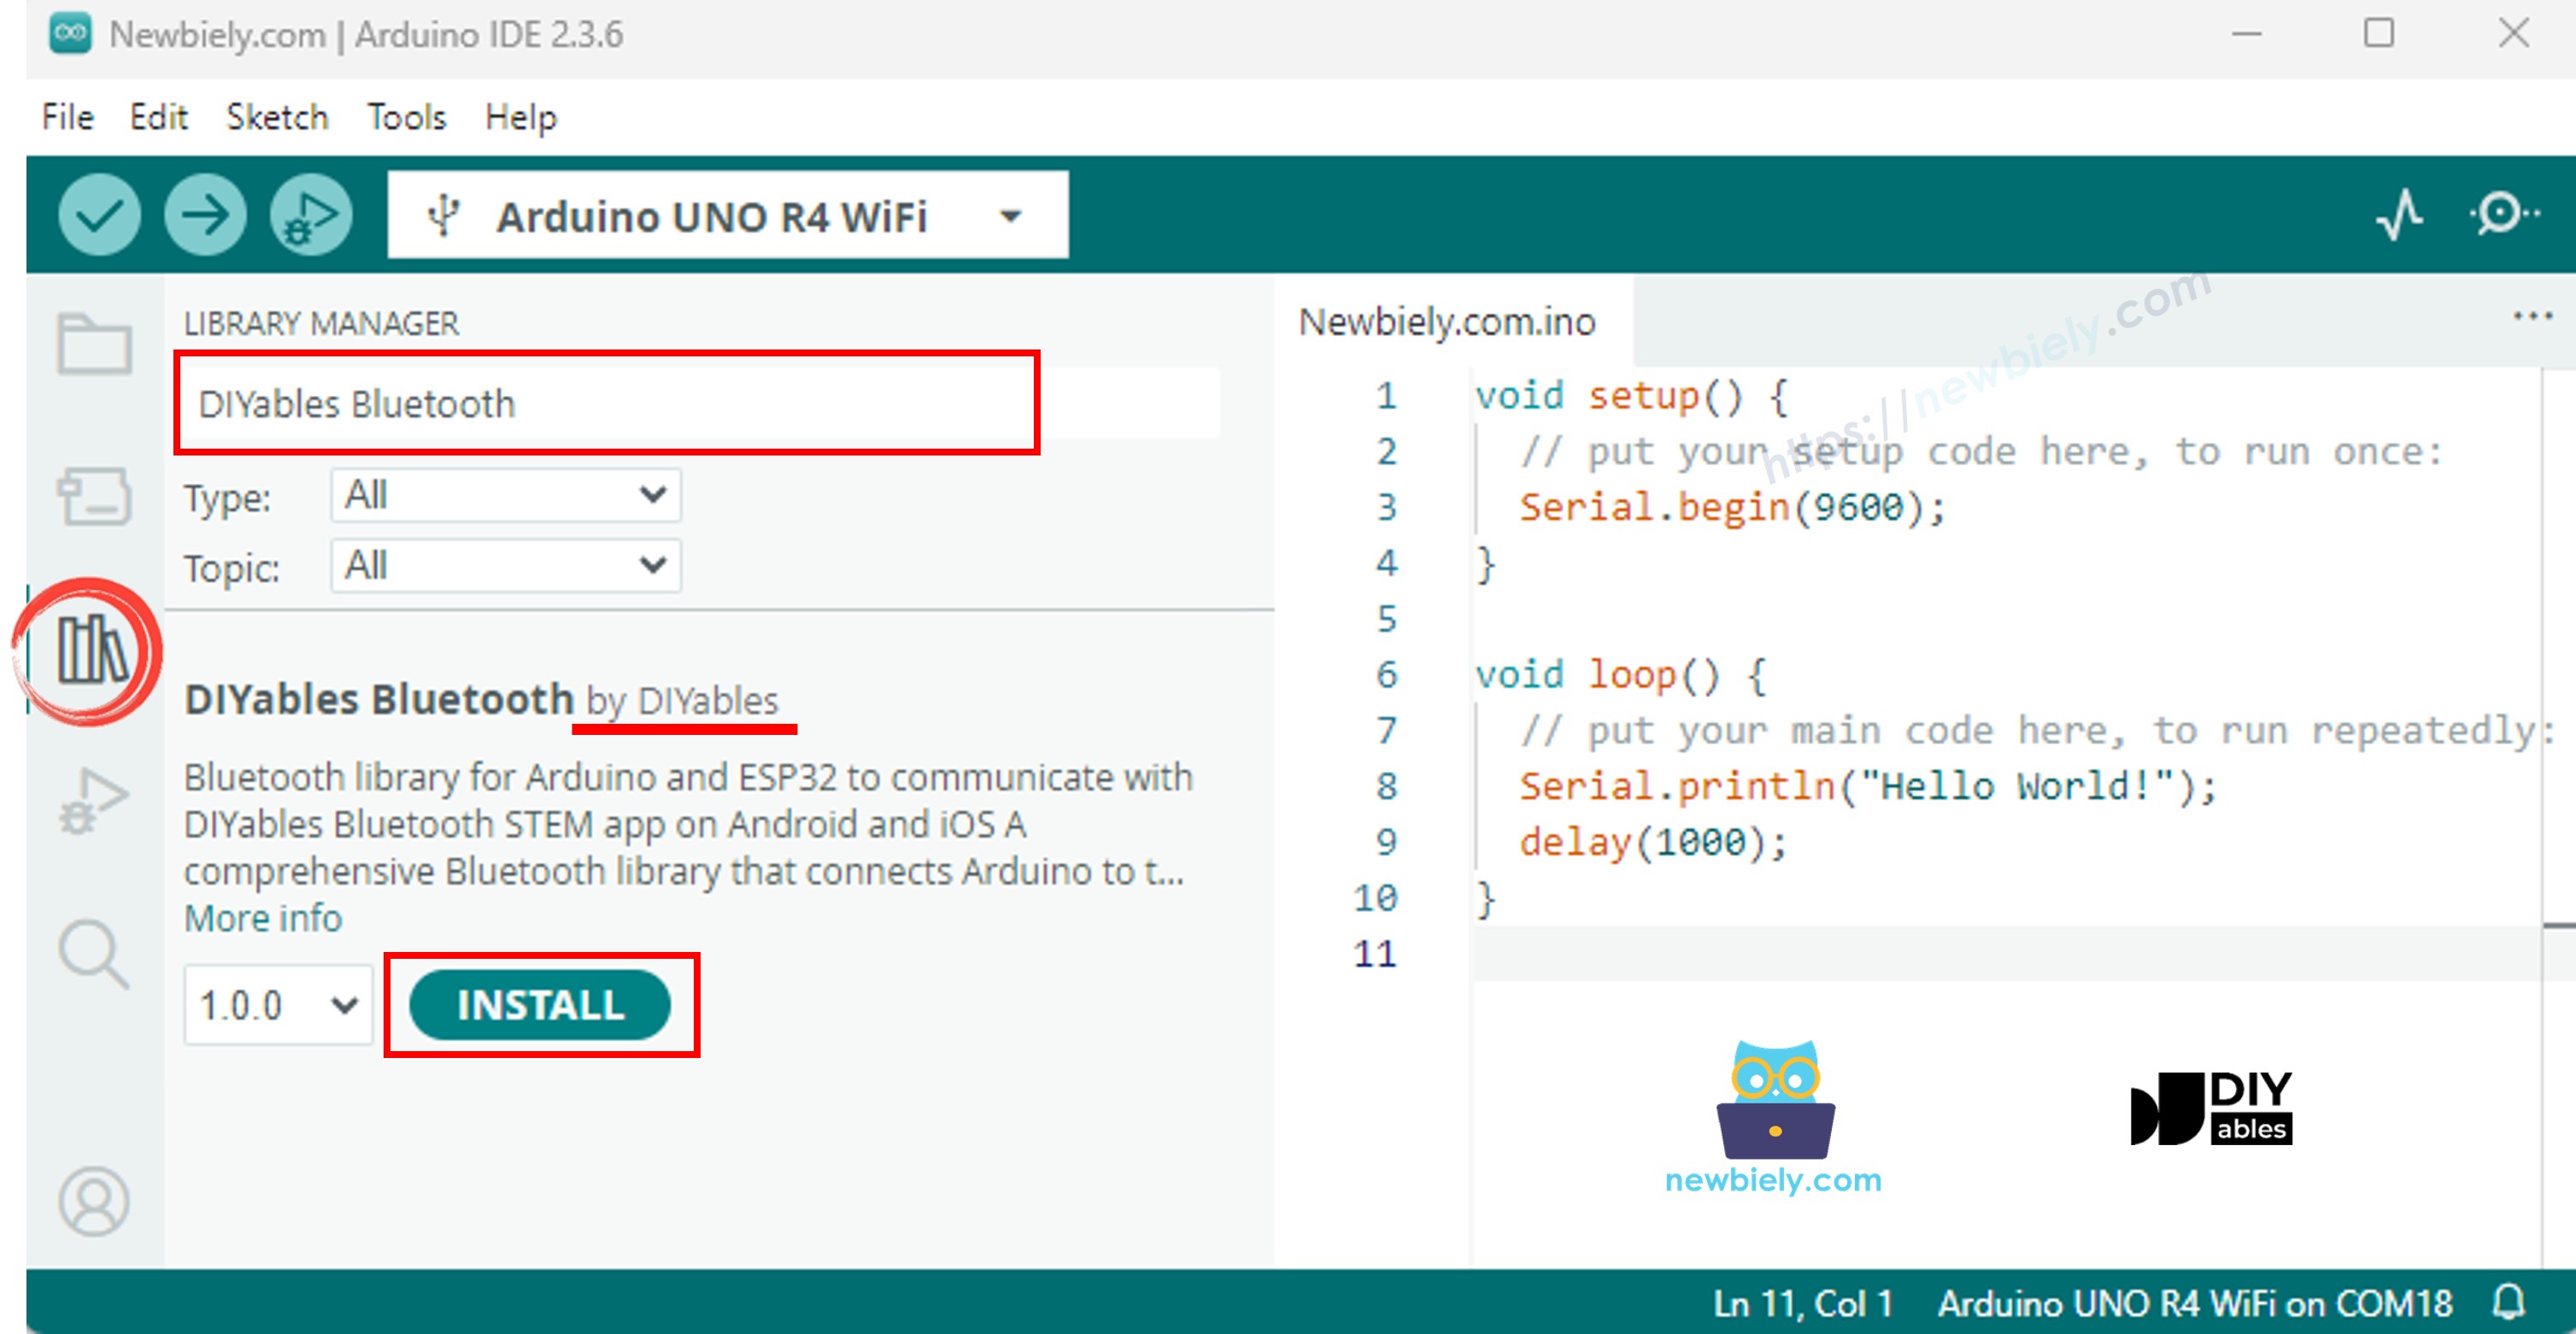
Navigieren Sie zum Libraries Symbol in der linken Leiste der Arduino IDE.
Suchen Sie nach "DIYables Bluetooth" und finden Sie die DIYables Bluetooth Bibliothek von DIYables
Klicken Sie auf die Install Schaltfläche, um die Bibliothek zu installieren.
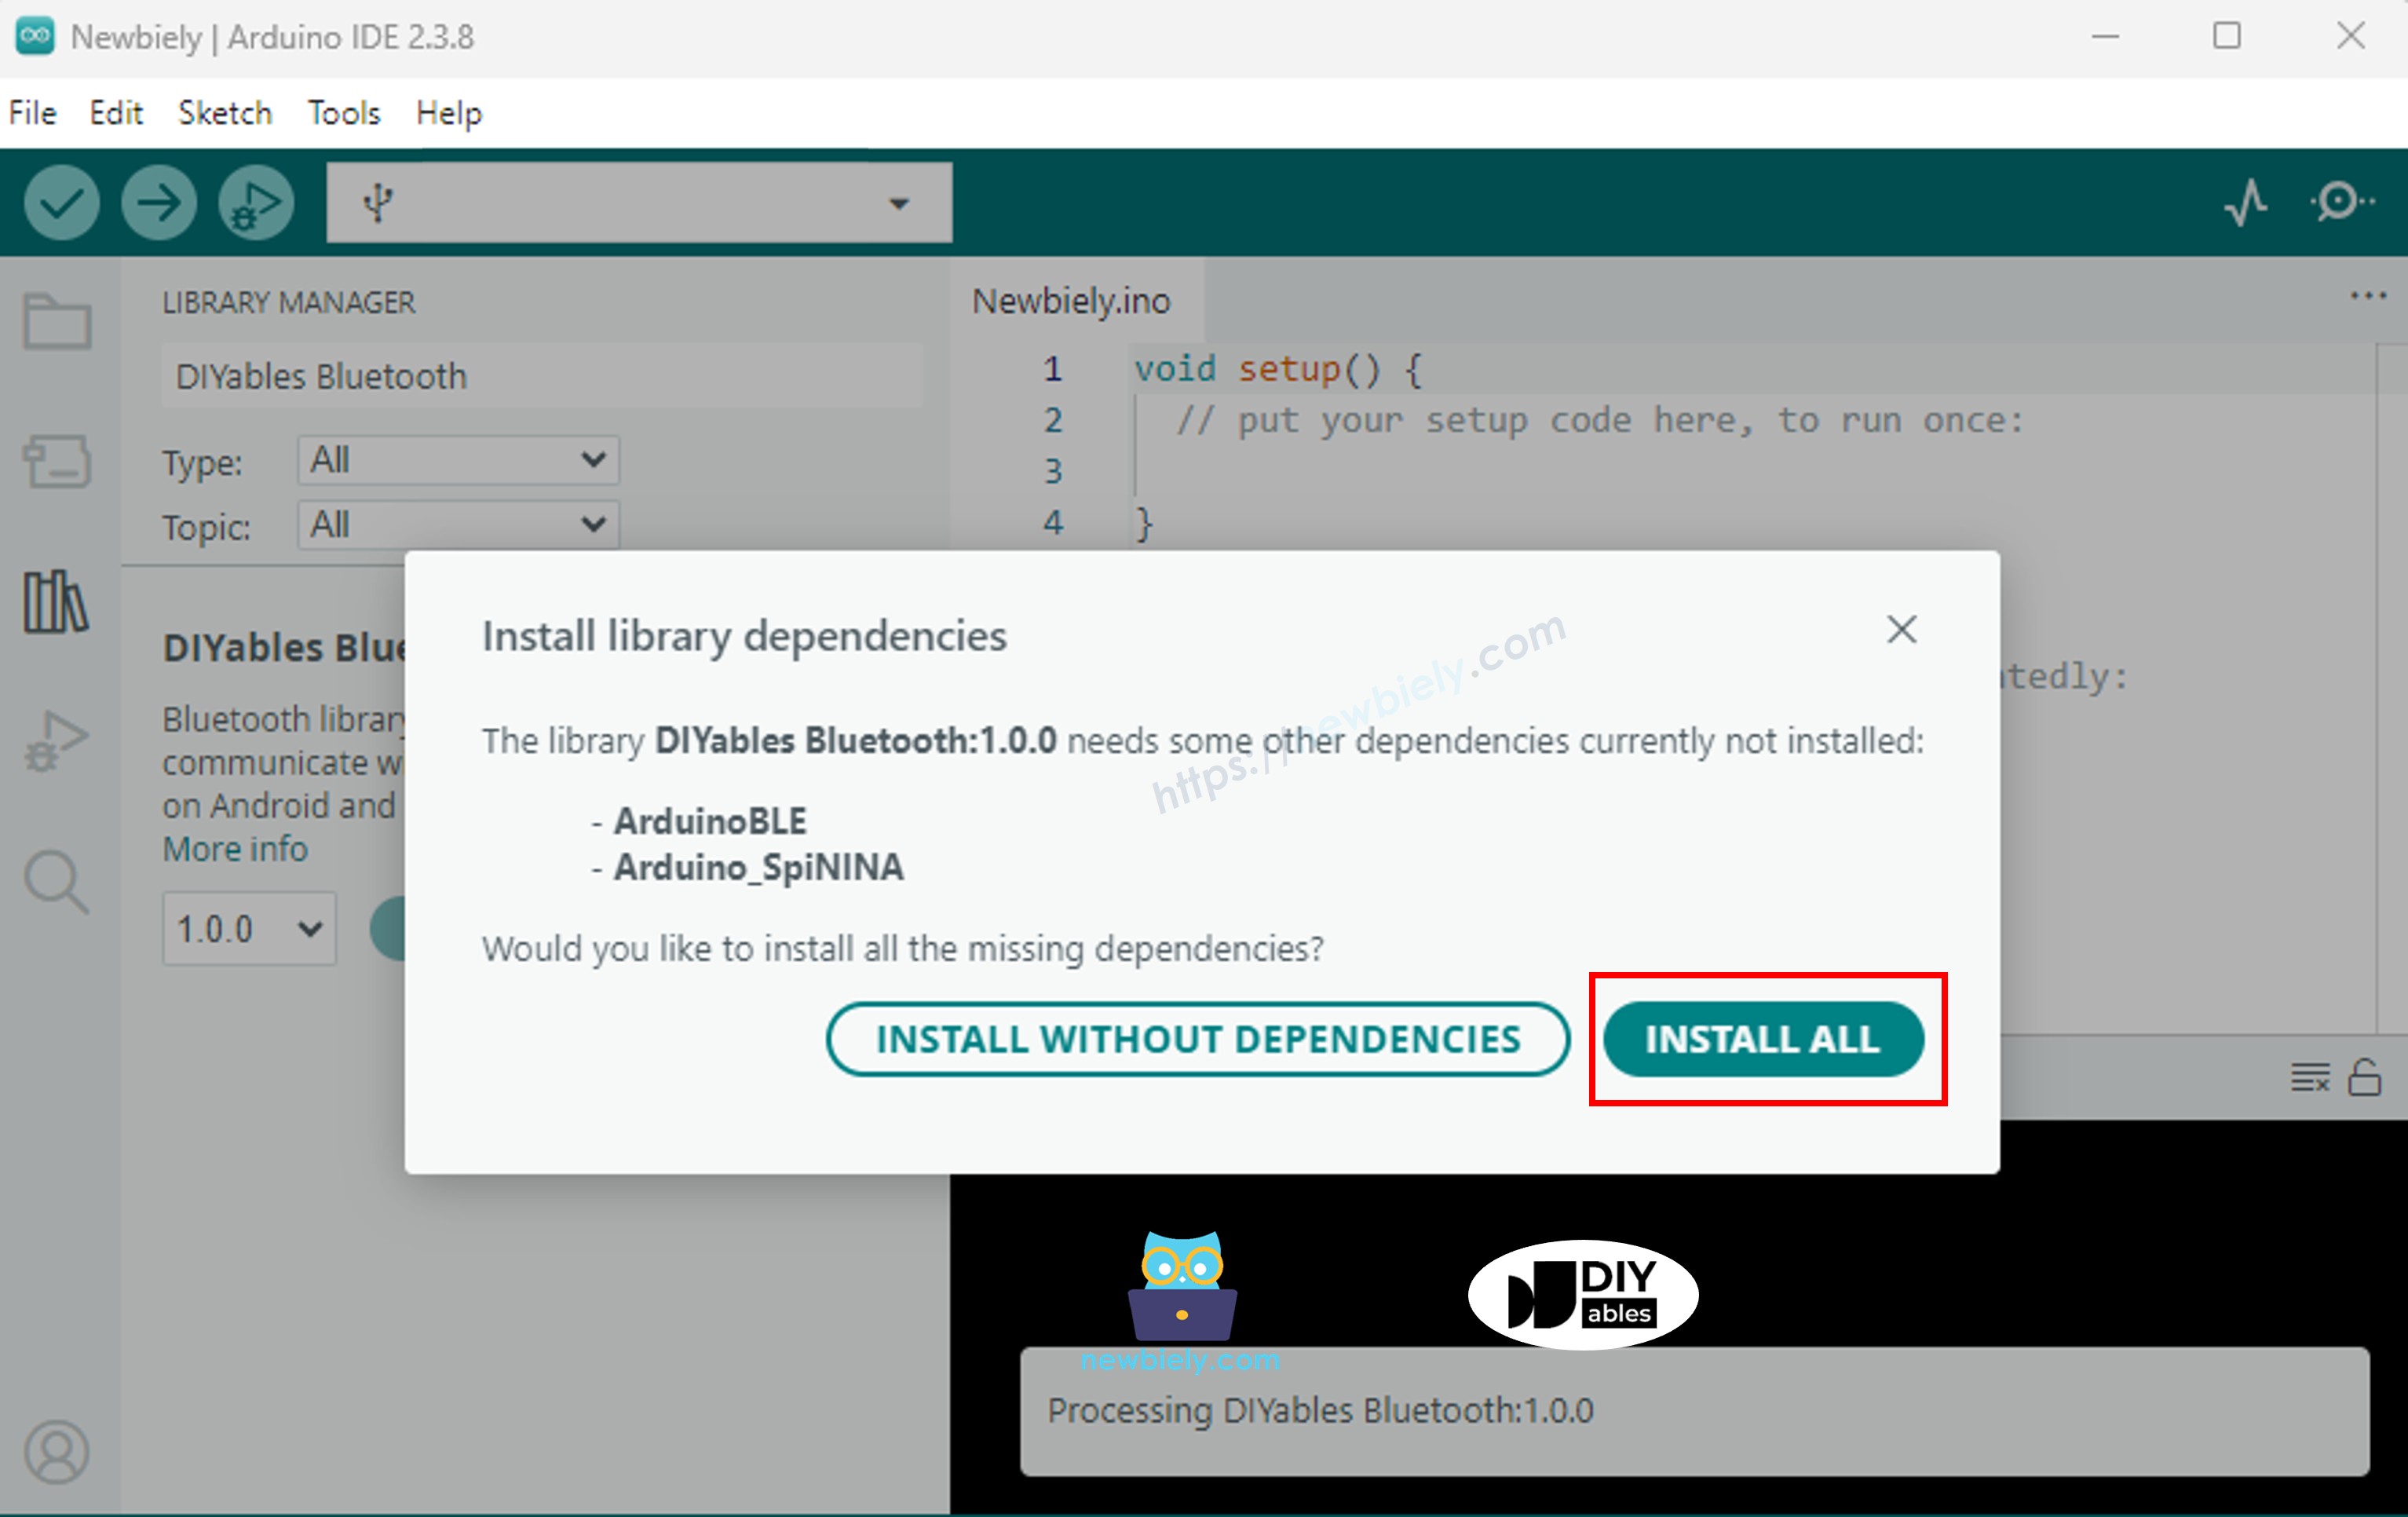
Sie werden gefragt, ob Sie weitere Bibliotheksabhängigkeiten installieren möchten
Klicken Sie auf die Install All Schaltfläche, um alle Bibliotheksabhängigkeiten zu installieren.
BLE Code
Gehen Sie in der Arduino IDE zu File Examples DIYables Bluetooth ArduinoBLE_RTC Beispiel, oder kopieren Sie den obigen Code und fügen Sie ihn in den Editor der Arduino IDE ein
/* * DIYables Bluetooth Library - Bluetooth RTC Example * Works with DIYables Bluetooth STEM app on Android and iOS * * This example demonstrates the Bluetooth RTC (Real-Time Clock) feature: * - Real-time clock display for both Arduino and mobile app * - One-click time synchronization from mobile app to Arduino * - Hardware RTC integration for persistent timekeeping * - Visual time difference monitoring * * Compatible Boards: * - Arduino UNO R4 WiFi (with built-in RTC) * Note: This example requires a board with hardware RTC. * Other BLE boards can be used with an external RTC module (e.g., DS3231). * * Setup: * 1. Upload the sketch to your Arduino * 2. Open Serial Monitor to see connection status * 3. Use DIYables Bluetooth App to connect and sync time * * Tutorial: https://diyables.io/bluetooth-app * Author: DIYables */#include <DIYables_BluetoothServer.h>#include <DIYables_BluetoothRTC.h>#include <platforms/DIYables_ArduinoBLE.h>#include"RTC.h"// BLE Configurationconst char* DEVICE_NAME = "Arduino_RTC";const char* SERVICE_UUID = "19B10000-E8F2-537E-4F6C-D104768A1214";const char* TX_UUID = "19B10001-E8F2-537E-4F6C-D104768A1214";const char* RX_UUID = "19B10002-E8F2-537E-4F6C-D104768A1214";// Create Bluetooth instancesDIYables_ArduinoBLE bluetooth(DEVICE_NAME, SERVICE_UUID, TX_UUID, RX_UUID);DIYables_BluetoothServer bluetoothServer(bluetooth);// Create RTC app instanceDIYables_BluetoothRTC bluetoothRTC;voidsetup() {Serial.begin(9600);delay(1000);Serial.println("DIYables Bluetooth - RTC Example");// Initialize RTC RTC.begin();// Check if RTC is running and set initial time if needed RTCTime savedTime; RTC.getTime(savedTime);if (!RTC.isRunning() || savedTime.getYear() == 2000) {Serial.println("RTC is NOT running, setting initial time...");// Set a default time - you can modify this to match current time RTCTime startTime(28, Month::AUGUST, 2025, 12, 0, 0, DayOfWeek::THURSDAY, SaveLight::SAVING_TIME_ACTIVE); RTC.setTime(startTime);Serial.println("RTC initialized with default time"); } else {Serial.println("RTC is already running"); }// Print initial RTC time RTCTime initialTime; RTC.getTime(initialTime);Serial.print("Initial RTC Time: ");Serial.print(initialTime.getYear());Serial.print("/");Serial.print(Month2int(initialTime.getMonth()));Serial.print("/");Serial.print(initialTime.getDayOfMonth());Serial.print(" - ");if (initialTime.getHour() < 10) Serial.print("0");Serial.print(initialTime.getHour());Serial.print(":");if (initialTime.getMinutes() < 10) Serial.print("0");Serial.print(initialTime.getMinutes());Serial.print(":");if (initialTime.getSeconds() < 10) Serial.print("0");Serial.print(initialTime.getSeconds());Serial.println();// Initialize Bluetooth server with platform-specific implementation bluetoothServer.begin();// Add RTC app to server bluetoothServer.addApp(&bluetoothRTC);// Set up connection event callbacks bluetoothServer.setOnConnected([]() {Serial.println("Bluetooth connected!");// Send current time to app on connection sendCurrentTimeToApp(); }); bluetoothServer.setOnDisconnected([]() {Serial.println("Bluetooth disconnected!"); });// Set callback for time sync from mobile app (Unix timestamp) bluetoothRTC.onTimeSync(onTimeSyncReceived);// Set callback for local time sync from mobile app (date/time components) bluetoothRTC.onLocalTimeSync(onLocalTimeSyncReceived);// Set callback for time request from mobile app bluetoothRTC.onTimeRequest(onTimeRequested);Serial.println("Waiting for Bluetooth connection...");Serial.println("Connect via app to sync time");}voidloop() {// Handle Bluetooth server communications bluetoothServer.loop();// Send current time to mobile app and print to Serial every 1 secondstaticunsignedlong lastUpdate = 0;if (millis() - lastUpdate >= 1000) { lastUpdate = millis();// Get current RTC time RTCTime currentTime; RTC.getTime(currentTime);// Send time to mobile app in human readable format bluetoothRTC.sendTime(currentTime.getYear(), Month2int(currentTime.getMonth()), currentTime.getDayOfMonth(), currentTime.getHour(), currentTime.getMinutes(), currentTime.getSeconds());// Print time to Serial MonitorSerial.print("RTC Time: ");Serial.print(currentTime.getYear());Serial.print("/");Serial.print(Month2int(currentTime.getMonth()));Serial.print("/");Serial.print(currentTime.getDayOfMonth());Serial.print(" - ");if (currentTime.getHour() < 10) Serial.print("0");Serial.print(currentTime.getHour());Serial.print(":");if (currentTime.getMinutes() < 10) Serial.print("0");Serial.print(currentTime.getMinutes());Serial.print(":");if (currentTime.getSeconds() < 10) Serial.print("0");Serial.print(currentTime.getSeconds());Serial.println(); }delay(10);}// Callback function called when mobile app sends time sync commandvoid onTimeSyncReceived(unsignedlong unixTimestamp) {Serial.print("Time sync received (Unix): ");Serial.println(unixTimestamp);// Convert Unix timestamp to RTCTime RTCTime newTime; newTime.setUnixTime(unixTimestamp);// Set RTC time RTC.setTime(newTime);Serial.println("Arduino RTC synchronized from Unix timestamp!");}// Callback function called when mobile app sends local time sync with componentsvoid onLocalTimeSyncReceived(intyear, intmonth, intday, inthour, intminute, intsecond) {Serial.print("Local time sync received: ");Serial.print(year);Serial.print("/");Serial.print(month);Serial.print("/");Serial.print(day);Serial.print(" ");Serial.print(hour);Serial.print(":");Serial.print(minute);Serial.print(":");Serial.println(second);// Create RTCTime from components (local time)// Convert month integer to Month enum Month monthEnum;switch(month) {case 1: monthEnum = Month::JANUARY; break;case 2: monthEnum = Month::FEBRUARY; break;case 3: monthEnum = Month::MARCH; break;case 4: monthEnum = Month::APRIL; break;case 5: monthEnum = Month::MAY; break;case 6: monthEnum = Month::JUNE; break;case 7: monthEnum = Month::JULY; break;case 8: monthEnum = Month::AUGUST; break;case 9: monthEnum = Month::SEPTEMBER; break;case 10: monthEnum = Month::OCTOBER; break;case 11: monthEnum = Month::NOVEMBER; break;case 12: monthEnum = Month::DECEMBER; break;default: monthEnum = Month::JANUARY; break; } RTCTime newTime(day, monthEnum, year, hour, minute, second, DayOfWeek::MONDAY, SaveLight::SAVING_TIME_ACTIVE);// Set RTC time RTC.setTime(newTime);Serial.println("Arduino RTC synchronized from local time components!");}// Callback function called when mobile app requests current Arduino timevoid onTimeRequested() {Serial.println("Time requested by app"); sendCurrentTimeToApp();}// Helper function to send current time to mobile appvoid sendCurrentTimeToApp() {// Get current RTC time and send to app in human readable format RTCTime currentTime; RTC.getTime(currentTime); bluetoothRTC.sendTime(currentTime.getYear(), Month2int(currentTime.getMonth()), currentTime.getDayOfMonth(), currentTime.getHour(), currentTime.getMinutes(), currentTime.getSeconds());}
Klicken Sie auf die Upload Schaltfläche in der Arduino IDE, um den Code auf den Arduino UNO R4 WiFi hochzuladen
Öffnen Sie den Serial Monitor
Überprüfen Sie das Ergebnis im Serial Monitor. Es sieht wie folgt aus:
Newbiely | Arduino IDE 2.3.8
──
☐
✕
File
Edit
Sketch
Tools
Help
Arduino Uno R4 WiFi
Newbiely.ino
···
8Serial.println("Hello World!");
Output
Serial Monitor
Message (Enter to send message to 'Arduino Uno R4 WiFi' on 'COM15')
New Line
9600 baud
DIYables Bluetooth - RTC Example
Waiting for Bluetooth connection...
RTC not running or year is 2000, waiting for time sync...
Ln 11, Col 1
Arduino Uno R4 WiFi on COM15
2
Mobile App
Installieren Sie die DIYables Bluetooth App auf Ihrem Smartphone: Android | iOS
Hinweis: Die DIYables Bluetooth App unterstützt sowohl BLE als auch Classic Bluetooth auf Android und BLE auf iOS. Da der Arduino UNO R4 WiFi BLE verwendet, funktioniert die App auf Android und iOS. Keine manuelle Kopplung erforderlich für BLE — einfach scannen und verbinden.
Öffnen Sie die DIYables Bluetooth App
Beim ersten Öffnen der App werden Berechtigungen angefordert. Bitte gewähren Sie folgende Berechtigungen:
Nearby Devices Berechtigung (Android 12+) / Bluetooth Berechtigung (iOS) - erforderlich zum Scannen und Verbinden von Bluetooth-Geräten
Location Berechtigung (nur Android 11 und darunter) - erforderlich für ältere Android-Versionen zum Scannen nach BLE-Geräten
Stellen Sie sicher, dass Bluetooth auf Ihrem Telefon aktiviert ist
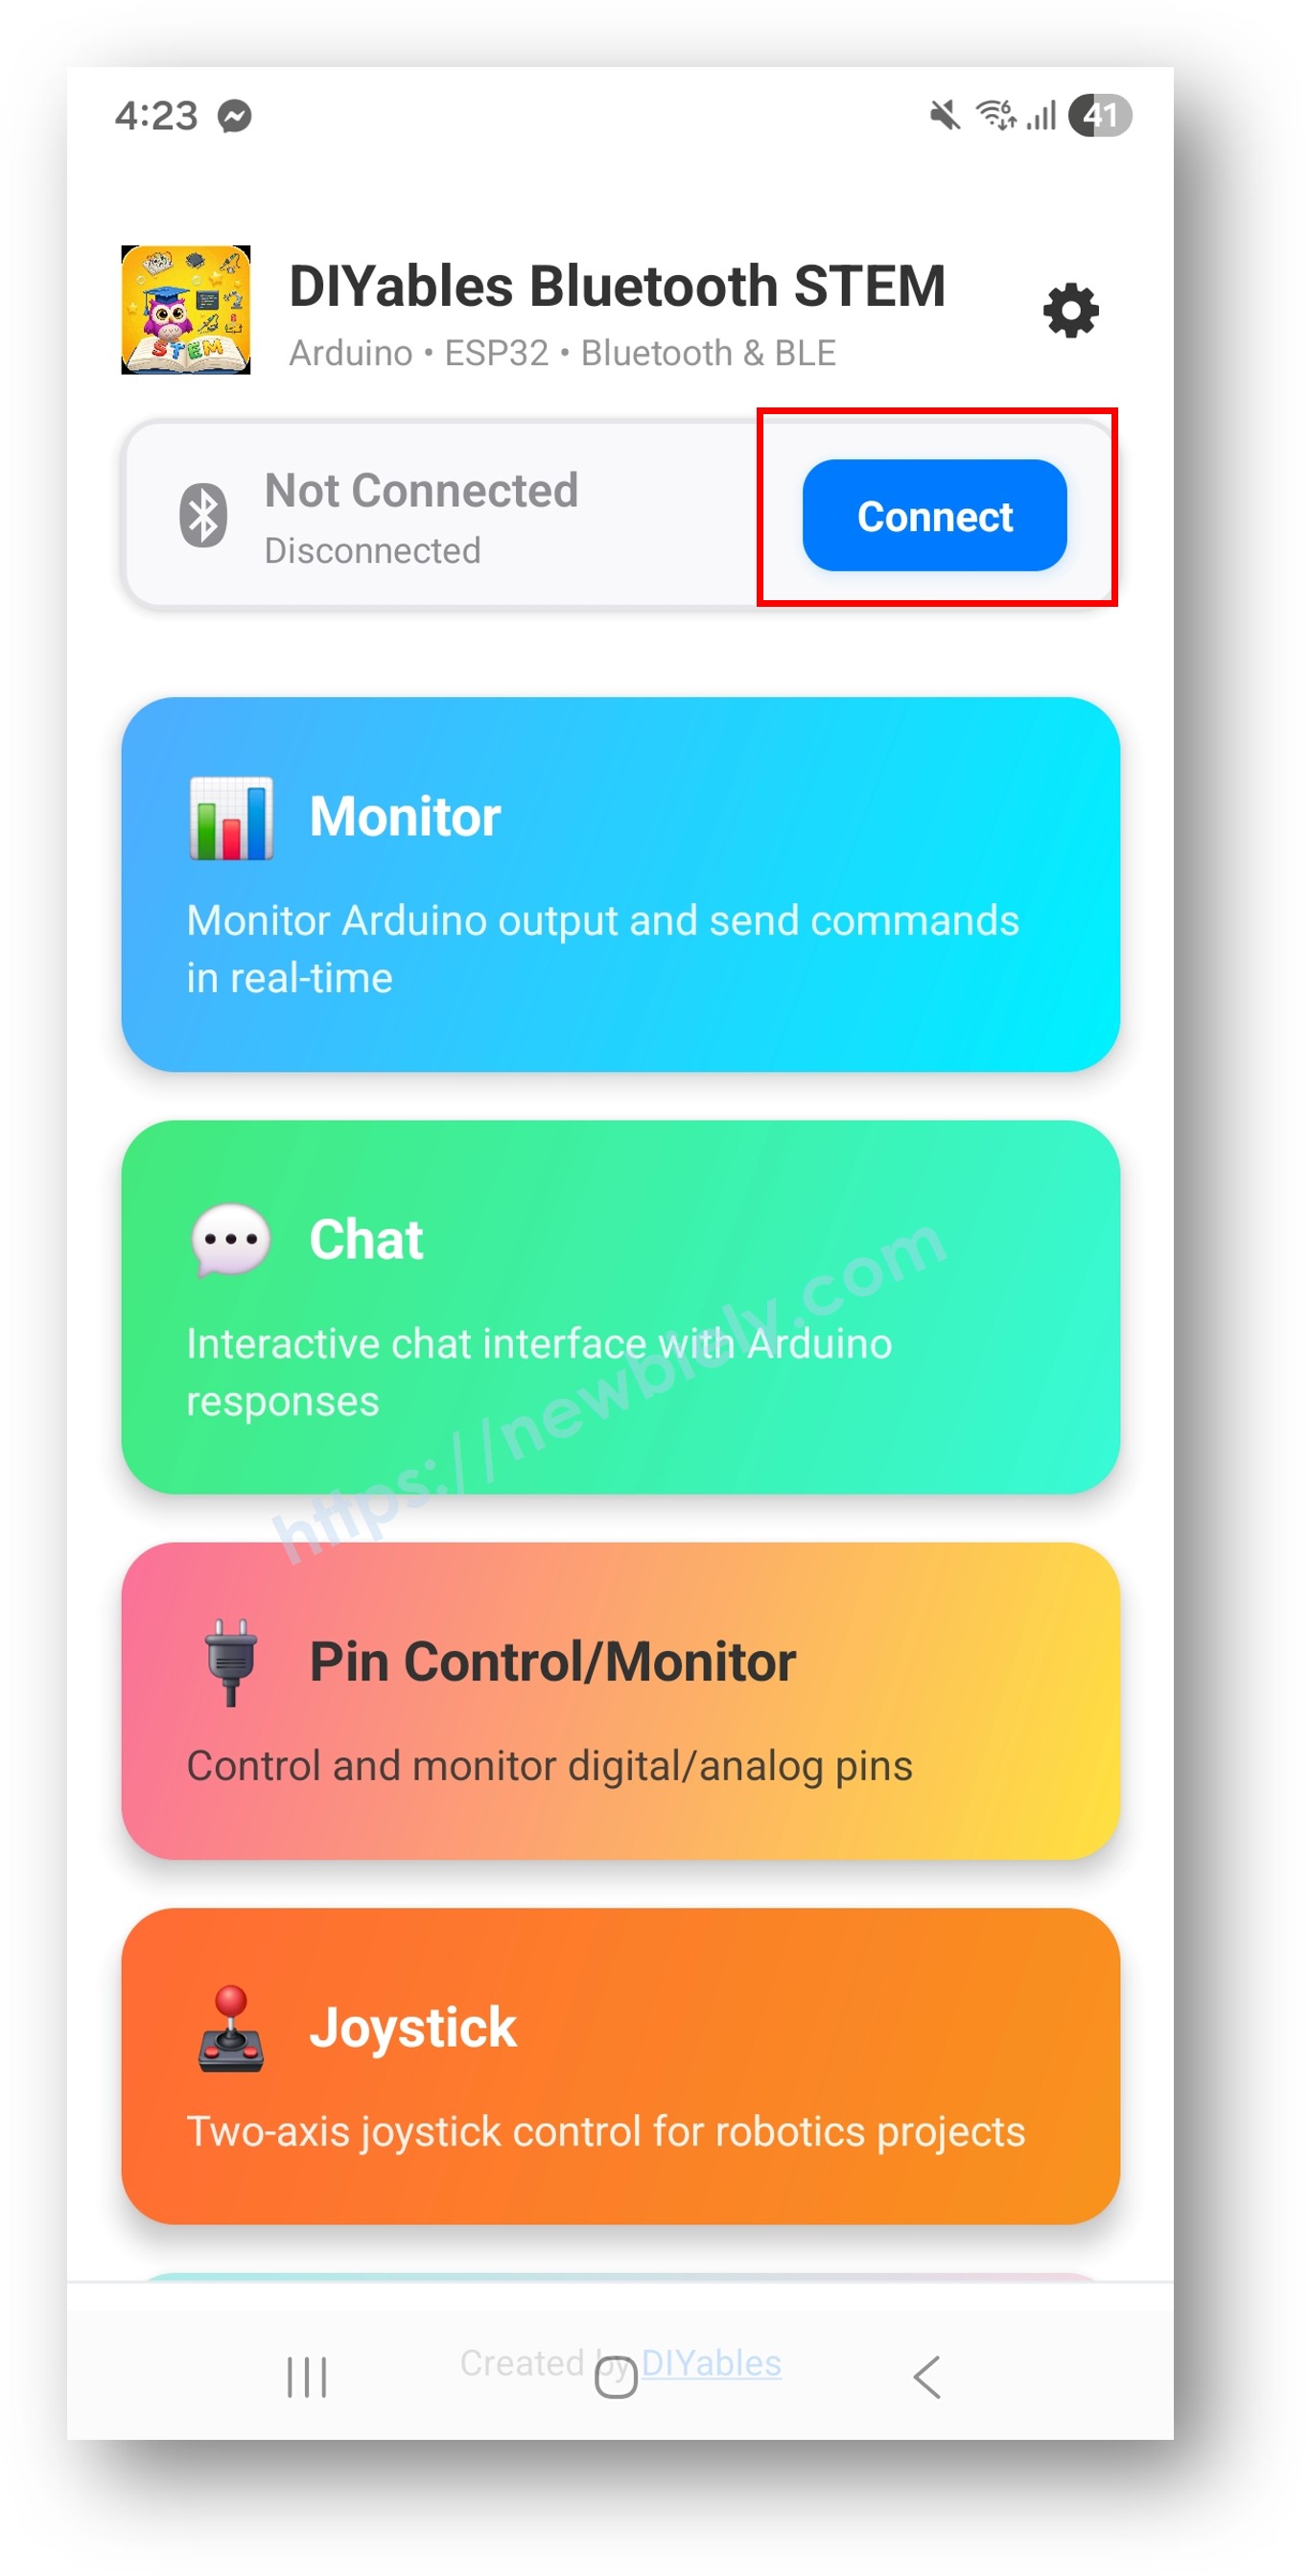
Tippen Sie auf dem Startbildschirm auf die Connect Schaltfläche. Die App scannt nach BLE-Geräten.
Finden und tippen Sie auf "Arduino_RTC" in den Scan-Ergebnissen, um sich zu verbinden.
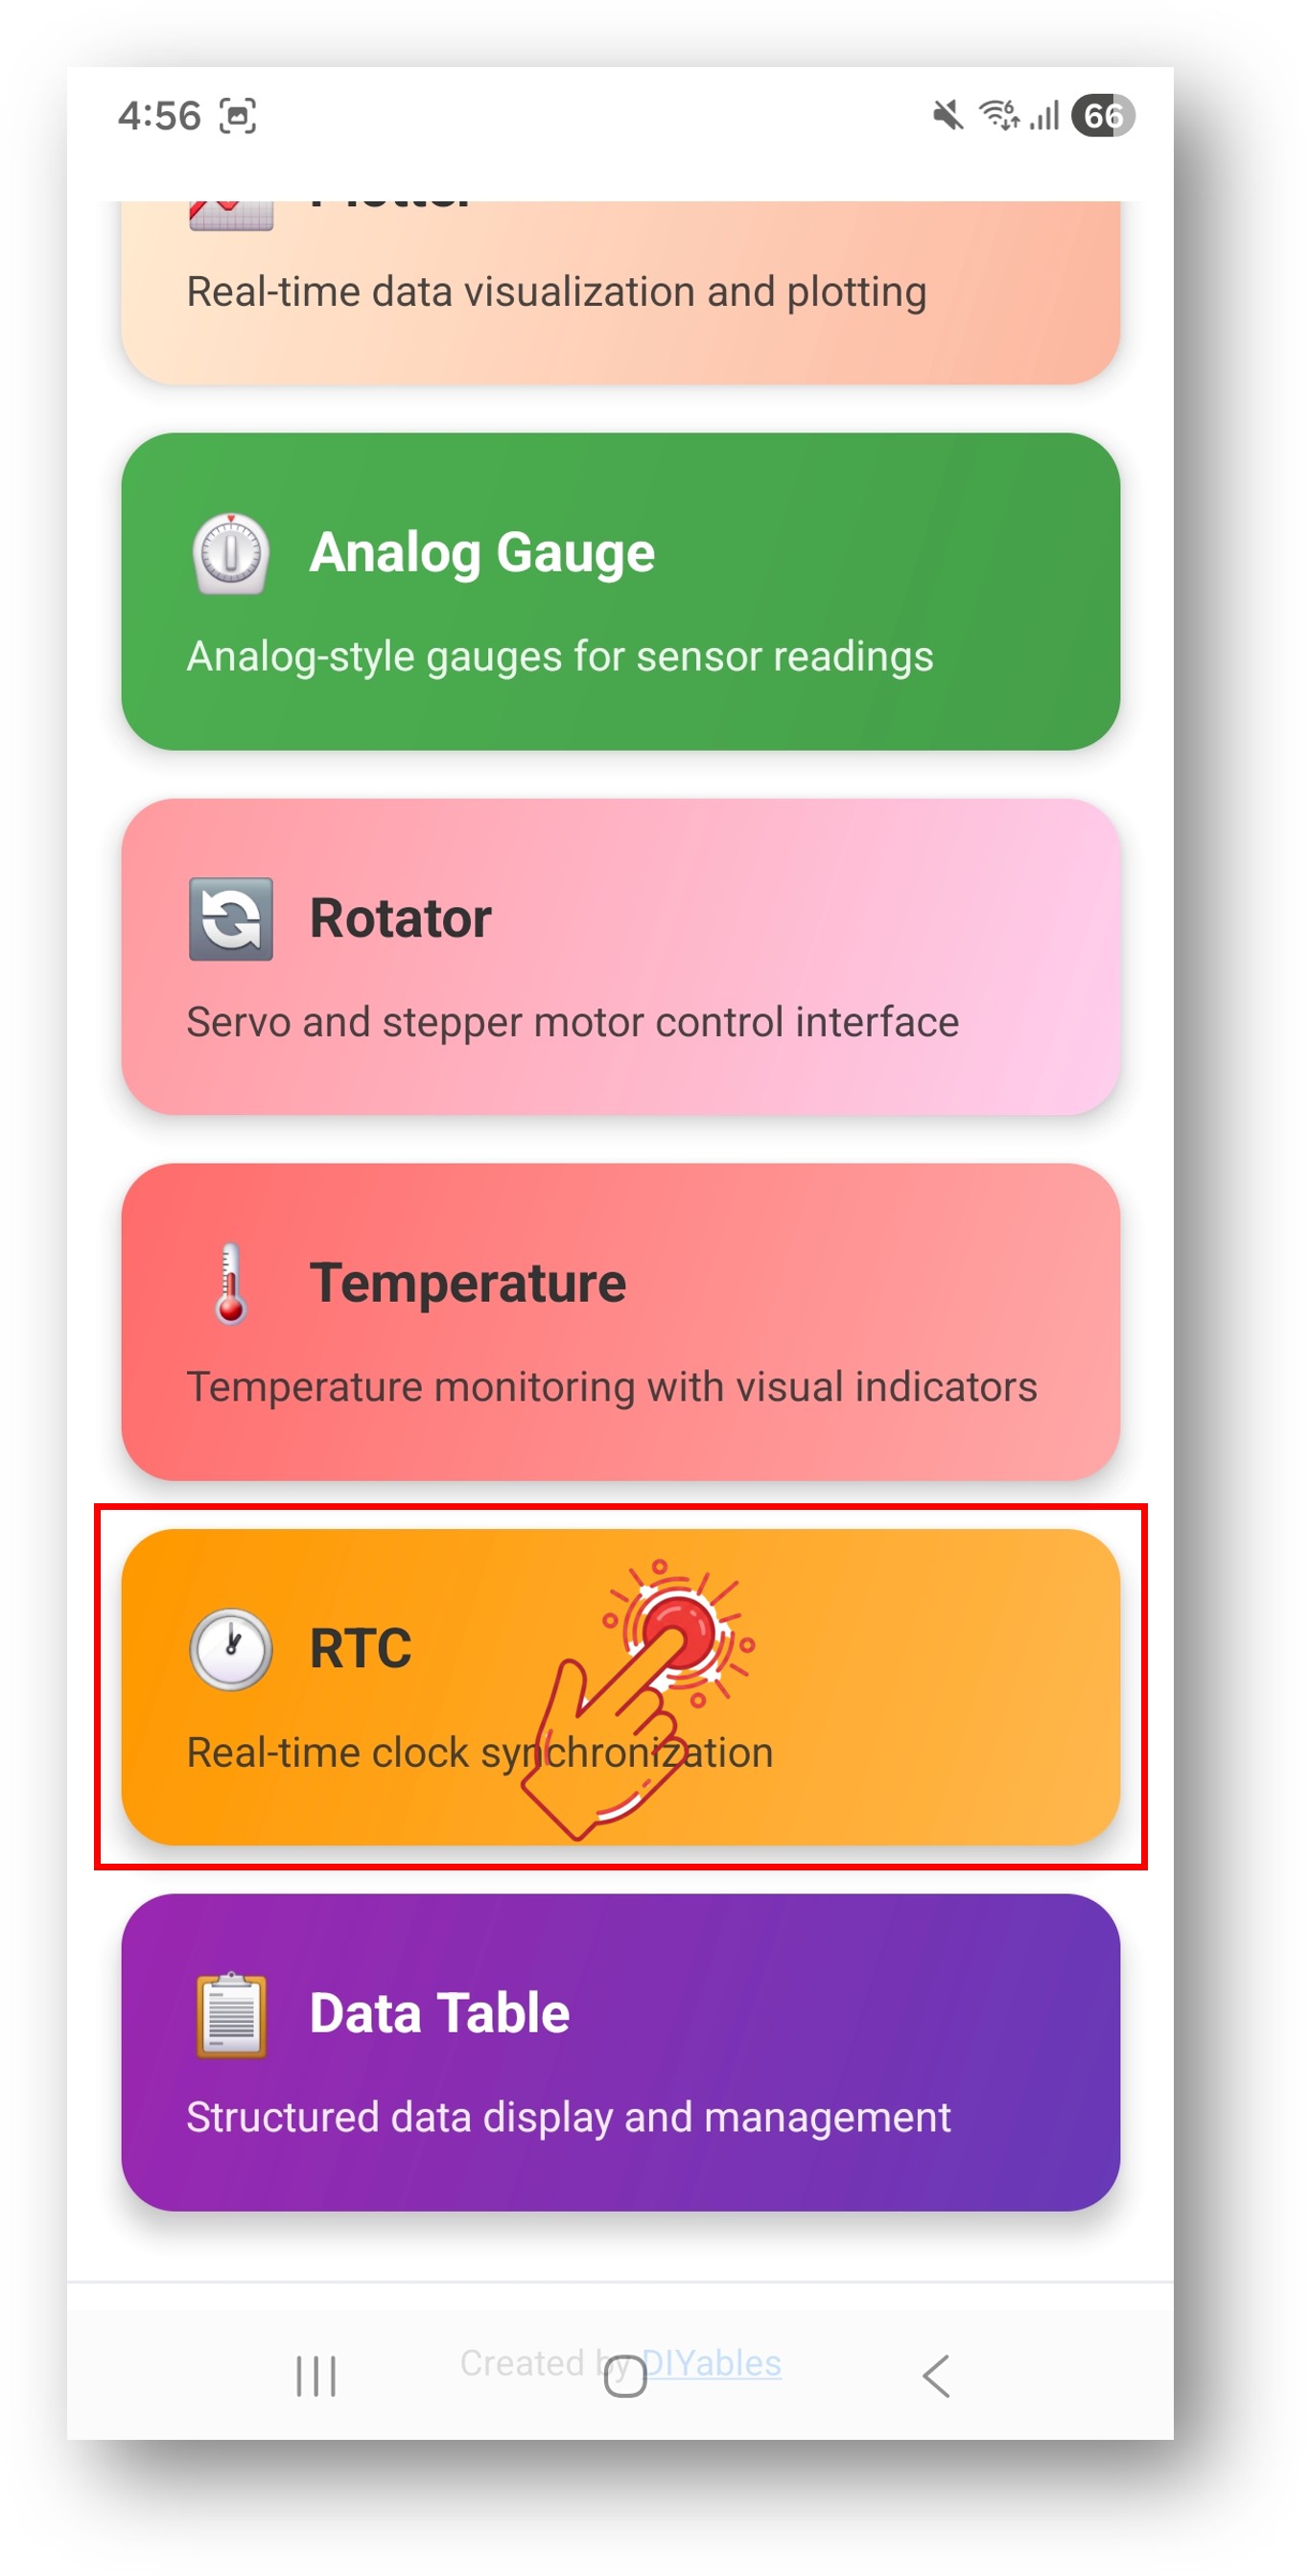
Nach der Verbindung kehrt die App automatisch zum Startbildschirm zurück. Wählen Sie die RTC App aus dem App-Menü.
Hinweis: Sie können das Einstellungssymbol auf dem Startbildschirm antippen, um Apps auf dem Startbildschirm ein-/auszublenden. Weitere Details finden Sie im DIYables Bluetooth App Benutzerhandbuch.
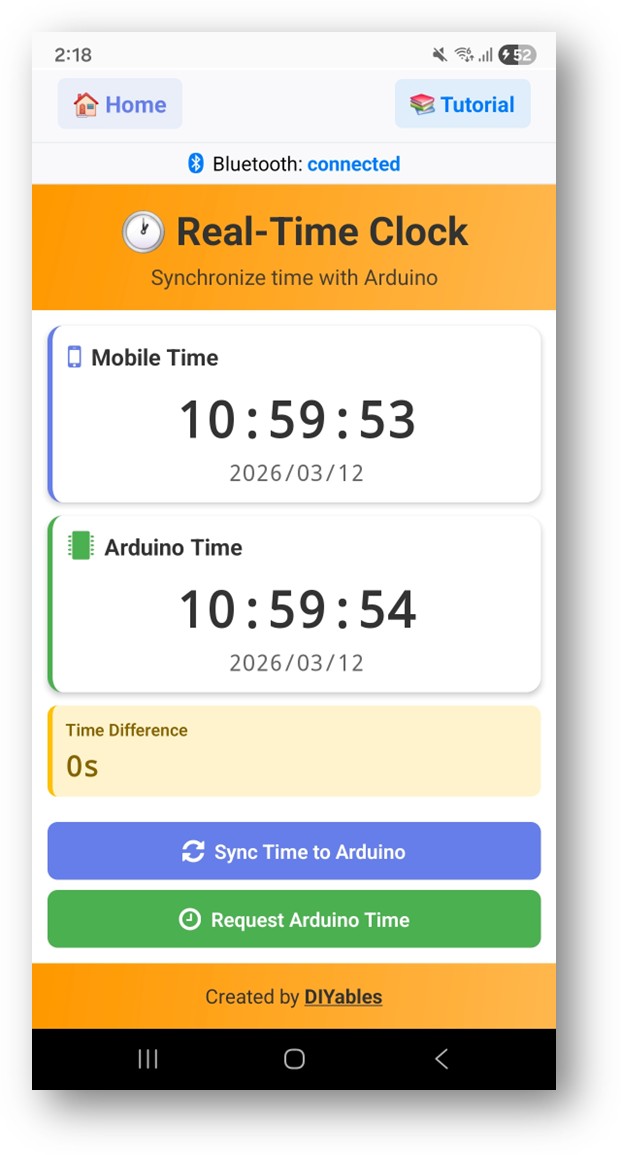
Die App zeigt die aktuelle Zeit von der Arduino RTC an
Verwenden Sie die Sync Schaltfläche, um die Zeit des Telefons mit dem Arduino zu synchronisieren
Die Zeit wird jede Sekunde aktualisiert
Schauen Sie nun zurück auf den Serial Monitor in der Arduino IDE. Sie werden sehen:
Newbiely | Arduino IDE 2.3.8
──
☐
✕
File
Edit
Sketch
Tools
Help
Arduino Uno R4 WiFi
Newbiely.ino
···
8Serial.println("Hello World!");
Output
Serial Monitor
Message (Enter to send message to 'Arduino Uno R4 WiFi' on 'COM15')
New Line
9600 baud
Bluetooth connected!
Time sync received (unix): 1719849600
RTC set to: 2025/07/01 12:00:00
Current time: 2025/07/01 12:00:01
Current time: 2025/07/01 12:00:02
Ln 11, Col 1
Arduino Uno R4 WiFi on COM15
2
Kreative Anpassung - Code an Ihr Projekt anpassen
Zeitsynchronisations-Methoden
Die App kann die Zeit auf den Arduino mit zwei Methoden synchronisieren:
// Methode 1: Unix Timestamp SynchronisationbluetoothRTC.onTimeSync([](unsignedlong unixTime) {// Unix Timestamp konvertieren und RTC setzenSerial.print("Unix time: ");Serial.println(unixTime);});// Methode 2: Lokale Zeitkomponenten SynchronisationbluetoothRTC.onLocalTimeSync([](intyear, intmonth, intday, inthour, intminute, intsecond) {// RTC direkt mit Komponenten setzenSerial.print("Local time: ");Serial.print(year);Serial.print("/");Serial.print(month);Serial.print("/");Serial.println(day);});
Zeit an App senden
// Aktuelle Zeit an die App sendenbluetoothRTC.sendTime(year, month, day, hour, minute, second);
Zeit-Anfragen bearbeiten
bluetoothRTC.onTimeRequest([]() {// App fordert die aktuelle Zeit an// RTC lesen und Zeit zurücksenden RTCTime currentTime; RTC.getTime(currentTime); bluetoothRTC.sendTime( currentTime.getYear(), Month2int(currentTime.getMonth()), currentTime.getDayOfMonth(), currentTime.getHour(), currentTime.getMinutes(), currentTime.getSeconds() );});
Verwendung der integrierten RTC
Die integrierte RTC des Arduino UNO R4 WiFi wird über die RTC.h Bibliothek angesprochen:
#include"RTC.h"voidsetup() { RTC.begin(); // Hardware-RTC initialisieren}// Zeit auf der RTC setzenRTCTime timeToSet;timeToSet.setYear(2025);timeToSet.setMonth(Month::JULY);timeToSet.setDayOfMonth(1);timeToSet.setHour(12);timeToSet.setMinute(0);timeToSet.setSecond(0);RTC.setTime(timeToSet);// Zeit von der RTC lesenRTCTime currentTime;RTC.getTime(currentTime);intyear = currentTime.getYear();intmonth = Month2int(currentTime.getMonth());intday = currentTime.getDayOfMonth();inthour = currentTime.getHour();intminute = currentTime.getMinutes();intsecond = currentTime.getSeconds();
Die folgende Video-Demo verwendet den folgenden Code:
/* * Dieser Arduino UNO R4 Code wurde von newbiely.de entwickelt * Dieser Arduino UNO R4 Code wird der Öffentlichkeit ohne jegliche Einschränkung zur Verfügung gestellt. * Für vollständige Anleitungen und Schaltpläne besuchen Sie bitte: * https://newbiely.de/tutorials/arduino-uno-r4/arduino-uno-r4-diyables-bluetooth-app-rtc*//* * DIYables Bluetooth Library - Bluetooth RTC Example * Works with DIYables Bluetooth STEM app on Android and iOS * * This example demonstrates the Bluetooth RTC (Real-Time Clock) feature: * - Real-time clock display for both Arduino and mobile app * - One-click time synchronization from mobile app to Arduino * - Hardware RTC integration for persistent timekeeping * - Visual time difference monitoring * * Compatible Boards: * - Arduino UNO R4 WiFi (with built-in RTC) * Note: This example requires a board with hardware RTC. * Other BLE boards can be used with an external RTC module (e.g., DS3231). * * Setup: * 1. Upload the sketch to your Arduino * 2. Open Serial Monitor to see connection status * 3. Use DIYables Bluetooth App to connect and sync time * * Tutorial: https://diyables.io/bluetooth-app * Author: DIYables */#include <DIYables_BluetoothServer.h>#include <DIYables_BluetoothRTC.h>#include <platforms/DIYables_ArduinoBLE.h>#include"RTC.h"#include <MD_Parola.h>#include <MD_MAX72xx.h>// BLE Configurationconst char* DEVICE_NAME = "Arduino_RTC";const char* SERVICE_UUID = "19B10000-E8F2-537E-4F6C-D104768A1214";const char* TX_UUID = "19B10001-E8F2-537E-4F6C-D104768A1214";const char* RX_UUID = "19B10002-E8F2-537E-4F6C-D104768A1214";// Create Bluetooth instancesDIYables_ArduinoBLE bluetooth(DEVICE_NAME, SERVICE_UUID, TX_UUID, RX_UUID);DIYables_BluetoothServer bluetoothServer(bluetooth);// Create RTC app instanceDIYables_BluetoothRTC bluetoothRTC;// --- DISPLAY SUBSYSTEM CONFIGURATION ---#define HARDWARE_TYPE MD_MAX72XX::FC16_HW// Hardware register layout variant for physical modules#define MAX_DEVICES 4 // Number of cascaded 8x8 matrix blocks#define CS_PIN 9 // SPI Chip Select active-low hardware pinMD_Parola ledMatrix = MD_Parola(HARDWARE_TYPE, CS_PIN, MAX_DEVICES);// --- ALARM SUBSYSTEM ARCHITECTURE ---constint BUZZER_PIN = 8;bool isAlarming = false; // State flag to prevent redundant re-initialization of display buffersstruct AlarmTime {inthour;intminute;};// Scheduled alarm matrices for daily medication dispatchconstint TOTAL_ALARMS = 3;AlarmTime medicationAlarms[TOTAL_ALARMS] = { {12, 53}, // Slot 1: Morning Dose {12, 54}, // Slot 2: Noon Dose {12, 55} // Slot 3: Evening Dose};// Fixed-size static allocation to prevent dangling pointers during stack deallocationchar AlertMsg[50] = ""; voidsetup() {Serial.begin(9600);delay(1000);// Configure GPIO peripheralspinMode(BUZZER_PIN, OUTPUT);digitalWrite(BUZZER_PIN, LOW);// Initialize SPI-driven LED Matrix ledMatrix.begin(); ledMatrix.setIntensity(3); // Brightness optimization register value to prevent camera sensor overexposure ledMatrix.displayClear();// Set initial boot token into display queue ledMatrix.displayText("Medicine Reminder System READY", PA_LEFT, 60, 2000, PA_SCROLL_LEFT, PA_SCROLL_LEFT);Serial.println("DIYables Bluetooth - RTC Example");// Initialize RTC RTC.begin();// Check if RTC is running and set initial time if needed RTCTime savedTime; RTC.getTime(savedTime);if (!RTC.isRunning() || savedTime.getYear() == 2000) {Serial.println("RTC is NOT running, setting initial time...");// Set a default time - you can modify this to match current time RTCTime startTime(25, Month::MAY, 2026, 8, 13, 0, DayOfWeek::THURSDAY, SaveLight::SAVING_TIME_ACTIVE); RTC.setTime(startTime);Serial.println("RTC initialized with default time"); } else {Serial.println("RTC is already running"); }// Print initial RTC time RTCTime initialTime; RTC.getTime(initialTime);Serial.print("Initial RTC Time: ");Serial.print(initialTime.getYear());Serial.print("/");Serial.print(Month2int(initialTime.getMonth()));Serial.print("/");Serial.print(initialTime.getDayOfMonth());Serial.print(" - ");if (initialTime.getHour() < 10) Serial.print("0");Serial.print(initialTime.getHour());Serial.print(":");if (initialTime.getMinutes() < 10) Serial.print("0");Serial.print(initialTime.getMinutes());Serial.print(":");if (initialTime.getSeconds() < 10) Serial.print("0");Serial.print(initialTime.getSeconds());Serial.println();// Initialize Bluetooth server with platform-specific implementation bluetoothServer.begin();// Add RTC app to server bluetoothServer.addApp(&bluetoothRTC);// Set up connection event callbacks bluetoothServer.setOnConnected([]() {Serial.println("Bluetooth connected!");// Send current time to app on connection sendCurrentTimeToApp(); }); bluetoothServer.setOnDisconnected([]() {Serial.println("Bluetooth disconnected!"); });// Set callback for time sync from mobile app (Unix timestamp) bluetoothRTC.onTimeSync(onTimeSyncReceived);// Set callback for local time sync from mobile app (date/time components) bluetoothRTC.onLocalTimeSync(onLocalTimeSyncReceived);// Set callback for time request from mobile app bluetoothRTC.onTimeRequest(onTimeRequested);Serial.println("Waiting for Bluetooth connection...");Serial.println("Connect via app to sync time");}voidloop() {// Handle Bluetooth server communications bluetoothServer.loop();// Non-blocking shift engine: Calculates next step pixel translations on every passif (ledMatrix.displayAnimate()) { ledMatrix.displayReset(); }// Send current time to mobile app and print to Serial every 1 secondstaticunsignedlong lastUpdate = 0;if (millis() - lastUpdate >= 1000) { lastUpdate = millis();// Get current RTC time RTCTime currentTime; RTC.getTime(currentTime);int currentH = currentTime.getHour();int currentM = currentTime.getMinutes();int currentS = currentTime.getSeconds();// Send time to mobile app in human readable format bluetoothRTC.sendTime(currentTime.getYear(), Month2int(currentTime.getMonth()), currentTime.getDayOfMonth(), currentTime.getHour(), currentTime.getMinutes(), currentTime.getSeconds());// Print time to Serial MonitorSerial.print("RTC Time: ");Serial.print(currentTime.getYear());Serial.print("/");Serial.print(Month2int(currentTime.getMonth()));Serial.print("/");Serial.print(currentTime.getDayOfMonth());Serial.print(" - ");if (currentTime.getHour() < 10) Serial.print("0");Serial.print(currentTime.getHour());Serial.print(":");if (currentTime.getMinutes() < 10) Serial.print("0");Serial.print(currentTime.getMinutes());Serial.print(":");if (currentTime.getSeconds() < 10) Serial.print("0");Serial.print(currentTime.getSeconds());Serial.println();// Sequential search scan across active alarm vectorsfor (int i = 0; i < TOTAL_ALARMS; i++) {if (currentH == medicationAlarms[i].hour && currentM == medicationAlarms[i].minute && currentS == 0) {// Conditional gate to prevent continuous buffer overwrites within the same secondif (!isAlarming) { isAlarming = true;// Low-level buffer formatting to map runtime integers into locked memory space// %02d pads leading zeros to preserve fixed structural layout formatting [HH:MM] sprintf(AlertMsg, "TAKE MEDICATION ! [%02d:%02d] ", currentH, currentM); ledMatrix.displayClear(); // Link the safe static memory pointer directly into the display rendering core ledMatrix.displayText(AlertMsg, PA_LEFT, 60, 0, PA_SCROLL_LEFT, PA_SCROLL_LEFT);Serial.print("[ALARM] Array index match detected at slot ID: ");Serial.println(i + 1); } } }// Auto-timeout block: Clears state metrics after 30 elapsed duty secondsif (currentS >= 20 && isAlarming) { isAlarming = false; ledMatrix.displayClear(); ledMatrix.displayText("Medicine Reminder System With APP RTC", PA_LEFT, 60, 0, PA_SCROLL_LEFT, PA_SCROLL_LEFT);Serial.println("[ALARM] Trigger window expired. Display registers reset to default state."); } }// Asynchronous Active Buzzer Duty Cycle Control (50% duty cycle, 1Hz rate square-wave generator)if (isAlarming) {staticunsignedlong lastBuzzerToggle = 0;if (millis() - lastBuzzerToggle >= 500) { lastBuzzerToggle = millis();digitalWrite(BUZZER_PIN, !digitalRead(BUZZER_PIN)); // Invert state logic } } else {digitalWrite(BUZZER_PIN, LOW); // Enforce noise suppression when system state is idle }delay(10);}// Callback function called when mobile app sends time sync commandvoid onTimeSyncReceived(unsignedlong unixTimestamp) {Serial.print("Time sync received (Unix): ");Serial.println(unixTimestamp);// Convert Unix timestamp to RTCTime RTCTime newTime; newTime.setUnixTime(unixTimestamp);// Set RTC time RTC.setTime(newTime);Serial.println("Arduino RTC synchronized from Unix timestamp!");}// Callback function called when mobile app sends local time sync with componentsvoid onLocalTimeSyncReceived(intyear, intmonth, intday, inthour, intminute, intsecond) {Serial.print("Local time sync received: ");Serial.print(year);Serial.print("/");Serial.print(month);Serial.print("/");Serial.print(day);Serial.print(" ");Serial.print(hour);Serial.print(":");Serial.print(minute);Serial.print(":");Serial.println(second);// Create RTCTime from components (local time)// Convert month integer to Month enum Month monthEnum;switch(month) {case 1: monthEnum = Month::JANUARY; break;case 2: monthEnum = Month::FEBRUARY; break;case 3: monthEnum = Month::MARCH; break;case 4: monthEnum = Month::APRIL; break;case 5: monthEnum = Month::MAY; break;case 6: monthEnum = Month::JUNE; break;case 7: monthEnum = Month::JULY; break;case 8: monthEnum = Month::AUGUST; break;case 9: monthEnum = Month::SEPTEMBER; break;case 10: monthEnum = Month::OCTOBER; break;case 11: monthEnum = Month::NOVEMBER; break;case 12: monthEnum = Month::DECEMBER; break;default: monthEnum = Month::JANUARY; break; } RTCTime newTime(day, monthEnum, year, hour, minute, second, DayOfWeek::MONDAY, SaveLight::SAVING_TIME_ACTIVE);// Set RTC time RTC.setTime(newTime);Serial.println("Arduino RTC synchronized from local time components!");}// Callback function called when mobile app requests current Arduino timevoid onTimeRequested() {Serial.println("Time requested by app"); sendCurrentTimeToApp();}// Helper function to send current time to mobile appvoid sendCurrentTimeToApp() {// Get current RTC time and send to app in human readable format RTCTime currentTime; RTC.getTime(currentTime); bluetoothRTC.sendTime(currentTime.getYear(), Month2int(currentTime.getMonth()), currentTime.getDayOfMonth(), currentTime.getHour(), currentTime.getMinutes(), currentTime.getSeconds());}
Fehlerbehebung
Häufige Probleme
1. Gerät kann in der App nicht gefunden werden
Stellen Sie sicher, dass der Arduino UNO R4 WiFi eingeschaltet ist und der Sketch hochgeladen wurde
Überprüfen Sie, ob Bluetooth auf Ihrem Telefon aktiviert ist
Bei Android 11 und darunter aktivieren Sie auch die Standortdienste
2. Zeit zeigt 2000/01/01 oder falsche Zeit
Die RTC muss mindestens einmal nach dem Einschalten synchronisiert werden
Verwenden Sie die Sync-Schaltfläche in der App, um die Zeit zu setzen
Die RTC verliert die Zeit, wenn das Board ausgeschaltet wird (keine Batterie-Sicherung)
3. Zeit synchronisiert nicht von der App
Überprüfen Sie, ob die onTimeSync und onLocalTimeSync Callbacks eingerichtet sind
Überprüfen Sie den Serial Monitor auf Sync-Nachrichten
Stellen Sie sicher, dass die BLE-Verbindung stabil ist
4. RTC driftet über die Zeit
Der integrierte RTC-Kristall hat begrenzte Genauigkeit
Synchronisieren Sie regelmäßig über die App
Für kritische Zeitmessung verwenden Sie zusätzlich NTP über WiFi
5. Monats-Konvertierungsprobleme
Die Arduino UNO R4 WiFi RTC verwendet ein Month Enum, keine Ganzzahl
Verwenden Sie eine Konvertierungsfunktion (wie Month2int() im Beispiel) für ganzzahlige Monate
Monate sind 1-basiert (Januar = 1)
6. Upload schlägt fehl oder Board wird nicht erkannt
Installieren Sie das neueste Arduino UNO R4 Board-Paket über den Board Manager
Versuchen Sie ein anderes USB-Kabel oder einen anderen Port
Projektideen
Digitaluhr mit BLE-Zeitsynchronisation
Datenlogger mit präzisen Zeitstempeln
Geplante Aufgaben-Automatisierung (Ein-/Ausschalten zu bestimmten Zeiten)
Wecker mit Smartphone-Steuerung
Zeitgestempelter Event-Rekorder
Nächste Schritte
Nach der Beherrschung des Bluetooth RTC Beispiels, versuchen Sie:
Bluetooth Monitor - Für textbasierte Statusanzeige mit Zeitstempeln
Bluetooth Table - Für strukturierte Daten mit Zeitfeldern
Bluetooth Chat - Für bidirektionale Kommunikation
Multiple Bluetooth Apps - RTC mit anderen Apps kombinieren
Sie können gerne den Link zu diesem Tutorial teilen. Bitte verwenden Sie jedoch unsere Inhalte nicht auf anderen Websites. Wir haben viel Mühe und Zeit in die Erstellung der Inhalte investiert, bitte respektieren Sie unsere Arbeit!