Dieses Tutorial zeigt Ihnen, wie Sie den ESP8266 verwenden, um Datum und Uhrzeit vom DS1307 RTC-Modul auszulesen. Im Detail werden wir lernen:
Wie man das DS1307 RTC-Modul mit dem ESP8266 verbindet.
Wie man den ESP8266 programmiert, um Datum und Uhrzeit (Sekunde, Minute, Stunde, Wochentag, Tag des Monats, Monat und Jahr) vom DS1307 RTC-Modul auszulesen.
Wie man den ESP8266 programmiert, um tägliche Zeitpläne mit dem DS1307 RTC-Modul zu erstellen.
Wie man den ESP8266 programmiert, um wöchentliche Zeitpläne mit dem DS1307 RTC-Modul zu erstellen.
Wie man den ESP8266 programmiert, um Zeitpläne an einem bestimmten Datum mit dem DS1307 RTC-Modul zu erstellen.
Offenlegung: Einige der in diesem Abschnitt bereitgestellten Links sind Amazon-Affiliate-Links. Wir können eine Provision für Käufe erhalten, die über diese Links getätigt werden, ohne zusätzliche Kosten für Sie. Wir schätzen Ihre Unterstützung.
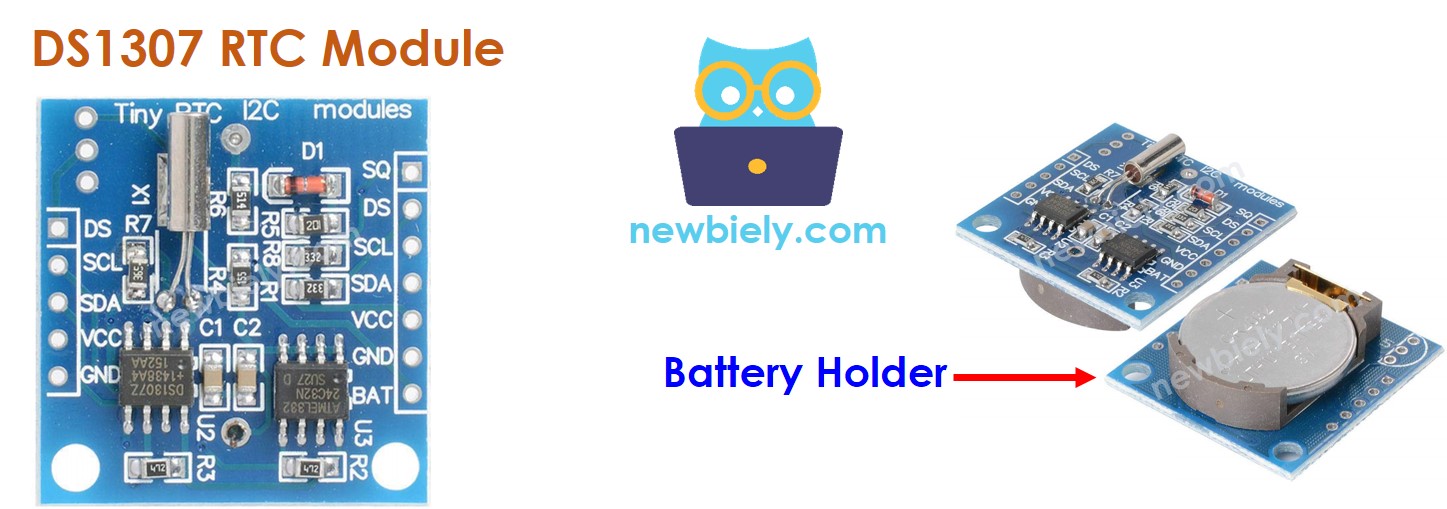
Über DS1307 Echtzeituhr-Modul
Der ESP8266 verfügt über bestimmte Funktionen im Zusammenhang mit der Zeit, zum Beispiel millis(), micros(). Diese können jedoch Datum und Uhrzeit (Sekunden, Minuten, Stunden, Tag, Datum, Monat und Jahr) nicht bereitstellen. Um Datum und Uhrzeit zu erhalten, muss ein RTC-Modul (Real-Time Clock) wie DS3231 oder DS1370 verwendet werden. Das DS3231-Modul hat eine höhere Genauigkeit als das DS1370. Für weitere Informationen siehe DS3231 vs DS1307.
Pinbelegung des DS1307 RTC-Moduls
Das DS1307-Echtzeituhr-Modul hat 12 Pins, aber für den normalen Betrieb benötigt es 4 Pins: VCC, GND, SDA und SCL.
Der SCL-Pin ist ein serieller Taktpin für die I2C-Schnittstelle.
Der SDA-Pin ist ein serieller Datenpin für die I2C-Schnittstelle.
Der VCC-Pin versorgt das Modul mit Strom. Er kann von 3,3 V bis 5,5 V reichen.
Der GND-Pin ist der Massepin.
Das DS1307-Modul hat ein Batteriefach, das die Zeit auf dem Modul beibehält, wenn eine CR2032-Batterie eingesetzt wird und die Hauptstromversorgung ausgeschaltet ist. Ohne die Batterie geht die Uhrzeit verloren, wenn die Hauptstromversorgung unterbrochen wird, und sie muss zurückgesetzt werden.
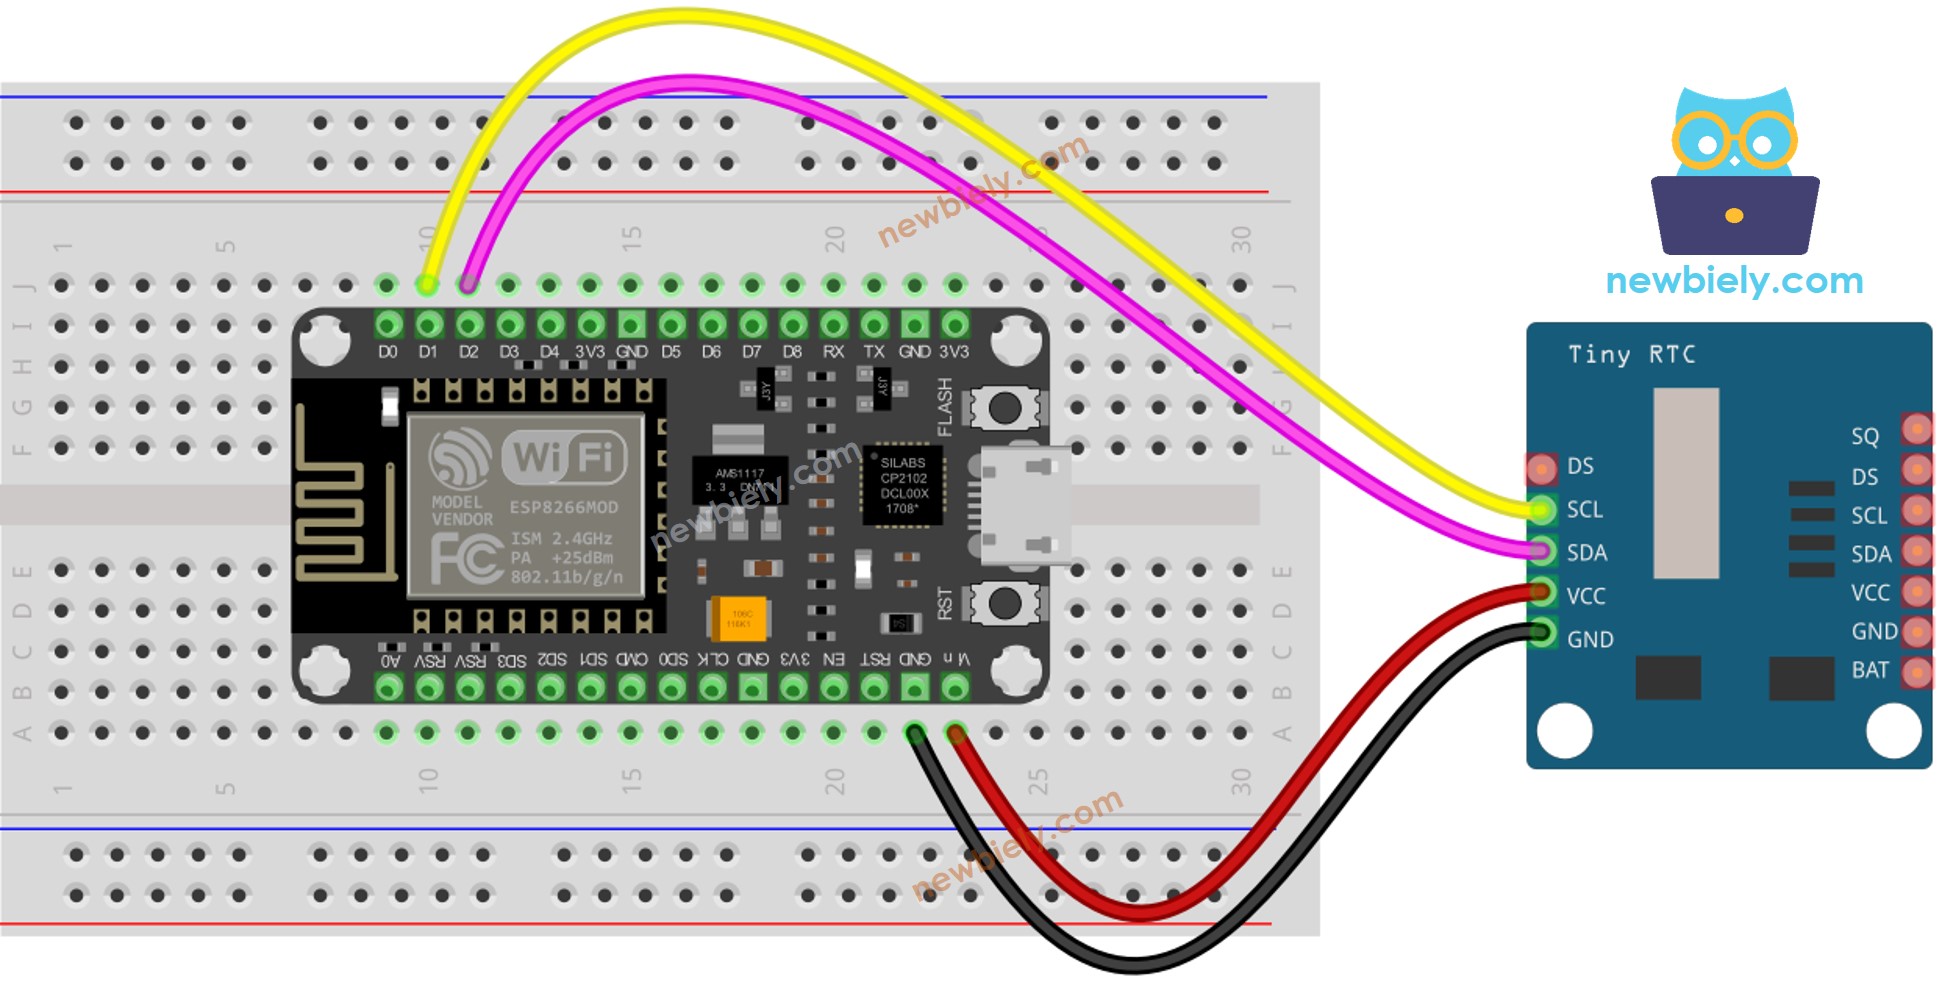
Verdrahtungsdiagramm
Dieses Bild wurde mit Fritzing erstellt. Klicken Sie, um das Bild zu vergrößern.
/* * Dieser ESP8266 NodeMCU Code wurde von newbiely.de entwickelt * Dieser ESP8266 NodeMCU Code wird der Öffentlichkeit ohne jegliche Einschränkung zur Verfügung gestellt. * Für vollständige Anleitungen und Schaltpläne besuchen Sie bitte: * https://newbiely.de/tutorials/esp8266/esp8266-ds1307-rtc-module*/#include <RTClib.h>RTC_DS1307 rtc;char daysOfTheWeek[7][12] = {"Sunday","Monday","Tuesday","Wednesday","Thursday","Friday","Saturday"};voidsetup () {Serial.begin(9600);// SETUP RTC MODULEif (! rtc.begin()) {Serial.println("Couldn't find RTC");Serial.flush();while (1); }// automatically sets the RTC to the date & time on PC this sketch was compiled rtc.adjust(DateTime(F(__DATE__), F(__TIME__)));// manually sets the RTC with an explicit date & time, for example to set// January 21, 2021 at 3am you would call:// rtc.adjust(DateTime(2021, 1, 21, 3, 0, 0));}voidloop () {DateTimenow = rtc.now();Serial.print("Date & Time: ");Serial.print(now.year(), DEC);Serial.print('/');Serial.print(now.month(), DEC);Serial.print('/');Serial.print(now.day(), DEC);Serial.print(" (");Serial.print(daysOfTheWeek[now.dayOfTheWeek()]);Serial.print(") ");Serial.print(now.hour(), DEC);Serial.print(':');Serial.print(now.minute(), DEC);Serial.print(':');Serial.println(now.second(), DEC);delay(1000); // delay 1 seconds}
Schnelle Schritte
Um mit dem ESP8266 in der Arduino-IDE zu beginnen, befolgen Sie diese Schritte:
Verbinde das ESP8266-Board über ein USB-Kabel mit deinem Computer.
Öffne die Arduino IDE auf deinem Computer.
Wähle das richtige ESP8266-Board aus, z. B. NodeMCU 1.0 (ESP-12E-Modul), und den entsprechenden COM-Port.
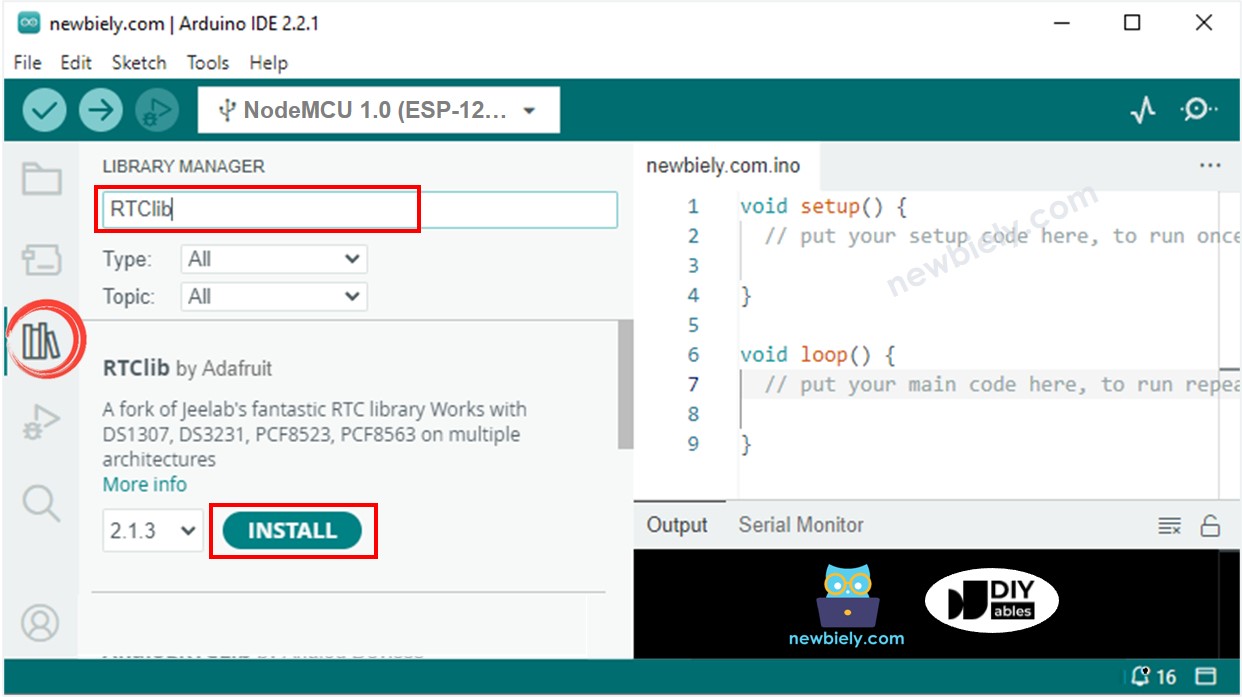
Klicke auf das Libraries-Symbol in der linken Leiste der Arduino IDE.
Suche nach “RTClib” und finde die RTC-Bibliothek von Adafruit.
Drücke den Install-Button, um die RTC-Bibliothek hinzuzufügen.
Kopiere den Code und öffne ihn in der Arduino IDE.
Klicke im Arduino IDE auf die Hochladen-Schaltfläche, um den Code zu kompilieren und auf den ESP8266 hochzuladen.
Öffne den Serial Monitor.
Sieh dir das Ergebnis im Serial Monitor an.
Newbiely | Arduino IDE 2.3.8
──
☐
✕
File
Edit
Sketch
Tools
Help
Nodemcu 1.0 (ESP-12E Module)
Newbiely.ino
···
8Serial.println("Hello World!");
Output
Serial Monitor
Message (Enter to send message to 'Nodemcu 1.0 (ESP-12E Module)' on 'COM15')
New Line
9600 baud
Date & Time: 2021/10/6 (Wednesday) 9:9:35
Date & Time: 2021/10/6 (Wednesday) 9:9:36
Date & Time: 2021/10/6 (Wednesday) 9:9:37
Date & Time: 2021/10/6 (Wednesday) 9:9:38
Date & Time: 2021/10/6 (Wednesday) 9:9:39
Date & Time: 2021/10/6 (Wednesday) 9:9:40
Date & Time: 2021/10/6 (Wednesday) 9:9:41
Date & Time: 2021/10/6 (Wednesday) 9:9:42
Date & Time: 2021/10/6 (Wednesday) 9:9:43
Date & Time: 2021/10/6 (Wednesday) 9:9:44
Ln 11, Col 1
Nodemcu 1.0 (ESP-12E Module) on COM15
2
ESP8266-Code – Wie man einen Tagesplan erstellt
/* * Dieser ESP8266 NodeMCU Code wurde von newbiely.de entwickelt * Dieser ESP8266 NodeMCU Code wird der Öffentlichkeit ohne jegliche Einschränkung zur Verfügung gestellt. * Für vollständige Anleitungen und Schaltpläne besuchen Sie bitte: * https://newbiely.de/tutorials/esp8266/esp8266-ds1307-rtc-module*/// Date and time functions using a DS1307 RTC connected via I2C and Wire lib#include <RTClib.h>// event from 13:50 to 14:10uint8_t DAILY_EVENT_START_HH = 13; // event start time: houruint8_t DAILY_EVENT_START_MM = 50; // event start time: minuteuint8_t DAILY_EVENT_END_HH = 14; // event end time: houruint8_t DAILY_EVENT_END_MM = 10; // event end time: minuteRTC_DS1307 rtc;char daysOfTheWeek[7][12] = {"Sunday","Monday","Tuesday","Wednesday","Thursday","Friday","Saturday"};voidsetup () {Serial.begin(9600);// SETUP RTC MODULEif (! rtc.begin()) {Serial.println("Couldn't find RTC");while (1); }// sets the RTC to the date & time on PC this sketch was compiled rtc.adjust(DateTime(F(__DATE__), F(__TIME__)));// sets the RTC with an explicit date & time, for example to set// January 21, 2021 at 3am you would call:// rtc.adjust(DateTime(2021, 1, 21, 3, 0, 0));}voidloop () {DateTimenow = rtc.now();if (now.hour() >= DAILY_EVENT_START_HH &&now.minute() >= DAILY_EVENT_START_MM &&now.hour() < DAILY_EVENT_END_HH &&now.minute() < DAILY_EVENT_END_MM) {Serial.println("It is on scheduled time");// TODO: write your code" } else {Serial.println("It is NOT on scheduled time"); } printTime(now);}void printTime(DateTime time) {Serial.print("TIME: ");Serial.print(time.year(), DEC);Serial.print('/');Serial.print(time.month(), DEC);Serial.print('/');Serial.print(time.day(), DEC);Serial.print(" (");Serial.print(daysOfTheWeek[time.dayOfTheWeek()]);Serial.print(") ");Serial.print(time.hour(), DEC);Serial.print(':');Serial.print(time.minute(), DEC);Serial.print(':');Serial.println(time.second(), DEC);}
ESP8266-Code – Wie man einen wöchentlichen Zeitplan erstellt
/* * Dieser ESP8266 NodeMCU Code wurde von newbiely.de entwickelt * Dieser ESP8266 NodeMCU Code wird der Öffentlichkeit ohne jegliche Einschränkung zur Verfügung gestellt. * Für vollständige Anleitungen und Schaltpläne besuchen Sie bitte: * https://newbiely.de/tutorials/esp8266/esp8266-ds1307-rtc-module*/// Date and time functions using a DS1307 RTC connected via I2C and Wire lib#include <RTClib.h>// UNCHANGABLE PARAMATERS#define SUNDAY 0#define MONDAY 1#define TUESDAY 2#define WEDNESDAY 3#define THURSDAY 4#define FRIDAY 5#define SATURDAY 6// event on Monday, from 13:50 to 14:10uint8_t WEEKLY_EVENT_DAY = MONDAY;uint8_t WEEKLY_EVENT_START_HH = 13; // event start time: houruint8_t WEEKLY_EVENT_START_MM = 50; // event start time: minuteuint8_t WEEKLY_EVENT_END_HH = 14; // event end time: houruint8_t WEEKLY_EVENT_END_MM = 10; // event end time: minuteRTC_DS1307 rtc;char daysOfTheWeek[7][12] = {"Sunday","Monday","Tuesday","Wednesday","Thursday","Friday","Saturday"};voidsetup () {Serial.begin(9600);// SETUP RTC MODULEif (! rtc.begin()) {Serial.println("Couldn't find RTC");while (1); }// sets the RTC to the date & time on PC this sketch was compiled rtc.adjust(DateTime(F(__DATE__), F(__TIME__)));// sets the RTC with an explicit date & time, for example to set// January 21, 2021 at 3am you would call:// rtc.adjust(DateTime(2021, 1, 21, 3, 0, 0));}voidloop () {DateTimenow = rtc.now();if (now.dayOfTheWeek() == WEEKLY_EVENT_DAY &&now.hour() >= WEEKLY_EVENT_START_HH &&now.minute() >= WEEKLY_EVENT_START_MM &&now.hour() < WEEKLY_EVENT_END_HH &&now.minute() < WEEKLY_EVENT_END_MM) {Serial.println("It is on scheduled time");// TODO: write your code" } else {Serial.println("It is NOT on scheduled time"); } printTime(now);}void printTime(DateTime time) {Serial.print("TIME: ");Serial.print(time.year(), DEC);Serial.print('/');Serial.print(time.month(), DEC);Serial.print('/');Serial.print(time.day(), DEC);Serial.print(" (");Serial.print(daysOfTheWeek[time.dayOfTheWeek()]);Serial.print(") ");Serial.print(time.hour(), DEC);Serial.print(':');Serial.print(time.minute(), DEC);Serial.print(':');Serial.println(time.second(), DEC);}
ESP8266-Code – Wie man einen Zeitplan an einem bestimmten Datum erstellt
/* * Dieser ESP8266 NodeMCU Code wurde von newbiely.de entwickelt * Dieser ESP8266 NodeMCU Code wird der Öffentlichkeit ohne jegliche Einschränkung zur Verfügung gestellt. * Für vollständige Anleitungen und Schaltpläne besuchen Sie bitte: * https://newbiely.de/tutorials/esp8266/esp8266-ds1307-rtc-module*/// Date and time functions using a DS1307 RTC connected via I2C and Wire lib#include <RTClib.h>// UNCHANGABLE PARAMATERS#define SUNDAY 0#define MONDAY 1#define TUESDAY 2#define WEDNESDAY 3#define THURSDAY 4#define FRIDAY 5#define SATURDAY 6#define JANUARY 1#define FEBRUARY 2#define MARCH 3#define APRIL 4#define MAY 5#define JUNE 6#define JULY 7#define AUGUST 8#define SEPTEMBER 9#define OCTOBER 10#define NOVEMBER 11#define DECEMBER 12// event from 13:50 August 15, 2021 to 14:10 September 29, 2021DateTime EVENT_START(2021, AUGUST, 15, 13, 50);DateTime EVENT_END(2021, SEPTEMBER, 29, 14, 10);RTC_DS1307 rtc;char daysOfTheWeek[7][12] = {"Sunday","Monday","Tuesday","Wednesday","Thursday","Friday","Saturday"};voidsetup () {Serial.begin(9600);// SETUP RTC MODULEif (! rtc.begin()) {Serial.println("Couldn't find RTC");Serial.flush();while (1); }// sets the RTC to the date & time on PC this sketch was compiled rtc.adjust(DateTime(F(__DATE__), F(__TIME__)));// sets the RTC with an explicit date & time, for example to set// January 21, 2021 at 3am you would call:// rtc.adjust(DateTime(2021, 1, 21, 3, 0, 0));}voidloop () {DateTimenow = rtc.now();if (now.secondstime() >= EVENT_START.secondstime() &&now.secondstime() < EVENT_END.secondstime()) {Serial.println("It is on scheduled time");// TODO: write your code" } else {Serial.println("It is NOT on scheduled time"); } printTime(now);}void printTime(DateTime time) {Serial.print("TIME: ");Serial.print(time.year(), DEC);Serial.print('/');Serial.print(time.month(), DEC);Serial.print('/');Serial.print(time.day(), DEC);Serial.print(" (");Serial.print(daysOfTheWeek[time.dayOfTheWeek()]);Serial.print(") ");Serial.print(time.hour(), DEC);Serial.print(':');Serial.print(time.minute(), DEC);Serial.print(':');Serial.println(time.second(), DEC);}
Video Tutorial
Wir erwägen die Erstellung von Video-Tutorials. Wenn Sie Video-Tutorials für wichtig halten, abonnieren Sie bitte unseren YouTube-Kanal , um uns zu motivieren, die Videos zu erstellen.
Sie können gerne den Link zu diesem Tutorial teilen. Bitte verwenden Sie jedoch unsere Inhalte nicht auf anderen Websites. Wir haben viel Mühe und Zeit in die Erstellung der Inhalte investiert, bitte respektieren Sie unsere Arbeit!