ESP8266 - Mini Mp3 Spieler

Der ESP8266 (NodeMCU, Wemos D1 Mini und ähnliche Platinen) ist ein beliebter WiFi-fähiger Mikrokontroller, der mit 3,3V läuft. Die Kombination mit dem DIYables Mini Mp3 Player-Modul ermöglicht ein WiFi-fähiges Audiogerät mit nur wenigen Drähten und einer Micro-SD-Karte.

In diesem Tutorial werden Sie:

ESP8266 NodeMCU Mini Mp3 Spieler

Erforderliche Komponenten

1×ESP8266 NodeMCU ESP-12E
1×Empfohlen: ESP8266 NodeMCU ESP-12E (Uno-form)
1×USB-Kabel Typ-C
1×DIYables Mini Mp3 Player-Modul
1×Micro SD-Karte
1×Lautsprecher
1×Steckbrett
1×Jumper-Kabel
1×(Empfohlen) Schraubklemmen-Erweiterungsboard für ESP8266
1×(Empfohlen) Stromverteiler für ESP8266 Typ-C

Oder Sie können die folgenden Kits kaufen:

1×DIYables Sensor-Kit (18 Sensoren/Displays)
Offenlegung: Einige der in diesem Abschnitt bereitgestellten Links sind Amazon-Affiliate-Links. Wir können eine Provision für Käufe erhalten, die über diese Links getätigt werden, ohne zusätzliche Kosten für Sie. Wir schätzen Ihre Unterstützung.

Kein Widerstand erforderlich. Der ESP8266 verwendet 3,3V-Logik — eine perfekte Übereinstimmung für das Modul.

Modulübersicht

Das DIYables Mini Mp3 Player-Modul umhüllt den YX5200-24SS mp3-Decoder-Chip. Es liest mp3-Dateien von einer Micro-SD-Karte und gibt Audio durch einen integrierten Verstärker (max. 3W-Lautsprecher) oder DAC-Pins für externe Verstärkung aus.

Sie steuern es über UART mit 9600 Baud. Der Funktionsumfang umfasst:

  • Abspielen, Pausieren, Fortsetzen, Stoppen, Weiter, Zurück
  • Lautstärkeregelung: 0 bis 30
  • 6 EQ-Voreinstellungen (Normal, Pop, Rock, Jazz, Klassik, Bass)
  • Eine Spur wiederholen, einen Ordner wiederholen, alle wiederholen oder Zufallsmodus
  • Aus nummerierten Ordnern abspielen
  • Werbungsunterbrechungen
  • Statusabfragen (aktueller Titel, Lautstärke, Wiedergabezustand)
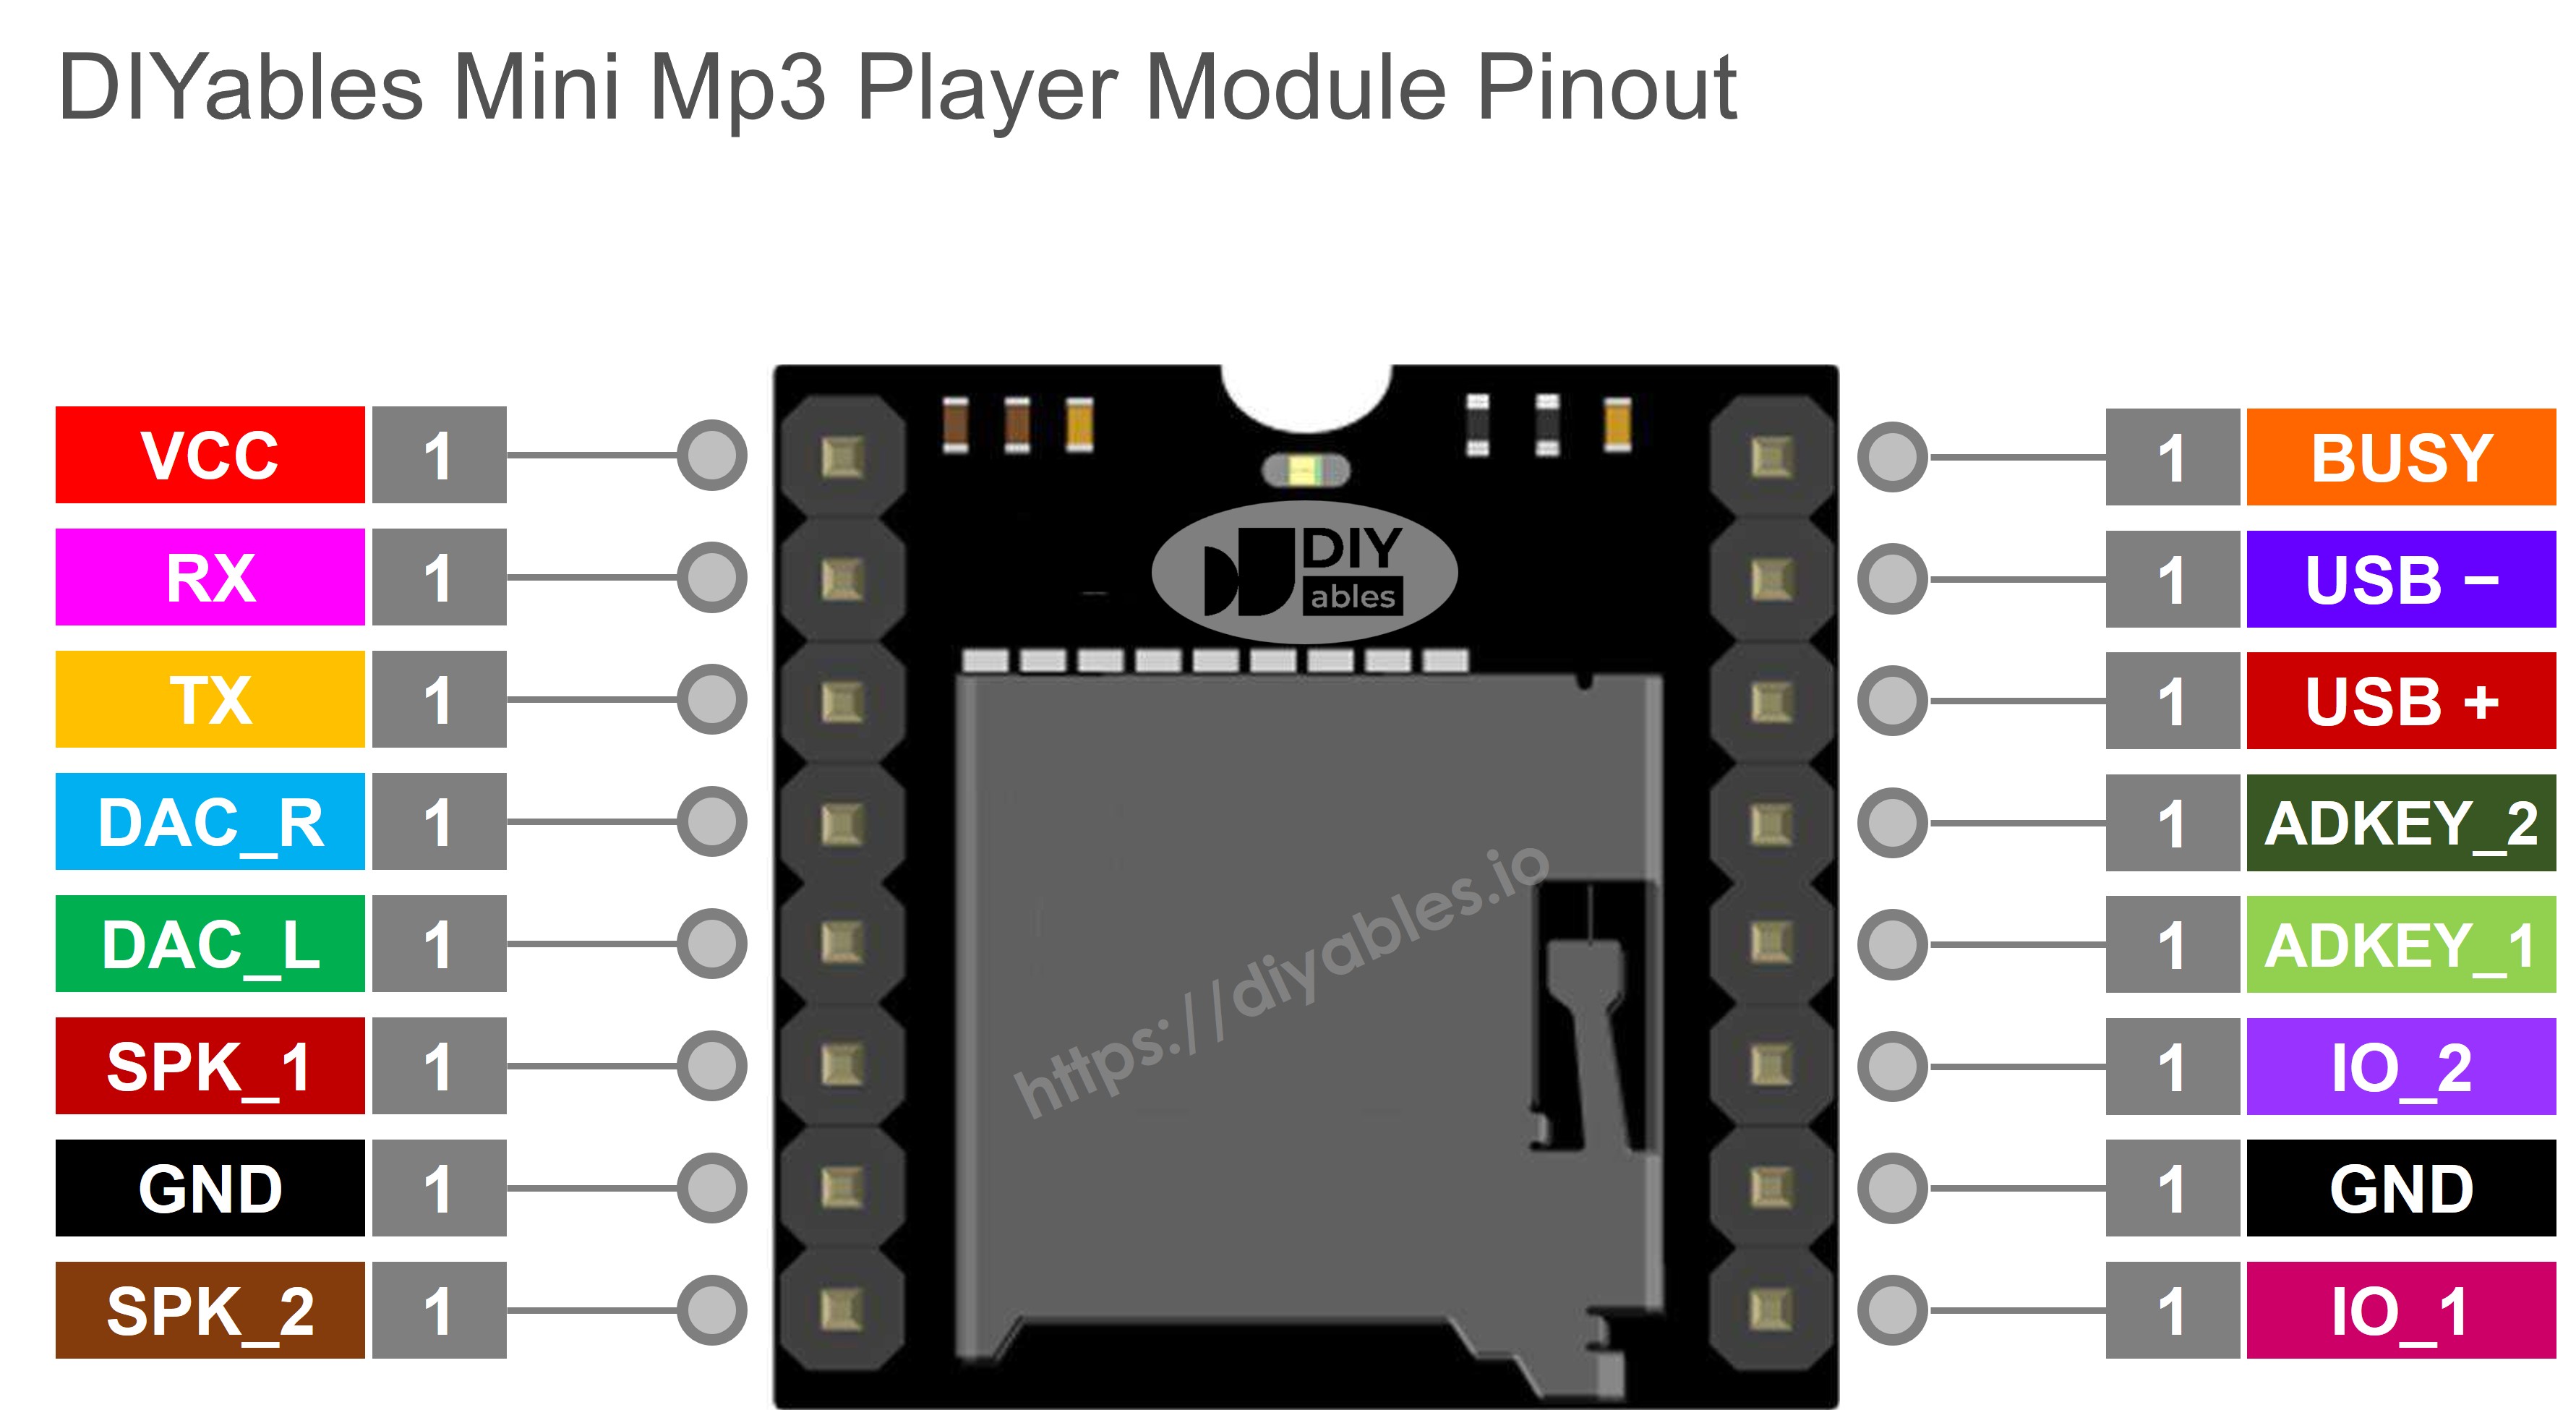
Modulstifte

Stift Beschreibung
VCC 3,2V – 5,0V Stromversorgung
GND Masse
RX Serieller Eingang von ESP8266 TX
TX Serieller Ausgang zu ESP8266 RX
SPK_1 Lautsprecher + (integrierter Verstärker, max. 3W)
SPK_2 Lautsprecher −
DAC_R Rechter Line-Level-Ausgang
DAC_L Linker Line-Level-Ausgang
BUSY LOW während der Wiedergabe
IO_1 Kurzdruck = zurück, Langdruck = Lautstärke−
IO_2 Kurzdruck = weiter, Langdruck = Lautstärke+
Mini Mp3 Player Pinbelegung

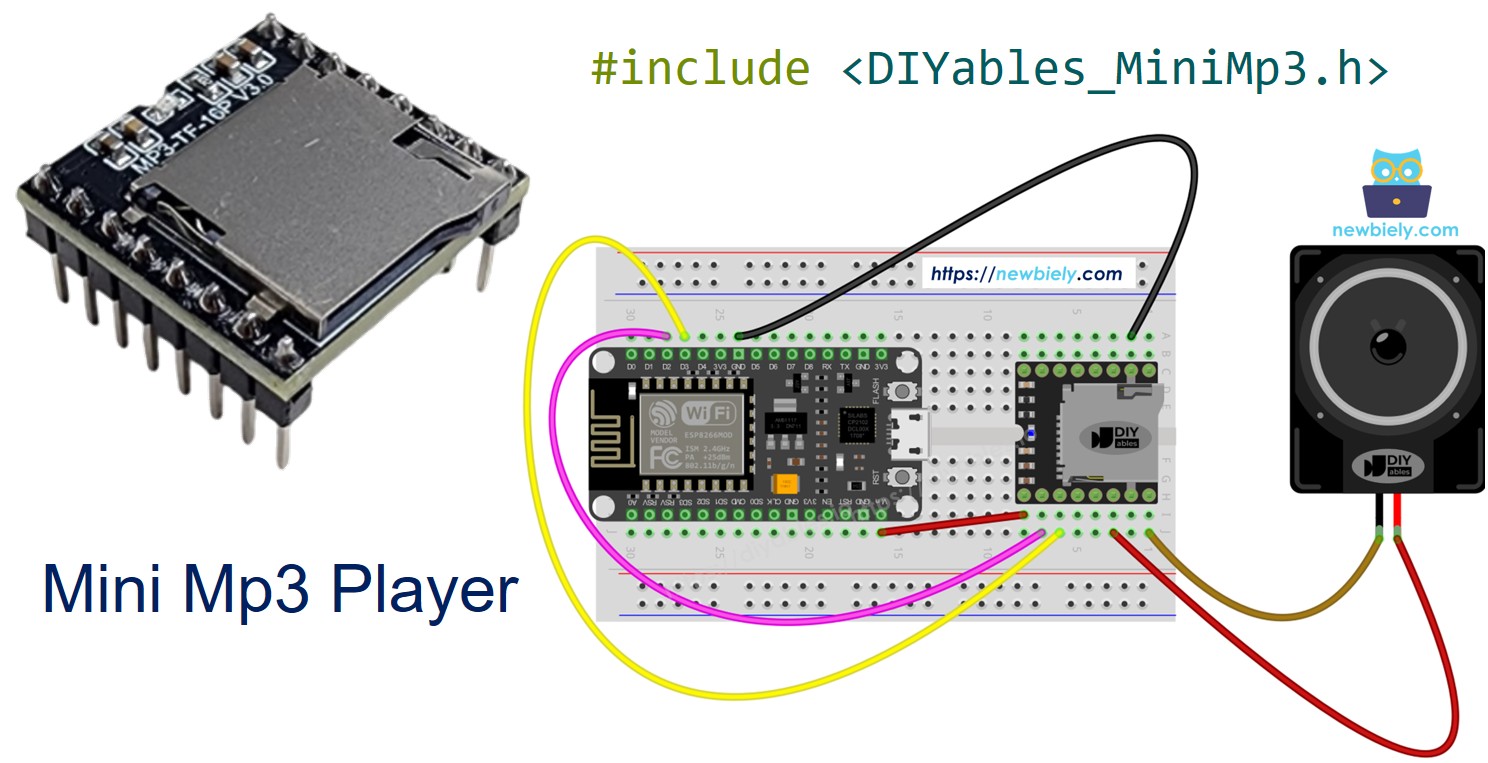
Verdrahtung auf ESP8266

Der ESP8266 hat nur eine Hardware-UART, die von der USB-Seriellbrücke verwendet wird. Für das mp3-Modul verwenden wir SoftwareSerial auf zwei verfügbaren GPIO-Pins.

Mini Mp3 Player ESP8266 (NodeMCU) Bemerkungen
VCC 3.3V
GND GND
RX D7 (GPIO 13) Kein Widerstand — bereits 3,3V
TX D5 (GPIO 14)
SPK_1 Lautsprecher +
SPK_2 Lautsprecher −
Verdrahtungsschema ESP8266 NodeMCU Mini Mp3 Player

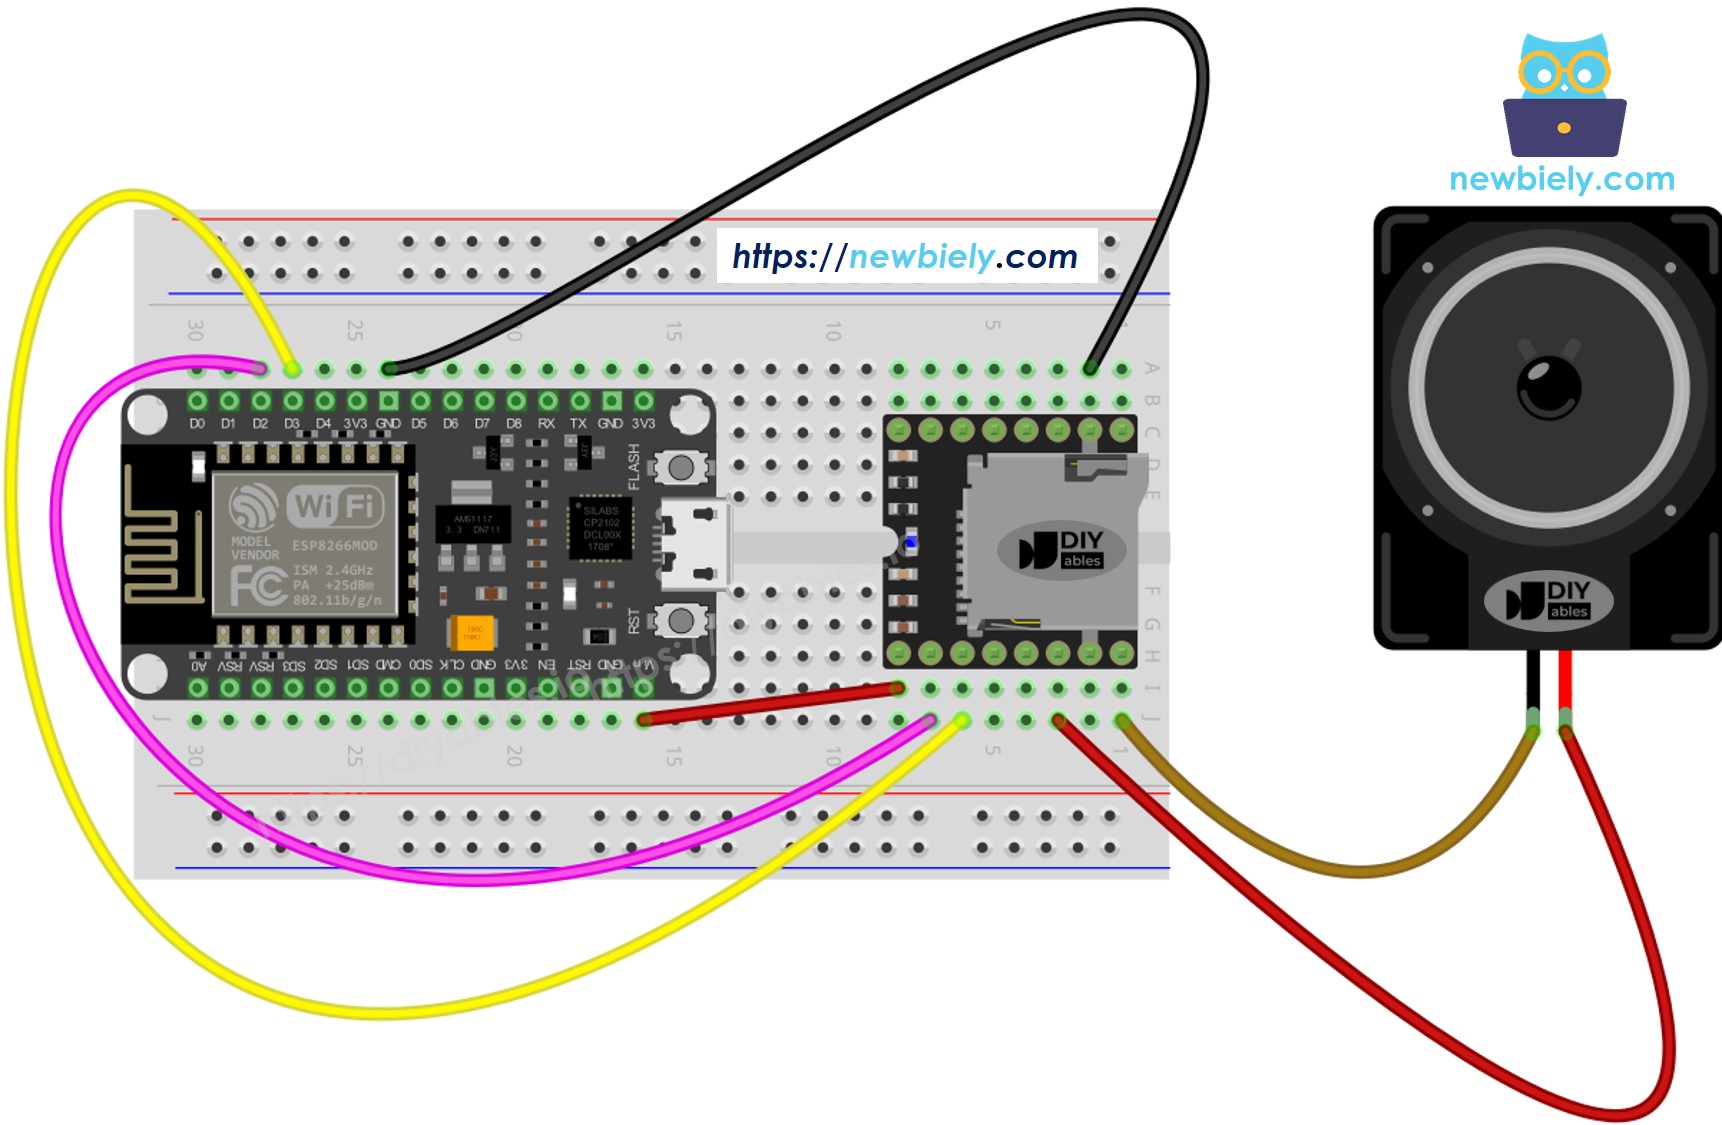
Dieses Bild wurde mit Fritzing erstellt. Klicken Sie, um das Bild zu vergrößern.

Weitere Informationen finden Sie unter ESP8266-Pinbelegung und wie man ESP8266 und andere Komponenten mit Strom versorgt.

Vermeiden Sie GPIO 0, 2 und 15 für die mp3-Serienleitungen — diese Stifte beeinflussen das Startverhalten. D5 und D7 sind sichere Universaleingabe-/Ausgangsstifte.

Vorbereitung Ihrer SD-Karte

  1. Formatieren Sie als FAT16 oder FAT32.
  2. Fügen Sie mp3-Dateien mit nullgefüllten Namen hinzu:
/001.mp3 /002.mp3 /003.mp3
  1. Für Ordner:
/01/001.mp3 /01/002.mp3 /02/001.mp3

Dinge, die zu beachten sind:

  • Die Nummerierung beginnt bei 1, nicht bei 0.
  • Die Titelreihenfolge hängt von der Kopierreihenfolge ab, nicht von den Dateinamen. Formatieren Sie zuerst, dann kopieren Sie Dateien einzeln.
  • Ordner: 01–99. Dateien in Ordnern: 001–255.

Installieren der Bibliothek

  • Verbinden Sie den ESP8266 über USB mit Ihrem Computer.
  • In der Arduino IDE wählen Sie Ihre Platine (z. B. NodeMCU 1.0) und den Port aus.
  • Gehen Sie zu Bibliotheken in der Seitenleiste.
  • Suchen Sie "DIYables_MiniMp3" und installieren Sie sie.
ESP8266 NodeMCU Mini Mp3 Player-Bibliothek

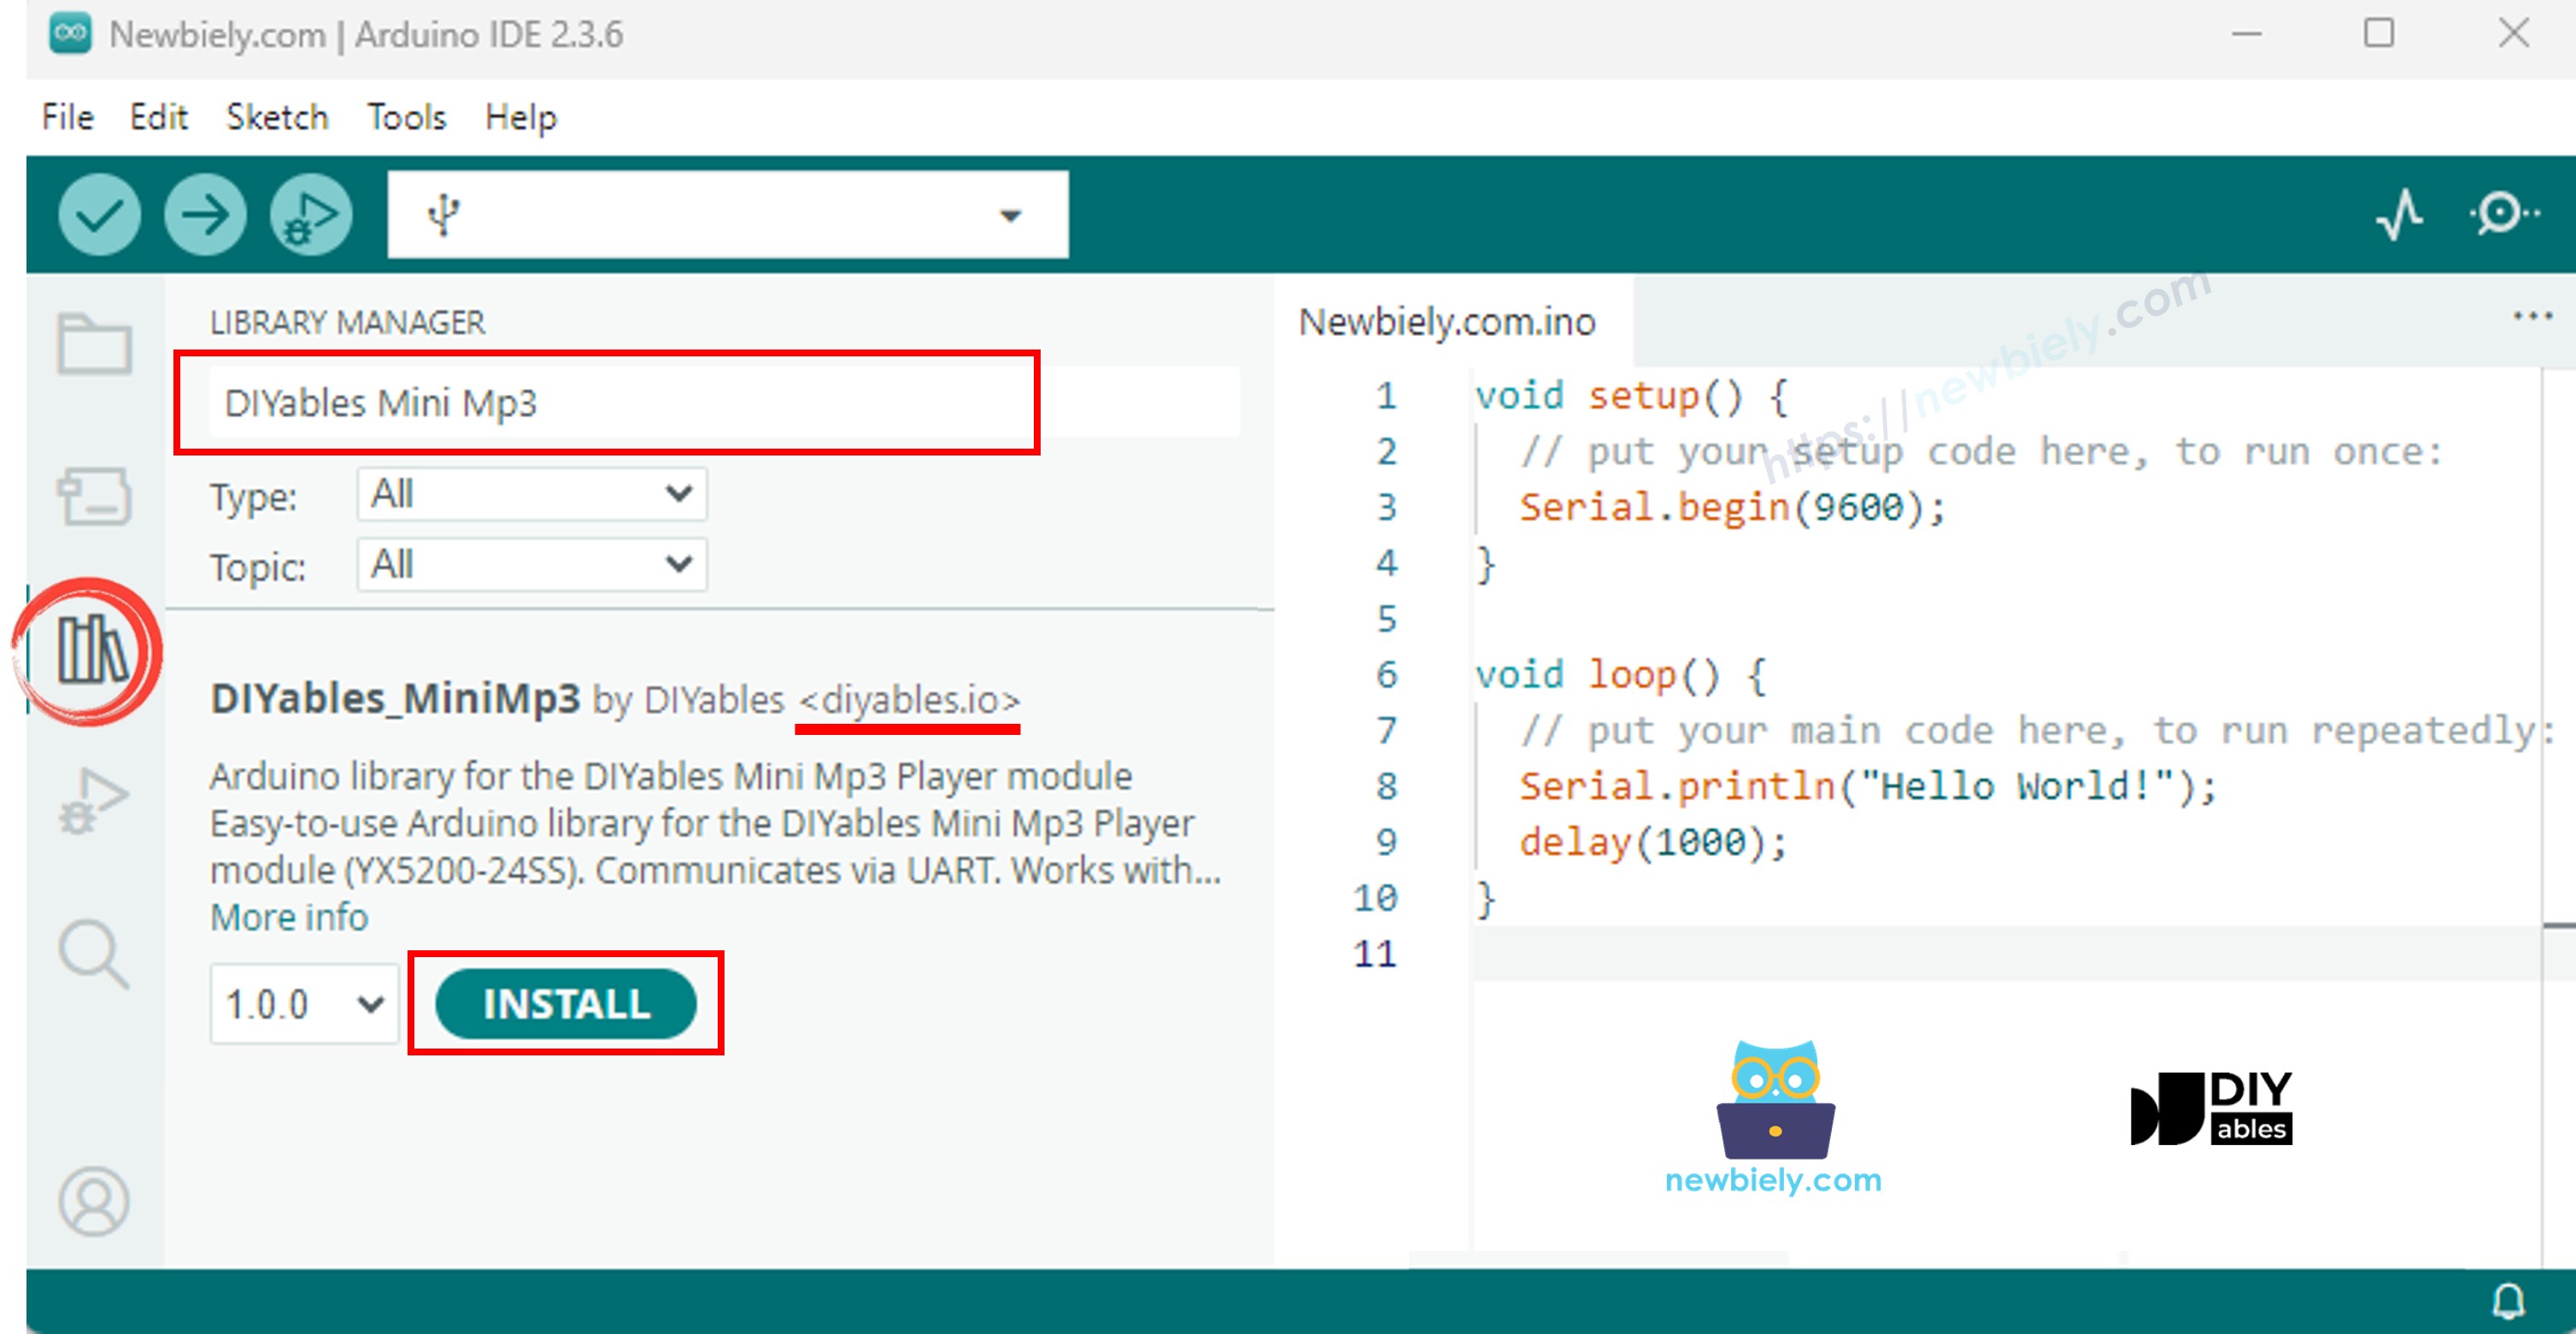
Keine anderen Bibliotheken sind erforderlich.

Grundmuster für Code

#include <DIYables_MiniMp3.h> #include <SoftwareSerial.h> SoftwareSerial mp3Serial(D5, D7); // RX=D5(GPIO14), TX=D7(GPIO13) DIYables_MiniMp3 mp3; void setup() { Serial.begin(115200); mp3Serial.begin(9600); mp3.begin(mp3Serial); delay(1000); // Module startup time mp3.setVolume(25); } void loop() { // Your code here }

Die ESP8266 SoftwareSerial-Bibliothek funktioniert zuverlässig bei 9600 Baud. Rufen Sie nach begin() immer delay(1000) auf, um das Modul initialisieren zu lassen.

ESP8266 Code — Eine Spur abspielen

/* * DIYables Mini Mp3 Player - Play One Track * * Product: DIYables Mini Mp3 Player Module * https://diyables.io/products/mini-mp3-player-module * * Plays track 001 once, then stops. * * Wiring Table: * Mini Mp3 RX -> ESP8266 Pin D2 * Mini Mp3 TX -> ESP8266 Pin D3 * Mini Mp3 VCC -> 5V * Mini Mp3 GND -> GND * Speaker connected to SPK_1 and SPK_2 pins * * SD Card: Put mp3 files in root, named 001.mp3, 002.mp3, etc. */ #include <DIYables_MiniMp3.h> #include <SoftwareSerial.h> SoftwareSerial mp3Serial(D3, D2); // RX, TX DIYables_MiniMp3 mp3; void setup() { Serial.begin(9600); mp3Serial.begin(9600); mp3.begin(mp3Serial); delay(1000); // Wait for the module to initialize mp3.setVolume(25); // Set volume (0 to 30) Serial.println("Playing track 1..."); mp3.play(1); // Play track 001.mp3 } void loop() { // Nothing to do here }

Erste Schritte

  • Bereiten Sie die SD-Karte vor, fügen Sie sie ein und verdrahten Sie das Modul wie gezeigt.
  • Öffnen Sie die Arduino IDE, wählen Sie Ihre ESP8266-Platine aus und laden Sie sie hoch.
  • Titel 001.mp3 wird sofort abgespielt.

Transportsteuerelemente

Funktion Erklärung Code
play(n) Titel n starten mp3.play(1)
playNext() Vorwärts überspringen mp3.playNext()
playPrevious() Rückwärts überspringen mp3.playPrevious()
pause() Ausgabe pausieren mp3.pause()
resume() Pausierte Spur fortsetzen mp3.resume()
stop() Wiedergabe beenden mp3.stop()

ESP8266 Code — Mehrere Spuren

/* * DIYables Mini Mp3 Player - Play Multiple Tracks * * Product: DIYables Mini Mp3 Player Module * https://diyables.io/products/mini-mp3-player-module * * Plays tracks one after another with a delay between them. * * Wiring Table: * Mini Mp3 RX -> ESP8266 Pin D2 * Mini Mp3 TX -> ESP8266 Pin D3 * Mini Mp3 VCC -> 5V * Mini Mp3 GND -> GND * Speaker connected to SPK_1 and SPK_2 pins * * SD Card: Put mp3 files in root, named 001.mp3, 002.mp3, 003.mp3 */ #include <DIYables_MiniMp3.h> #include <SoftwareSerial.h> SoftwareSerial mp3Serial(D3, D2); // RX, TX DIYables_MiniMp3 mp3; int currentTrack = 1; int totalTracks = 3; // Change this to match your SD card unsigned long lastTrackTime = 0; unsigned long trackDuration = 5000; // Wait 5 seconds between tracks (adjust as needed) void setup() { Serial.begin(9600); mp3Serial.begin(9600); mp3.begin(mp3Serial); delay(1000); mp3.setVolume(20); Serial.println("Playing track 1..."); mp3.play(currentTrack); lastTrackTime = millis(); } void loop() { // After trackDuration, play the next track if (millis() - lastTrackTime >= trackDuration) { currentTrack++; if (currentTrack > totalTracks) currentTrack = 1; // Loop back to first track Serial.print("Playing track "); Serial.println(currentTrack); mp3.play(currentTrack); lastTrackTime = millis(); } }

ESP8266 Code — Lautstärkenschaltflächen

/* * DIYables Mini Mp3 Player - Volume Control * * Product: DIYables Mini Mp3 Player Module * https://diyables.io/products/mini-mp3-player-module * * Use two buttons to increase/decrease the volume. * Press button on pin D5 to volume up, pin D6 to volume down. * * Wiring Table: * Mini Mp3 RX -> ESP8266 Pin D2 * Mini Mp3 TX -> ESP8266 Pin D3 * Mini Mp3 VCC -> 5V * Mini Mp3 GND -> GND * Speaker connected to SPK_1 and SPK_2 pins * Button UP -> Pin D5 (other leg to GND) * Button DOWN -> Pin D6 (other leg to GND) * * SD Card: Put mp3 files in root, named 001.mp3, 002.mp3, etc. */ #include <DIYables_MiniMp3.h> #include <SoftwareSerial.h> SoftwareSerial mp3Serial(D3, D2); // RX, TX DIYables_MiniMp3 mp3; const int BUTTON_VOL_UP = D5; const int BUTTON_VOL_DOWN = D6; int volume = 15; // Start at half volume void setup() { Serial.begin(9600); mp3Serial.begin(9600); pinMode(BUTTON_VOL_UP, INPUT_PULLUP); pinMode(BUTTON_VOL_DOWN, INPUT_PULLUP); mp3.begin(mp3Serial); delay(1000); mp3.setVolume(volume); mp3.loopTrack(1); // Play track 1 on repeat Serial.print("Volume: "); Serial.println(volume); } void loop() { // Volume Up button (pressed = LOW because of INPUT_PULLUP) if (digitalRead(BUTTON_VOL_UP) == LOW) { if (volume < 30) { volume++; mp3.setVolume(volume); Serial.print("Volume: "); Serial.println(volume); } delay(200); // Simple debounce } // Volume Down button if (digitalRead(BUTTON_VOL_DOWN) == LOW) { if (volume > 0) { volume--; mp3.setVolume(volume); Serial.print("Volume: "); Serial.println(volume); } delay(200); // Simple debounce } }

Lautstärkeregelung

Funktion Was es tut Code
setVolume(v) Auf eine bestimmte Stufe einstellen mp3.setVolume(20)
volumeUp() Um eins erhöhen mp3.volumeUp()
volumeDown() Um eins verringern mp3.volumeDown()
getVolume() Aktuelle Lautstärke lesen mp3.getVolume()

ESP8266 Code — Weiter/Zurück

/* * DIYables Mini Mp3 Player - Next/Previous with Buttons * * Product: DIYables Mini Mp3 Player Module * https://diyables.io/products/mini-mp3-player-module * * Use two buttons to play next/previous tracks. * Displays the current track number on the Serial Monitor. * * Wiring Table: * Mini Mp3 RX -> ESP8266 Pin D2 * Mini Mp3 TX -> ESP8266 Pin D3 * Mini Mp3 VCC -> 5V * Mini Mp3 GND -> GND * Speaker connected to SPK_1 and SPK_2 pins * Button NEXT -> Pin D5 (other leg to GND) * Button PREV -> Pin D6 (other leg to GND) * * SD Card: Put mp3 files in root, named 001.mp3, 002.mp3, etc. */ #include <DIYables_MiniMp3.h> #include <SoftwareSerial.h> SoftwareSerial mp3Serial(D3, D2); // RX, TX DIYables_MiniMp3 mp3; const int BUTTON_NEXT = D5; const int BUTTON_PREV = D6; void setup() { Serial.begin(9600); mp3Serial.begin(9600); pinMode(BUTTON_NEXT, INPUT_PULLUP); pinMode(BUTTON_PREV, INPUT_PULLUP); mp3.begin(mp3Serial); delay(1000); mp3.setVolume(20); mp3.play(1); // Start with track 1 Serial.println("Press NEXT or PREV button to change track"); } void loop() { if (digitalRead(BUTTON_NEXT) == LOW) { Serial.println("Next track"); mp3.playNext(); delay(300); // Simple debounce } if (digitalRead(BUTTON_PREV) == LOW) { Serial.println("Previous track"); mp3.playPrevious(); delay(300); // Simple debounce } }

ESP8266 Code — Pausieren/Fortsetzen

/* * DIYables Mini Mp3 Player - Pause and Resume * * Product: DIYables Mini Mp3 Player Module * https://diyables.io/products/mini-mp3-player-module * * Demonstrates pausing and resuming playback using a single button. * Press the button to toggle between pause and resume. * * Wiring Table: * Mini Mp3 RX -> ESP8266 Pin D2 * Mini Mp3 TX -> ESP8266 Pin D3 * Mini Mp3 VCC -> 5V * Mini Mp3 GND -> GND * Speaker connected to SPK_1 and SPK_2 pins * Button -> Pin D5 (other leg to GND) * * SD Card: Put mp3 files in root, named 001.mp3, 002.mp3, etc. */ #include <DIYables_MiniMp3.h> #include <SoftwareSerial.h> SoftwareSerial mp3Serial(D3, D2); // RX, TX DIYables_MiniMp3 mp3; const int BUTTON_PIN = D5; bool paused = false; void setup() { Serial.begin(9600); mp3Serial.begin(9600); pinMode(BUTTON_PIN, INPUT_PULLUP); mp3.begin(mp3Serial); delay(1000); mp3.setVolume(20); mp3.play(1); Serial.println("Playing. Press button to pause/resume."); } void loop() { if (digitalRead(BUTTON_PIN) == LOW) { if (paused) { mp3.resume(); Serial.println("Resumed"); } else { mp3.pause(); Serial.println("Paused"); } paused = !paused; delay(300); // Simple debounce } }

ESP8266 Code — Eine Spur wiederholen

/* * DIYables Mini Mp3 Player - Loop Track * * Product: DIYables Mini Mp3 Player Module * https://diyables.io/products/mini-mp3-player-module * * Loops (repeats) a track continuously with EQ setting. * * Wiring Table: * Mini Mp3 RX -> ESP8266 Pin D2 * Mini Mp3 TX -> ESP8266 Pin D3 * Mini Mp3 VCC -> 5V * Mini Mp3 GND -> GND * Speaker connected to SPK_1 and SPK_2 pins * * SD Card file structure: * /001.mp3 * /002.mp3 * ... */ #include <DIYables_MiniMp3.h> #include <SoftwareSerial.h> SoftwareSerial mp3Serial(D3, D2); // RX, TX DIYables_MiniMp3 mp3; void setup() { Serial.begin(9600); mp3Serial.begin(9600); mp3.begin(mp3Serial); delay(1000); // Wait for the module to initialize mp3.setVolume(25); // Volume: 0 to 30 mp3.setEQ(DIYables_MiniMp3::EQ_NORMAL); Serial.println("Playing track 1 on loop..."); mp3.loopTrack(1); } void loop() { // Your code here }

Schleife & Zufallsmodus

Funktion Verhalten Code
loopTrack(n) Eine Spur wiederholen mp3.loopTrack(1)
loopFolder(f) Ordnerinhalt wiederholen mp3.loopFolder(1)
loopAll() Alles wiederholen mp3.loopAll()
stopLoop() Schleifenbildung abbrechen mp3.stopLoop()
shuffle() Zufallsreihenfolge mp3.shuffle()

ESP8266 Code — Ordnerwiedergabe

/* * DIYables Mini Mp3 Player - Play from Folder * * Product: DIYables Mini Mp3 Player Module * https://diyables.io/products/mini-mp3-player-module * * Plays tracks from specific folders on the SD card. * * Wiring Table: * Mini Mp3 RX -> ESP8266 Pin D2 * Mini Mp3 TX -> ESP8266 Pin D3 * Mini Mp3 VCC -> 5V * Mini Mp3 GND -> GND * Speaker connected to SPK_1 and SPK_2 pins * * SD Card file structure: * /01/001.mp3 <- playFolder(1, 1) * /01/002.mp3 <- playFolder(1, 2) * /02/001.mp3 <- playFolder(2, 1) * /02/002.mp3 <- playFolder(2, 2) * * IMPORTANT: * - Numbering starts from 1, NOT 0 * - Folder names must be 2-digit zero-padded (01-99) * - Track names must be 3-digit zero-padded (001-255) * - Format SD card as FAT32, then copy files one by one in order * - Track order is determined by the order files were copied, * NOT by filename. So copy them in the correct sequence. */ #include <DIYables_MiniMp3.h> #include <SoftwareSerial.h> SoftwareSerial mp3Serial(D3, D2); // RX, TX DIYables_MiniMp3 mp3; void setup() { Serial.begin(9600); mp3Serial.begin(9600); mp3.begin(mp3Serial); delay(1000); mp3.setVolume(20); // Play track 1 from folder 01 Serial.println("Playing folder 01, track 001..."); mp3.playFolder(1, 1); delay(5000); // Play track 2 from folder 01 Serial.println("Playing folder 01, track 002..."); mp3.playFolder(1, 2); delay(5000); // Play track 1 from folder 02 Serial.println("Playing folder 02, track 001..."); mp3.playFolder(2, 1); } void loop() { // Nothing to do here }

Ordnerfunktionen

Funktion Verwendung Code
playFolder(f, t) Ordner f, Titel t mp3.playFolder(1, 1)
playLargeFolder(f, t) Großer Ordnermodus mp3.playLargeFolder(1, 500)
playFromMP3Folder(t) /mp3-Ordner mp3.playFromMP3Folder(1)

ESP8266 Code — Serielle Monitorsteuerung

/* * DIYables Mini Mp3 Player - Serial Command Control * * Product: DIYables Mini Mp3 Player Module * https://diyables.io/products/mini-mp3-player-module * * Control the Mp3 player by typing commands in the Serial Monitor. * Great for testing all functions without extra hardware. * * Commands (type in Serial Monitor, then press Enter): * 1-9 Play track 1 to 9 * + Volume up * - Volume down * p Pause * r Resume * s Stop * n Next track * b Previous track (back) * ? Show current status * * Wiring Table: * Mini Mp3 RX -> ESP8266 Pin D2 * Mini Mp3 TX -> ESP8266 Pin D3 * Mini Mp3 VCC -> 5V * Mini Mp3 GND -> GND * Speaker connected to SPK_1 and SPK_2 pins * * SD Card: Put mp3 files in root, named 001.mp3, 002.mp3, etc. */ #include <DIYables_MiniMp3.h> #include <SoftwareSerial.h> SoftwareSerial mp3Serial(D3, D2); // RX, TX DIYables_MiniMp3 mp3; void setup() { Serial.begin(9600); mp3Serial.begin(9600); mp3.begin(mp3Serial); delay(1000); mp3.setVolume(20); Serial.println("=== DIYables Mini Mp3 Player ==="); Serial.println("Commands:"); Serial.println(" 1-9 Play track number"); Serial.println(" + Volume up"); Serial.println(" - Volume down"); Serial.println(" p Pause"); Serial.println(" r Resume"); Serial.println(" s Stop"); Serial.println(" n Next track"); Serial.println(" b Previous track"); Serial.println(" ? Show status"); Serial.println("================================"); } void loop() { if (Serial.available()) { char cmd = Serial.read(); switch (cmd) { case '1': case '2': case '3': case '4': case '5': case '6': case '7': case '8': case '9': Serial.print("Playing track "); Serial.println(cmd - '0'); mp3.play(cmd - '0'); break; case '+': Serial.println("Volume up"); mp3.volumeUp(); break; case '-': Serial.println("Volume down"); mp3.volumeDown(); break; case 'p': Serial.println("Paused"); mp3.pause(); break; case 'r': Serial.println("Resumed"); mp3.resume(); break; case 's': Serial.println("Stopped"); mp3.stop(); break; case 'n': Serial.println("Next track"); mp3.playNext(); break; case 'b': Serial.println("Previous track"); mp3.playPrevious(); break; case '?': { Serial.println("--- Status ---"); int16_t vol = mp3.getVolume(); Serial.print("Volume: "); Serial.println(vol); int16_t track = mp3.getCurrentTrack(); Serial.print("Current track: "); Serial.println(track); bool playing = mp3.isPlaying(); Serial.print("Playing: "); Serial.println(playing ? "Yes" : "No"); int16_t total = mp3.getTrackCount(); Serial.print("Total tracks: "); Serial.println(total); Serial.println("--------------"); break; } default: break; } } }

Equalizer-Voreinstellungen

Konstante Wert Soundprofil
DIYables_MiniMp3::EQ_NORMAL 0 Flach
DIYables_MiniMp3::EQ_POP 1 Pop
DIYables_MiniMp3::EQ_ROCK 2 Rock
DIYables_MiniMp3::EQ_JAZZ 3 Jazz
DIYables_MiniMp3::EQ_CLASSIC 4 Klassik
DIYables_MiniMp3::EQ_BASS 5 Bass schwer
mp3.setEQ(DIYables_MiniMp3::EQ_NORMAL);

Modulstatus lesen

Jede Abfrage blockiert (bis zu 100 ms). Gibt −1 bei Fehler zurück.

Funktion Gibt zurück Bedeutung
isPlaying() bool wahr = Audio aktiv
getVolume() int16_t 0–30
getEQ() int16_t 0–5
getTrackCount() int16_t Alle Titel auf der Karte
getCurrentTrack() int16_t Aktuelle Titelnummer
getFolderCount() int16_t Ordneranzahl
getTrackCountInFolder(f) int16_t Titel in Ordner f

※ UNSERE NACHRICHTEN

  • Sie können gerne den Link zu diesem Tutorial teilen. Bitte verwenden Sie jedoch unsere Inhalte nicht auf anderen Websites. Wir haben viel Mühe und Zeit in die Erstellung der Inhalte investiert, bitte respektieren Sie unsere Arbeit!