ESP32 - SSD1309 OLED Display 128x64 | 2,42 Zoll I2C OLED Anleitung
Ein OLED (Organic Light-Emitting Diode) Display bietet selbstleuchtende Pixel, die tiefe Schwarztöne, hohen Kontrast und weite Betrachtungswinkel liefern — eine großartige Verbesserung gegenüber herkömmlichen LCDs. Der SSD1309 ist der Treiber-IC, der häufig auf 2,42-Zoll (manchmal als 2,4-Zoll bezeichnet) 128×64 I2C OLED Modulen zu finden ist.
In dieser Schritt-für-Schritt-Anleitung lernen Sie, wie Sie das SSD1309 OLED 128×64 mit einem ESP32 Board unter Verwendung der DIYables_OLED_SSD1309 Bibliothek verbinden und programmieren. Konkret behandeln wir:
- Verkabelung des 2,42-Zoll SSD1309 OLED mit ESP32 über I2C
- Anzeige von Text und Zahlen auf dem Bildschirm
- Zentrieren von Text sowohl vertikal als auch horizontal
- Zeichnen geometrischer Formen (Linien, Rechtecke, Kreise, Dreiecke, abgerundete Rechtecke)
- Darstellen monochromer Bitmap-Bilder
- Hardware-Scrolling in vier Richtungen
- Anpassen von Kontrast und Dimmen des Displays
- Verwendung benutzerdefinierter externer Schriftarten aus der Adafruit GFX Schriftsammlung
Benötigte Hardware
Oder Sie können die folgenden Kits kaufen:
| 1 | × | DIYables ESP32 Starter-Kit (ESP32 enthalten) | |
| 1 | × | DIYables Sensor-Kit (18 Sensoren/Displays) |
Über das SSD1309 2,42-Zoll OLED Display
Der SSD1309 ist ein Single-Chip CMOS OLED Treiber-IC, der für 128×64 Dot-Matrix-Panels entwickelt wurde. Er ist register-kompatibel mit dem weit verbreiteten SSD1306, sodass viele bestehende Code-Beispiele mit minimalen Änderungen übertragen werden können. Die wichtigsten Hardware-Unterschiede sind:
- Keine eingebaute Charge Pump — der SSD1309 benötigt eine externe VCC-Schiene, obwohl praktisch alle Breakout-Boards (einschließlich 2,42-Zoll und 2,4-Zoll Module) mit einem integrierten Boost-Converter geliefert werden, sodass dies für Sie transparent ist.
- Höhere Spannungstoleranz — der SSD1309 akzeptiert bis zu 16 V VCC, während der SSD1306 auf etwa 4,2 V begrenzt ist.
Das 2,42-Zoll (2,4-Zoll) OLED Modul verwendet häufig den SSD1309 Treiber und verfügt über eine 128×64 Pixel Auflösung mit I2C Schnittstelle. Die Panel-Farbe (weiß, blau, gelb, grün oder zweizonal) wird durch das physikalische OLED Material bestimmt und ist nicht softwaresteuerbar.
Diese Anleitung kommuniziert mit dem Display über den I2C Bus, der nur zwei Signalleitungen (SDA und SCL) benötigt und den Bus mit anderen I2C Peripheriegeräten teilen kann.
SSD1309 OLED Pinout (I2C Modul)
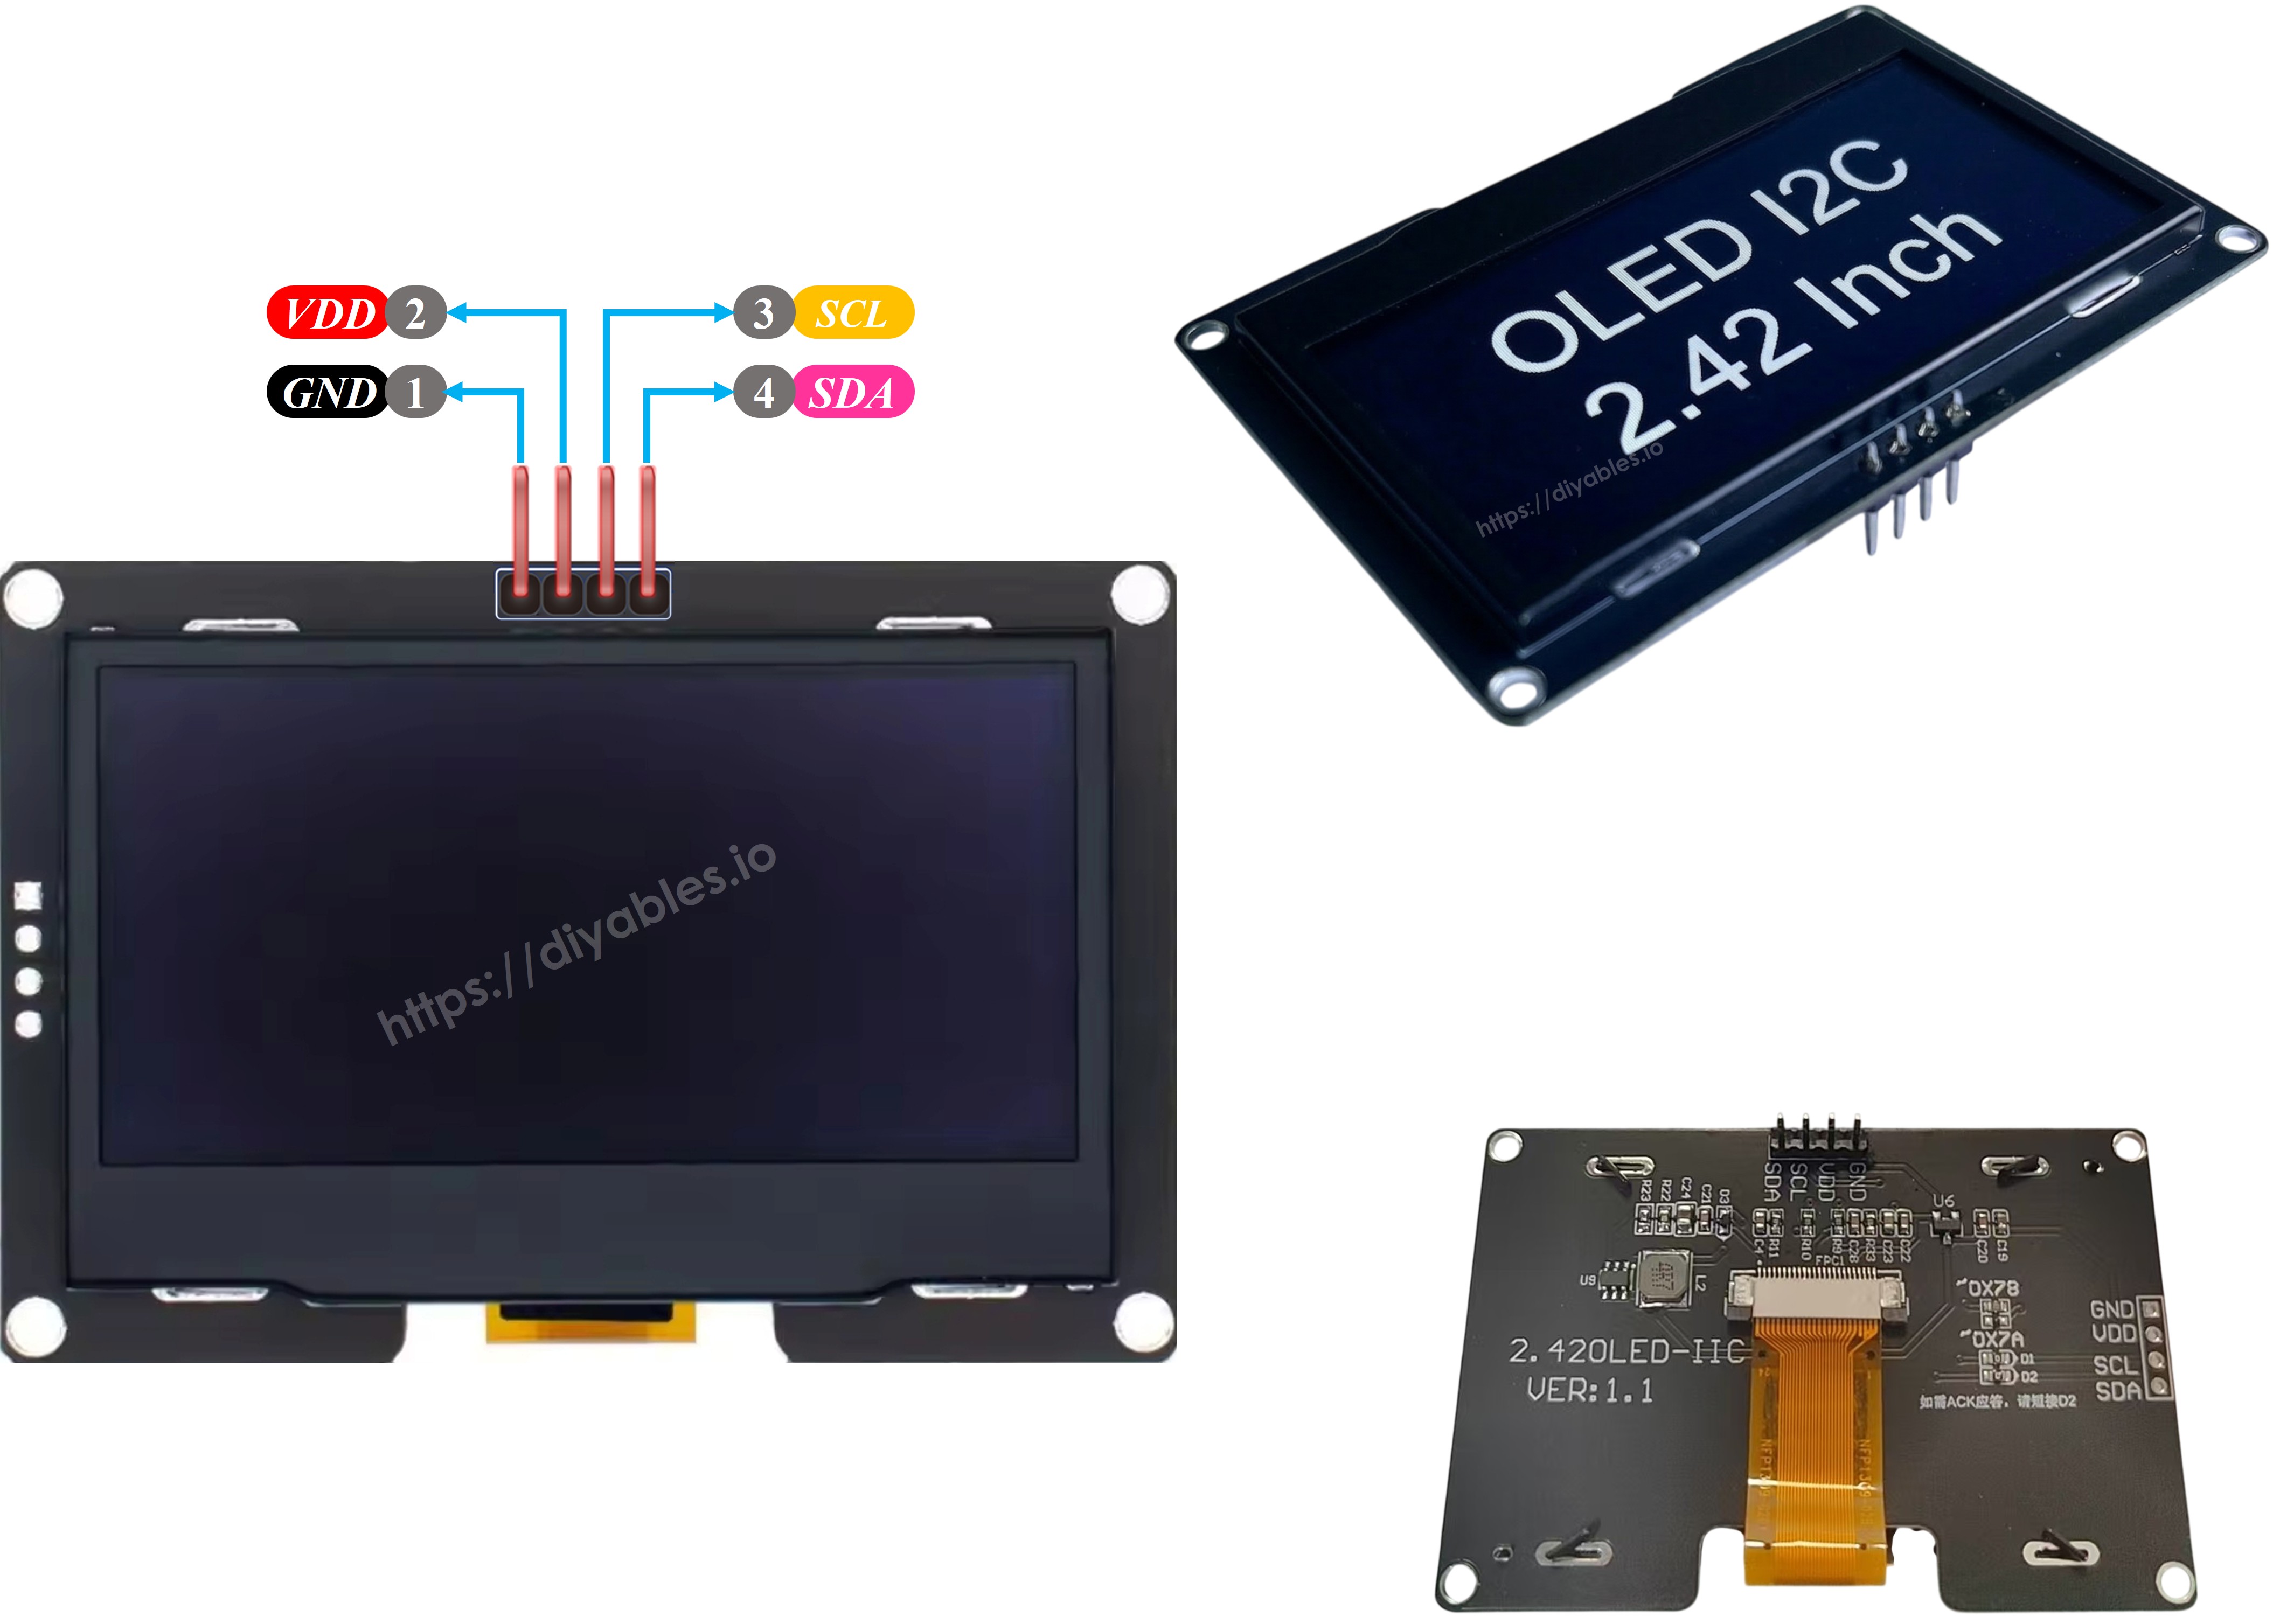
Das typische 2,42-Zoll SSD1309 I2C OLED Modul hat vier Pins:
- GND Pin: sollte mit dem Ground des ESP32 verbunden werden
- VCC Pin: sollte mit dem 3,3V oder 5V Pin des ESP32 verbunden werden (prüfen Sie die Spezifikationen Ihres Moduls)
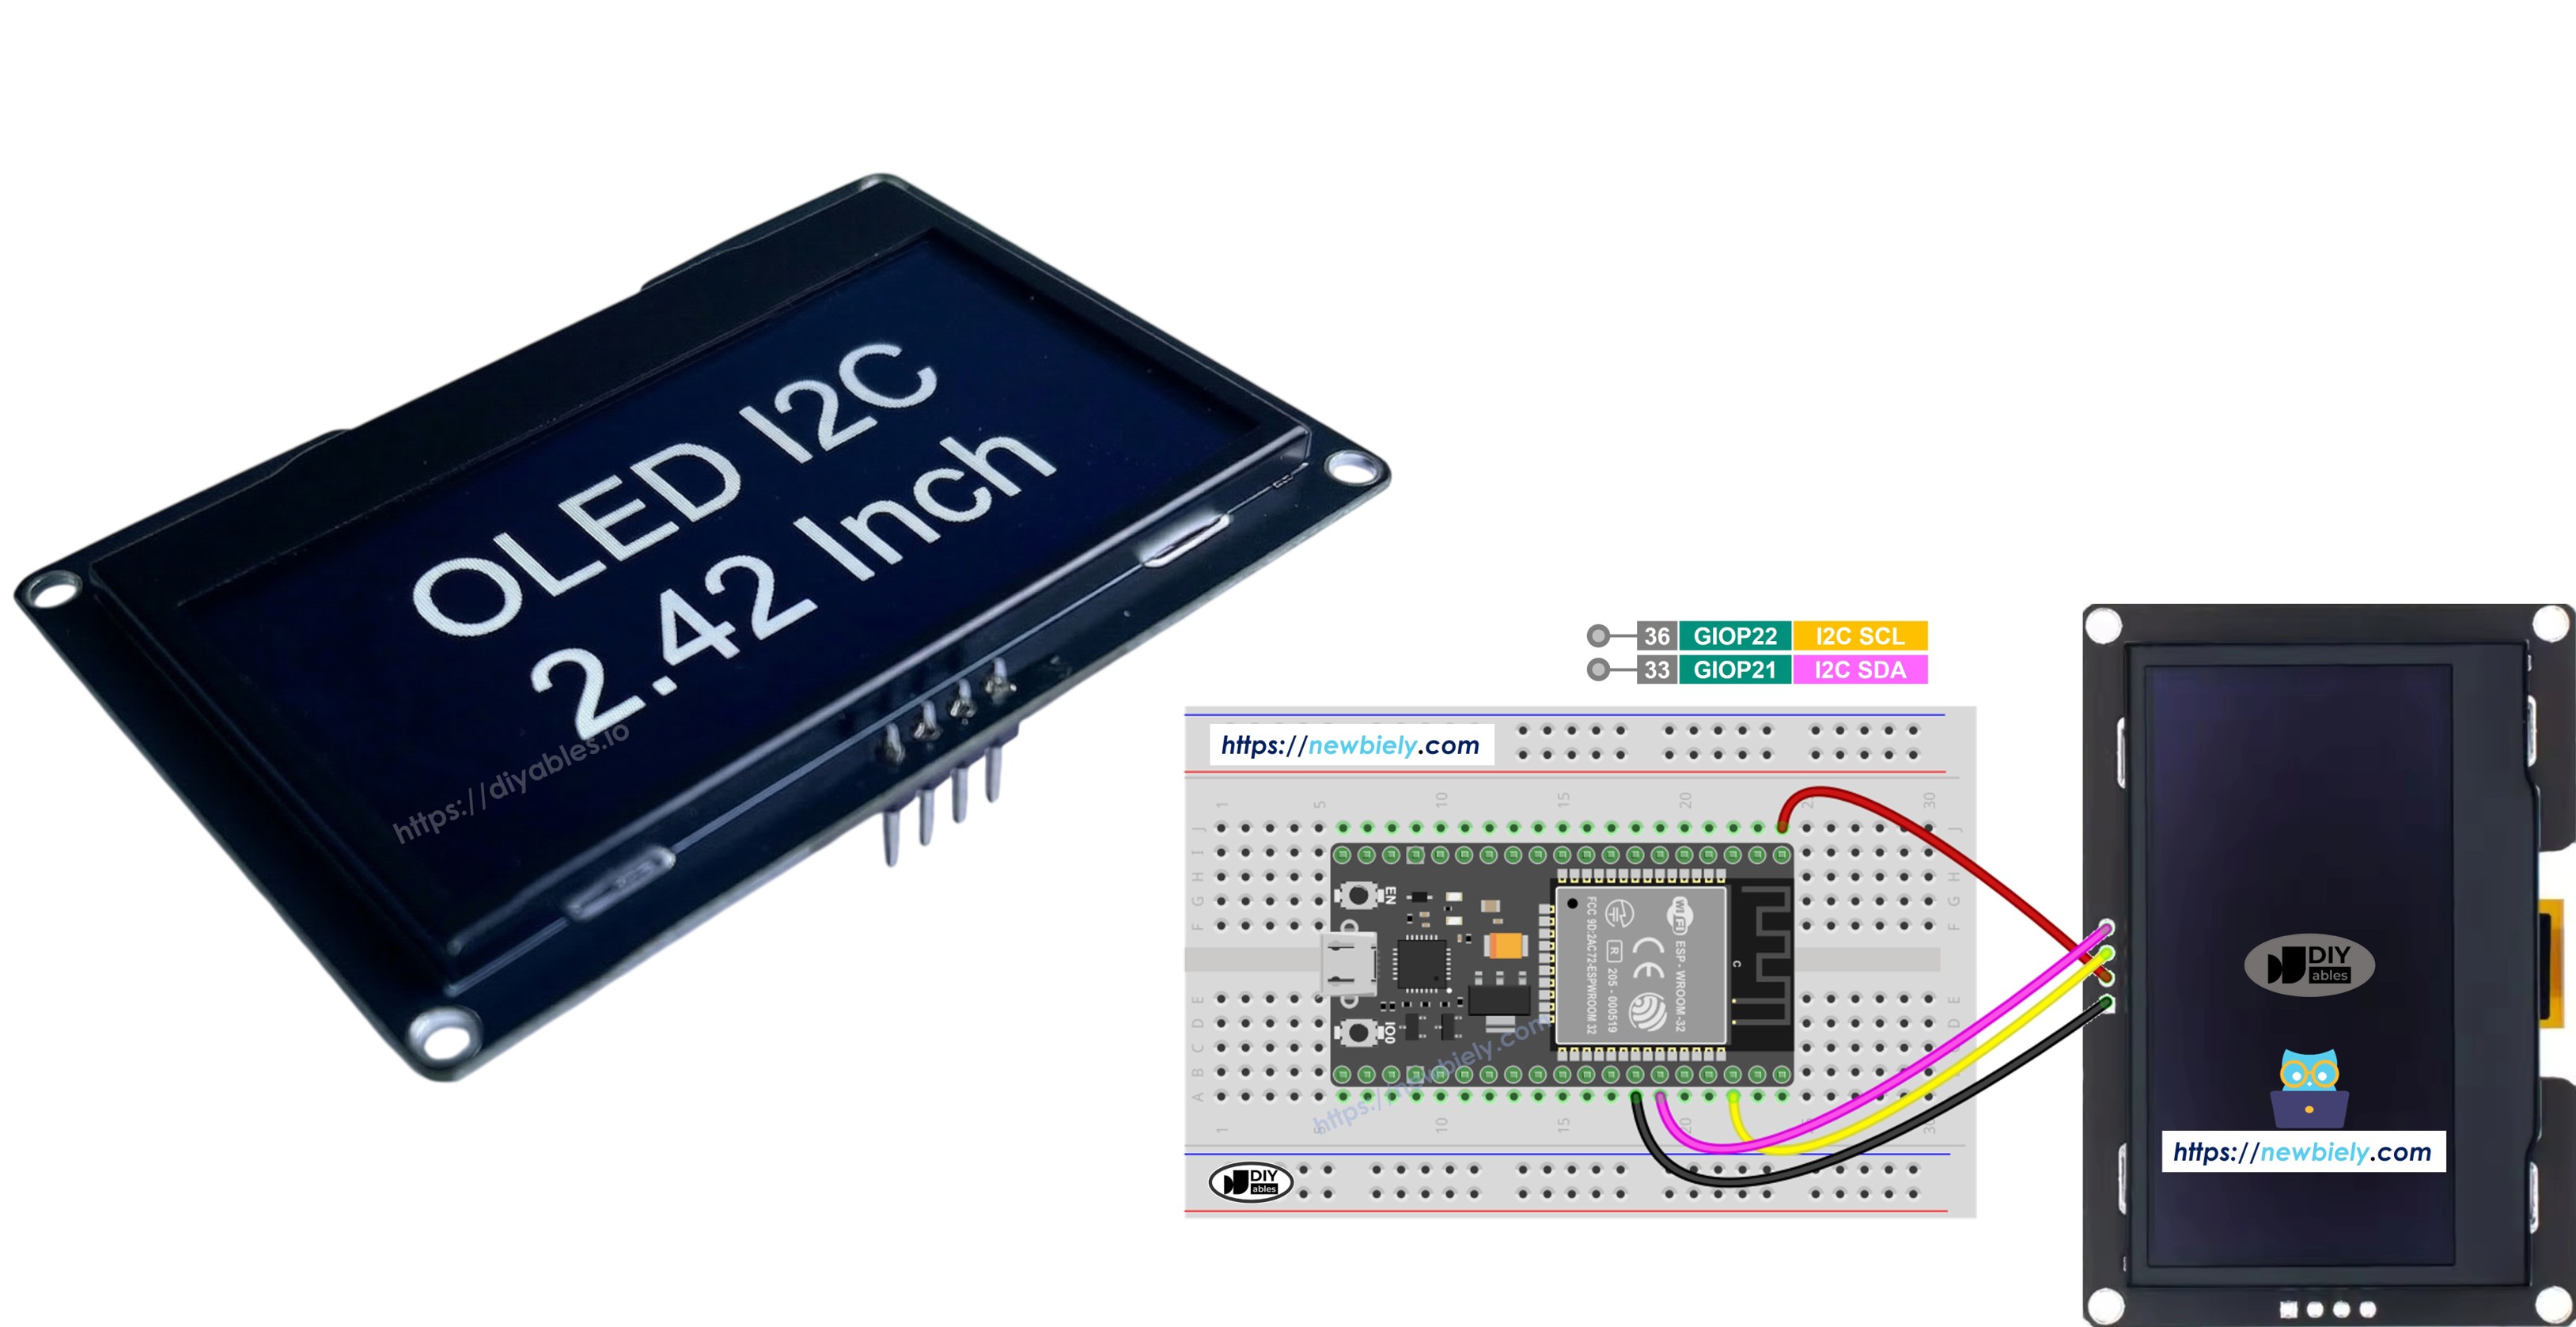
- SCL Pin: ist ein I2C Clock-Pin. Verbinden Sie mit GPIO 22 (Standard SCL)
- SDA Pin: ist ein I2C Daten-Pin. Verbinden Sie mit GPIO 21 (Standard SDA)
※ Notiz:
Die Pin-Reihenfolge kann zwischen Herstellern variieren. Überprüfen Sie immer die Beschriftungen auf Ihrem OLED Modul.
Schaltplan
- So verbinden Sie ESP32 mit SSD1309 OLED 128x64 Display über Breadboard (Steckplatine)

Dieses Bild wurde mit Fritzing erstellt. Klicken Sie, um das Bild zu vergrößern.
Wenn Sie nicht wissen, wie Sie ESP32 und andere Komponenten mit Strom versorgen, finden Sie Anleitungen im folgenden Tutorial: Wie man ESP32 mit Strom versorgt.
- So verbinden Sie ESP32 mit SSD1309 OLED 128x64 Display über Schraubklemmen-Breakout-Board
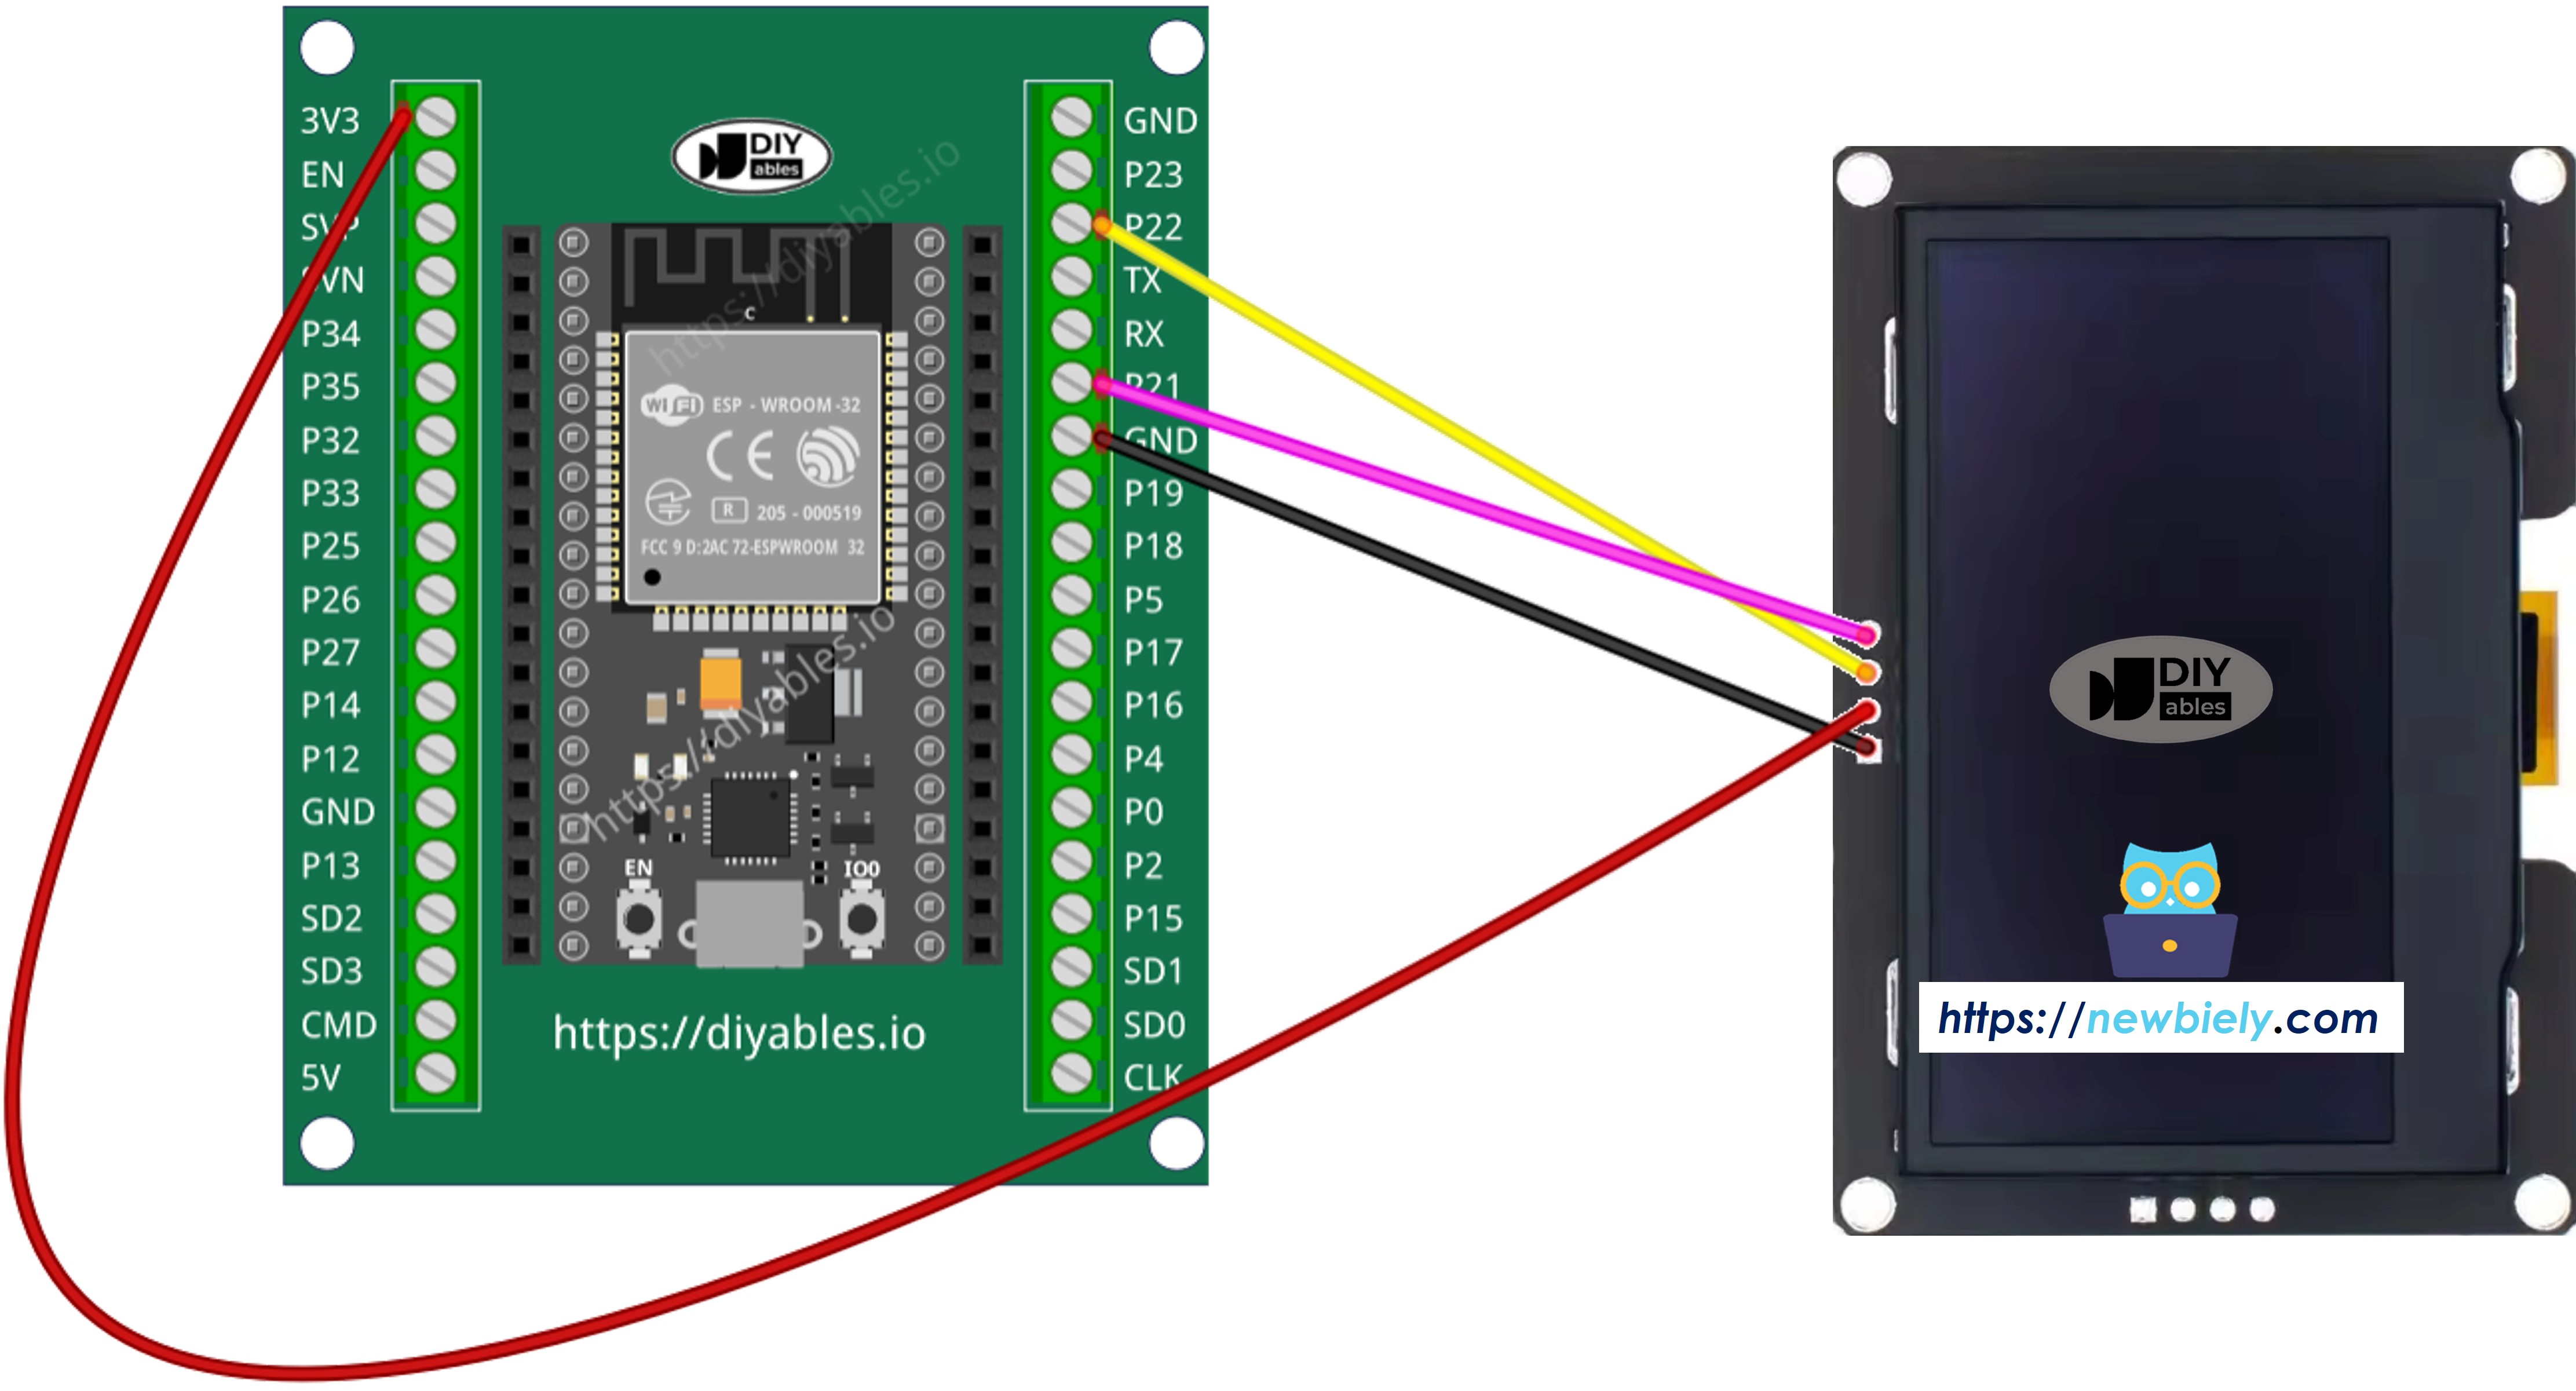
Dieses Bild wurde mit Fritzing erstellt. Klicken Sie, um das Bild zu vergrößern.
ESP32 für SSD1309 OLED programmieren
Installation der DIYables_OLED_SSD1309 Bibliothek
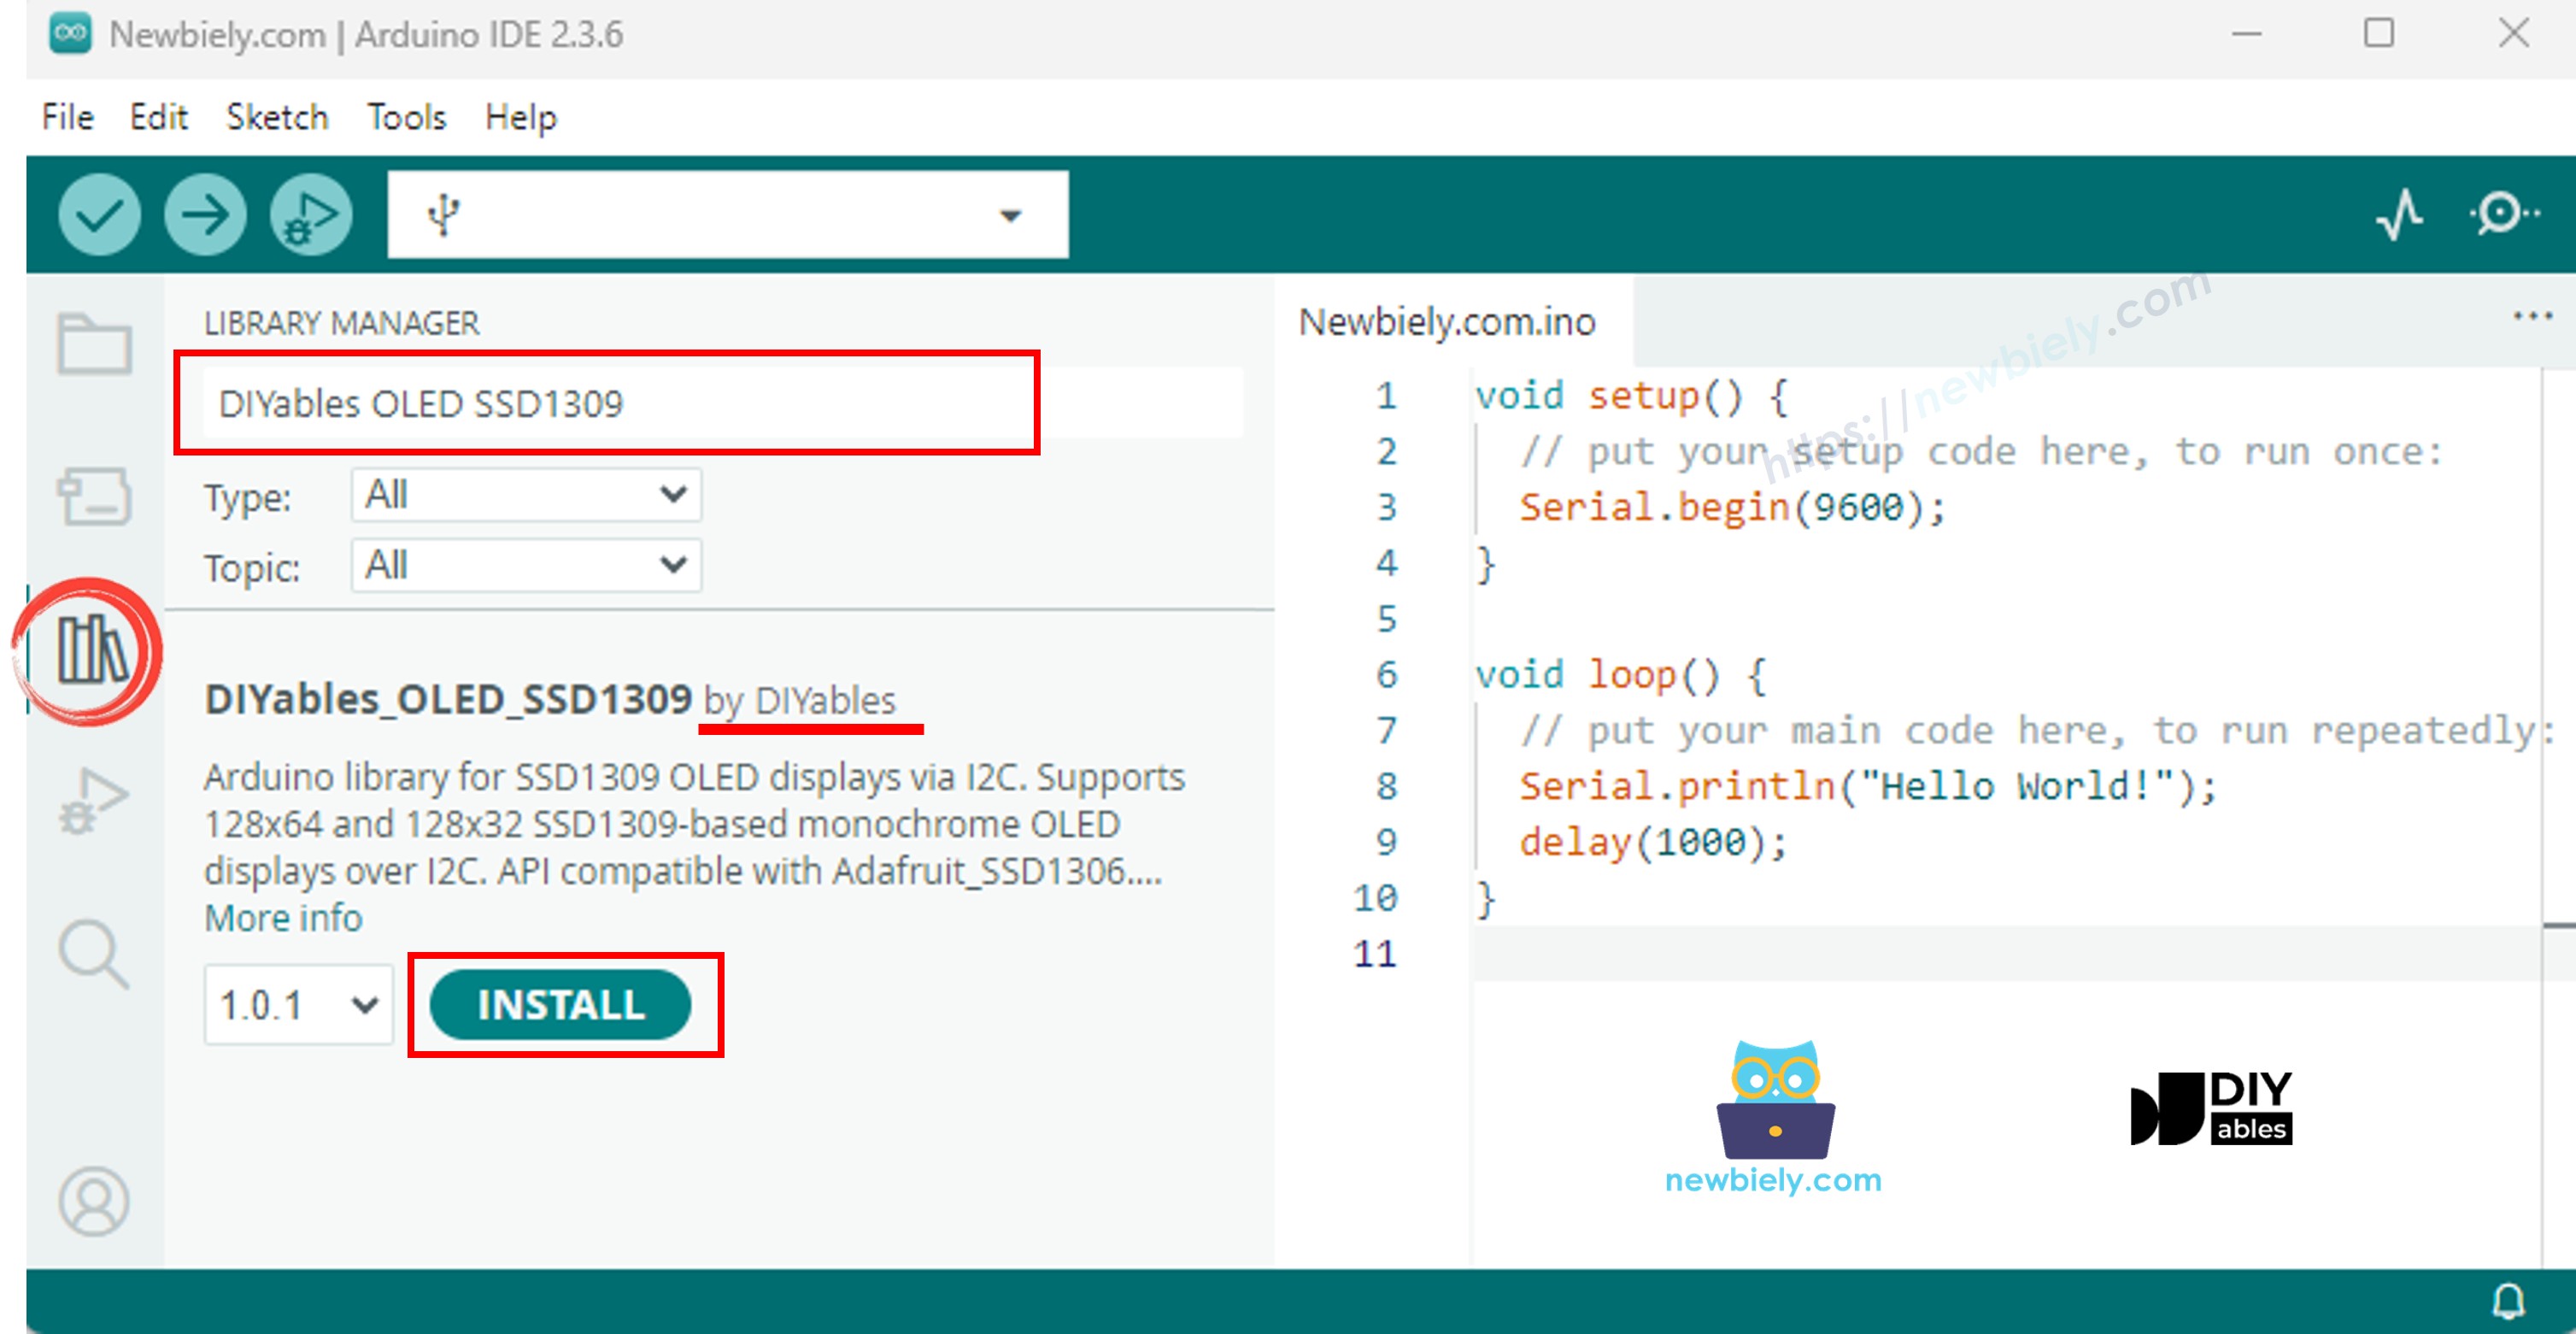
Die DIYables_OLED_SSD1309 Bibliothek ist speziell für SSD1309 Displays angepasst und erweitert Adafruit_GFX für erweiterte Grafikunterstützung.
- Öffnen Sie die Arduino IDE
- Navigieren Sie zum Libraries Symbol in der linken Seitenleiste
- Suchen Sie nach DIYables_OLED_SSD1309
- Klicken Sie auf Install
- Eine Abhängigkeitsabfrage erscheint — klicken Sie auf Install All, um auch die Adafruit GFX Library zu installieren (erforderlich für Formzeichnungen und Schriftarten)
Programmierschritte
- Erforderliche Bibliotheken einbinden
- Bildschirmabmessungen definieren
- Display-Objekt deklarieren
- OLED in setup() initialisieren
- Inhalt anzeigen
ESP32 Code — Hello World auf SSD1309 OLED
Der einfachste Einstieg: ein paar Textzeilen in verschiedenen Größen ausgeben.
ESP32 Code — Text auf SSD1309 OLED anzeigen
Das folgende Beispiel demonstriert weitere Text-Features — verschiedene Größen, Zahlenformatierung und das F() Makro zur RAM-Einsparung.
Nützliche Display-Funktionen Referenz
Hier ist eine Schnellreferenz der am häufigsten verwendeten Funktionen bei der Arbeit mit dem SSD1309 OLED über die DIYables Bibliothek:
- oled.clearDisplay() — Frame-Buffer löschen (alle Pixel aus).
- oled.display() — Buffer zum OLED übertragen, damit Änderungen sichtbar werden.
- oled.drawPixel(x, y, color) — einzelnen Pixel setzen oder löschen.
- oled.setTextSize(n) — Schriftart um Faktor *n* skalieren (1 = 6×8, 2 = 12×16, …, bis zu 8).
- oled.setCursor(x, y) — Text-Cursor zu Pixel-Koordinaten *(x, y)* bewegen.
- oled.setTextColor(SSD1309_PIXEL_ON) — nur Text-Vordergrund (Hintergrund ist transparent).
- oled.setTextColor(SSD1309_PIXEL_OFF, SSD1309_PIXEL_ON) — Text mit expliziter Hintergrundfarbe.
- oled.println("message") — String ausgeben und zur nächsten Zeile wechseln.
- oled.println(number) — Integer in Dezimaldarstellung ausgeben.
- oled.println(number, HEX) — Integer in Hexadezimaldarstellung ausgeben.
- oled.startscrollright(start, stop) — Hardware-Scroll nach rechts zwischen Seite *start* und Seite *stop*.
- oled.startscrollleft(start, stop) — Hardware-Scroll nach links.
- oled.startscrolldiagright(start, stop) — Hardware-Scroll diagonal nach rechts.
- oled.startscrolldiagleft(start, stop) — Hardware-Scroll diagonal nach links.
- oled.stopscroll() — aktives Hardware-Scrolling stoppen.
- oled.setContrast(value) — Display-Helligkeit anpassen (0–255).
- oled.dim(true/false) — Display schnell auf Minimum dimmen oder vorherigen Kontrast wiederherstellen.
- oled.invertDisplay(true/false) — Hardware-Farbinvertierung (an-Pixel ↔ aus-Pixel).
Text vertikal und horizontal auf dem SSD1309 OLED zentrieren
ESP32 Code — Formen auf SSD1309 OLED zeichnen
Da die DIYables_OLED_SSD1309 Bibliothek Adafruit_GFX erweitert, erhalten Sie einen vollständigen Satz von Form-Zeichnungsprimitive: Pixel, Linien, Rechtecke, gefüllte Rechtecke, Kreise, gefüllte Kreise, Dreiecke, gefüllte Dreiecke und abgerundete Rechtecke. Das folgende Sketch durchläuft alle mit animierten Demos.
ESP32 Code — Hardware-Scrolling auf SSD1309 OLED
Der SSD1309 hat eine eingebaute Scrolling-Engine, die den Display-Inhalt ohne CPU-Last verschiebt. Die DIYables Bibliothek stellt vier Scroll-Richtungen zur Verfügung: rechts, links, diagonal-rechts und diagonal-links. Jede nimmt einen Start-Seiten- und Stop-Seiten-Parameter (Seiten sind 8-Pixel-hohe horizontale Streifen, nummeriert 0–7 auf einem 64-Pixel-hohen Display).
※ Notiz:
Rufen Sie immer display() auf, um Ihren Inhalt zum OLED zu übertragen bevor Sie ein Scrolling starten. Vermeiden Sie das Zeichnen neuer Inhalte während aktives Scrolling läuft — rufen Sie zuerst stopscroll() auf.
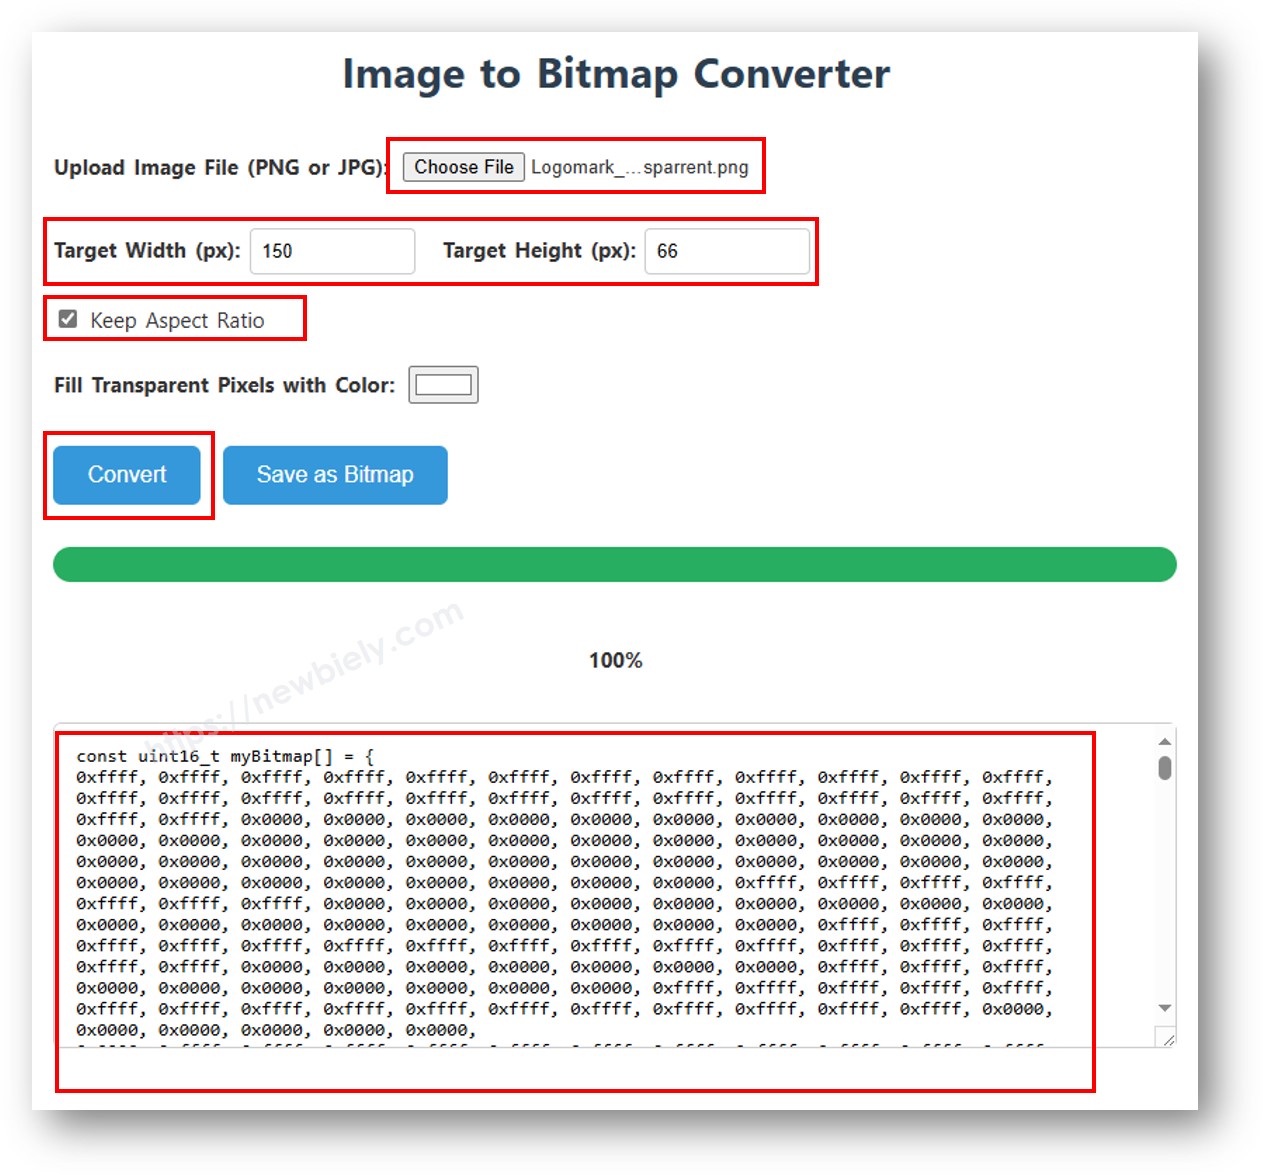
ESP32 Code — Bitmap-Bild auf SSD1309 OLED anzeigen
Um ein Bitmap auf dem SSD1309 OLED anzuzeigen, müssen Sie Ihr Bild zuerst in ein C Byte-Array konvertieren. Verwenden Sie das kostenlose image2cpp Online-Tool für diese Konvertierung:
- Laden Sie Ihre Bilddatei hoch (PNG, JPG, BMP, etc.).
- Setzen Sie die Canvas-Größe auf 128×64 (oder kleiner).
- Wählen Sie Arduino code als Ausgabeformat.
- Kopieren Sie das generierte Array in Ihr Sketch.
Das folgende Beispiel wechselt zwischen einem 16×16 Herz-Icon und einem vollbreiten DIYables Logo:
※ Notiz:
- Die Bitmap-Abmessungen dürfen die Bildschirmauflösung nicht überschreiten (128×64 für das 2,42-Zoll Modul).
ESP32 Code — Kontrast und Dimmen auf SSD1309 OLED
Der SSD1309 unterstützt 256 Kontraststufen (0–255). Die DIYables Bibliothek bietet setContrast() für feine Steuerung und dim() für schnelles Umschalten zwischen minimaler Helligkeit und dem zuvor konfigurierten Level.
ESP32 Code — Benutzerdefinierte externe Schriftarten auf SSD1309 OLED
Die Adafruit GFX Bibliothek wird mit Dutzenden skalierbarer FreeFont Schriftarten geliefert (Serif, Sans, Mono — jeweils in Regular, Bold, Italic und vier Größen). Sie können jede davon auf dem SSD1309 Display aktivieren, indem Sie den entsprechenden Header einbinden und setFont() aufrufen.
※ Notiz:
- Wenn eine externe Schriftart aktiv ist, bezieht sich die Cursor Y-Koordinate auf die Text-Grundlinie, nicht auf die obere linke Ecke. Dies unterscheidet sich von der eingebauten 5×7 Schriftart.
- Externe Schriftarten werden im Flash (PROGMEM) gespeichert. Der ESP32 hat ausreichend Flash-Speicher, sodass Sie gerne mehrere Schriftdateien in Ihrem Projekt verwenden können.
SSD1309 OLED Fehlerbehebung mit ESP32
Wenn nach dem Hochladen Ihres Sketches nichts auf dem 2,42-Zoll SSD1309 OLED erscheint, arbeiten Sie diese Prüfungen durch:
- Verkabelung überprüfen — bestätigen Sie, dass SDA, SCL, VCC und GND mit den korrekten ESP32 Pins verbunden sind.
- Treiber-Chip bestätigen — diese Bibliothek ist für den SSD1309 entwickelt. Wenn Ihr Modul einen anderen Controller verwendet (z.B. SH1106), wird es nicht korrekt antworten.
- I2C Adresse prüfen — die meisten SSD1309 Module verwenden standardmäßig 0x3C, aber einige verwenden 0x3D. Führen Sie das folgende I2C Scanner Sketch aus, um die tatsächliche Adresse zu erkennen:
Erwartete Serial Monitor Ausgabe, wenn der SSD1309 erkannt wird:
- Sicherstellen, dass display() aufgerufen wird — der SSD1309 verwendet einen Frame-Buffer. Zeichnungsfunktionen modifizieren nur den Buffer im RAM; nichts erscheint auf dem Bildschirm, bis Sie oled.display() aufrufen.
- Stromversorgung prüfen — das 2,42-Zoll Modul verbraucht mehr Strom als kleinere OLEDs. Stellen Sie sicher, dass Ihre Stromquelle ausreichend Strom liefern kann (typischerweise 20–40 mA bei voller Helligkeit). Bei USB-Stromversorgung ist dies normalerweise kein Problem mit ESP32.
- Benutzerdefinierte I2C Pins (optional) — Wenn Sie nicht-Standard I2C Pins verwenden müssen, initialisieren Sie Wire mit Wire.begin(SDA_PIN, SCL_PIN) bevor Sie display.begin() aufrufen.
Zusammenfassung
Diese Anleitung hat alle wesentlichen Punkte für die Verwendung des 2,42-Zoll SSD1309 OLED Displays (128×64) mit ESP32 abgedeckt, einschließlich:
- Hardware-Verbindungen und I2C Verkabelung
- Text- und Zahlenanzeige mit verschiedenen Größen
- Form-Zeichnungen (Rechtecke, Kreise, Dreiecke)
- Bitmap-Bild-Darstellung
- Hardware-Scrolling in vier Richtungen
- Kontrast- und Helligkeitssteuerung
- Benutzerdefinierte externe Schriftarten
Die DIYables_OLED_SSD1309 Bibliothek vereinfacht die SSD1309 Programmierung durch Bereitstellung von High-Level-Funktionen für Text, Grafiken und Display-Steuerung, während sie Adafruit GFX für erweiterte Zeichnungsmöglichkeiten nutzt.
Für weitere ESP32 Projekte und Anleitungen besuchen Sie esp32io.com