Arduino - Tastenzähler - OLED

In diesem Tutorial werden wir Arduino verwenden:

In diesem Tutorial wird der Taster ebenfalls entprellt, ohne die delay()-Funktion zu verwenden. Siehe Warum benötigen wir Entprellung?

Über OLED und Knopf

Wenn Sie nichts über OLED und Taster wissen (Pinbelegung, Funktionsweise, Programmierung ...), informieren Sie sich in den folgenden Tutorials darüber:

Verdrahtungsdiagramm

Arduino-Taster OLED-Verdrahtungsdiagramm

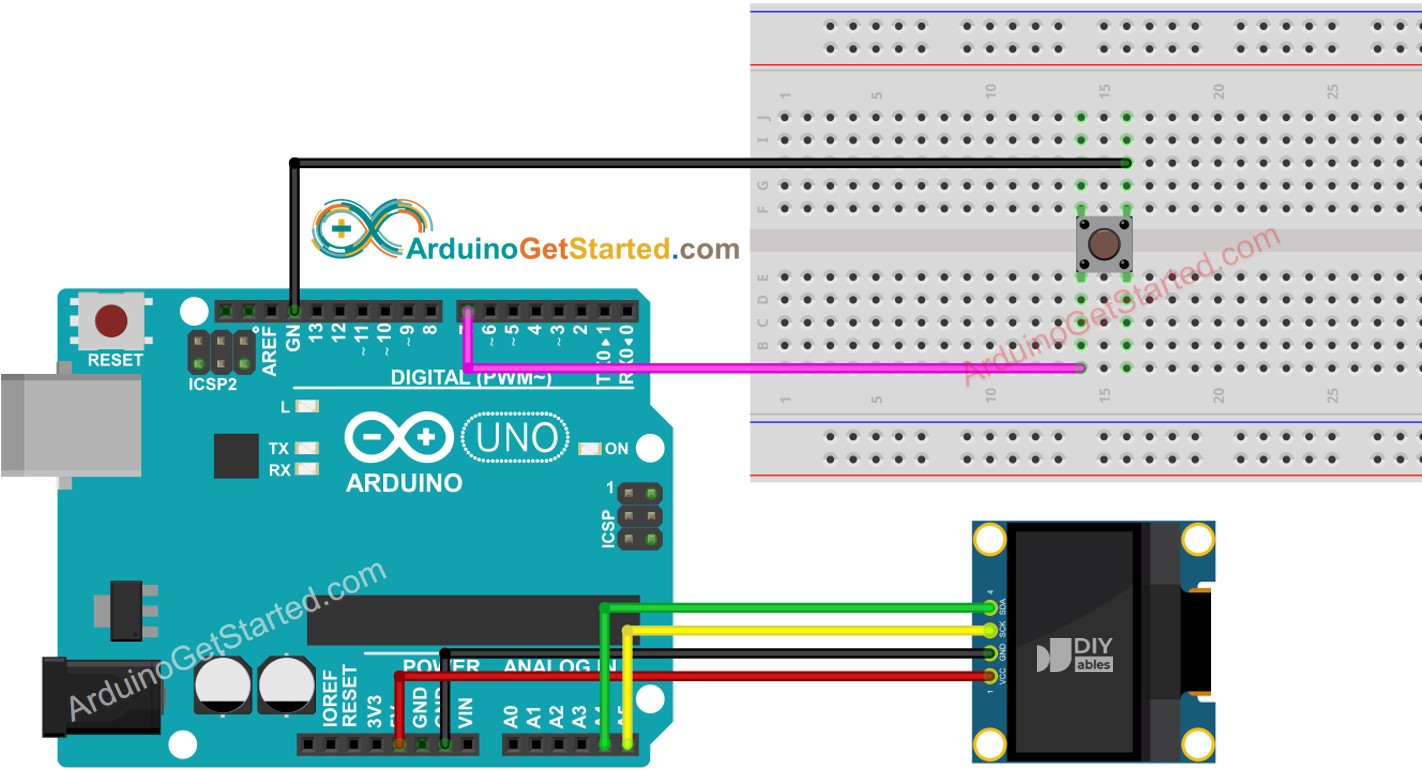
Dieses Bild wurde mit Fritzing erstellt. Klicken Sie, um das Bild zu vergrößern.

Arduino-Code - Anzeige der Tastenzahl auf dem OLED-Display

/* * Dieser Arduino Code wurde von newbiely.de entwickelt * Dieser Arduino Code wird der Öffentlichkeit ohne jegliche Einschränkung zur Verfügung gestellt. * Für vollständige Anleitungen und Schaltpläne besuchen Sie bitte: * https://newbiely.de/tutorials/arduino/arduino-button-count-oled */ #include <Wire.h> #include <Adafruit_GFX.h> #include <Adafruit_SSD1306.h> #include <ezButton.h> #define SCREEN_WIDTH 128 // OLED display width, in pixels #define SCREEN_HEIGHT 64 // OLED display height, in pixels Adafruit_SSD1306 oled(SCREEN_WIDTH, SCREEN_HEIGHT, &Wire, -1); // create SSD1306 display object connected to I2C ezButton button(7); // create ezButton object that attach to pin 7; unsigned long lastCount = 0; void setup() { Serial.begin(9600); // initialize OLED display with address 0x3C for 128x64 if (!oled.begin(SSD1306_SWITCHCAPVCC, 0x3C)) { Serial.println(F("SSD1306 allocation failed")); while (true); } delay(2000); // wait for initializing oled.clearDisplay(); // clear display oled.setTextSize(2); // text size oled.setTextColor(WHITE); // text color oled.setCursor(0, 10); // position to display button.setDebounceTime(50); // set debounce time to 50 milliseconds button.setCountMode(COUNT_FALLING); } void loop() { button.loop(); // MUST call the loop() function first unsigned long count = button.getCount(); if (lastCount != count) { Serial.println(count); // print count to Serial Monitor oled.clearDisplay(); // clear display oled.println(count); // display count oled.display(); // show on OLED lastCount != count; } }

Schnelle Schritte

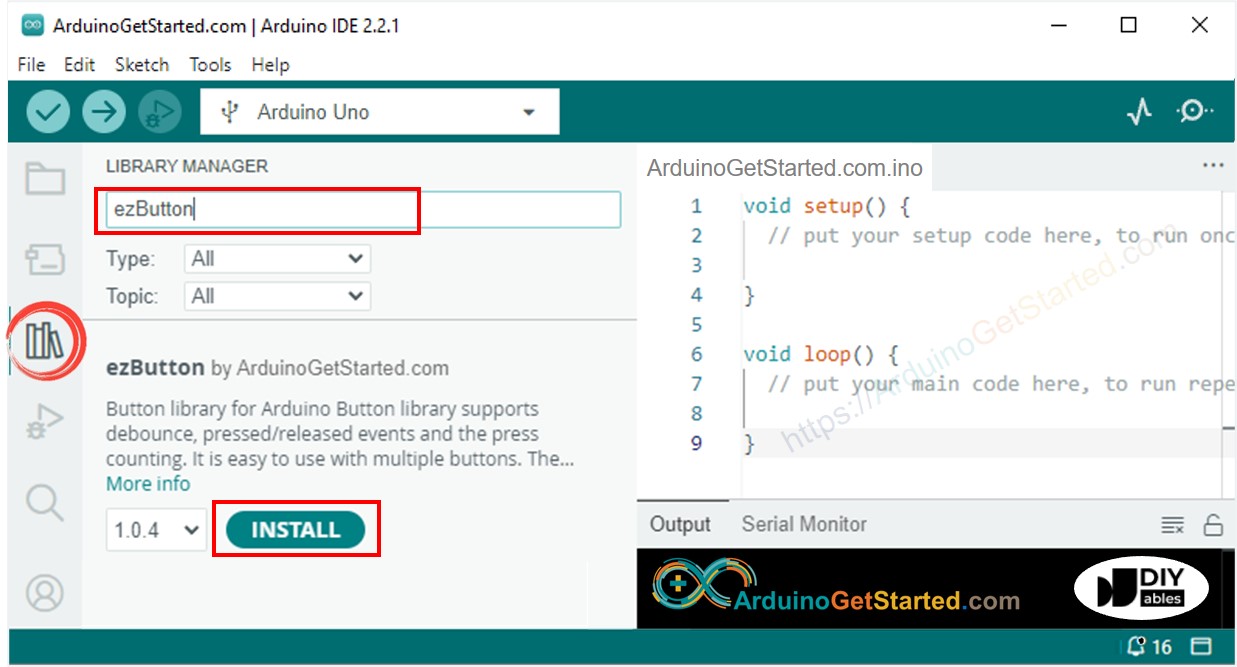
  • Gehen Sie zum Bibliotheken-Symbol in der linken Seitenleiste der Arduino IDE.
  • Suchen Sie “ezButton”, und finden Sie dann die Button-Bibliothek von ArduinoGetStarted
  • Klicken Sie auf die Install-Schaltfläche, um die ezButton-Bibliothek zu installieren.
Arduino-Taster-Bibliothek
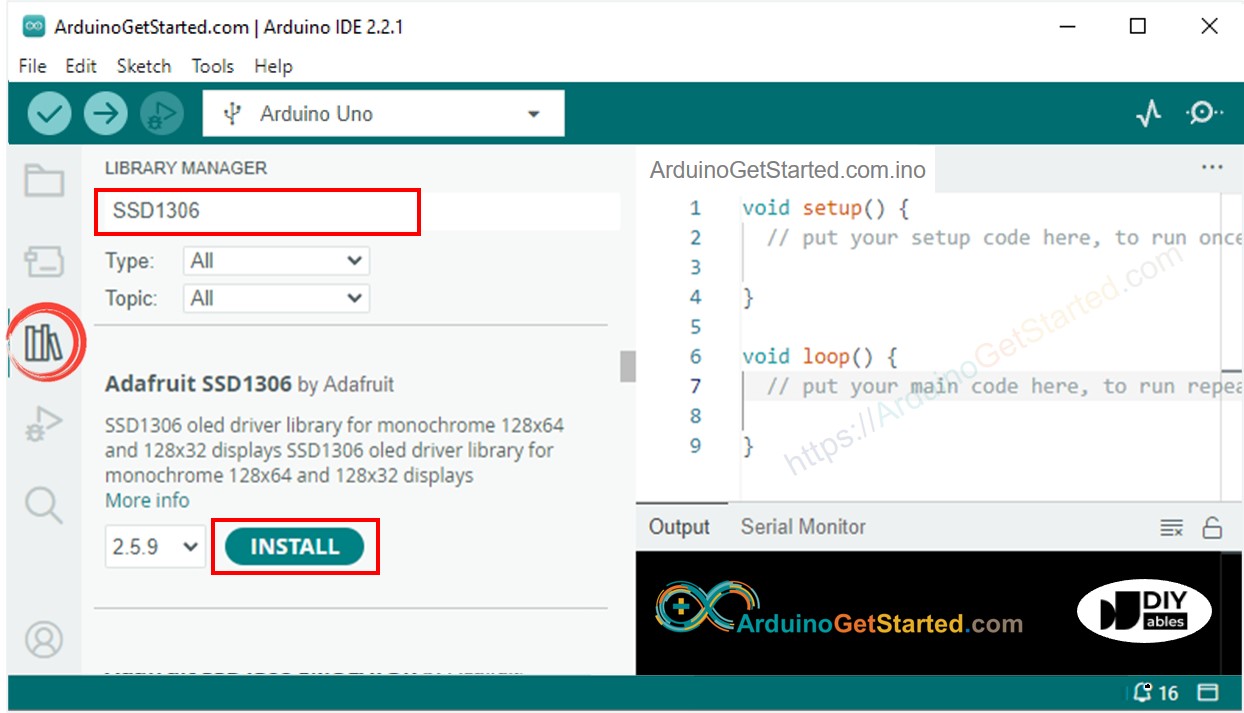
  • Suchen Sie nach „SSD1306“, dann finden Sie die SSD1306-Bibliothek von Adafruit.
  • Klicken Sie auf die Schaltfläche Installieren, um die Bibliothek zu installieren.
Arduino-OLED-Bibliothek
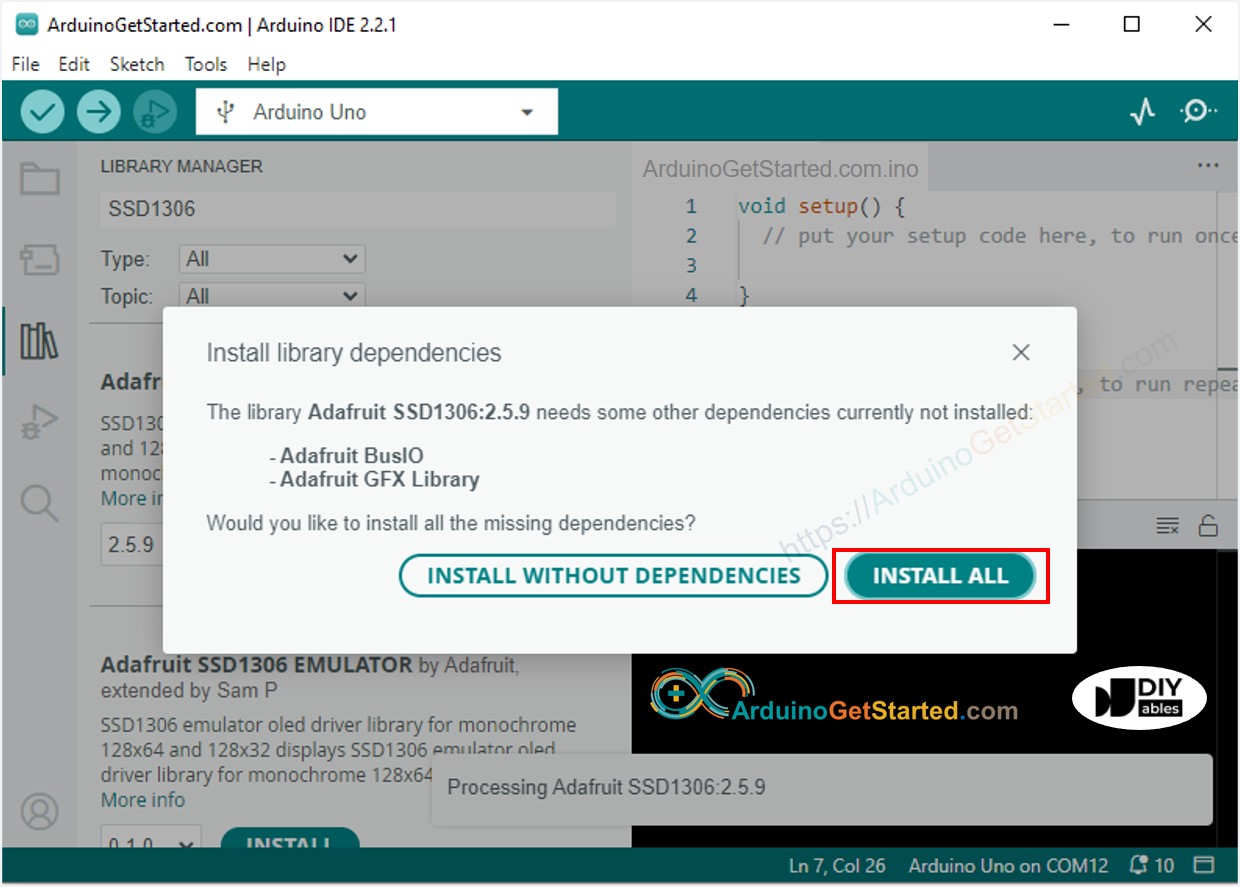
  • Sie werden aufgefordert, einige weitere Bibliotheksabhängigkeiten zu installieren
  • Klicken Sie auf die Schaltfläche Alle installieren, um alle Bibliotheksabhängigkeiten zu installieren
Arduino Adafruit GFX Sensorbibliothek
  • Kopiere den obigen Code und öffne ihn mit der Arduino IDE
  • Klicke in der Arduino IDE auf die Upload-Schaltfläche, um den Code auf den Arduino hochzuladen.
  • Drücke den Knopf mehrmals
  • Sieh, wie sich die Zählzahl auf dem OLED ändert

Der obige Code zeigt lediglich die Anzahl der Tastendrücke oben links an. Lass uns den Code ändern, damit er zentriert wird!

Arduino-Code - Vertikale und horizontale Zentrierung auf dem OLED

/* * Dieser Arduino Code wurde von newbiely.de entwickelt * Dieser Arduino Code wird der Öffentlichkeit ohne jegliche Einschränkung zur Verfügung gestellt. * Für vollständige Anleitungen und Schaltpläne besuchen Sie bitte: * https://newbiely.de/tutorials/arduino/arduino-button-count-oled */ #include <Wire.h> #include <Adafruit_GFX.h> #include <Adafruit_SSD1306.h> #include <ezButton.h> #define SCREEN_WIDTH 128 // OLED display width, in pixels #define SCREEN_HEIGHT 64 // OLED display height, in pixels Adafruit_SSD1306 oled(SCREEN_WIDTH, SCREEN_HEIGHT, &Wire, -1); // create SSD1306 display object connected to I2C ezButton button(7); // create ezButton object that attach to pin 7; unsigned long lastCount = 0; void setup() { Serial.begin(9600); // initialize OLED display with address 0x3C for 128x64 if (!oled.begin(SSD1306_SWITCHCAPVCC, 0x3C)) { Serial.println(F("SSD1306 allocation failed")); while (true); } delay(2000); // wait for initializing oled.clearDisplay(); // clear display oled.setTextSize(2); // text size oled.setTextColor(WHITE); // text color oled.setCursor(0, 10); // position to display button.setDebounceTime(50); // set debounce time to 50 milliseconds button.setCountMode(COUNT_FALLING); } void loop() { button.loop(); // MUST call the loop() function first unsigned long count = button.getCount(); if (lastCount != count) { Serial.println(count); // print count to Serial Monitor String text = String(count); oledDisplayCenter(text); lastCount != count; } } void oledDisplayCenter(String text) { int16_t x1; int16_t y1; uint16_t width; uint16_t height; oled.getTextBounds(text, 0, 0, &x1, &y1, &width, &height); // display on horizontal and vertical center oled.clearDisplay(); // clear display oled.setCursor((SCREEN_WIDTH - width) / 2, (SCREEN_HEIGHT - height) / 2); oled.println(text); // text to display oled.display(); }

※ Notiz:

Der obige Code zentriert den Text automatisch sowohl horizontal als auch vertikal auf dem OLED-Display. Siehe Wie man Text auf dem OLED vertikal und horizontal zentriert für weitere Details.

Video Tutorial

Wir erwägen die Erstellung von Video-Tutorials. Wenn Sie Video-Tutorials für wichtig halten, abonnieren Sie bitte unseren YouTube-Kanal , um uns zu motivieren, die Videos zu erstellen.

※ UNSERE NACHRICHTEN

  • Sie können gerne den Link zu diesem Tutorial teilen. Bitte verwenden Sie jedoch unsere Inhalte nicht auf anderen Websites. Wir haben viel Mühe und Zeit in die Erstellung der Inhalte investiert, bitte respektieren Sie unsere Arbeit!