Arduino - Temperatur- und Luftfeuchtigkeitssensor - OLED-Display
In diesem Tutorial lernen wir:
Wie man die Temperatur und Luftfeuchtigkeit vom DHT11-Sensor ausliest und sie auf einem OLED-Display anzeigt.
Wie man die Temperatur und Luftfeuchtigkeit vom DHT22-Sensor ausliest und sie auf einem OLED-Display anzeigt.
You can use DHT22 sensor instead of DHT11 sensor.
Oder Sie können die folgenden Kits kaufen:
Offenlegung: Einige der in diesem Abschnitt bereitgestellten Links sind Amazon-Affiliate-Links. Wir können eine Provision für Käufe erhalten, die über diese Links getätigt werden, ohne zusätzliche Kosten für Sie. Wir schätzen Ihre Unterstützung.
Kaufhinweis: Wenn Sie ein größeres OLED-Display möchten, verwenden Sie das 2.42 inch OLED Display 128x64.
Wenn Sie nichts über OLED-Displays sowie DHT11- und DHT22-Temperatur- und Feuchtigkeitssensoren wissen (Pinbelegung, Funktionsweise, Programmierung ...), lernen Sie in den folgenden Tutorials mehr darüber:
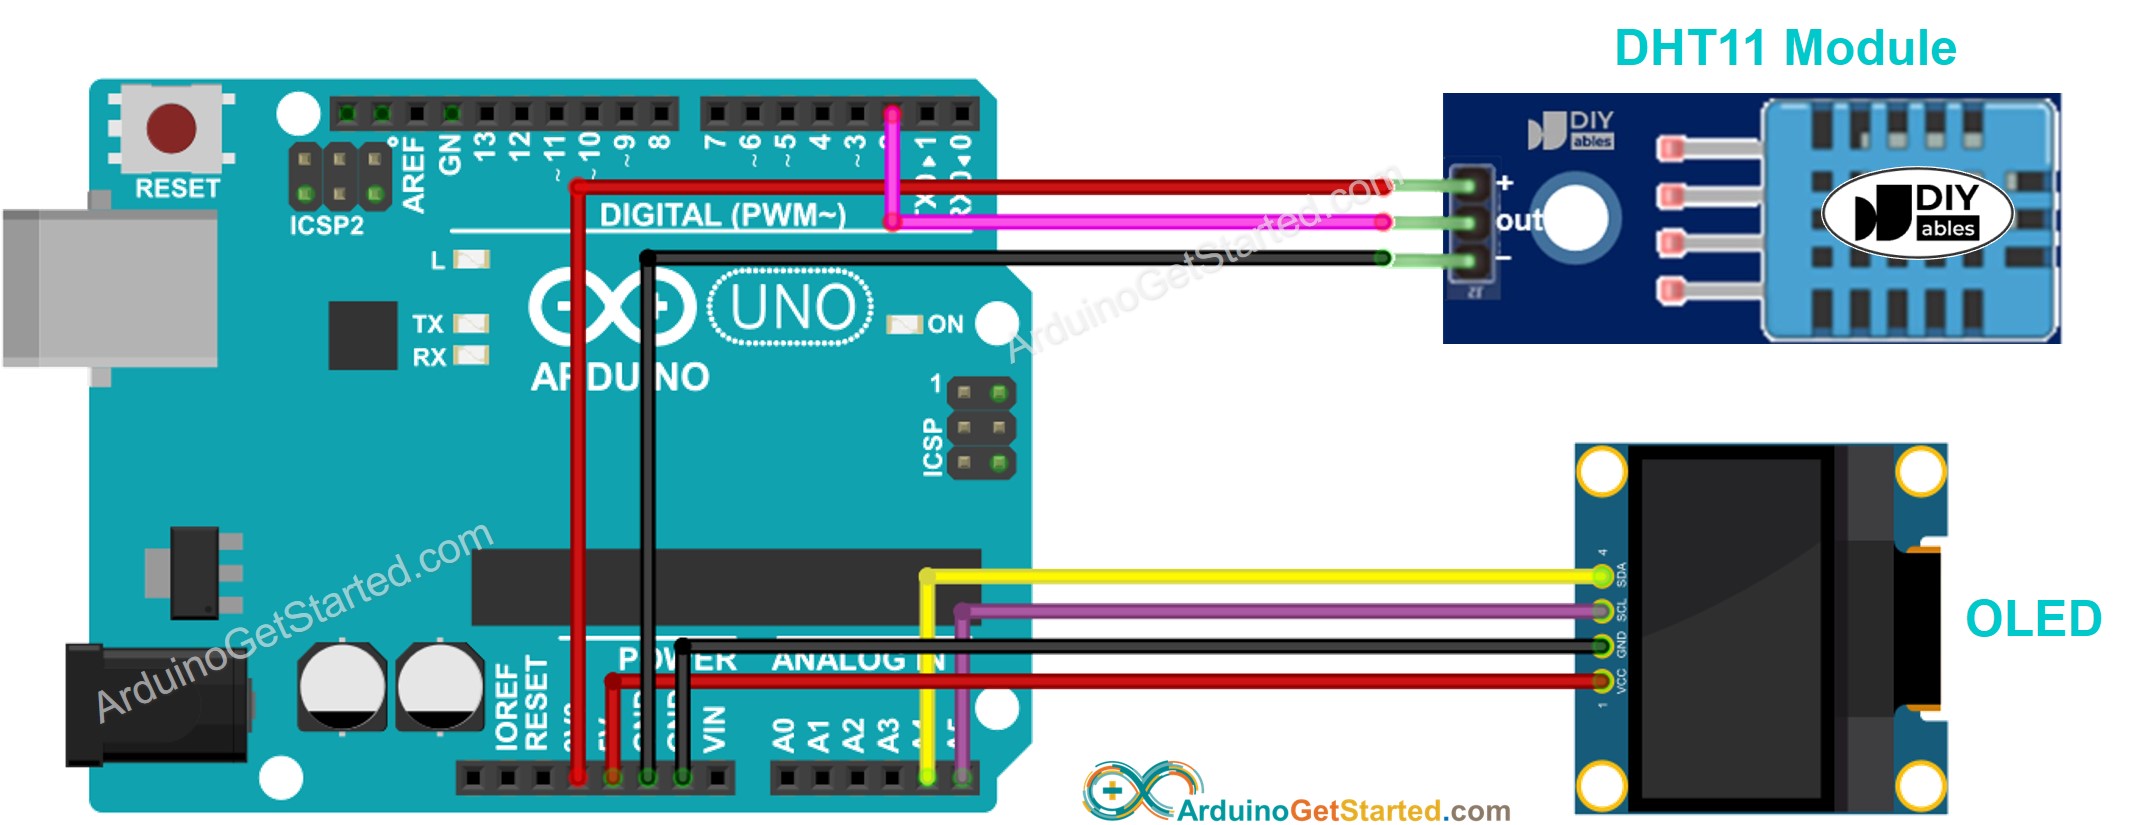
Dieses Bild wurde mit Fritzing erstellt. Klicken Sie, um das Bild zu vergrößern.
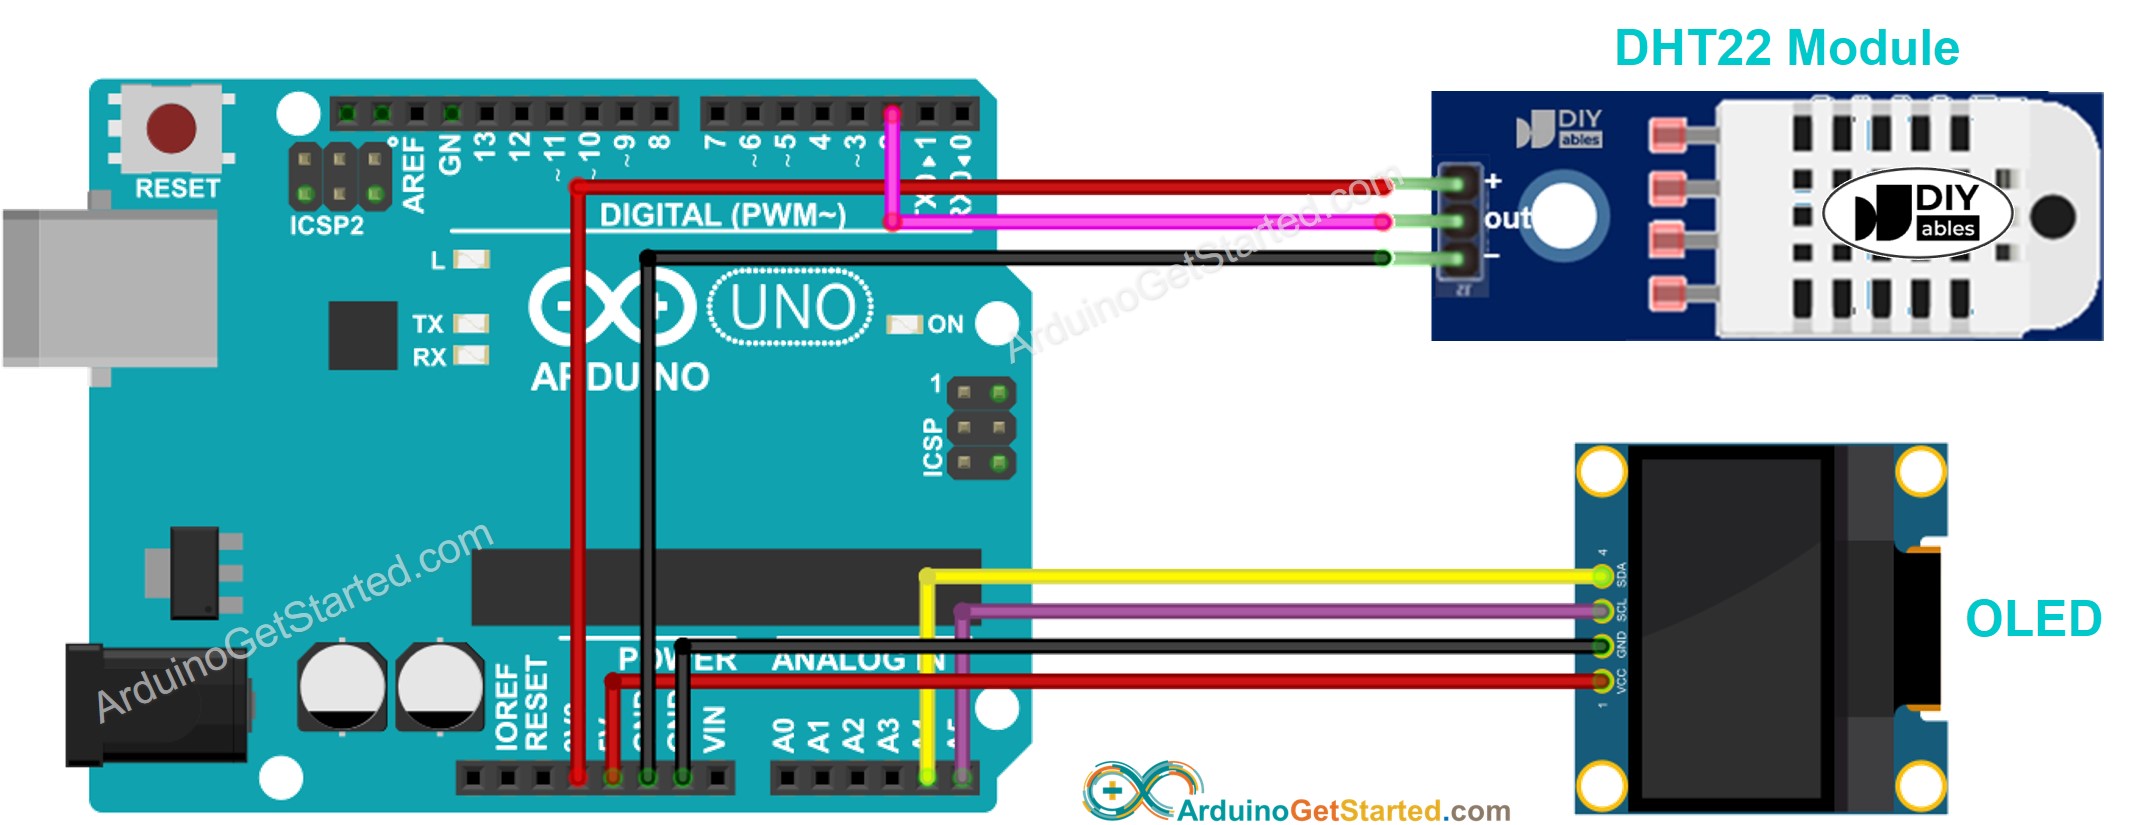
Dieses Bild wurde mit Fritzing erstellt. Klicken Sie, um das Bild zu vergrößern.
#include <Wire.h>
#include <Adafruit_GFX.h>
#include <Adafruit_SSD1306.h>
#include <DHT.h>
#define SCREEN_WIDTH 128
#define SCREEN_HEIGHT 64
#define DHTPIN 2
#define DHTTYPE DHT11
Adafruit_SSD1306 oled(SCREEN_WIDTH, SCREEN_HEIGHT, &Wire, -1);
DHT dht(DHTPIN, DHTTYPE);
String temperature;
String humidity;
void setup() {
Serial.begin(9600);
if (!oled.begin(SSD1306_SWITCHCAPVCC, 0x3C)) {
Serial.println(F("SSD1306 allocation failed"));
while (true)
;
}
delay(2000);
oled.clearDisplay();
oled.setTextSize(3);
oled.setTextColor(WHITE);
oled.setCursor(0, 10);
dht.begin();
temperature.reserve(10);
humidity.reserve(10);
}
void loop() {
float humi = dht.readHumidity();
float tempC = dht.readTemperature();
if (isnan(humi) || isnan(tempC)) {
temperature = "Failed";
humidity = "Failed";
} else {
temperature = String(tempC, 1);
temperature += char(247);
temperature += "C";
humidity = String(humi, 1);
humidity += "%";
}
Serial.print(tempC);
Serial.print("°C | " );
Serial.print(humi);
Serial.println("%");
oledDisplayCenter(temperature, humidity);
}
void oledDisplayCenter(String temperature, String humidity) {
int16_t x1;
int16_t y1;
uint16_t width_T;
uint16_t height_T;
uint16_t width_H;
uint16_t height_H;
oled.getTextBounds(temperature, 0, 0, &x1, &y1, &width_T, &height_T);
oled.getTextBounds(temperature, 0, 0, &x1, &y1, &width_H, &height_H);
oled.clearDisplay();
oled.setCursor((SCREEN_WIDTH - width_T) / 2, SCREEN_HEIGHT / 2 - height_T - 5);
oled.println(temperature);
oled.setCursor((SCREEN_WIDTH - width_H) / 2, SCREEN_HEIGHT / 2 + 5);
oled.println(humidity);
oled.display();
}
Öffne die Arduino IDE auf deinem PC.
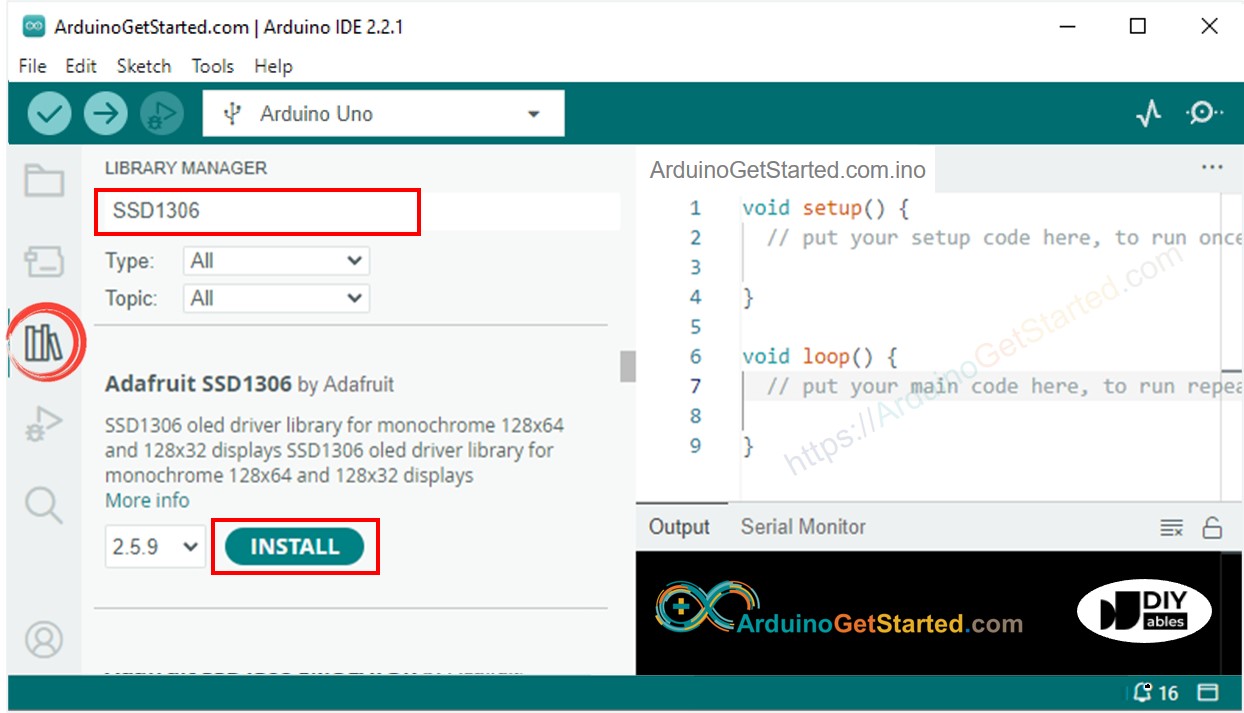
Gehe zum Bibliotheken-Symbol in der linken Seitenleiste der Arduino IDE.
Suche „SSD1306“, dann finde die SSD1306-Bibliothek von Adafruit.
Klicke auf die Schaltfläche Installieren, um die Bibliothek zu installieren.
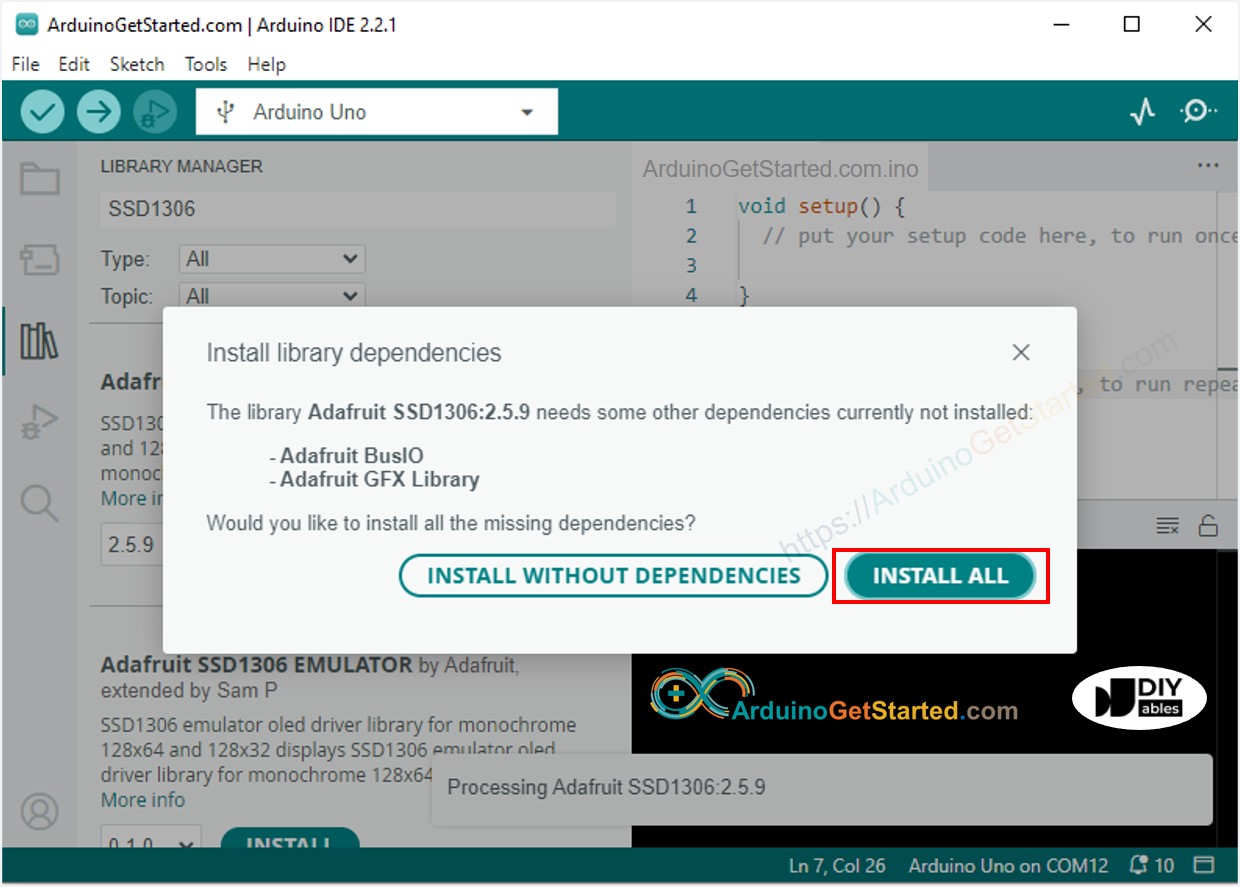
Sie werden aufgefordert, einige weitere Bibliotheksabhängigkeiten zu installieren.
Klicken Sie auf den Button Install All, um alle Bibliotheksabhängigkeiten zu installieren.
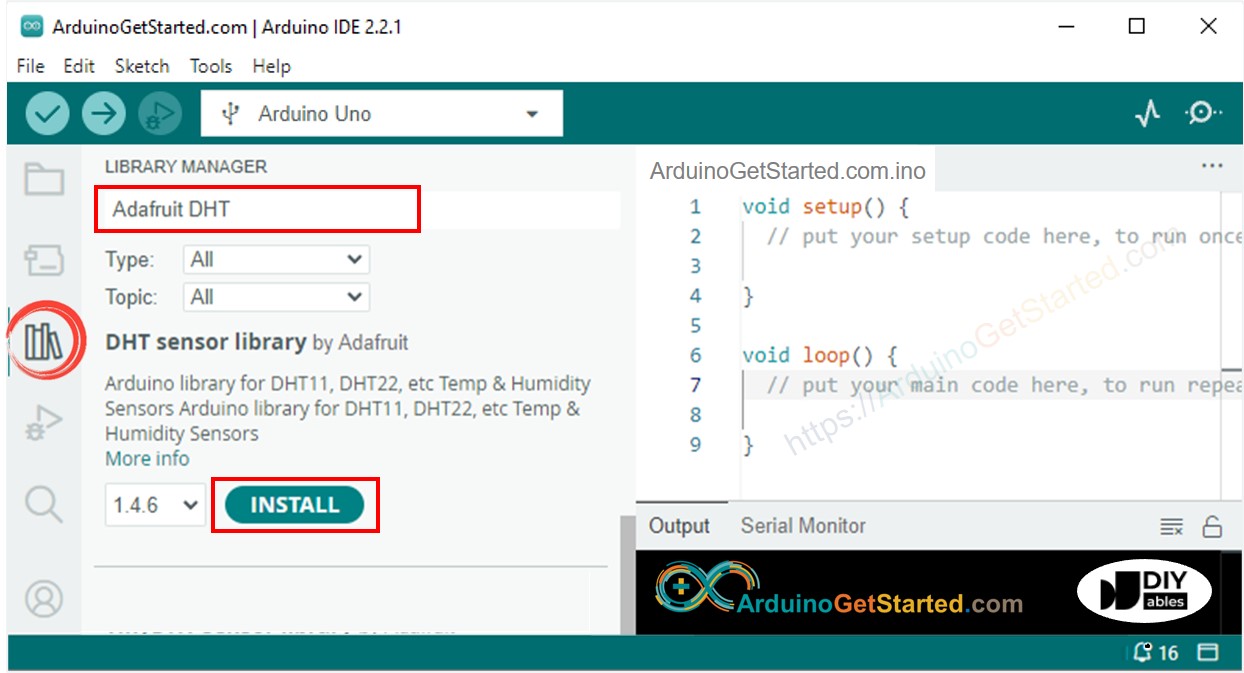
Suchen Sie nach “DHT”, und finden Sie dann die DHT-Sensor-Bibliothek von Adafruit
Klicken Sie auf die Schaltfläche Install, um die Bibliothek zu installieren.
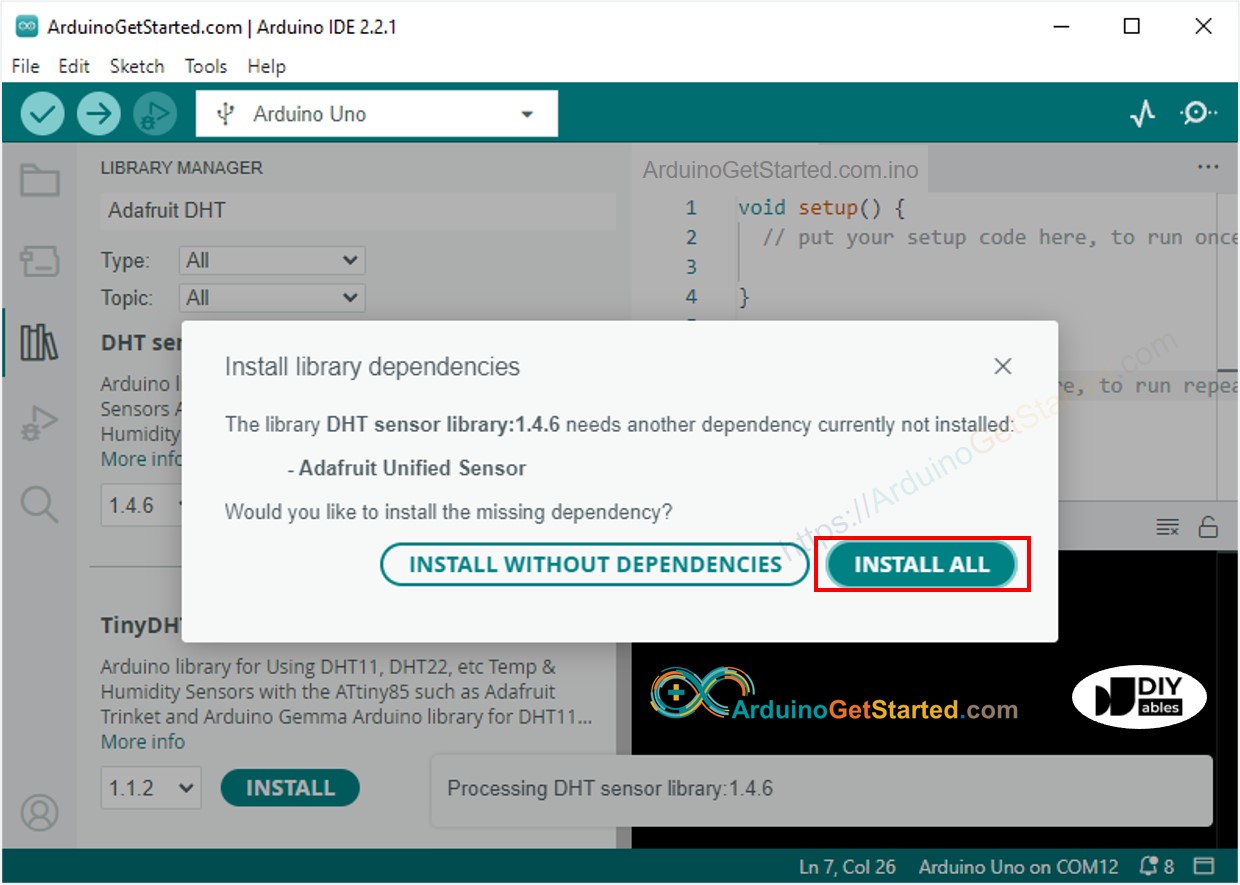
Sie werden aufgefordert, einige weitere Bibliotheksabhängigkeiten zu installieren.
Klicken Sie auf die Schaltfläche Alle installieren, um alle Bibliotheksabhängigkeiten zu installieren.
Kopieren Sie den obigen Code und öffnen Sie ihn mit der Arduino-IDE
Klicken Sie in der Arduino-IDE auf die Hochladen-Schaltfläche, um den Code auf Arduino hochzuladen
Tauchen Sie den Sensor in heißes und kaltes Wasser ein, oder halten Sie den Sensor in der Hand
Sehen Sie das Ergebnis auf dem OLED-Display und im Serial Monitor
※ Notiz:
Der About-Code zentriert den Text automatisch horizontal und vertikal auf dem OLED-Display.
#include <Wire.h>
#include <Adafruit_GFX.h>
#include <Adafruit_SSD1306.h>
#include <DHT.h>
#define SCREEN_WIDTH 128
#define SCREEN_HEIGHT 64
#define DHTPIN 2
#define DHTTYPE DHT22
Adafruit_SSD1306 oled(SCREEN_WIDTH, SCREEN_HEIGHT, &Wire, -1);
DHT dht(DHTPIN, DHTTYPE);
String temperature;
String humidity;
void setup() {
Serial.begin(9600);
if (!oled.begin(SSD1306_SWITCHCAPVCC, 0x3C)) {
Serial.println(F("SSD1306 allocation failed"));
while (true)
;
}
delay(2000);
oled.clearDisplay();
oled.setTextSize(3);
oled.setTextColor(WHITE);
oled.setCursor(0, 10);
dht.begin();
temperature.reserve(10);
humidity.reserve(10);
}
void loop() {
float humi = dht.readHumidity();
float tempC = dht.readTemperature();
if (isnan(humi) || isnan(tempC)) {
temperature = "Failed";
humidity = "Failed";
} else {
temperature = String(tempC, 1);
temperature += char(247);
temperature += "C";
humidity = String(humi, 1);
humidity += "%";
Serial.print(tempC);
Serial.print("°C | " );
Serial.print(humi);
Serial.println("%");
}
oledDisplayCenter(temperature, humidity);
}
void oledDisplayCenter(String temperature, String humidity) {
int16_t x1;
int16_t y1;
uint16_t width_T;
uint16_t height_T;
uint16_t width_H;
uint16_t height_H;
oled.getTextBounds(temperature, 0, 0, &x1, &y1, &width_T, &height_T);
oled.getTextBounds(temperature, 0, 0, &x1, &y1, &width_H, &height_H);
oled.clearDisplay();
oled.setCursor((SCREEN_WIDTH - width_T) / 2, SCREEN_HEIGHT / 2 - height_T - 5);
oled.println(temperature);
oled.setCursor((SCREEN_WIDTH - width_H) / 2, SCREEN_HEIGHT / 2 + 5);
oled.println(humidity);
oled.display();
}
※ Notiz:
Der Code für DHT11 und DHT22 ist identisch, abgesehen von einer Codezeile. Die Bibliothek für DHT11 und DHT22 ist dieselbe.
Wir erwägen die Erstellung von Video-Tutorials. Wenn Sie Video-Tutorials für wichtig halten, abonnieren Sie bitte unseren YouTube-Kanal , um uns zu motivieren, die Videos zu erstellen.