Arduino - SSD1309 OLED-Display 128x64 | 2,42 Zoll I2C OLED Tutorial

Ein OLED-Display (Organic Light-Emitting Diode) bietet selbstleuchtende Pixel, die ein tiefes Schwarz, hohen Kontrast und weite Blickwinkel liefern – und damit eine großartige Aufrüstung gegenüber herkömmlichen LCDs darstellen. Der SSD1309 ist der Treiber-IC, der üblicherweise auf 2,42-Zoll (manchmal als 2,4-Zoll bezeichnet) 128×64 I2C-OLED-Modulen zu finden ist.

Arduino SSD1309 OLED-Display

In dieser Schritt-für-Schritt-Anleitung lernen Sie, wie Sie das SSD1309 OLED 128×64 mit einem Arduino-Board verbinden und programmieren, wobei die DIYables_OLED_SSD1309-Bibliothek verwendet wird. Genauer gesagt werden wir Folgendes abdecken:

Erforderliche Hardware

1×Arduino Uno R3
1×USB 2.0 Kabel Typ A/B (für USB-A PC)
1×USB 2.0 Kabel Typ C/B (für USB-C PC)
1×SSD1309 I2C OLED Display 128x64 (2.42 inch)
1×Verbindungskabel
1×(Empfohlen) Schraubklemmenblock-Shield für Arduino Uno
1×(Empfohlen) Breadboard-Shield für Arduino Uno
1×(Empfohlen) Gehäuse für Arduino Uno
1×(Empfohlen) Prototyping-Grundplatte & Breadboard-Kit für Arduino Uno

Oder Sie können die folgenden Kits kaufen:

1×DIYables STEM V3 Starter-Kit (Arduino enthalten)
1×DIYables Sensor-Kit (30 Sensoren/Displays)
1×DIYables Sensor-Kit (18 Sensoren/Displays)
Offenlegung: Einige der in diesem Abschnitt bereitgestellten Links sind Amazon-Affiliate-Links. Wir können eine Provision für Käufe erhalten, die über diese Links getätigt werden, ohne zusätzliche Kosten für Sie. Wir schätzen Ihre Unterstützung.

Über das SSD1309 2,42-Zoll-OLED-Display

Der SSD1309 ist ein CMOS-OLED-Treiber-IC, der in einem einzigen Chip integriert ist und für 128×64 Dot-Matrix-Panelen entwickelt wurde. Er ist registerkompatibel mit dem weit verbreiteten SSD1306, sodass viele vorhandene Code-Beispiele mit nur minimalen Änderungen übernommen werden können. Die wesentlichen Hardware-Unterschiede sind:

  • Keine integrierte Ladespumpe — der SSD1309 benötigt eine externe VCC-Spannungsversorgung, wobei praktisch alle Breakout-Boards (einschließlich 2,42-Zoll- und 2,4-Zoll-Module) mit einem eingebauten Boost-Wandler geliefert werden, sodass dies für Sie transparent ist.
  • Höhere Spannungszulässigkeit — der SSD1309 akzeptiert bis zu 16 V VCC, während der SSD1306 auf ungefähr 4,2 V beschränkt ist.

Das 2,42-Zoll-(2,4-Zoll)-OLED-Modul verwendet typischerweise den SSD1309-Treiber und besitzt eine Auflösung von 128×64 Pixeln mit I2C-Schnittstelle. Die Panelfarbe (weiß, blau, gelb, grün oder Dual-Zone) wird durch das physische OLED-Material bestimmt und ist softwareseitig nicht steuerbar.

Dieses Tutorial kommuniziert mit dem Display über den I2C-Bus, der nur zwei Signalleitungen (SDA und SCL) benötigt und den Bus mit anderen I2C-Peripheriegeräten teilen kann.

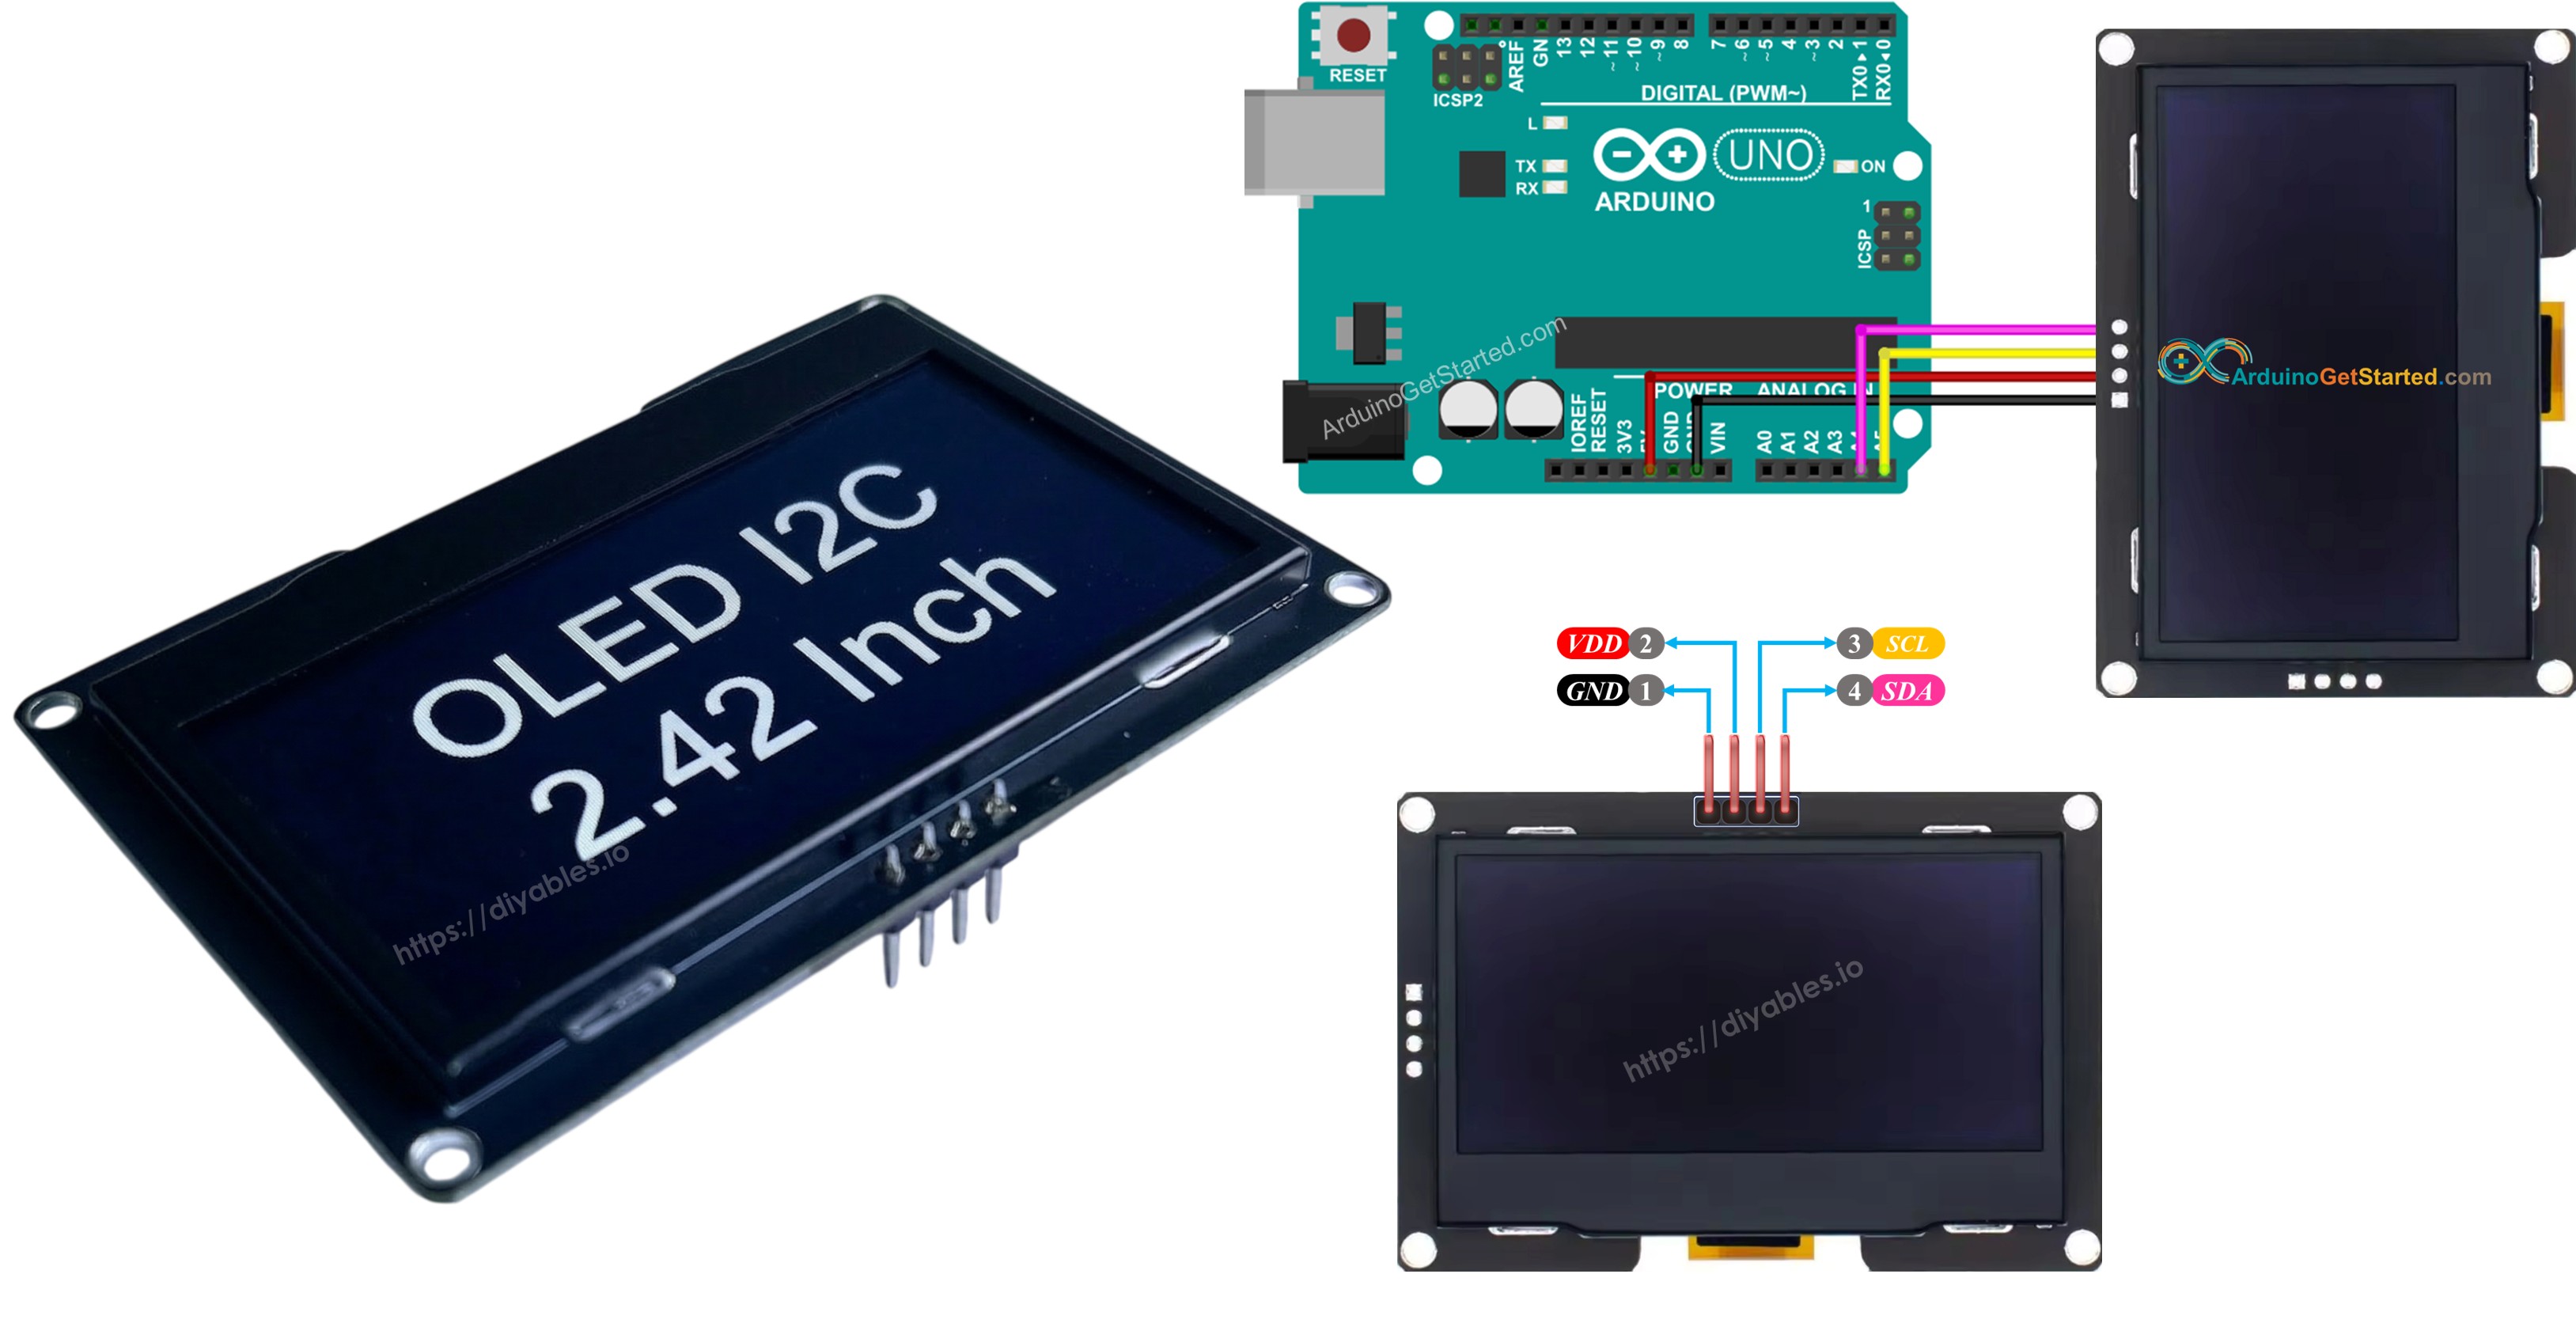
SSD1309 OLED-Pinbelegung (I2C-Modul)

Das typische 2,42-Zoll-SSD1309-I2C-OLED-Modul verfügt über vier Pins:

  • GND — Mit der Masse-Schiene des Arduino verbinden.
  • VCC — Stromversorgung. Mit dem Arduino 5 V (oder 3,3 V, je nach dem auf dem Modul integrierten Regler) verbinden.
  • SCL — I2C-Taktleitung.
  • SDA — I2C-Datenleitung.
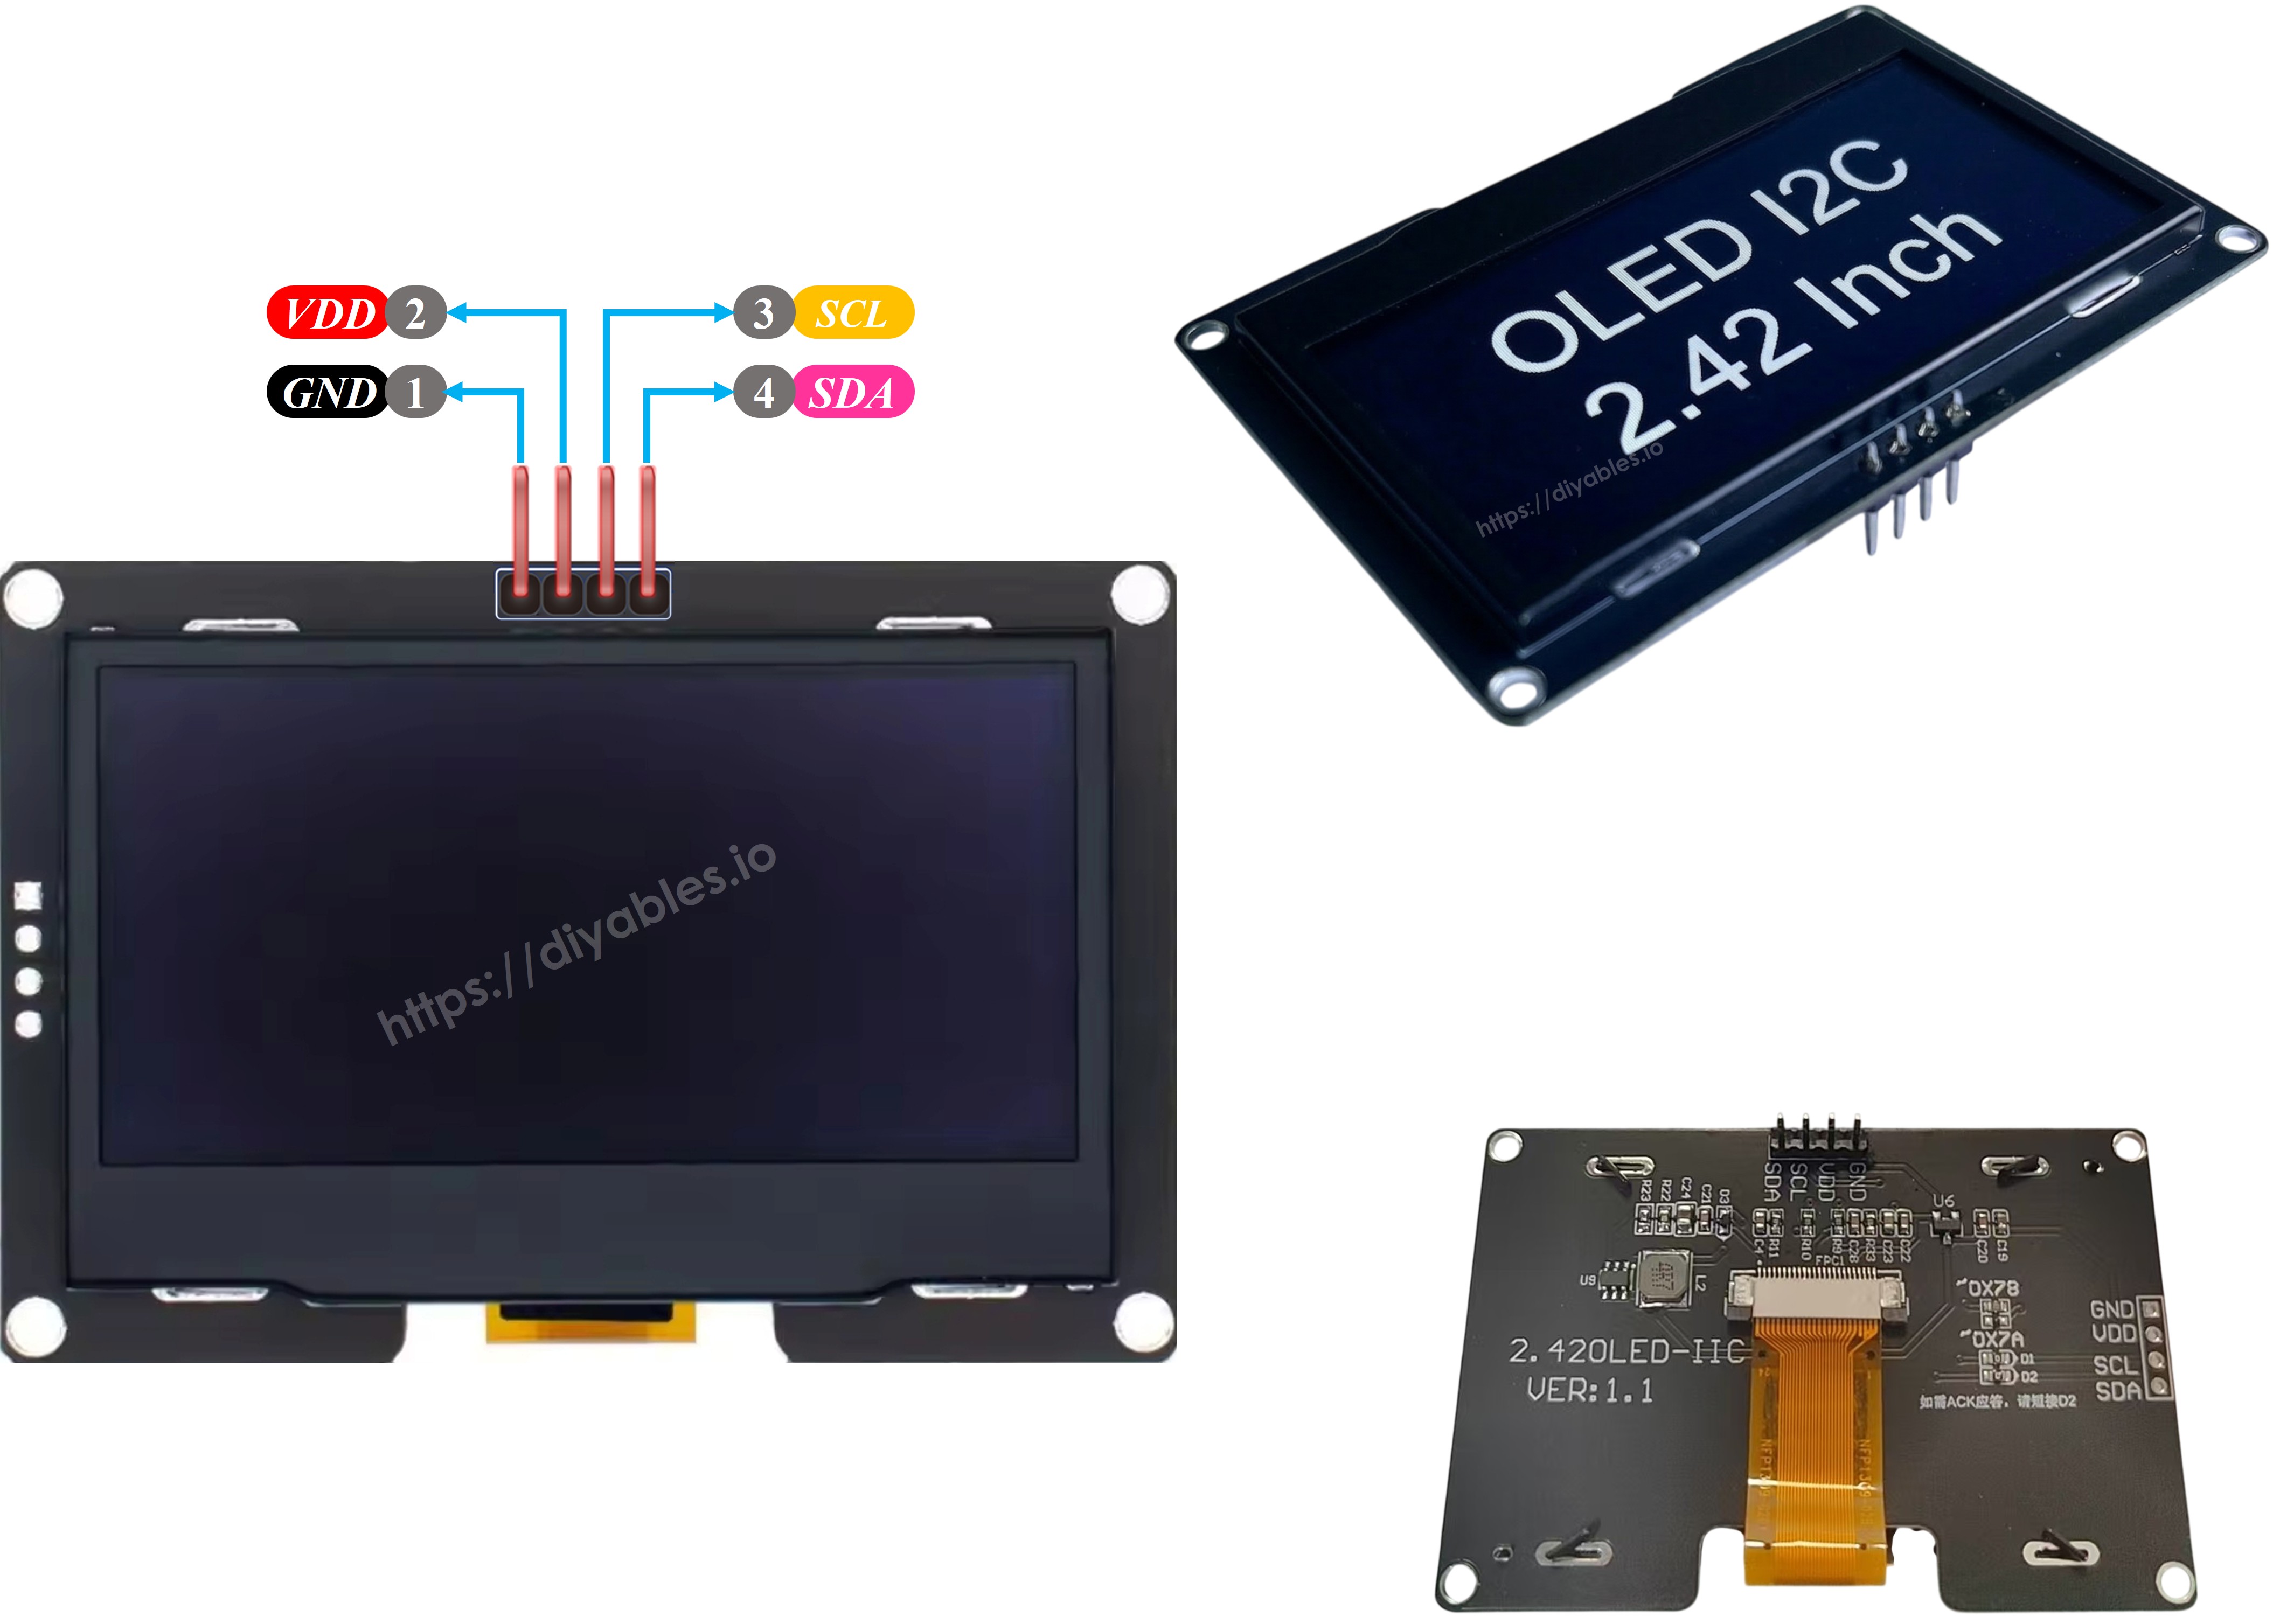
SSD1309 OLED Pinbelegung

※ Notiz:

  • Die Pin-Belegung variiert je nach Hersteller. Vergewissern Sie sich vor dem Verdrahten unbedingt, dass die auf Ihrem Modul aufgedruckten Beschriftungen korrekt sind.
  • Dieses Tutorial wurde mit dem 2,42-Zoll SSD1309 OLED-Display von DIYables verifiziert. Andere SSD1309-basierte 2,4/2,42-Zoll-Module sollten identisch funktionieren.

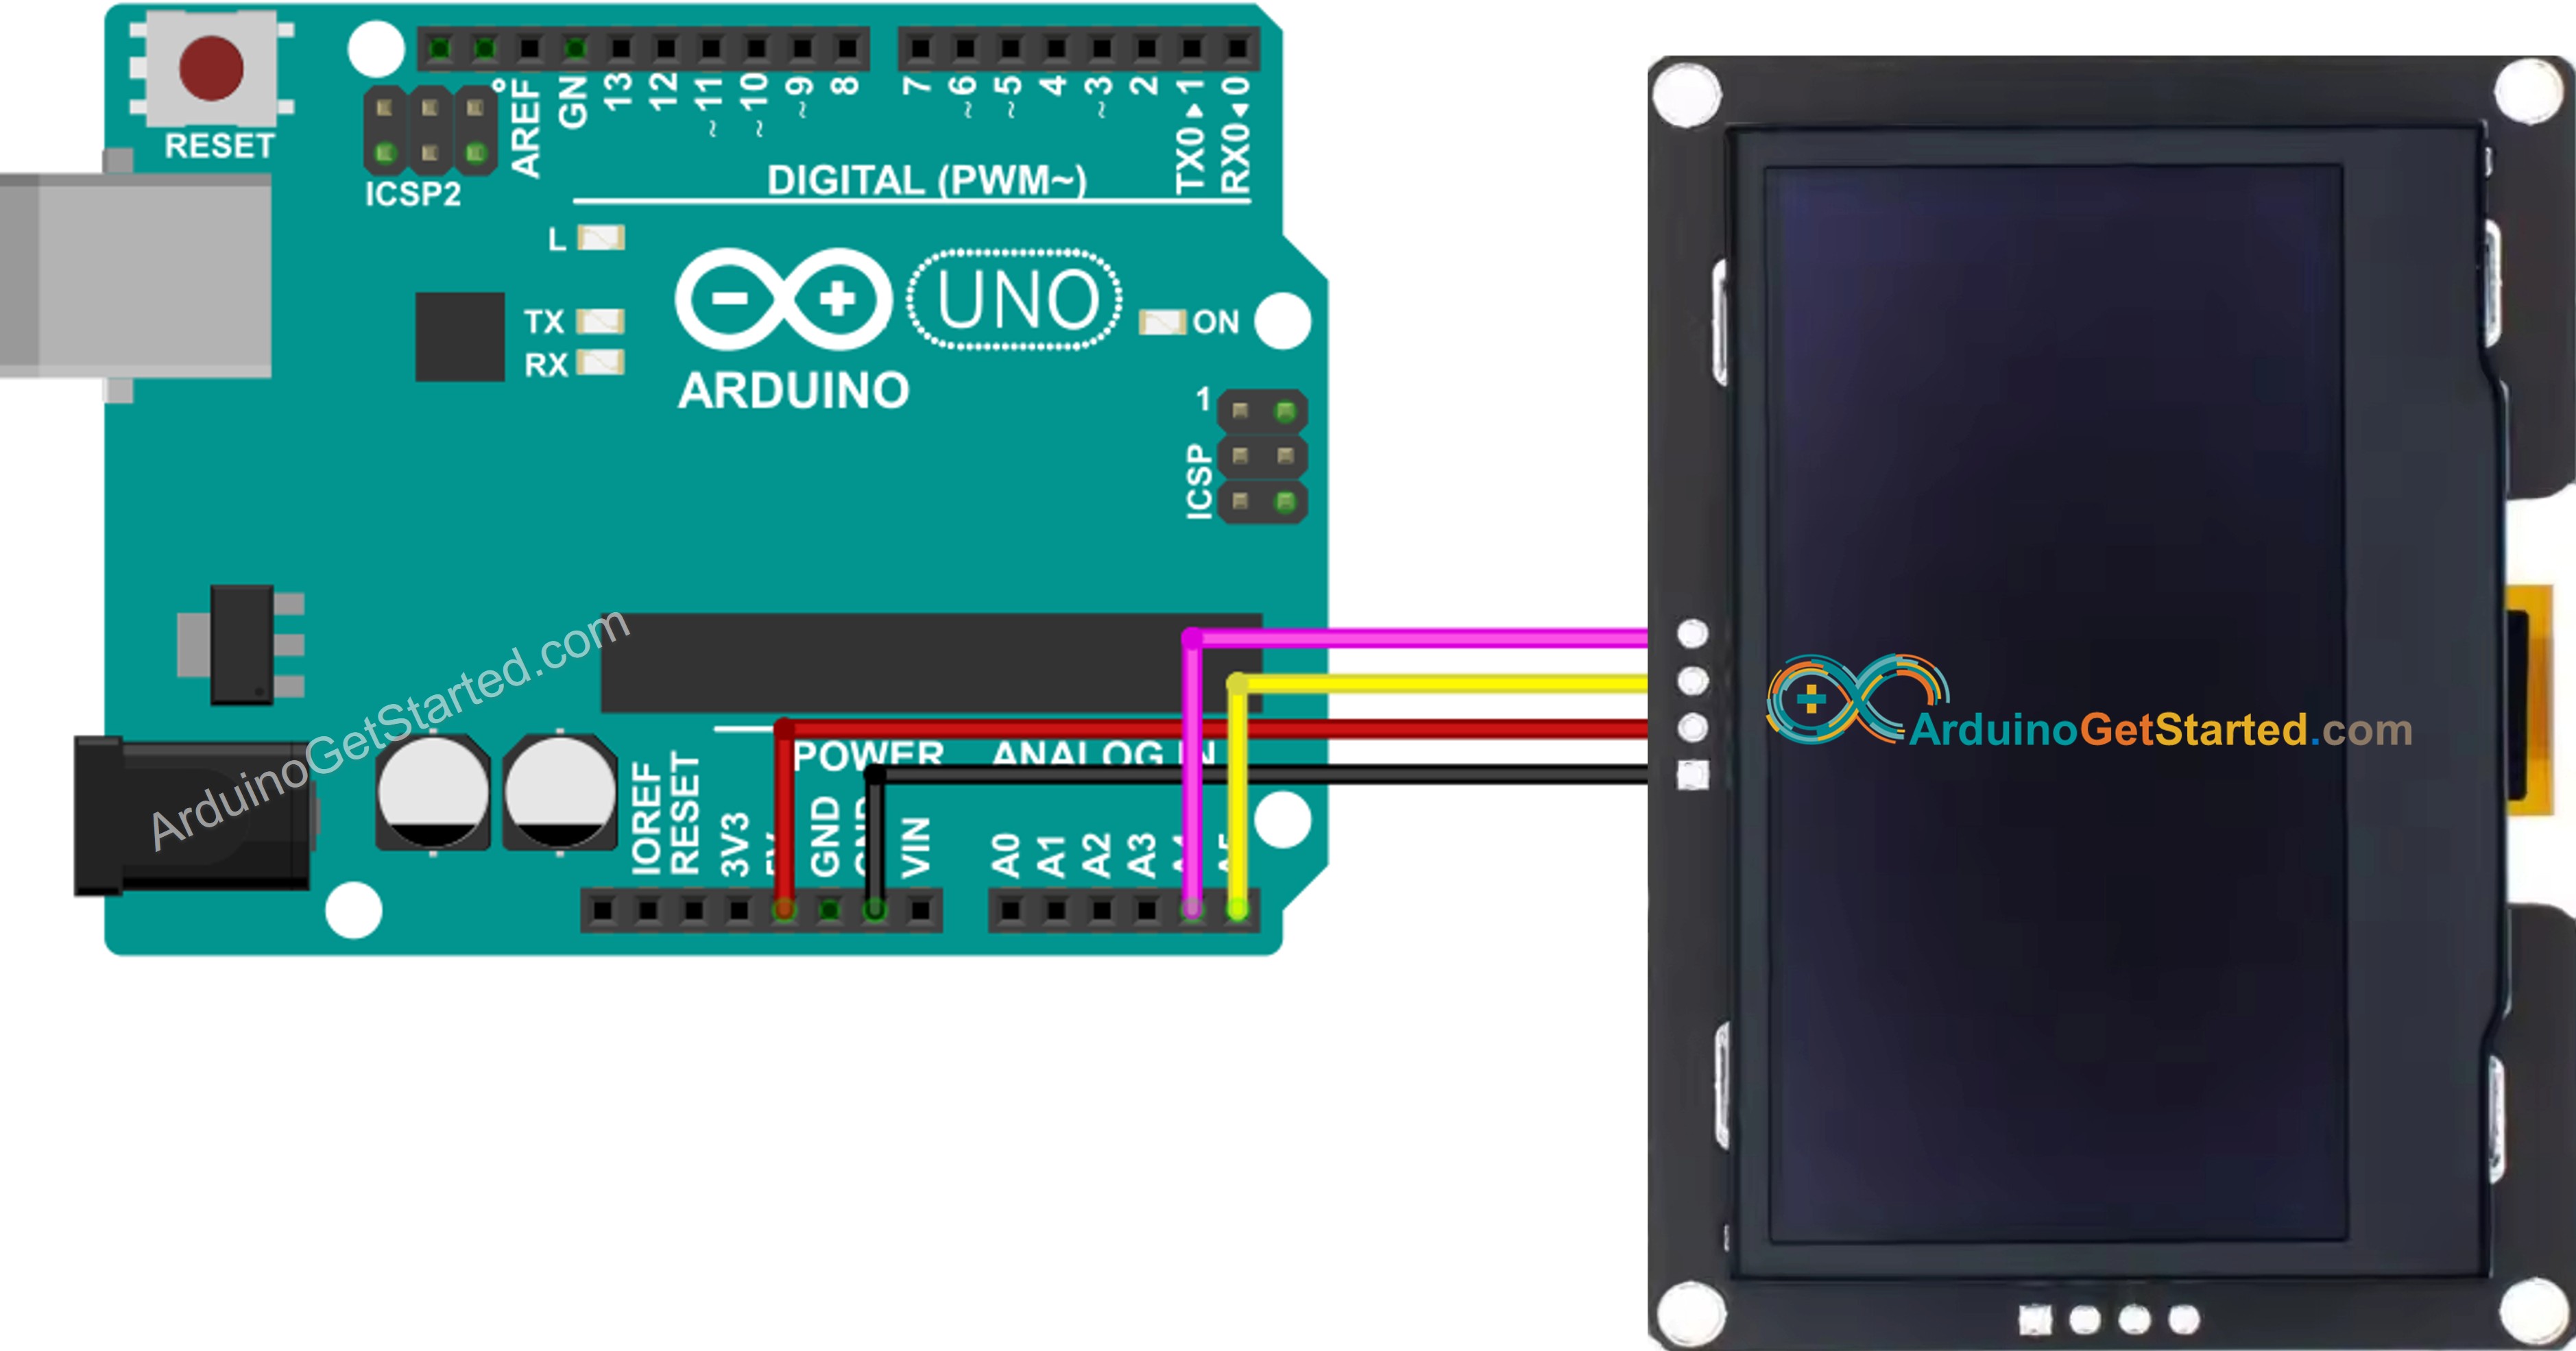
Schaltplan – Arduino und SSD1309 OLED 128×64

  • Schematische Verdrahtung zwischen Arduino und dem 2,42-Zoll SSD1309 OLED 128×64
Arduino SSD1309 OLED 128×64 Verdrahtungsdiagramm

Dieses Bild wurde mit Fritzing erstellt. Klicken Sie, um das Bild zu vergrößern.

  • Foto der tatsächlichen Verdrahtung zwischen Arduino und SSD1309-OLED 128×64
Arduino SSD1309 OLED 128x64 echte Verdrahtung

Dieses Bild wurde mit Fritzing erstellt. Klicken Sie, um das Bild zu vergrößern.

Bei der Verwendung einer anderen Arduino-Variante ändern sich die I2C-Pins. Die unten stehende Tabelle listet die richtigen Verbindungen auf.

OLED Module Arduino Uno, Nano Arduino Mega
Vin 5V 5V
GND GND GND
SDA A4 20
SCL A5 21

Erste Schritte – SSD1309-OLED mit Arduino

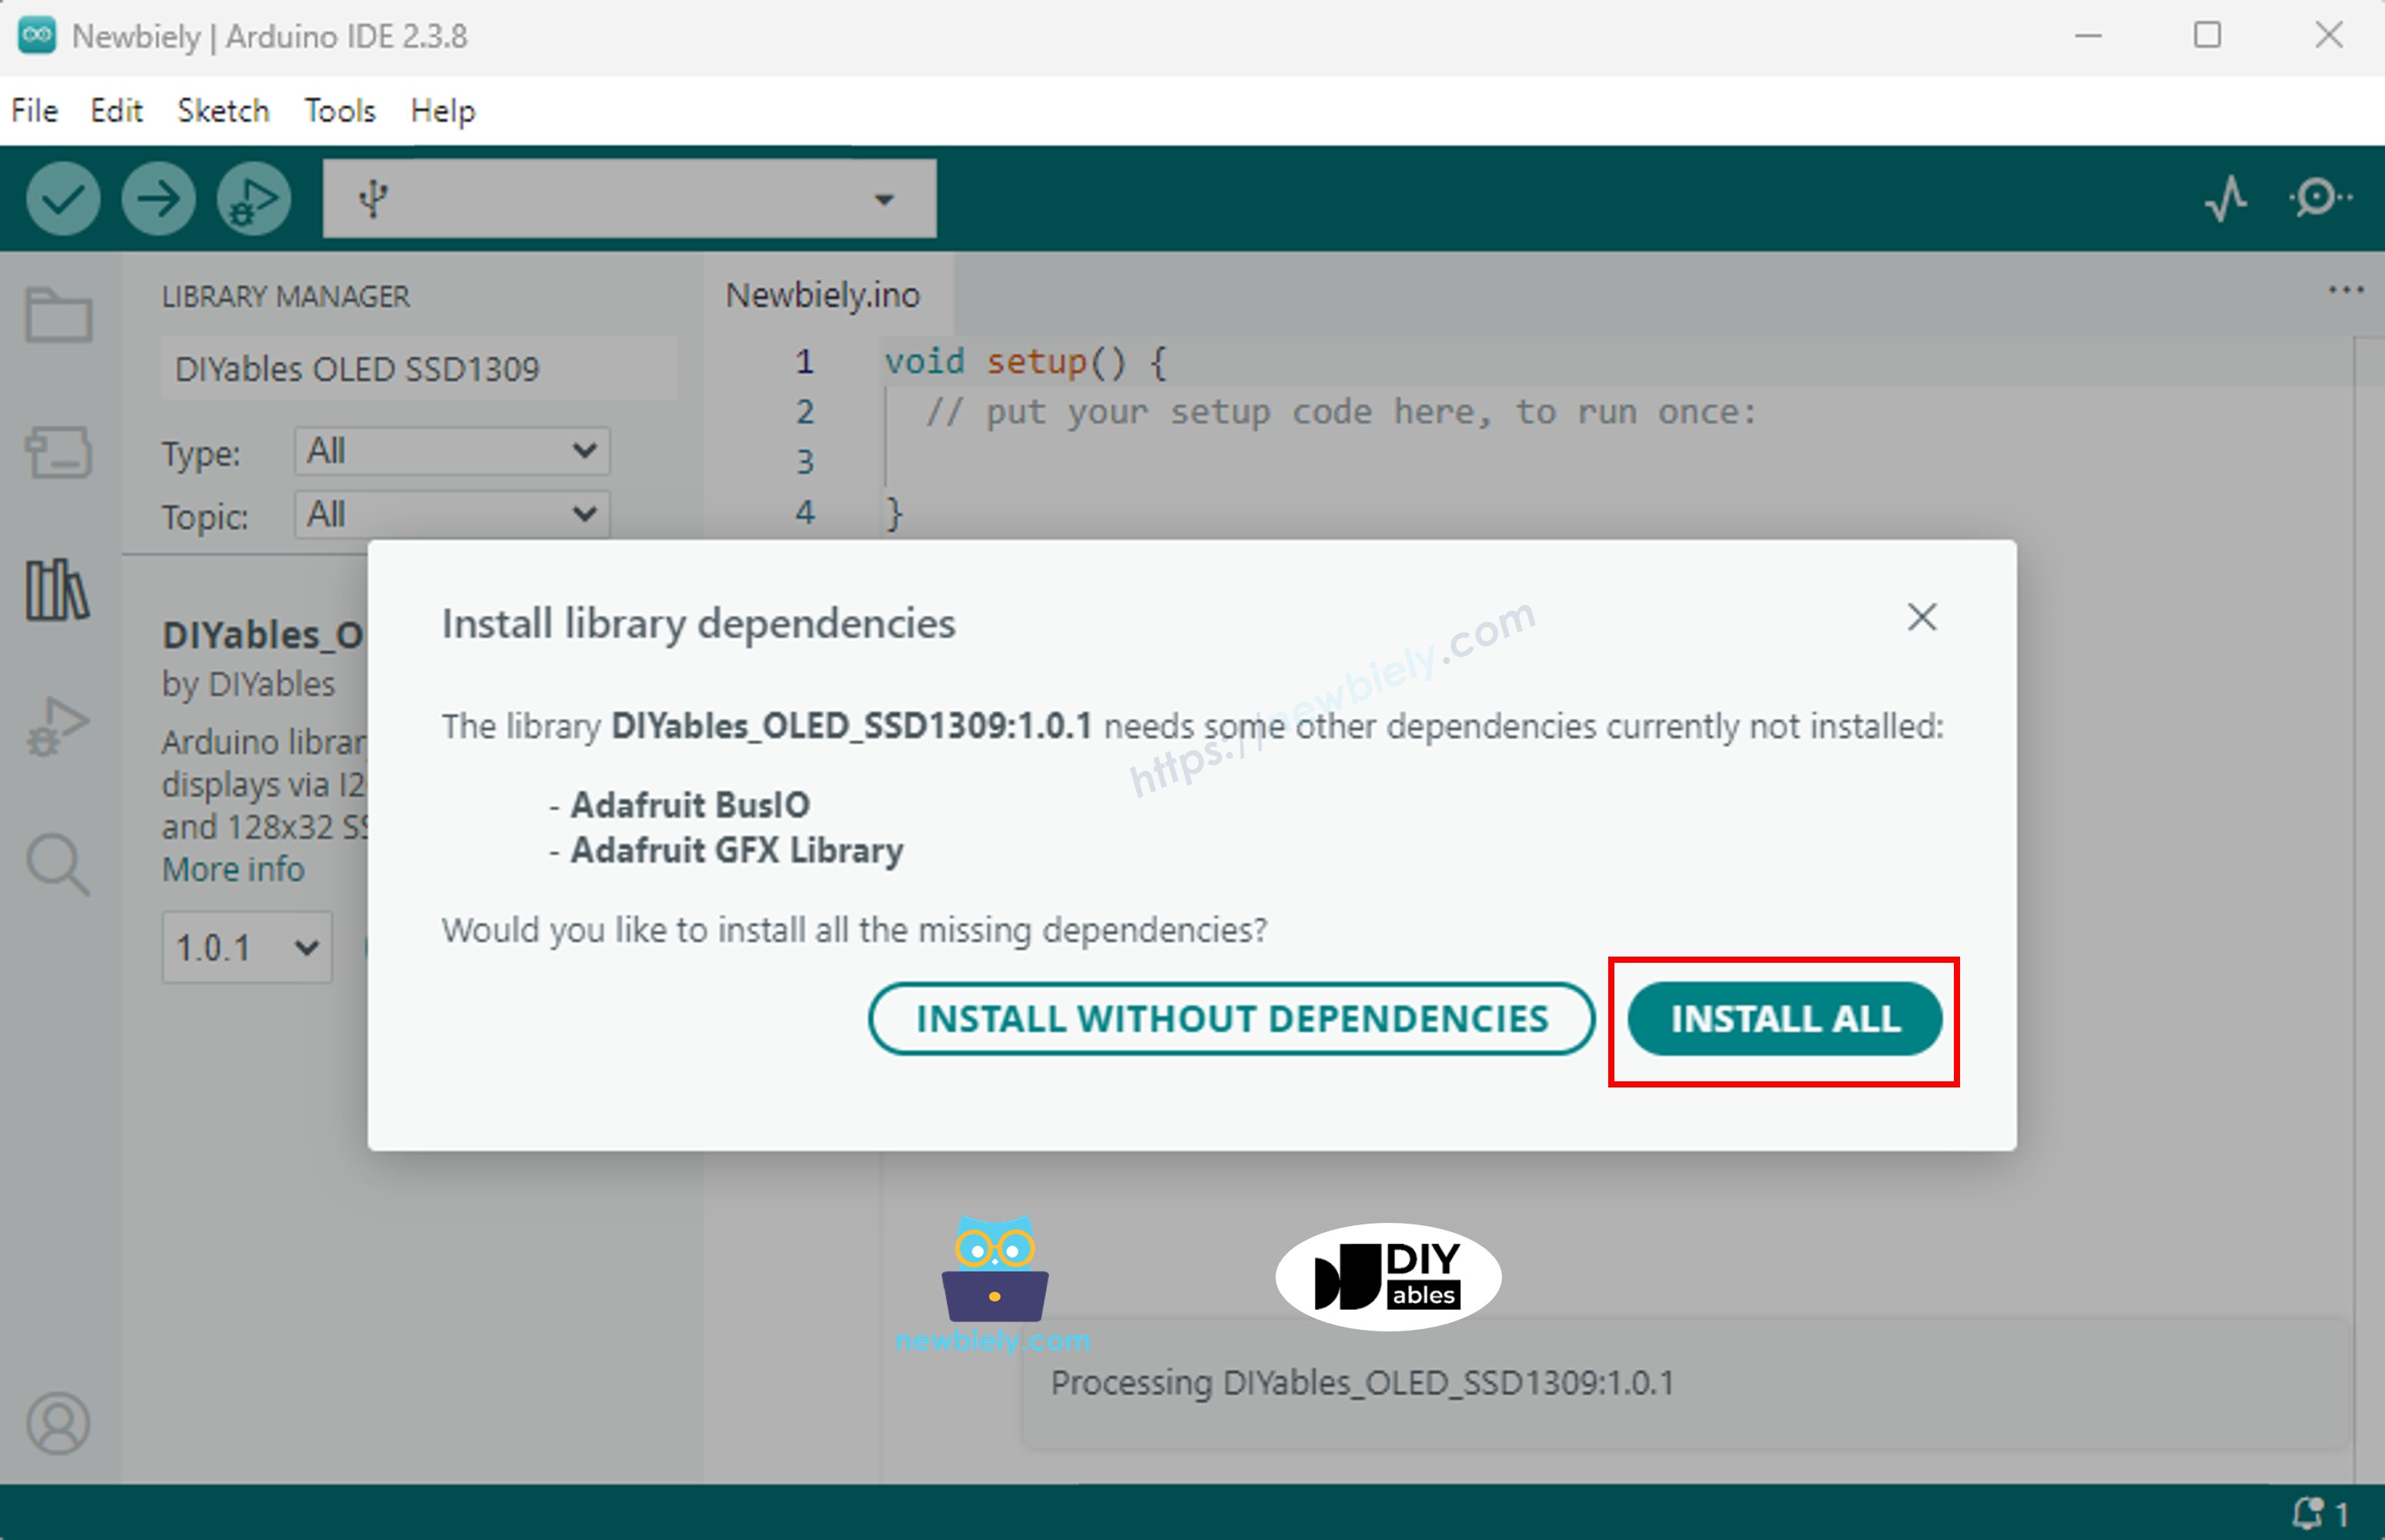
Schritt 1: Installieren Sie die DIYables_OLED_SSD1309-Bibliothek

  • Öffnen Sie die Arduino IDE und klicken Sie auf das Bibliotheken-Symbol in der linken Seitenleiste.
  • Geben Sie im Suchfeld "DIYables_OLED_SSD1309" ein und finden Sie die von DIYables veröffentlichte Bibliothek.
  • Klicken Sie auf die Installieren-Schaltfläche.
Arduino SSD1309 OLED-Bibliothek
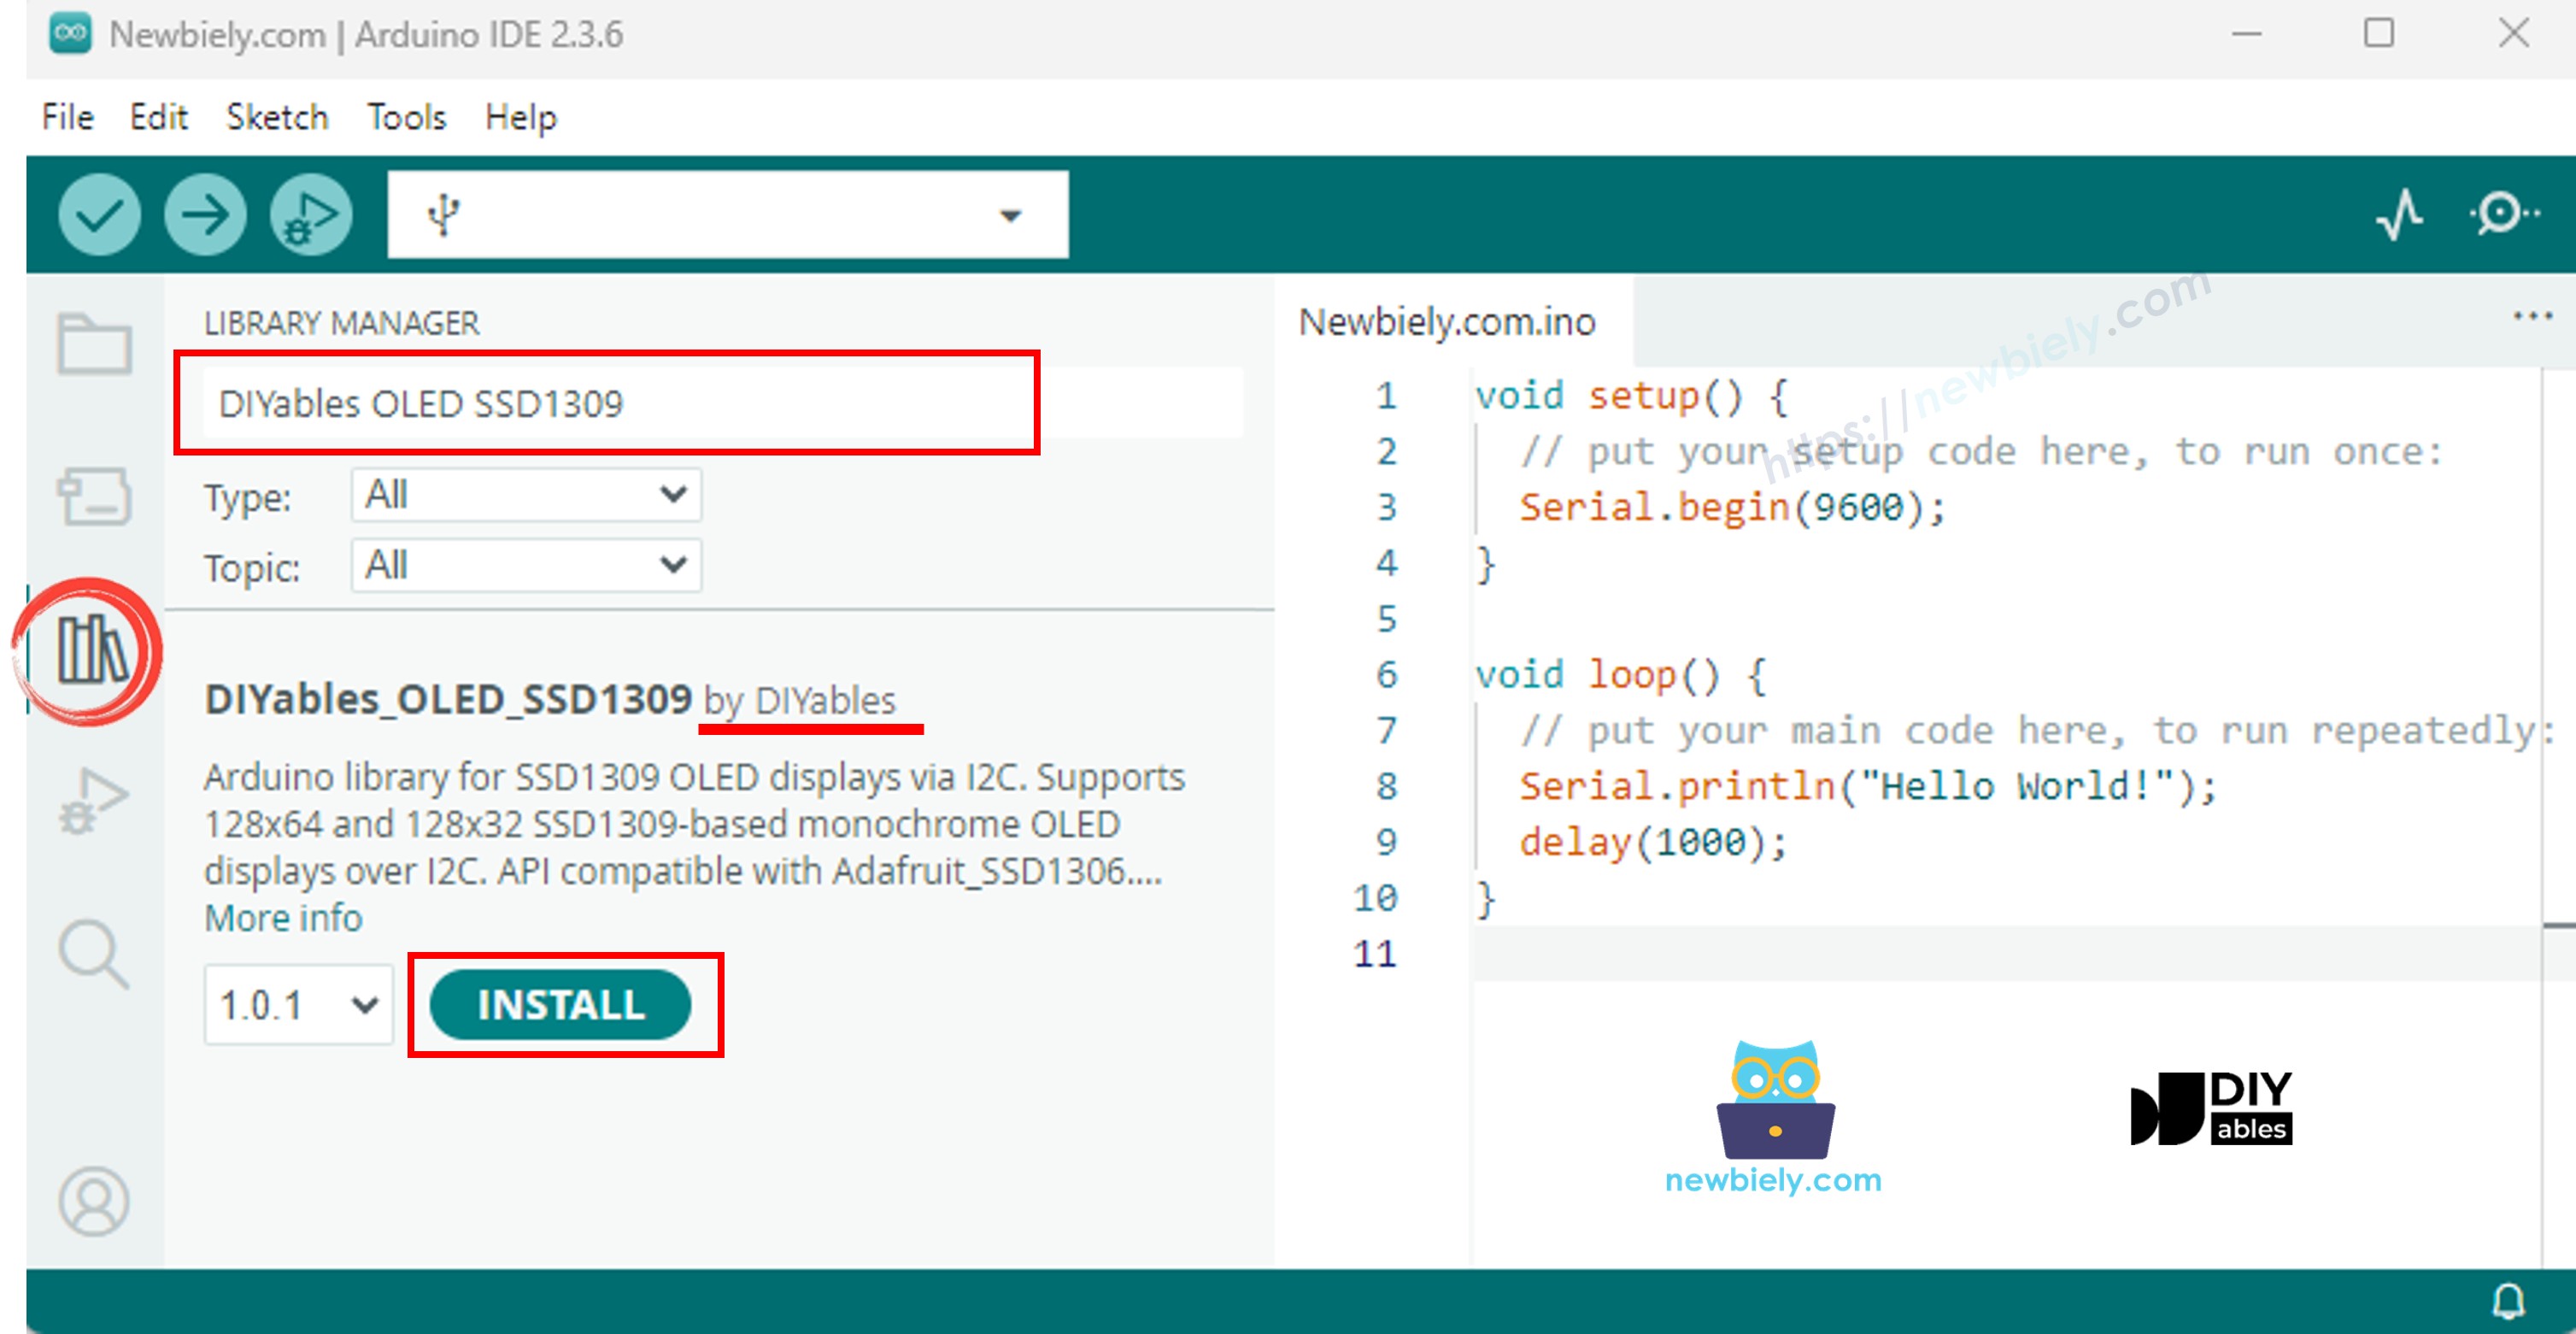
  • Die IDE wird Sie auffordern, die benötigte Abhängigkeit (Adafruit GFX Library) zu installieren. Klicken Sie auf Alle installieren, um fortzufahren.
Arduino Adafruit GFX-Bibliothek

Schritt 2: Grundlegendes Programmiermuster

Jeder Sketch, der den SSD1309 ansteuert, folgt dem gleichen Muster: Header-Dateien einbinden, ein Display-Objekt erstellen, es in setup() initialisieren, in den Offscreen-Puffer zeichnen, dann den Puffer mit display() auf dem Bildschirm anzeigen.

  • Die erforderlichen Header-Dateien einbinden:
#include <Wire.h> #include <Adafruit_GFX.h> #include <DIYables_OLED_SSD1309.h>
  • Stellen Sie die Bildschirmabmessungen ein (128×64 für das 2,42-Zoll-Modul):
#define SCREEN_WIDTH 128 // OLED display width, in pixels #define SCREEN_HEIGHT 64 // OLED display height, in pixels
  • Erzeuge das Display-Objekt (übergib -1, wenn kein Reset-Pin verbunden ist):
// Create an SSD1309 display instance on the default I2C bus DIYables_OLED_SSD1309 oled(SCREEN_WIDTH, SCREEN_HEIGHT, &Wire, -1);
  • Initialisiere das Display in setup():
// Initialise the SSD1309 — use address 0x3C (default for most modules) if (!oled.begin(SSD1309_SWITCHCAPVCC, 0x3C)) { Serial.println(F("SSD1309 allocation failed")); while (true); }
  • Danach kannst du jede Zeichnungsfunktion (clearDisplay(), drawPixel(), print(), usw.) aufrufen, gefolgt von oled.display(), um den Bildschirm zu aktualisieren.

※ Notiz:

Alle Beispielcodes in diesem Tutorial zielen auf das SSD1309 OLED 128×64 (2,42 Zoll) ab und verwenden die DIYables_OLED_SSD1309-Bibliothek.

Arduino-Code — Hallo Welt auf dem SSD1309-OLED-Display

Der einfachste Ausgangspunkt: Drucke einige Zeilen Text in unterschiedlichen Größen.

/* * Dieser Arduino Code wurde von newbiely.de entwickelt * Dieser Arduino Code wird der Öffentlichkeit ohne jegliche Einschränkung zur Verfügung gestellt. * Für vollständige Anleitungen und Schaltpläne besuchen Sie bitte: * https://newbiely.de/tutorials/arduino/arduino-ssd1309-oled-display */ /* * DIYables OLED SSD1309 – Hello World * Prints text in two sizes on the 2.42 inch 128x64 I2C OLED. */ #include <Wire.h> #include <Adafruit_GFX.h> #include <DIYables_OLED_SSD1309.h> #define SCREEN_WIDTH 128 #define SCREEN_HEIGHT 64 #define OLED_RESET -1 #define SCREEN_ADDRESS 0x3C DIYables_OLED_SSD1309 display(SCREEN_WIDTH, SCREEN_HEIGHT, &Wire, OLED_RESET); void setup() { Serial.begin(9600); if (!display.begin(SSD1309_SWITCHCAPVCC, SCREEN_ADDRESS)) { Serial.println(F("SSD1309 allocation failed")); for (;;); } display.clearDisplay(); display.setTextSize(1); // 6x8 pixels per character display.setTextColor(SSD1309_PIXEL_ON); // turn pixels on display.setCursor(0, 0); display.println(F("Hello, World!")); display.println(); display.setTextSize(2); // 12x16 pixels per character display.println(F("DIYables")); display.setTextSize(1); display.println(); display.println(F("SSD1309 OLED 128x64")); display.display(); // push buffer to screen } void loop() { }

Arduino-Code — Text auf SSD1309 OLED anzeigen

Das folgende Beispiel demonstriert weitere Textfunktionen — mehrere Größen, Zahlenformatierung und das F()-Makro zum Sparen von RAM.

/* * Dieser Arduino Code wurde von newbiely.de entwickelt * Dieser Arduino Code wird der Öffentlichkeit ohne jegliche Einschränkung zur Verfügung gestellt. * Für vollständige Anleitungen und Schaltpläne besuchen Sie bitte: * https://newbiely.de/tutorials/arduino/arduino-ssd1309-oled-display */ /* * DIYables OLED SSD1309 – Display Text Demo * Demonstrates text display features on 2.42" SSD1309 128x64 I2C OLED. */ #include <Wire.h> #include <Adafruit_GFX.h> #include <DIYables_OLED_SSD1309.h> #define SCREEN_WIDTH 128 #define SCREEN_HEIGHT 64 #define OLED_RESET -1 #define SCREEN_ADDRESS 0x3C DIYables_OLED_SSD1309 display(SCREEN_WIDTH, SCREEN_HEIGHT, &Wire, OLED_RESET); void setup() { Serial.begin(9600); if (!display.begin(SSD1309_SWITCHCAPVCC, SCREEN_ADDRESS)) { Serial.println(F("SSD1309 allocation failed")); for (;;); } delay(2000); // wait for initializing display.clearDisplay(); // clear display display.setTextSize(1); // text size = 1 display.setTextColor(SSD1309_PIXEL_ON); // set text color display.setCursor(0, 10); // set position to display display.println(F("Text size = 1")); // display text display.display(); // update display delay(2000); display.setTextSize(2); // text size = 2 display.setCursor(0, 30); // set position to display display.println(F("Size = 2")); // display text display.display(); // update display delay(2000); display.clearDisplay(); // clear display display.setTextSize(1); display.setCursor(0, 0); display.println(F("Display integer:")); display.println(12345); display.println(); display.println(F("Display float:")); display.println(1.2345); display.println(); display.println(F("Display HEX:")); display.println(0xABCD, HEX); display.display(); // update display } void loop() { }

Referenz zu nützlichen Anzeige-Funktionen

Nachfolgend finden Sie eine Schnellreferenzliste der am häufigsten verwendeten Funktionen beim Arbeiten mit dem SSD1309-OLED über die DIYables-Bibliothek:

  • oled.clearDisplay() — Lösche den Framebuffer (alle Pixel aus).
  • oled.display() — Übertrage den Puffer auf das OLED, damit Änderungen sichtbar werden.
  • oled.drawPixel(x, y, color) — Setze bzw. lösche einen einzelnen Pixel.
  • oled.setTextSize(n) — Skaliere die Schrift um den Faktor *n* (1 = 6×8, 2 = 12×16, …, bis zu 8).
  • oled.setCursor(x, y) — Bewege den Textcursor zu den Pixelkoordinaten *(x, y)*.
  • oled.setTextColor(SSD1309_PIXEL_ON) — Nur der Textvordergrund (Hintergrund ist transparent).
  • oled.setTextColor(SSD1309_PIXEL_OFF, SSD1309_PIXEL_ON) — Text mit expliziter Hintergrundfarbe.
  • oled.println("message") — Gibt eine Zeichenkette aus und springt zur nächsten Zeile.
  • oled.println(number) — Gibt eine Ganzzahl im Dezimalsystem aus.
  • oled.println(number, HEX) — Gibt eine Ganzzahl im Hexadezimalsystem aus.
  • oled.startscrollright(start, stop) — Hardware-Scroll nach rechts zwischen Seite *start* und Seite *stop*.
  • oled.startscrollleft(start, stop) — Hardware-Scroll nach links zwischen Seite *start* und Seite *stop*.
  • oled.startscrolldiagright(start, stop) — Hardware-Scroll diagonale nach rechts zwischen Seite *start* und Seite *stop*.
  • oled.startscrolldiagleft(start, stop) — Hardware-Scroll diagonale nach links zwischen Seite *start* und Seite *stop*.
  • oled.stopscroll() — Stoppe jegliches aktives Hardware-Scroll.
  • oled.setContrast(value) — Passe die Display-Helligkeit an (0–255).
  • oled.dim(true/false) — Dimmt das Display schnell auf den Minimalwert oder stellt den vorherigen Kontrast wieder her.
  • oled.invertDisplay(true/false) — Farb-Inversion auf Hardware-Ebene (Pixel an ↔ Pixel aus).

So zentrieren Sie Text vertikal und horizontal auf dem SSD1309 OLED

Siehe Wie man vertikal und horizontal auf OLED zentriert

Arduino-Code — Formen auf dem SSD1309-OLED-Display zeichnen

Da die DIYables_OLED_SSD1309-Bibliothek Adafruit_GFX erweitert, erhalten Sie eine vollständige Sammlung von Formen zum Zeichnen: Pixel, Linien, Rechtecke, ausgefüllte Rechtecke, Kreise, ausgefüllte Kreise, Dreiecke, ausgefüllte Dreiecke und abgerundete Rechtecke. Der unten gezeigte Sketch durchläuft alle mit animierten Demos.

/* * Dieser Arduino Code wurde von newbiely.de entwickelt * Dieser Arduino Code wird der Öffentlichkeit ohne jegliche Einschränkung zur Verfügung gestellt. * Für vollständige Anleitungen und Schaltpläne besuchen Sie bitte: * https://newbiely.de/tutorials/arduino/arduino-ssd1309-oled-display */ /* * DIYables OLED SSD1309 – Draw Shapes * Cycles through every shape primitive on the 2.42" SSD1309 128x64 OLED. */ #include <Wire.h> #include <Adafruit_GFX.h> #include <DIYables_OLED_SSD1309.h> #define SCREEN_WIDTH 128 #define SCREEN_HEIGHT 64 #define OLED_RESET -1 #define SCREEN_ADDRESS 0x3C DIYables_OLED_SSD1309 display(SCREEN_WIDTH, SCREEN_HEIGHT, &Wire, OLED_RESET); void setup() { Serial.begin(9600); if (!display.begin(SSD1309_SWITCHCAPVCC, SCREEN_ADDRESS)) { Serial.println(F("SSD1309 allocation failed")); for (;;); } display.clearDisplay(); } void loop() { // --- Pixels --- display.clearDisplay(); for (int16_t i = 0; i < display.width(); i += 4) { display.drawPixel(i, i * display.height() / display.width(), SSD1309_PIXEL_ON); } display.display(); delay(1500); // --- Lines --- display.clearDisplay(); for (int16_t i = 0; i < display.width(); i += 8) { display.drawLine(0, 0, i, display.height() - 1, SSD1309_PIXEL_ON); } for (int16_t i = 0; i < display.height(); i += 8) { display.drawLine(0, 0, display.width() - 1, i, SSD1309_PIXEL_ON); } display.display(); delay(1500); // --- Rectangles --- display.clearDisplay(); for (int16_t i = 0; i < display.height() / 2; i += 4) { display.drawRect(i, i, display.width() - 2 * i, display.height() - 2 * i, SSD1309_PIXEL_ON); } display.display(); delay(1500); // --- Filled rectangles (inverse) --- display.clearDisplay(); for (int16_t i = 0; i < display.height() / 2; i += 6) { display.fillRect(i, i, display.width() - 2 * i, display.height() - 2 * i, SSD1309_PIXEL_INVERSE); } display.display(); delay(1500); // --- Circles --- display.clearDisplay(); for (int16_t i = max(display.width(), display.height()) / 2; i > 0; i -= 5) { display.drawCircle(display.width() / 2, display.height() / 2, i, SSD1309_PIXEL_ON); } display.display(); delay(1500); // --- Filled circles (inverse) --- display.clearDisplay(); for (int16_t i = max(display.width(), display.height()) / 2; i > 0; i -= 6) { display.fillCircle(display.width() / 2, display.height() / 2, i, SSD1309_PIXEL_INVERSE); } display.display(); delay(1500); // --- Rounded rectangles --- display.clearDisplay(); for (int16_t i = 0; i < display.height() / 2 - 2; i += 4) { display.drawRoundRect(i, i, display.width() - 2 * i, display.height() - 2 * i, display.height() / 4, SSD1309_PIXEL_ON); } display.display(); delay(1500); // --- Filled rounded rectangles (inverse) --- display.clearDisplay(); for (int16_t i = 0; i < display.height() / 2 - 2; i += 4) { display.fillRoundRect(i, i, display.width() - 2 * i, display.height() - 2 * i, display.height() / 4, SSD1309_PIXEL_INVERSE); } display.display(); delay(1500); // --- Triangles --- display.clearDisplay(); for (int16_t i = 0; i < max(display.width(), display.height()) / 2; i += 5) { display.drawTriangle( display.width() / 2, display.height() / 2 - i, display.width() / 2 - i, display.height() / 2 + i, display.width() / 2 + i, display.height() / 2 + i, SSD1309_PIXEL_ON); } display.display(); delay(1500); // --- Filled triangles (inverse) --- display.clearDisplay(); for (int16_t i = max(display.width(), display.height()) / 2; i > 0; i -= 6) { display.fillTriangle( display.width() / 2, display.height() / 2 - i, display.width() / 2 - i, display.height() / 2 + i, display.width() / 2 + i, display.height() / 2 + i, SSD1309_PIXEL_INVERSE); } display.display(); delay(1500); }

Arduino-Code – Hardware-Scrollen auf einem SSD1309-OLED

Der SSD1309 verfügt über einen eingebauten Scroll-Mechanismus, der den Anzeigeninhalt verschiebt, ohne CPU-Last zu verursachen. Die DIYables-Bibliothek bietet vier Scrollrichtungen: rechts, links, diagonal-rechts und diagonal-links. Jede nimmt einen Startseiten- und einen Endseitenparameter (Seiten sind 8 Pixel hohe horizontale Streifen, die auf einem 64-Pixel-hohen Display von 0 bis 7 nummeriert sind).

※ Notiz:

Rufen Sie immer display() auf, um Ihre Inhalte auf dem OLED anzuzeigen, bevor Sie mit dem Scrollen beginnen. Vermeiden Sie es, während des Scrollens neue Inhalte zu zeichnen — rufen Sie zuerst stopscroll() auf.

/* * Dieser Arduino Code wurde von newbiely.de entwickelt * Dieser Arduino Code wird der Öffentlichkeit ohne jegliche Einschränkung zur Verfügung gestellt. * Für vollständige Anleitungen und Schaltpläne besuchen Sie bitte: * https://newbiely.de/tutorials/arduino/arduino-ssd1309-oled-display */ /* * DIYables OLED SSD1309 – Scroll Text * Demonstrates all four hardware scroll directions on the 2.42" OLED. */ #include <Wire.h> #include <Adafruit_GFX.h> #include <DIYables_OLED_SSD1309.h> #define SCREEN_WIDTH 128 #define SCREEN_HEIGHT 64 #define OLED_RESET -1 #define SCREEN_ADDRESS 0x3C DIYables_OLED_SSD1309 display(SCREEN_WIDTH, SCREEN_HEIGHT, &Wire, OLED_RESET); void setup() { Serial.begin(9600); if (!display.begin(SSD1309_SWITCHCAPVCC, SCREEN_ADDRESS)) { Serial.println(F("SSD1309 allocation failed")); for (;;); } display.clearDisplay(); display.setTextSize(2); display.setTextColor(SSD1309_PIXEL_ON); display.setCursor(10, 24); display.println(F("DIYables")); display.display(); delay(2000); } void loop() { // Scroll right across all pages display.startscrollright(0x00, 0x07); delay(3000); display.stopscroll(); delay(500); // Scroll left display.startscrollleft(0x00, 0x07); delay(3000); display.stopscroll(); delay(500); // Diagonal scroll right display.startscrolldiagright(0x00, 0x07); delay(3000); display.stopscroll(); delay(500); // Diagonal scroll left display.startscrolldiagleft(0x00, 0x07); delay(3000); display.stopscroll(); delay(500); }

Arduino-Code – Bitmap-Bild auf dem SSD1309-OLED-Display anzeigen

Um eine Bitmap auf dem SSD1309-OLED darzustellen, musst du zuerst dein Bild in ein C-Byte-Array konvertieren. Verwende das kostenlose image2cpp Online-Tool, um dies zu tun:

  1. Laden Sie Ihr Bild hoch (PNG, JPG, BMP usw.).
  2. Setzen Sie die Leinwandgröße auf 128×64 (oder kleiner).
  3. Wählen Sie Arduino-Code als Ausgabformat.
  4. Kopieren Sie das generierte Array in Ihren Sketch.
Bild zu Bitmap-Array

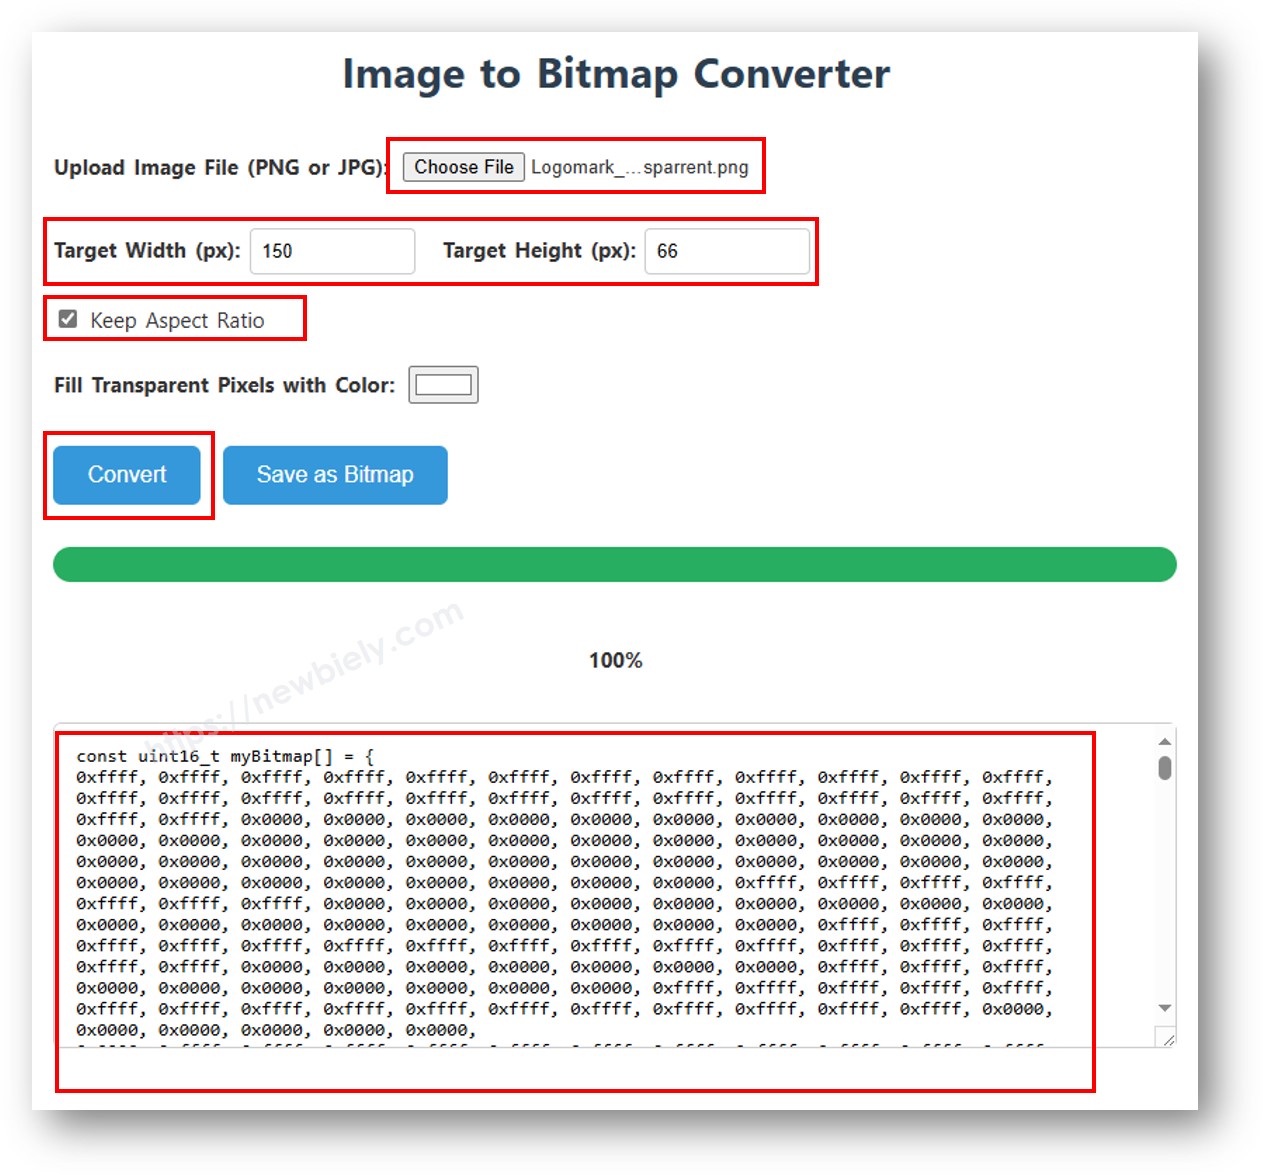
Das untenstehende Beispiel wechselt zwischen einem 16×16-Herzsymbol und einem DIYables-Logo in voller Breite:

/* * Dieser Arduino Code wurde von newbiely.de entwickelt * Dieser Arduino Code wird der Öffentlichkeit ohne jegliche Einschränkung zur Verfügung gestellt. * Für vollständige Anleitungen und Schaltpläne besuchen Sie bitte: * https://newbiely.de/tutorials/arduino/arduino-ssd1309-oled-display */ /* * DIYables OLED SSD1309 – Display Image Demo * Displays bitmap images on the 2.42" SSD1309 128x64 I2C OLED. */ #include <Wire.h> #include <Adafruit_GFX.h> #include <DIYables_OLED_SSD1309.h> #define SCREEN_WIDTH 128 #define SCREEN_HEIGHT 64 #define OLED_RESET -1 #define SCREEN_ADDRESS 0x3C DIYables_OLED_SSD1309 display(SCREEN_WIDTH, SCREEN_HEIGHT, &Wire, OLED_RESET); // 16x16 heart bitmap const unsigned char heart16x16[] PROGMEM = { 0x00, 0x00, 0x03, 0xc0, 0x0f, 0xf0, 0x1f, 0xf8, 0x3f, 0xfc, 0x7f, 0xfe, 0xff, 0xff, 0xff, 0xff, 0xff, 0xff, 0xff, 0xff, 0x7f, 0xfe, 0x3f, 0xfc, 0x1f, 0xf8, 0x0f, 0xf0, 0x03, 0xc0, 0x00, 0x00 }; // 128x64 DIYables logo bitmap const unsigned char diyablesLogo[] PROGMEM = { 0xff, 0xff, 0xff, 0xff, 0xff, 0xff, 0xff, 0xff, 0xff, 0xff, 0xff, 0xff, 0xff, 0xff, 0xff, 0xff, 0xff, 0xff, 0xff, 0xff, 0xff, 0xff, 0xff, 0xff, 0xff, 0xff, 0xff, 0xff, 0xff, 0xff, 0xff, 0xff, 0xff, 0xff, 0xfe, 0x00, 0x07, 0xff, 0xff, 0xff, 0xff, 0xff, 0xff, 0x80, 0x01, 0xff, 0xff, 0xff, 0xff, 0xff, 0xe0, 0x00, 0x00, 0xff, 0xff, 0xff, 0xff, 0xff, 0xfc, 0x00, 0x00, 0x3f, 0xff, 0xff, 0xff, 0xff, 0x80, 0x00, 0x00, 0x1f, 0xff, 0xff, 0xff, 0xff, 0xe0, 0x00, 0x00, 0x07, 0xff, 0xff, 0xff, 0xfe, 0x00, 0x00, 0x00, 0x07, 0xff, 0xff, 0xff, 0xff, 0x80, 0x00, 0x00, 0x01, 0xff, 0xff, 0xff, 0xfc, 0x00, 0x00, 0x00, 0x03, 0xff, 0xff, 0xff, 0xff, 0x00, 0x00, 0x00, 0x00, 0xff, 0xff, 0xff, 0xf0, 0x00, 0x00, 0x00, 0x00, 0xff, 0xff, 0xff, 0xfc, 0x00, 0x00, 0x00, 0x00, 0x3f, 0xff, 0xff, 0xe0, 0x00, 0x00, 0x00, 0x00, 0x3f, 0xff, 0xff, 0xf0, 0x00, 0x00, 0x00, 0x00, 0x1f, 0xff, 0xff, 0xc0, 0x00, 0x00, 0x00, 0x00, 0x1f, 0xff, 0xff, 0xe0, 0x00, 0x00, 0x00, 0x00, 0x0f, 0xff, 0xff, 0x80, 0x00, 0x00, 0x00, 0x00, 0x0f, 0xff, 0xff, 0xc0, 0x00, 0x00, 0x00, 0x00, 0x07, 0xff, 0xff, 0x00, 0x00, 0x00, 0x00, 0x00, 0x03, 0xff, 0xff, 0x80, 0x00, 0x00, 0x00, 0x00, 0x03, 0xff, 0xfe, 0x00, 0x00, 0x00, 0x00, 0x00, 0x01, 0xff, 0xfe, 0x00, 0x00, 0x00, 0x00, 0x00, 0x01, 0xff, 0xfc, 0x00, 0x00, 0xff, 0xf0, 0x00, 0x00, 0xff, 0xfc, 0x00, 0x00, 0x3f, 0xfc, 0x00, 0x00, 0xff, 0xfc, 0x00, 0x03, 0xff, 0xfc, 0x00, 0x00, 0x7f, 0xf8, 0x00, 0x00, 0xff, 0xff, 0x00, 0x00, 0xff, 0xf8, 0x00, 0x0f, 0xff, 0xff, 0x00, 0x00, 0x3f, 0xf0, 0x00, 0x03, 0xff, 0xff, 0xc0, 0x00, 0x7f, 0xf0, 0x00, 0x1f, 0xff, 0xff, 0xc0, 0x00, 0x1f, 0xe0, 0x00, 0x0f, 0xff, 0xff, 0xe0, 0x00, 0x7f, 0xf0, 0x00, 0x7f, 0xff, 0xff, 0xe0, 0x00, 0x0f, 0xc0, 0x00, 0x1f, 0xff, 0xff, 0xf8, 0x00, 0x3f, 0xe0, 0x00, 0xff, 0xff, 0xff, 0xf8, 0x00, 0x07, 0x80, 0x00, 0x7f, 0xff, 0xff, 0xfc, 0x00, 0x1f, 0xe0, 0x00, 0xff, 0xff, 0xff, 0xfc, 0x00, 0x03, 0x80, 0x00, 0xff, 0xff, 0xff, 0xfc, 0x00, 0x1f, 0xc0, 0x01, 0xff, 0xff, 0xff, 0xfe, 0x00, 0x03, 0x00, 0x01, 0xff, 0xff, 0xff, 0xfe, 0x00, 0x1f, 0xc0, 0x03, 0xff, 0xff, 0xff, 0xff, 0x00, 0x00, 0x00, 0x03, 0xff, 0xff, 0xff, 0xff, 0x00, 0x0f, 0xc0, 0x03, 0xff, 0xff, 0xff, 0xff, 0x80, 0x00, 0x00, 0x07, 0xff, 0xf0, 0x7f, 0xff, 0x00, 0x0f, 0xc0, 0x07, 0xff, 0xff, 0xff, 0xff, 0xc0, 0x00, 0x00, 0x0f, 0xff, 0xf0, 0x7f, 0xff, 0x80, 0x0f, 0x80, 0x07, 0xff, 0xff, 0xff, 0xff, 0xe0, 0x00, 0x00, 0x1f, 0xff, 0xf0, 0x7f, 0xff, 0x80, 0x07, 0x80, 0x0f, 0xff, 0xff, 0xff, 0xff, 0xf0, 0x00, 0x00, 0x3f, 0xff, 0xf0, 0x7f, 0xff, 0xc0, 0x07, 0x80, 0x0f, 0xff, 0xff, 0xff, 0xff, 0xf8, 0x00, 0x00, 0x7f, 0xff, 0xf0, 0x7f, 0xff, 0xc0, 0x07, 0x80, 0x0f, 0xfe, 0x00, 0x00, 0xff, 0xfc, 0x00, 0x00, 0xff, 0xfc, 0x00, 0x03, 0xff, 0xc0, 0x07, 0x80, 0x0f, 0xfe, 0x00, 0x00, 0xff, 0xfe, 0x00, 0x01, 0xff, 0xfc, 0x00, 0x01, 0xff, 0xc0, 0x07, 0x80, 0x0f, 0xfe, 0x00, 0x00, 0xff, 0xff, 0x00, 0x03, 0xff, 0xfc, 0x00, 0x01, 0xff, 0xc0, 0x07, 0x80, 0x0f, 0xfe, 0x00, 0x00, 0xff, 0xff, 0x00, 0x03, 0xff, 0xfc, 0x00, 0x01, 0xff, 0xc0, 0x07, 0x80, 0x0f, 0xfe, 0x00, 0x00, 0xff, 0xff, 0x00, 0x03, 0xff, 0xfc, 0x00, 0x01, 0xff, 0xc0, 0x07, 0x80, 0x0f, 0xff, 0xff, 0xff, 0xff, 0xfe, 0x00, 0x01, 0xff, 0xff, 0xe0, 0x7f, 0xff, 0xc0, 0x07, 0x80, 0x0f, 0xff, 0xff, 0xff, 0xff, 0xfc, 0x00, 0x00, 0xff, 0xff, 0xf0, 0x7f, 0xff, 0xc0, 0x07, 0x80, 0x0f, 0xff, 0xff, 0xff, 0xff, 0xfc, 0x00, 0x00, 0xff, 0xff, 0xf0, 0x7f, 0xff, 0xc0, 0x07, 0x80, 0x0f, 0xff, 0xff, 0xff, 0xff, 0xf8, 0x00, 0x00, 0x7f, 0xff, 0xf0, 0x7f, 0xff, 0xc0, 0x07, 0x80, 0x0f, 0xff, 0xff, 0xff, 0xff, 0xf0, 0x00, 0x00, 0x3f, 0xff, 0xf0, 0x7f, 0xff, 0x80, 0x07, 0x80, 0x07, 0xff, 0xff, 0xff, 0xff, 0xe0, 0x00, 0x00, 0x1f, 0xff, 0xf0, 0x7f, 0xff, 0x80, 0x07, 0xc0, 0x07, 0xff, 0xff, 0xff, 0xff, 0xc0, 0x00, 0x00, 0x0f, 0xff, 0xff, 0xff, 0xff, 0x80, 0x0f, 0xc0, 0x03, 0xff, 0xff, 0xff, 0xff, 0x80, 0x00, 0x00, 0x07, 0xff, 0xff, 0xff, 0xff, 0x00, 0x0f, 0xc0, 0x03, 0xff, 0xff, 0xff, 0xff, 0x00, 0x00, 0x00, 0x03, 0xff, 0xff, 0xff, 0xff, 0x00, 0x0f, 0xe0, 0x01, 0xff, 0xff, 0xff, 0xfe, 0x00, 0x03, 0x00, 0x01, 0xff, 0xff, 0xff, 0xfe, 0x00, 0x1f, 0xe0, 0x00, 0xff, 0xff, 0xff, 0xfc, 0x00, 0x07, 0x80, 0x00, 0xff, 0xff, 0xff, 0xfc, 0x00, 0x1f, 0xe0, 0x00, 0x7f, 0xff, 0xff, 0xf0, 0x00, 0x0f, 0xc0, 0x00, 0x3f, 0xff, 0xff, 0xf8, 0x00, 0x3f, 0xf0, 0x00, 0x3f, 0xff, 0xff, 0xe0, 0x00, 0x1f, 0xe0, 0x00, 0x1f, 0xff, 0xff, 0xf0, 0x00, 0x3f, 0xf8, 0x00, 0x1f, 0xff, 0xff, 0x80, 0x00, 0x3f, 0xe0, 0x00, 0x07, 0xff, 0xff, 0xe0, 0x00, 0x7f, 0xf8, 0x00, 0x0f, 0xff, 0xff, 0x00, 0x00, 0x7f, 0xf8, 0x00, 0x03, 0xff, 0xff, 0xc0, 0x00, 0x7f, 0xfc, 0x00, 0x03, 0xff, 0xf8, 0x00, 0x00, 0xff, 0xfc, 0x00, 0x00, 0xff, 0xff, 0x00, 0x00, 0xff, 0xfe, 0x00, 0x00, 0x7f, 0xe0, 0x00, 0x01, 0xff, 0xfe, 0x00, 0x00, 0x1f, 0xf8, 0x00, 0x01, 0xff, 0xfe, 0x00, 0x00, 0x00, 0x00, 0x00, 0x03, 0xff, 0xff, 0x00, 0x00, 0x00, 0x00, 0x00, 0x03, 0xff, 0xff, 0x00, 0x00, 0x00, 0x00, 0x00, 0x07, 0xff, 0xff, 0x80, 0x00, 0x00, 0x00, 0x00, 0x03, 0xff, 0xff, 0x80, 0x00, 0x00, 0x00, 0x00, 0x0f, 0xff, 0xff, 0xc0, 0x00, 0x00, 0x00, 0x00, 0x07, 0xff, 0xff, 0xc0, 0x00, 0x00, 0x00, 0x00, 0x1f, 0xff, 0xff, 0xe0, 0x00, 0x00, 0x00, 0x00, 0x0f, 0xff, 0xff, 0xe0, 0x00, 0x00, 0x00, 0x00, 0x7f, 0xff, 0xff, 0xf8, 0x00, 0x00, 0x00, 0x00, 0x3f, 0xff, 0xff, 0xf8, 0x00, 0x00, 0x00, 0x01, 0xff, 0xff, 0xff, 0xfe, 0x00, 0x00, 0x00, 0x00, 0x7f, 0xff, 0xff, 0xfc, 0x00, 0x00, 0x00, 0x03, 0xff, 0xff, 0xff, 0xff, 0x00, 0x00, 0x00, 0x00, 0xff, 0xff, 0xff, 0xff, 0x00, 0x00, 0x00, 0x0f, 0xff, 0xff, 0xff, 0xff, 0xc0, 0x00, 0x00, 0x03, 0xff, 0xff, 0xff, 0xff, 0xc0, 0x00, 0x00, 0x3f, 0xff, 0xff, 0xff, 0xff, 0xf0, 0x00, 0x00, 0x0f, 0xff, 0xff, 0xff, 0xff, 0xf0, 0x00, 0x01, 0xff, 0xff, 0xff, 0xff, 0xff, 0xfe, 0x00, 0x00, 0x3f, 0xff, 0xff, 0xff, 0xff, 0xff, 0x00, 0x0f, 0xff, 0xff, 0xff, 0xff, 0xff, 0xff, 0xc0, 0x03, 0xff, 0xff, 0xff, 0xff, 0xff, 0xff, 0xff, 0xff, 0xff, 0xff, 0xff, 0xff, 0xff, 0xff, 0xff, 0xff, 0xff, 0xff, 0xff, 0xff, 0xff, 0xff, 0xff, 0xff, 0xff, 0xff, 0xff, 0xff, 0xff, 0xff, 0xff, 0xff, 0xff, 0xff, 0xff, 0xff, 0xff, 0xff, 0xff, 0xff, 0xff, 0xff, 0xff, 0xff, 0xff, 0xff, 0xff, 0xff, 0xff, 0xff, 0xff, 0xff, 0xff, 0xff, 0xff, 0xff, 0xff, 0xff, 0xff, 0xff, 0xff, 0xff, 0xff, 0xff, 0xff, 0xff, 0xff }; void setup() { Serial.begin(9600); if (!display.begin(SSD1309_SWITCHCAPVCC, SCREEN_ADDRESS)) { Serial.println(F("SSD1309 allocation failed")); for (;;); } delay(2000); display.setCursor(0, 0); } void loop() { // Display 16x16 heart icon display.clearDisplay(); display.drawBitmap((SCREEN_WIDTH - 16) / 2, (SCREEN_HEIGHT - 16) / 2, heart16x16, 16, 16, SSD1309_PIXEL_ON); display.display(); delay(2000); // Display full-screen DIYables logo display.clearDisplay(); display.drawBitmap(0, 0, diyablesLogo, 128, 64, SSD1309_PIXEL_ON); display.display(); delay(2000); // Invert display display.invertDisplay(true); delay(2000); display.invertDisplay(false); delay(500); }

※ Notiz:

  • Die Bitmap-Dimensionen dürfen die Bildschirmauflösung nicht überschreiten (128×64 für das 2,42-Zoll-Modul).

Arduino-Code — Kontrast und Dimmen am SSD1309-OLED

Der SSD1309 unterstützt 256 Kontraststufen (0–255). Die DIYables-Bibliothek bietet setContrast() für eine feine Kontrolle und dim() für einen schnellen Wechsel zwischen der minimalen Helligkeit und dem zuvor konfigurierten Level.

/* * Dieser Arduino Code wurde von newbiely.de entwickelt * Dieser Arduino Code wird der Öffentlichkeit ohne jegliche Einschränkung zur Verfügung gestellt. * Für vollständige Anleitungen und Schaltpläne besuchen Sie bitte: * https://newbiely.de/tutorials/arduino/arduino-ssd1309-oled-display */ /* * DIYables OLED SSD1309 – Contrast & Dim * Sweeps contrast from 0→255→0 then toggles dim mode on the 2.42" OLED. */ #include <Wire.h> #include <Adafruit_GFX.h> #include <DIYables_OLED_SSD1309.h> #define SCREEN_WIDTH 128 #define SCREEN_HEIGHT 64 #define OLED_RESET -1 #define SCREEN_ADDRESS 0x3C DIYables_OLED_SSD1309 display(SCREEN_WIDTH, SCREEN_HEIGHT, &Wire, OLED_RESET); void setup() { Serial.begin(9600); if (!display.begin(SSD1309_SWITCHCAPVCC, SCREEN_ADDRESS)) { Serial.println(F("SSD1309 allocation failed")); for (;;); } // Draw a test pattern so the contrast changes are visible display.clearDisplay(); display.fillRect(0, 0, 64, 32, SSD1309_PIXEL_ON); display.fillRect(64, 32, 64, 32, SSD1309_PIXEL_ON); display.setTextSize(1); display.setTextColor(SSD1309_PIXEL_INVERSE); display.setCursor(16, 28); display.println(F("Contrast Demo")); display.display(); delay(2000); } void loop() { // Ramp up for (int c = 0; c <= 255; c += 5) { display.setContrast((uint8_t)c); delay(30); } delay(1000); // Ramp down for (int c = 255; c >= 0; c -= 5) { display.setContrast((uint8_t)c); delay(30); } delay(1000); // Quick dim toggle display.dim(true); // minimum brightness delay(2000); display.dim(false); // restore delay(2000); }

Arduino-Code — Benutzerdefinierte externe Schriftarten auf dem SSD1309-OLED-Display

Die Adafruit GFX-Bibliothek wird mit Dutzenden skalierbarer FreeFont-Schriftarten geliefert (Serif, Sans, Mono — jeweils in Regular, Bold, Italic und vier Größen). Sie können eine davon auf dem SSD1309-Display aktivieren, indem Sie den entsprechenden Header einbinden und setFont() aufrufen.

※ Notiz:

  • Wenn eine externe Schriftart aktiv ist, bezieht sich die Y-Koordinate des Cursors auf die Textgrundlinie, nicht auf die obere linke Ecke. Dies unterscheidet sich von der integrierten 5×7-Schriftart.
  • Externe Schriftarten werden im Flash-Speicher (PROGMEM) gespeichert. Bei speicherbegrenzten AVR-Boards (Arduino Uno = 32 KB Flash) verwenden Sie sie sparsam.
/* * Dieser Arduino Code wurde von newbiely.de entwickelt * Dieser Arduino Code wird der Öffentlichkeit ohne jegliche Einschränkung zur Verfügung gestellt. * Für vollständige Anleitungen und Schaltpläne besuchen Sie bitte: * https://newbiely.de/tutorials/arduino/arduino-ssd1309-oled-display */ /* * DIYables OLED SSD1309 – External Fonts * Cycles through three FreeFont typefaces on the 2.42" SSD1309 OLED. */ #include <Wire.h> #include <Adafruit_GFX.h> #include <DIYables_OLED_SSD1309.h> #include <Fonts/FreeSerif9pt7b.h> #include <Fonts/FreeSansBold12pt7b.h> #include <Fonts/FreeMono9pt7b.h> #define SCREEN_WIDTH 128 #define SCREEN_HEIGHT 64 #define OLED_RESET -1 #define SCREEN_ADDRESS 0x3C DIYables_OLED_SSD1309 display(SCREEN_WIDTH, SCREEN_HEIGHT, &Wire, OLED_RESET); void setup() { Serial.begin(9600); if (!display.begin(SSD1309_SWITCHCAPVCC, SCREEN_ADDRESS)) { Serial.println(F("SSD1309 allocation failed")); for (;;); } display.clearDisplay(); display.display(); } void loop() { // ── Built-in 5×7 font ── display.clearDisplay(); display.setFont(NULL); display.setTextSize(1); display.setTextColor(SSD1309_PIXEL_ON); display.setCursor(0, 0); display.println(F("Built-in 5x7 font")); display.println(); display.setTextSize(2); display.println(F("DIYables")); display.display(); delay(3000); // ── FreeSerif 9pt ── display.clearDisplay(); display.setFont(&FreeSerif9pt7b); display.setTextSize(1); display.setTextColor(SSD1309_PIXEL_ON); display.setCursor(0, 14); // Y = baseline display.println(F("FreeSerif 9pt")); display.setCursor(0, 38); display.println(F("DIYables OLED")); display.setCursor(0, 58); display.println(F("Hello World!")); display.display(); delay(3000); // ── FreeSansBold 12pt ── display.clearDisplay(); display.setFont(&FreeSansBold12pt7b); display.setTextSize(1); display.setTextColor(SSD1309_PIXEL_ON); display.setCursor(0, 20); display.println(F("SansBold")); display.setCursor(0, 52); display.println(F("DIYables")); display.display(); delay(3000); // ── FreeMono 9pt ── display.clearDisplay(); display.setFont(&FreeMono9pt7b); display.setTextSize(1); display.setTextColor(SSD1309_PIXEL_ON); display.setCursor(0, 14); display.println(F("FreeMono 9pt")); display.setCursor(0, 34); display.println(F("0123456789")); display.setCursor(0, 54); display.println(F("!@#$%^&*()")); display.display(); delay(3000); }

SSD1309 OLED Fehlerbehebung

Wenn nach dem Hochladen Ihres Sketches auf dem 2,42-Zoll-SSD1309-OLED nichts angezeigt wird, führen Sie diese Prüfungen durch:

  • Verkabelung überprüfen — Bestätigen Sie, dass SDA, SCL, VCC und GND an die richtigen Arduino-Pins angeschlossen sind.
  • Treiber-Chip bestätigen — Diese Bibliothek ist für den SSD1309 ausgelegt. Wenn Ihr Modul einen anderen Controller verwendet (z. B. SH1106), wird es nicht korrekt reagieren.
  • I2C-Adresse überprüfen — Die meisten SSD1309-Module verwenden standardmäßig 0x3C, aber einige verwenden 0x3D. Führen Sie den untenstehenden I2C-Scanner-Sketch aus, um die tatsächliche Adresse zu ermitteln:
// I2C address scanner — prints every detected device to the Serial Monitor #include <Wire.h> void setup() { Wire.begin(); Serial.begin(9600); Serial.println("I2C Scanner"); } void loop() { byte error, address; int nDevices = 0; Serial.println("Scanning..."); for (address = 1; address < 127; address++) { Wire.beginTransmission(address); error = Wire.endTransmission(); if (error == 0) { Serial.print("I2C device found at address 0x"); if (address < 16) Serial.print("0"); Serial.print(address, HEX); Serial.println(" !"); nDevices++; } else if (error == 4) { Serial.print("Unknown error at address 0x"); if (address < 16) Serial.print("0"); Serial.println(address, HEX); } } if (nDevices == 0) Serial.println("No I2C devices found"); else Serial.println("done"); delay(5000); }

Erwartete Ausgabe im seriellen Monitor, wenn der SSD1309 erkannt wird:

COM6
Send
Scanning... I2C device found at address 0x3C ! done
Autoscroll Show timestamp
Clear output
9600 baud  
Newline  
  • Stellen Sie sicher, dass display() aufgerufen wird — Der SSD1309 verwendet einen Framebuffer. Zeichnungsfunktionen ändern nur den Puffer im RAM; auf dem Bildschirm wird nichts angezeigt, bis Sie oled.display() aufrufen.
  • Stellen Sie sicher, dass die Stromversorgung ausreichend ist — Das 2,42-Zoll-Modul zieht mehr Strom als kleinere OLEDs. Stellen Sie sicher, dass Ihre Stromquelle ausreichend Strom liefern kann (typischerweise 20–40 mA bei voller Helligkeit).

※ UNSERE NACHRICHTEN

  • Sie können gerne den Link zu diesem Tutorial teilen. Bitte verwenden Sie jedoch unsere Inhalte nicht auf anderen Websites. Wir haben viel Mühe und Zeit in die Erstellung der Inhalte investiert, bitte respektieren Sie unsere Arbeit!